


简介
Kafka 是一种分布式、支持分区、多副本的消息中间件,支持发布-订阅模式,多用于实时处理大量数据缓存的场景,类似于一个“缓存池”。
架构
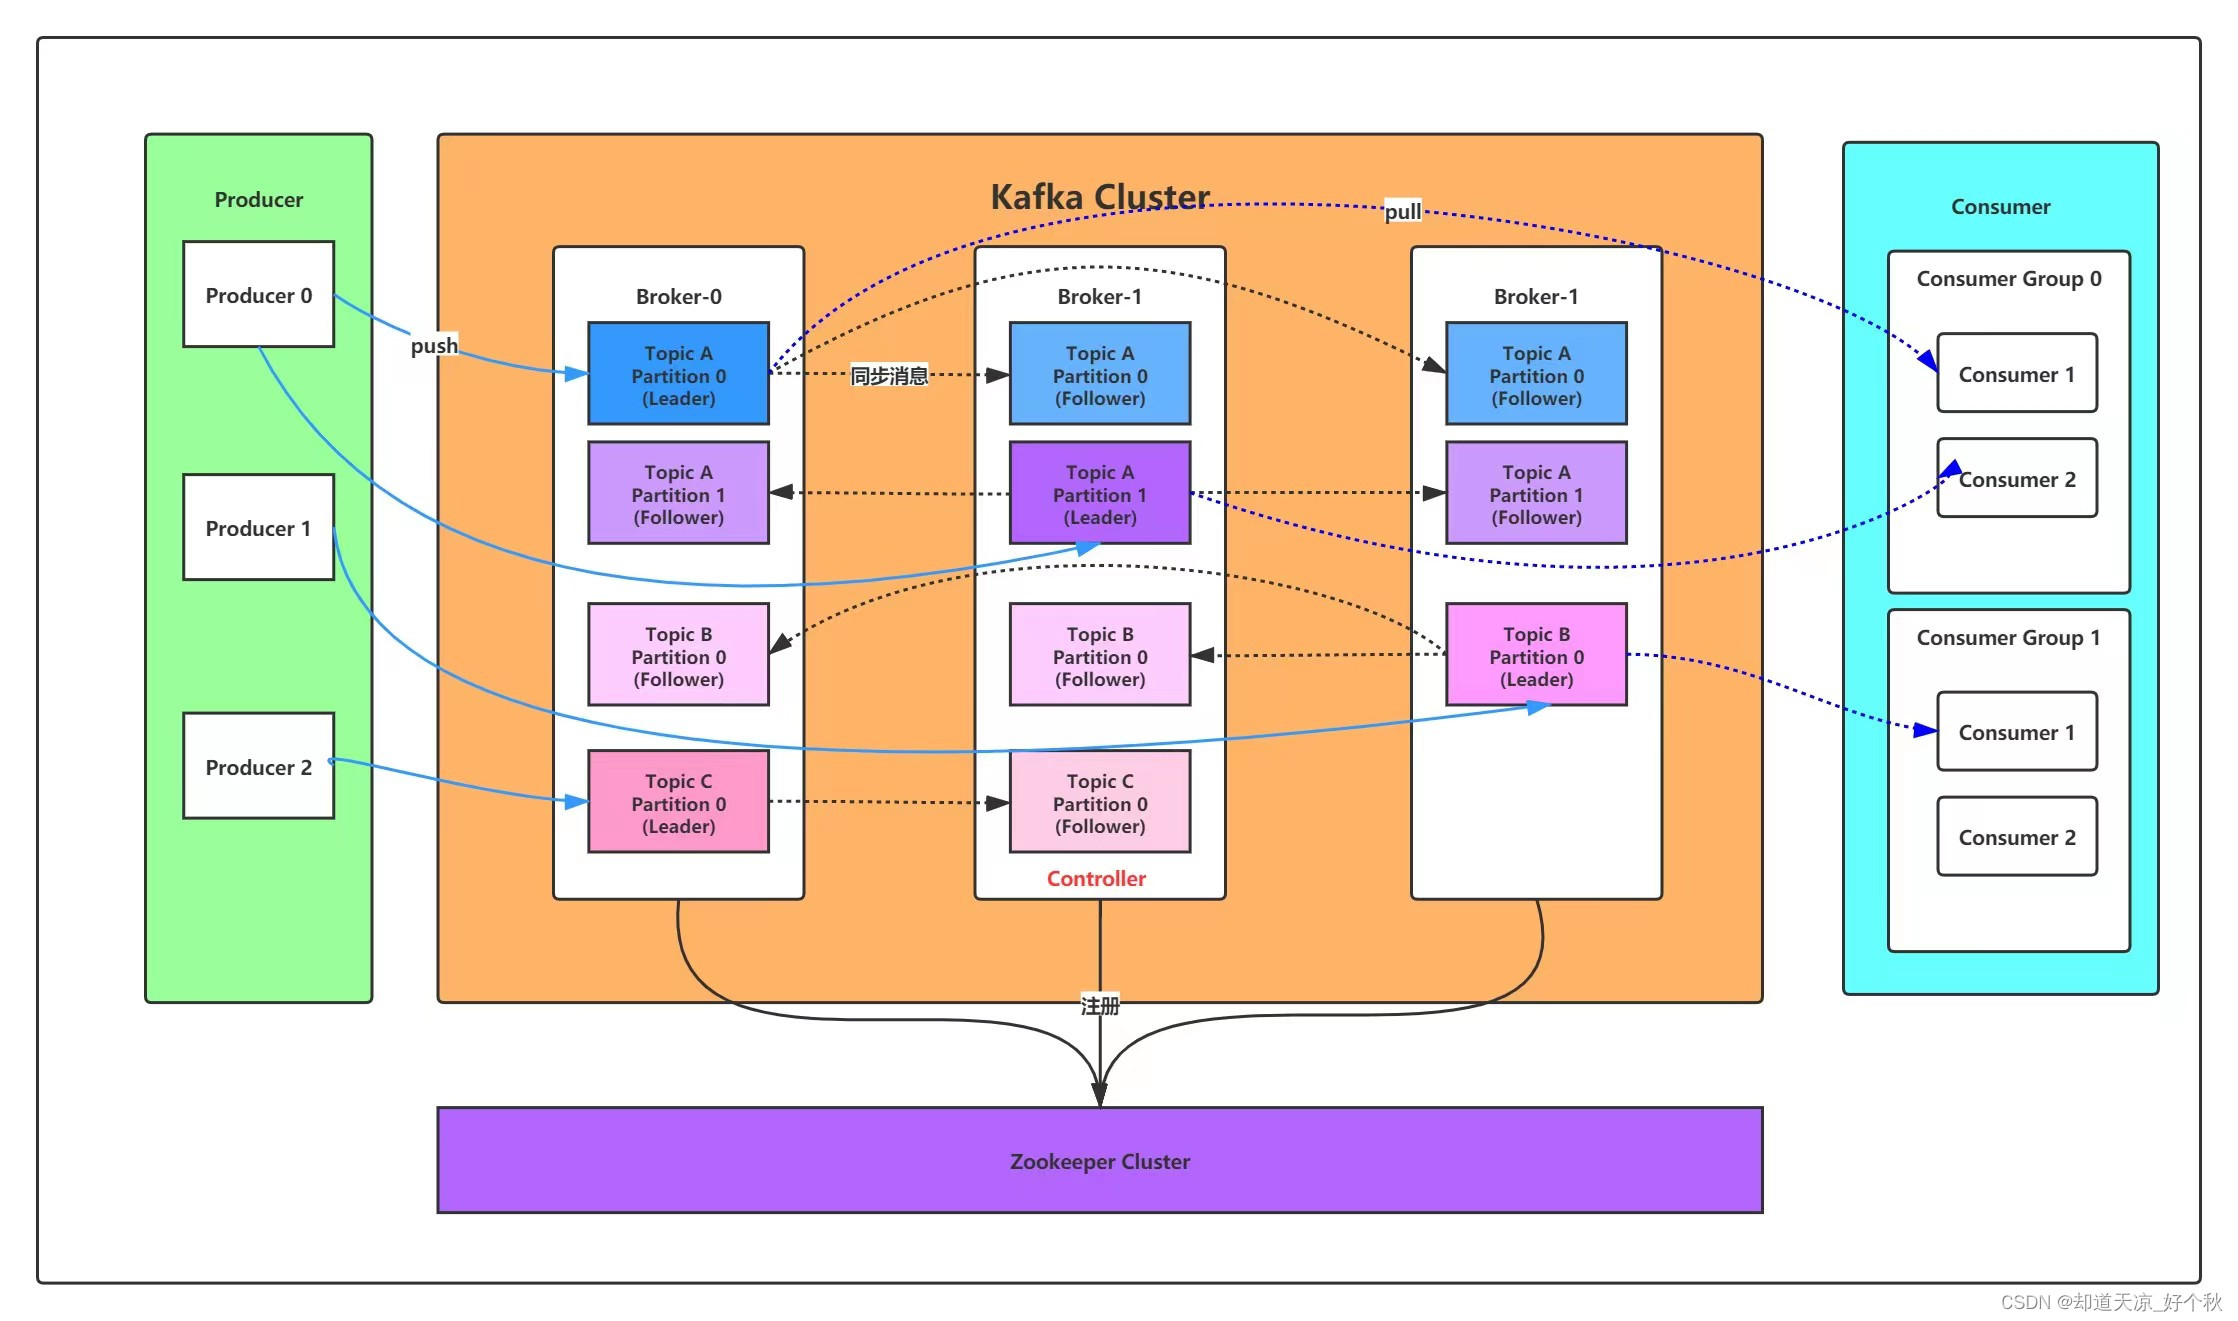
- Producer:消息生产者;
- Consumer:消息消费者;
- Broker:一台kafka服务器也称作一个broker,kafka集群包含多个broker;
- Topic:一个topic为一个消息队列,生产者、消费者基于topic进行发布-订阅;
- Partition:消息分区,一个topic可以分为多个partition,每个partition是一个消息队列;
- Replica:副本。一个topic的每个分区都有若干个副本,一个Leader和若干个Follower;
- Leader:每个分区多个副本的“主”,生产者发送数据的对象,以及消费者消费数据的对象都是Leader;
- Follower:每个分区多个副本中的“从”,实时从Leader中同步数据,保持和Leader数据的同步。Leader发生故障时,某个Follower会成为新的Leader;
安装部署
- 下载kafka安装包
# 下载地址,取最新包即可,最新版本为kafka_2.13-3.6.1.tgz
https://kafka.apache.org/downloads
- 解压
tar -zxvf kafka_2.13-3.6.1.tgz

mv kafka_2.13-3.6.1 kafka

cd kafka/
-
修改配置文件
1)本次集群配置采用kraft模式,集群节点为192.168.1.12~14;
2)在3个节点解压后,进入kafka/config/kraft目录,修改server.properties文件:
- 192.168.1.12节点配置文件修改如下
"node.id=1" "controller.quorum.voters=1@192.168.1.12:9093,1@192.168.1.13:9093,3@192.168.1.14:9093" "advertised.listeners=PLAINTEXT://192.168.1.12:9092"- 192.168.1.13节点配置文件修改如下
"node.id=2" "controller.quorum.voters=1@192.168.1.12:9093,1@192.168.1.13:9093,3@192.168.1.14:9093" "advertised.listeners=PLAINTEXT://192.168.1.13:9092"- 192.168.1.14节点配置文件修改如下
"node.id=3"
"controller.quorum.voters=1@192.168.1.12:9093,1@192.168.1.13:9093,3@192.168.1.14:9093"
"advertised.listeners=PLAINTEXT://192.168.1.14:9092"
节点说明:
# Broker节点 Kafka集群中的数据节点(消息队列),它们负责接收客户端的消息和传递消息给客户端,默认情况下,每个Broker节点会监听9092端口,该端口用于与客户端进行通信,客户端可以将消息发送到这个端口,或者从这个端口接收消息,这个端口可以称作客户端通信端口。 # Controller节点 Kafka集群中的控制器节点,负责管理集群的状态和元数据,Controller节点监听的端口通常是9093,该端口用于集群中其他节点获取元数据或在混合节点选举新的Controller时进行通信,通过该端口,其他节点可以与Controller节点交互,获取集群的元数据信息或参与控制器的选举过程,这个端口可以称作控制器端口。 # 混合节点 同时担任Broker和Controller角色的节点,这两个端口都会被使用,默认情况下混合节点将监听9092端口接收和传递消息给客户端,并监听9093端口用于与其他节点进行元数据交换和控制器选举通信,可见混合节点会同时使用两个端口分别作为客户端通信端口与控制器端口。 -
生成集群id
# KRaft模式的kafka集群需要设定一个id,在任意节点执行如下命令:
sh /usr/local/incvs-kafka/bin/kafka-storage.sh random-uuid
- 格式化数据目录
# 在集群所有节点执行如下命令:
sh /home/kafka/bin/kafka-storage.sh format -t "步骤4)生成的id" -c /home/kafka/config/kraft/server.properties
- 启动Kakfa
# 在3个节点依次执行如下命令:
sh /home/kafka/bin/kafka-server-start.sh /home/kafka/config/kraft/server.properties
测试
- 在192.168.1.13节点启动消费者脚本订阅“MykafkaTopic”
sh /home/kafka/bin/kafka-console-consumer.sh --bootstrap-server 192.168.1.13:9092 --topic MykafkaTopic
hello kafka
- 在192.168.1.12节点启动生产者脚本往topic生产消息
sh /home/kafka/bin/kafka-console-producer.sh --bootstrap-server 192.168.1.12:9092 --topic MykafkaTopic
>hello kafka
>
配置文件说明
server.properties配置示例:
############################# Server Basics #############################

# The role of this server. Setting this puts us in KRaft mode
process.roles=broker,controller

# The node id associated with this instance's roles
node.id=1

# The connect string for the controller quorum
controller.quorum.voters=1@localhost:9093

############################# Socket Server Settings #############################

# The address the socket server listens on.
# Combined nodes (i.e. those with `process.roles=broker,controller`) must list the controller listener here at a minimum.
# If the broker listener is not defined, the default listener will use a host name that is equal to the value of java.net.InetAddress.getCanonicalHostName(),
# with PLAINTEXT listener name, and port 9092.
#   FORMAT:
#     listeners = listener_name://host_name:port
#   EXAMPLE:
#     listeners = PLAINTEXT://your.host.name:9092
listeners=PLAINTEXT://:9092,CONTROLLER://:9093

# Name of listener used for communication between brokers.
inter.broker.listener.name=PLAINTEXT

# Listener name, hostname and port the broker will advertise to clients.
# If not set, it uses the value for "listeners".
advertised.listeners=PLAINTEXT://localhost:9092

# A comma-separated list of the names of the listeners used by the controller.
# If no explicit mapping set in `listener.security.protocol.map`, default will be using PLAINTEXT protocol
# This is required if running in KRaft mode.
controller.listener.names=CONTROLLER

# Maps listener names to security protocols, the default is for them to be the same. See the config documentation for more details
listener.security.protocol.map=CONTROLLER:PLAINTEXT,PLAINTEXT:PLAINTEXT,SSL:SSL,SASL_PLAINTEXT:SASL_PLAINTEXT,SASL_SSL:SASL_SSL

# The number of threads that the server uses for receiving requests from the network and sending responses to the network
num.network.threads=3

# The number of threads that the server uses for processing requests, which may include disk I/O
num.io.threads=8

# The send buffer (SO_SNDBUF) used by the socket server
socket.send.buffer.bytes=102400

# The receive buffer (SO_RCVBUF) used by the socket server
socket.receive.buffer.bytes=102400

# The maximum size of a request that the socket server will accept (protection against OOM)
socket.request.max.bytes=104857600


############################# Log Basics #############################

# A comma separated list of directories under which to store log files
log.dirs=/tmp/kraft-combined-logs

# The default number of log partitions per topic. More partitions allow greater
# parallelism for consumption, but this will also result in more files across
# the brokers.
num.partitions=1

# The number of threads per data directory to be used for log recovery at startup and flushing at shutdown.
# This value is recommended to be increased for installations with data dirs located in RAID array.
num.recovery.threads.per.data.dir=1

############################# Internal Topic Settings  #############################
# The replication factor for the group metadata internal topics "__consumer_offsets" and "__transaction_state"
# For anything other than development testing, a value greater than 1 is recommended to ensure availability such as 3.
offsets.topic.replication.factor=1
transaction.state.log.replication.factor=1
transaction.state.log.min.isr=1

############################# Log Flush Policy #############################

# Messages are immediately written to the filesystem but by default we only fsync() to sync
# the OS cache lazily. The following configurations control the flush of data to disk.
# There are a few important trade-offs here:
#    1. Durability: Unflushed data may be lost if you are not using replication.
#    2. Latency: Very large flush intervals may lead to latency spikes when the flush does occur as there will be a lot of data to flush.
#    3. Throughput: The flush is generally the most expensive operation, and a small flush interval may lead to excessive seeks.
# The settings below allow one to configure the flush policy to flush data after a period of time or
# every N messages (or both). This can be done globally and overridden on a per-topic basis.

# The number of messages to accept before forcing a flush of data to disk
#log.flush.interval.messages=10000

# The maximum amount of time a message can sit in a log before we force a flush
#log.flush.interval.ms=1000

############################# Log Retention Policy #############################

# The following configurations control the disposal of log segments. The policy can
# be set to delete segments after a period of time, or after a given size has accumulated.
# A segment will be deleted whenever *either* of these criteria are met. Deletion always happens
# from the end of the log.

# The minimum age of a log file to be eligible for deletion due to age
log.retention.hours=168

# A size-based retention policy for logs. Segments are pruned from the log unless the remaining
# segments drop below log.retention.bytes. Functions independently of log.retention.hours.
#log.retention.bytes=1073741824

# The maximum size of a log segment file. When this size is reached a new log segment will be created.
log.segment.bytes=1073741824

# The interval at which log segments are checked to see if they can be deleted according
# to the retention policies
log.retention.check.interval.ms=300000
- process.roles:服务器角色,包含broker和controller。如示例中使用kraft模式使用的混合模式,即“process.roles=broker,controller”;
- node.id:节点ID,一个集群中的node.id不能重复;
- controller.quorum.voters:控制选举的投票节点,格式为“node-id@host:port”;
- listeners:服务器监听的地址,格式为“listener_name://host_name:port”;
- inter.broker.listener.name:用于broker之间通信的监听器名称;
- advertised.listeners:服务器向客户端宣告的监听器名称、主机名和端口;
- controller.listener.names:控制器使用的监听器名称列表;
- listener.security.protocol.map:监听器名称到安全协议的映射。默认情况下,它们是相同的;
- num.network.threads:服务器用于从网络接收请求和向网络发送响应的线程数;
- num.io.threads:服务器用于处理请求(可能包括磁盘 I/O)的线程数;
- socket.send.buffer.bytes:服务器用于发送数据的缓冲区大小;
- socket.receive.buffer.bytes:服务器用于接收数据的缓冲区大小;
- socket.request.max.bytes:服务器接受的请求的最大大小(用于防止内存溢出);
- log.dirs:用于存储日志文件的目录列表;(重要,需清楚日志存储的原理);
- num.partitions:每个主题的默认日志分区数;
- num.recovery.threads.per.data.dir:每个数据目录在启动时用于日志恢复和关闭时用于刷新的线程数;
- offsets.topic.replication.factor:内部主题 “__consumer_offsets” 和 “__transaction_state” 的复制因子;
- transaction.state.log.replication.factor:事务状态日志的复制因子;
- transaction.state.log.min.isr:事务状态日志的最小同步副本数;
- log.flush.interval.messages:强制将数据刷新到磁盘之前接受的消息数;
- log.flush.interval.ms:消息在日志中停留的最大时间,超过这个时间就会强制刷新到磁盘;
- log.retention.hours:由于年龄而使日志文件有资格被删除的最小年龄;
- log.retention.bytes:基于大小的日志保留策略,默认1G;
- log.segment.bytes:日志段文件的最大大小;
- log.retention.check.interval.ms:检查日志段是否可以根据保留策略被删除的间隔;


 2902
2902


 被折叠的 条评论
为什么被折叠?
被折叠的 条评论
为什么被折叠?
 到【灌水乐园】发言


