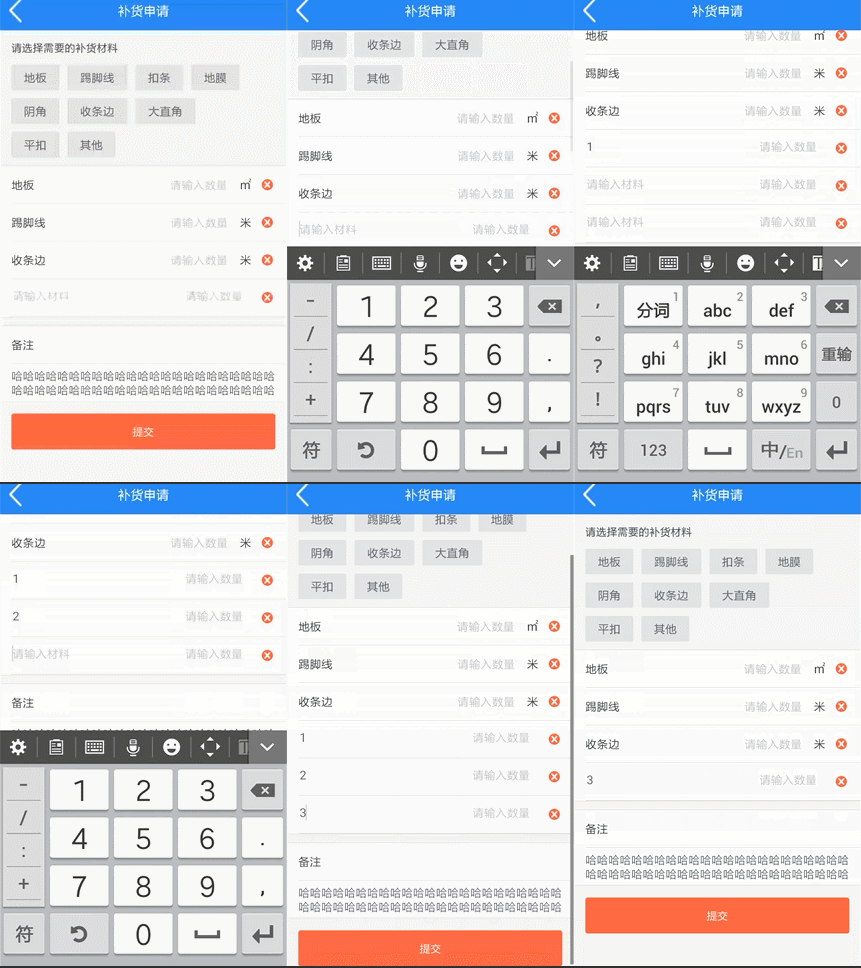
如上图,在添加材料时,可能需要添加不定数量的其他材料,此时就需动态添加材料栏。
代码和注释如下:
 //添加其他
        mTvAddOther.setOnClickListener(new View.OnClickListener() {
            @Override
            public void onClick(View v) {
                //1、新建带有TableRow和分隔线的LinearLayout
                final LinearLayout ll = new LinearLayout(ReplenishApplyActivity.this);
                //根据新建控件的外层容器是什么,选择相应的LayoutParams
                ll.setLayoutParams(new LinearLayout.LayoutParams(ViewGroup.LayoutParams.MATCH_PARENT, ViewGroup.LayoutParams.WRAP_CONTENT));
                ll.setBackgroundColor(getResources().getColor(R.color.bg_block_white));
                ll.setOrientation(LinearLayout.VERTICAL);

                //将新建的控件加入外层容器
                mLlMaterials.addView(ll);

                //2、新建TableRow
                TableRow tr = new TableRow(ReplenishApplyActivity.this);
                int height = DensityUtil.dip2px(46f);
                tr.setLayoutParams(new LinearLayout.LayoutParams(ViewGroup.LayoutParams.MATCH_PARENT, height));

                ll.addView(tr);

                //3、新建“材料输入框”
                EditText etName = new EditText(ReplenishApplyActivity.this);
                //LayoutParams主要设置的是新建控件相对于其他控件的布局属性,比如长宽、layout_gravity、margin等等
                TableRow.LayoutParams params = new TableRow.LayoutParams(ViewGroup.LayoutParams.WRAP_CONTENT, ViewGroup.LayoutParams.WRAP_CONTENT);
                params.gravity = Gravity.CENTER;
                int marginLeft = DensityUtil.dip2px(6f);
                params.setMargins(marginLeft, 0, 0, 0);
                //设置新建控件的布局属性
                etName.setLayoutParams(params);
                //设置新建控件它自身内部的属性
                etName.setHint("请输入材料");
                etName.setTextSize(15f);
                etName.setHintTextColor(getResources().getColor(R.color.text_color_hint));
                etName.setBackgroundResource(0);
                etName.setTextColor(getResources().getColor(R.color.text_color_light_dark));
                //设置最大输入字符数限制
                etName.setFilters(new InputFilter[]{new InputFilter.LengthFilter(10)});

                tr.addView(etName);

                //4、新建两个输入框之间的间隔
                Space space = new Space(ReplenishApplyActivity.this);
                TableRow.LayoutParams params1 = new TableRow.LayoutParams(0, ViewGroup.LayoutParams.MATCH_PARENT);
                params1.weight = 1;
                space.setLayoutParams(params1);

                tr.addView(space);

                //5、新建“数量输入框”
                EditText etValue = new EditText(ReplenishApplyActivity.this);
                TableRow.LayoutParams params2 = new TableRow.LayoutParams(ViewGroup.LayoutParams.WRAP_CONTENT, ViewGroup.LayoutParams.WRAP_CONTENT);
                params2.gravity = Gravity.CENTER;
                etValue.setLayoutParams(params);
                etValue.setHint("请输入数量");
                etValue.setTextSize(15f);
                etValue.setHintTextColor(getResources().getColor(R.color.text_color_hint));
                etValue.setTextColor(getResources().getColor(R.color.text_color_light_dark));
                etValue.setBackgroundResource(0);
                etValue.setFilters(new InputFilter[]{new InputFilter.LengthFilter(6)});

                tr.addView(etValue);

                //6、新建删除按钮
                ImageView imageView = new ImageView(ReplenishApplyActivity.this);
                int width = DensityUtil.dip2px(30f);
                TableRow.LayoutParams params3 = new TableRow.LayoutParams(width, ViewGroup.LayoutParams.MATCH_PARENT);
                params3.gravity = Gravity.CENTER;
                int margingRight = DensityUtil.dip2px(15f);
                params3.setMargins(0, 0, margingRight, 0);
                imageView.setLayoutParams(params3);
                int paddingLeft = DensityUtil.dip2px(10f);
                imageView.setPadding(paddingLeft, 0, 0, 0);
                imageView.setImageResource(R.drawable.icon_delete);
                imageView.setScaleType(ImageView.ScaleType.CENTER_INSIDE);
                //设置它的点击事件
                imageView.setOnClickListener(new View.OnClickListener() {
                    @Override
                    public void onClick(View v) {
                        ll.setVisibility(View.GONE);
                    }
                });

                tr.addView(imageView);

                //7、新建分隔线
                View view = new View(ReplenishApplyActivity.this);
                int height1 = DensityUtil.dip2px(1f);
                LinearLayout.LayoutParams params4 = new LinearLayout.LayoutParams(ViewGroup.LayoutParams.MATCH_PARENT, height1);
                int marginLeft1 = DensityUtil.dip2px(15f);
                params4.setMargins(marginLeft1, 0, 0, 0);
                view.setLayoutParams(params4);
                view.setBackgroundColor(getResources().getColor(R.color.bg_divide_gray));

                ll.addView(view);
            }
        });


 5846
5846

 被折叠的 条评论
为什么被折叠?


