spring boot最新教程(三):Spring Boot整合JdbcTemplate以及事务管理

一  JdbcTemplate的使用

       Spring对数据库的操作在jdbc上面做了深层次的封装,使用spring的注入功能,可以把DataSource注册到JdbcTemplate之中。 JdbcTemplate 是在JDBC API基础上提供了更抽象的封装,并提供了基于方法注解的事务管理能力。 通过使用SpringBoot自动配置功能并代替我们自动配置beans. 在maven中,我们需要增加spring-boot-starter-jdbc模块

<!-- jdbcTemplate 以及事务支持-->
		<dependency>
			<groupId>org.springframework.boot</groupId>
			<artifactId>spring-boot-starter-jdbc</artifactId>
		</dependency>

点开spring boot的自动配置包spring-boot-autoconfigure-1.5.2.RELEASE.jar,找到如下所示代码


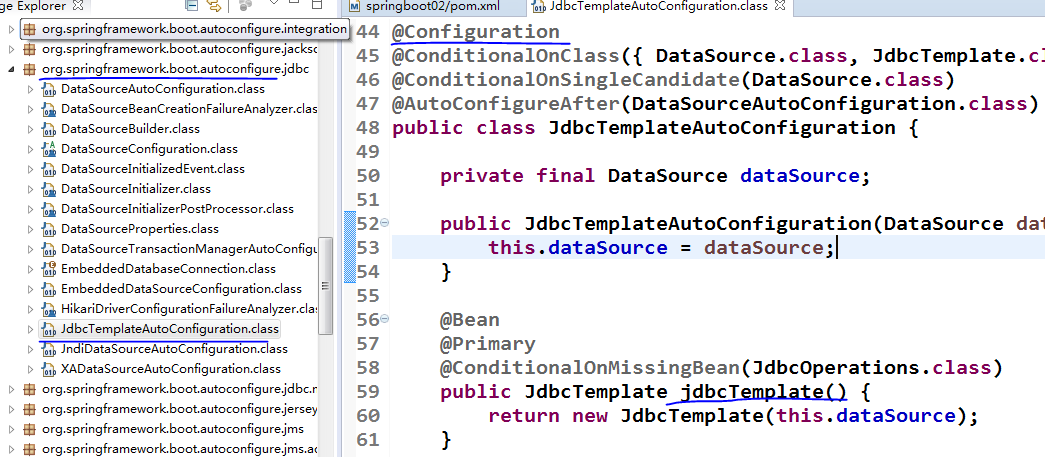
发现spring boot已经自动帮我们初始化好了jdbcTemplate对象,并且默认采用tomcat数据源dataSource,当然我们提供的数据源,系统将采用我们自定义的数据源!

完整的pom文件如下所示:

<project xmlns="http://maven.apache.org/POM/4.0.0" xmlns:xsi="http://www.w3.org/2001/XMLSchema-instance"
	xsi:schemaLocation="http://maven.apache.org/POM/4.0.0 http://maven.apache.org/xsd/maven-4.0.0.xsd">
	<modelVersion>4.0.0</modelVersion>
	<groupId>com.wx</groupId>
	<artifactId>springboot02</artifactId>
	<version>0.0.1-SNAPSHOT</version>

	<parent>
		<groupId>org.springframework.boot</groupId>
		<artifactId>spring-boot-starter-parent</artifactId>
		<version>1.5.2.RELEASE</version>
	</parent>

	<dependencies>
		<dependency>
			<groupId>org.springframework.boot</groupId>
			<artifactId>spring-boot-starter-web</artifactId>
		</dependency>
		<!-- jdbcTemplate 以及事务支持-->
		<dependency>
			<groupId>org.springframework.boot</groupId>
			<artifactId>spring-boot-starter-jdbc</artifactId>
		</dependency>

		<!-- MySQL连接 -->
		<dependency>
			<groupId>mysql</groupId>
			<artifactId>mysql-connector-java</artifactId>
			<scope>runtime</scope>
		</dependency>
		<dependency>
			<groupId>org.apache.tomcat.embed</groupId>
			<artifactId>tomcat-embed-jasper</artifactId>
			<scope>provided</scope>
		</dependency>
		<!-- jstl标签库 -->
		<dependency>
			<groupId>jstl</groupId>
			<artifactId>jstl</artifactId>
			<version>1.2</version>
		</dependency>
		<!-- 阿里巴巴json解析包 -->
		<dependency>
			<groupId>com.alibaba</groupId>
			<artifactId>fastjson</artifactId>
			<version>1.1.15</version>
		</dependency>
		<!-- 阿里巴巴druid连接池 -->
		<dependency>
			<groupId>com.alibaba</groupId>
			<artifactId>druid</artifactId>
			<version>1.0.9</version>
		</dependency>
	</dependencies>
	<build>
		<finalName>${project.artifactId}</finalName>
		<plugins>
			<!-- java编译插件 -->
			<plugin>
				<groupId>org.apache.maven.plugins</groupId>
				<artifactId>maven-compiler-plugin</artifactId>
				<configuration>
					<source>1.7</source>
					<target>1.7</target>
					<encoding>UTF-8</encoding>
				</configuration>
			</plugin>
			<!-- 如果你不想用maven命令运行spring boot可以不用作此配置 -->
			<plugin>
				<groupId>org.springframework.boot</groupId>
				<artifactId>spring-boot-maven-plugin</artifactId>
			</plugin>
		</plugins>

	</build>
</project>

好,接下来我们来看代码

sql脚本

CREATE TABLE users
(
  userId INT PRIMARY KEY AUTO_INCREMENT,
  userName VARCHAR(20) NOT NULL,
  PASSWORD VARCHAR(20) NOT NULL,
  email VARCHAR(50)
);
INSERT INTO users(userName,PASSWORD,email) VALUES('jack','123','jack@126.com');
INSERT INTO users(userName,PASSWORD,email) VALUES('mike','123','mike@126.com');
INSERT INTO users(userName,PASSWORD,email) VALUES('麻子','123','mazi@126.com');

CREATE TABLE account (
  acctId INT(11) NOT NULL,
  userName VARCHAR(20) NOT NULL,
  balance DOUBLE DEFAULT NULL,
  PRIMARY KEY (acctId)
)

INSERT INTO account VALUES(100,'麻子',2000);
INSERT INTO account VALUES(101,'小丽',2000);

数据源的配置类如下

package com.wx.boot;

import java.sql.SQLException;

import org.springframework.beans.factory.annotation.Value;
import org.springframework.context.annotation.Bean;
import org.springframework.context.annotation.Configuration;
import org.springframework.context.annotation.PropertySource;

import com.alibaba.druid.pool.DruidDataSource;

@Configuration
@PropertySource(value = { "classpath:druidConfig.properties",
"classpath:jdbc.properties" }, ignoreResourceNotFound = true)
public class DataSourceConfig {
	@Value("${driverClassName}")
	private String driverClassName;
	@Value("${url}")
	private String url;
	@Value("${duridUserName}")
	private String username;
	@Value("${password}")
	private String password;
	@Value("${filters}")
	private String filters;
	@Value("${initialSize}")
	private int initialSize;
	@Value("${maxActive}")
	private int maxActive;
	@Value("${minIdle}")
	private int minIdle;
	@Value("${maxWait}")
	private int maxWait;
	@Value("${validationQuery}")
	private String validationQuery;
	@Value("${testWhileIdle}")
	private boolean testWhileIdle;
	@Value("${testOnBorrow}")
	private boolean testOnBorrow;
	@Value("${testOnReturn}")
	private boolean testOnReturn;
	@Value("${maxPoolPreparedStatementPerConnectionSize}")
	private int maxPoolPreparedStatementPerConnectionSize;
	@Value("${removeAbandoned}")
	private boolean removeAbandoned;
	@Value("${removeAbandonedTimeout}")
	private int removeAbandonedTimeout;
	@Value("${timeBetweenEvictionRunsMillis}")
	private int timeBetweenEvictionRunsMillis;
	@Value("${minEvictableIdleTimeMillis}")
	private int minEvictableIdleTimeMillis;
	
	@Bean(initMethod="init",destroyMethod="close")
	public DruidDataSource dataSource(){
		DruidDataSource dataSource=new DruidDataSource();
		try {
			dataSource.setUrl(url);
			dataSource.setDriverClassName(driverClassName);
			dataSource.setUsername(username);
			dataSource.setPassword(password);
			dataSource.setFilters(filters);
			dataSource.setInitialSize(initialSize);
			dataSource.setMaxActive(maxActive);
			dataSource.setMinIdle(minIdle);
			dataSource.setMaxWait(maxWait);
			dataSource.setValidationQuery(validationQuery);
			dataSource.setTestWhileIdle(testWhileIdle);
			dataSource.setTestOnBorrow(testOnBorrow);
			dataSource.setTestOnReturn(testOnReturn);
			dataSource.setMaxPoolPreparedStatementPerConnectionSize(maxPoolPreparedStatementPerConnectionSize);
			dataSource.setRemoveAbandoned(removeAbandoned);
			dataSource.setRemoveAbandonedTimeout(removeAbandonedTimeout);
			dataSource.setTimeBetweenEvictionRunsMillis(timeBetweenEvictionRunsMillis);
			dataSource.setMinEvictableIdleTimeMillis(minEvictableIdleTimeMillis);
			System.out.println("连接池启动成功");
		} catch (SQLException e) {
			e.printStackTrace();
		}
		return dataSource;
	}
}

其它配置请参考前面的文章

重点来看dao层代码

package com.wx.dao.user;

import java.util.List;

import org.springframework.beans.factory.annotation.Autowired;
import org.springframework.jdbc.core.BeanPropertyRowMapper;
import org.springframework.jdbc.core.JdbcTemplate;
import org.springframework.stereotype.Repository;

import com.wx.entitys.UserEntity;

@Repository("userDao")
public class UserDaoImpl implements IUserDao {
	@Autowired
	private JdbcTemplate jdbcTemplate;
	
	//判断用户是否登录成功
	public boolean isLogin(UserEntity paramUser) {
		boolean flag=false;
		String sqlStr="select * from users where userName=? and passWord=?";
		List<UserEntity> userList=jdbcTemplate.query(sqlStr, 
				new Object[]{paramUser.getUserName(),paramUser.getPassWord()}, 
				new BeanPropertyRowMapper(UserEntity.class));
		if(userList!=null && userList.size()>0){
			flag=true;
		}
		return flag;
	}
	
	//判断用户是否存在
	public boolean isUserExist(String userName) {
		boolean flag=false;
		String sqlStr="select * from users where userName=?";
		List<UserEntity> userList=jdbcTemplate.query(sqlStr, new Object[]{userName}, 
				new BeanPropertyRowMapper(UserEntity.class));
		if(userList!=null && userList.size()>0){
			flag=true;
		}
		return flag;
	}
	
	//保存用户
	public void save(UserEntity user) {
		String sqlStr="insert into users(userName,passWord,email) values(?,?,?)";
		jdbcTemplate.update(sqlStr, 
				user.getUserName(),user.getPassWord(),user.getEmail());
	}
}

二   事务问题

1. 传统事务处理方式

Spring支持使用注解配置声明式事务,所使用的注解是@Transactional。

首先仍然需要在Spring配置文件中配置事务管理类,并添加对注解配置的事务的支持,代码如示
<!-- 定义事务管理器 -->
	<bean id="txManager"
		class="org.springframework.orm.hibernate3.HibernateTransactionManager">
		<property name="sessionFactory" ref="sessionFactory" />
	</bean>
	<tx:annotation-driven transaction-manager="txManager" />

经过如上配置,程序便支持使用@Transactional来配置事务了,代码如下所示:

public class UserService {
	private UserDao userDao;
	
	@Transactional(readOnly=false, propagation=Propagation.REQUIRES_NEW)
	public void addUser(User user) {
		this.userDao.save(user);
	}
}

在业务方法上添加@Transactional就为该方法添加了事务处理,@Transactional中也可以设置事务属性的值,默认的@Transactional设置如下。

(1)事务传播设置是PROPACrATION_REQUIRED。

(2) 事务隔离级别是ISOLATION DEFAULT。

(3) 事务是读/写。

(4) 事务超时默认是依赖于事务系统的,或者事务超时没有被支持。

(5) 任何RuntimeException将触发事务回滚,但是任何checked Exception将不触发事务回滚。

这些默认的设置当然也是可以被改变的。@Transactional注解的各种属性设置总结如表所示。

表 @Transactional注解的属性

属  性

类  型

说    明

propagation

枚举型:Propagation

可选的传播性设置。使用举例:@Transacli onal(propagation=Propagation.REQUIRES_NEW)

isolation

枚举型:Esolation

可选的隔离性级别。使用举例:@Transactional(isolation=Isolation.READ COMMITTED)

readOnly

布尔型

是否为只读型事务。使用举例:

@Trans actional(readOnly=true)

tlmeoUt

int型(以秒为单位)

事务超时。使用举例:@T ransactional(timeout=1 0)

roIlbackFor

一组Class类的实例,必须是Throwable的予类

一组异常类,遇到时必须进行圆滚。使用举例:

@Transactional(rollbackFor={S QLException.class}),多个异常可用英文逗号隔开

rollbackForClassName

一组Class类的名称,必须是Throwable的子类

一组异常类名,遇到时必须进行圆滚。使用举例:

@Transactional(rollbackForClassName={”SQLException”}),多个异常可用英文逗号隔开

noRollbackFor

一组Class类的实例,必须是Throwable的子类

一组异常类,遇到时必须不圆滚

noRollbackForClassName

一组Class类的名字,必须是Throwable的子类

一组异常类名,遇到时必须不圆滚

2.  spring boot事务处理方式

在Spring Boot中推荐使用@Transactional注解来申明事务。

首先需要导入依赖:

<dependency>		     <groupId>org.springframework.boot</groupId>
    <artifactId>spring-boot-starter-jdbc</artifactId>
</dependency>

当引入jdbc依赖之后,Spring Boot会自动默认分别注入DataSourceTransactionManager或JpaTransactionManager,所以我们不需要任何额外配置就可以用@Transactional注解进行事务的使用。spring-boot-starter-jdbc会触发DataSourceTransactionManagerAutoConfiguration这个自动化配置类,会构造事务管理器,如下图:


在业务类中添加@Transactional注解:

package com.wx.biz;

import org.springframework.beans.factory.annotation.Autowired;
import org.springframework.stereotype.Service;
import org.springframework.transaction.annotation.Transactional;

import com.wx.dao.account.IAccountDao;

@Service("acctBiz")
public class AccountBiz {
	@Autowired
	private IAccountDao acctDao;
	
	//把转账封装成一个方法,保证事务的原子性
	@Transactional
	public void doTransfer(Integer srcUserId,Integer targetUserId,double amount){
		acctDao.doPay(srcUserId, amount);
		acctDao.doReceive(targetUserId, amount);
	}
	@Transactional
	public void doPay(Integer userId, double amount){
		acctDao.doPay(userId, amount);
	}
	@Transactional
	public void doReceive(Integer userId, double amount){
		acctDao.doReceive(userId, amount);
	}
}

我们也可以在dao层添加事务,下面来演示事务隔离级别

package com.wx.dao.account;


import org.springframework.beans.factory.annotation.Autowired;
import org.springframework.jdbc.core.JdbcTemplate;
import org.springframework.stereotype.Repository;
import org.springframework.transaction.annotation.Propagation;
import org.springframework.transaction.annotation.Transactional;

import com.wx.entitys.AccountEntity;

@Repository(value="acctDao")
public class AcountDaoImpl implements IAccountDao{
	@Autowired
	private JdbcTemplate jdbcTemplate;
	
	@SuppressWarnings("unchecked")
	//演示事务隔离级别,每次开启一个新事务,而不是使用已经开启的事务
	@Transactional(propagation=Propagation.REQUIRES_NEW)
	public int doPay(Integer acctId, double money) {
		int result=0;
		String sqlStr="update account set balance=balance-? where userId=?";
		result=jdbcTemplate.update(sqlStr, money,acctId);
		if(result==0){
			throw new RuntimeException("支付失败...");
		}
		return result;
	}
	
	@SuppressWarnings("unchecked")
	@Transactional(propagation=Propagation.REQUIRES_NEW)
	public int doReceive(Integer acctId, double money) {
		int result=0;
		String sqlStr="update account set balance=balance+? where userId=?";
		result=jdbcTemplate.update(sqlStr, money,acctId);
		if(result==0){
			throw new RuntimeException("收款失败...");
		}
		return result;
	}
}

@Transactional不仅可以注解在方法上,也可以注解在类上。当注解在类上的时候意味着所有的public方法都是开启事务的。

  • 0
    点赞
  • 12
    收藏
    觉得还不错? 一键收藏
  • 打赏
    打赏
  • 0
    评论
评论
添加红包

请填写红包祝福语或标题

红包个数最小为10个

红包金额最低5元

当前余额3.43前往充值 >
需支付:10.00
成就一亿技术人!
领取后你会自动成为博主和红包主的粉丝 规则
hope_wisdom
发出的红包

打赏作者

御前两把刀刀

你的鼓励将是我创作的最大动力

¥1 ¥2 ¥4 ¥6 ¥10 ¥20
扫码支付:¥1
获取中
扫码支付

您的余额不足,请更换扫码支付或充值

打赏作者

实付
使用余额支付
点击重新获取
扫码支付
钱包余额 0

抵扣说明:

1.余额是钱包充值的虚拟货币,按照1:1的比例进行支付金额的抵扣。
2.余额无法直接购买下载,可以购买VIP、付费专栏及课程。

余额充值