


一、LNMP架构实战
安装所需环境:yum install -y wget gcc gcc-c++ make pcre pcre-devel zlib zlib-devel openssl openssl-devel
下载源码包:wget -c 'http://nginx.org/download/nginx-1.14.2.tar.gz'
解压:tar -xzf nginx-1.14.2.tar.gz
进入解压目录:cd nginx-1.14.2
预编译:./configure --prefix=/usr/local/nginx --with-http_stub_status_module
编译安装:make -j4 && make -j4 install
查看安装的nginx版本和编译时的参数及启用模块:cd /usr/local/nginx/sbin
./nginx -V

配置环境变量:echo "export PATH=$PATH:/usr/local/nginx/sbin/" >> /etc/profile
刷新读取配置文件:source /etc/profile
检查配置:nginx -t
启动nginx:nginx
查看监听端口:netstat -tulnp |grep nginx

升级nginx:
首先备份原先的nginx:
cd /usr/local/
cp -af nginx /root
解压要升级的nginx源码包:cd /usr/src
tar -xzf nginx-1.16.1.tar.gz
cd nginx-1.16.1

预编译,升级模块“--with-http_ssl_module”
./configure --prefix=/usr/local/nginx --with-http_stub_status_module --with-http_ssl_module

预编译后发现增加了一个模块:

使用“make”进行更新,此处不能使用make install 因为会覆盖掉配置文件:
make -j4

接下来拷贝升级后的二进制启动文件替换掉原来的启动文件:
先备份原来的二进制启动文件:cp /usr/local/nginx/sbin/nginx /usr/local/nginx/sbin/nginx.old.bak
cp /usr/src/nginx-1.16.1/objs/nginx /usr/local/nginx/sbin/

检查升级后是否正常:cd /usr/local/nginx/sbin
./nginx -t

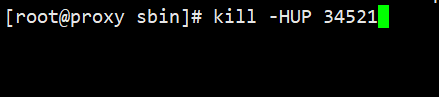
启动新的主进程,进行热升级:ps -aux |grep nginx


kill -USR2 34521

向旧版本的nginx主进程发送WINCH信号,主进程不退出,所有请求交给新版本的nginx进程处理:
命令:kill -WINCH 34521

若需回滚,则发送HUP信号,启动旧版本配置文件,执行旧版本进程,此时可把新版本的进程kill掉(可使用kill -9 34585 34586或kill -QUIT 34585 34586)
回滚发送HUP信号:kill -HUP 34521
若新进程没问题,则考虑把旧进程结束,命令:kill -QUIT 34521
或者:kill -9 34521

查看版本是否升级成功:
/usr/local/nginx/sbin/nginx -V

从1.14.2升级到了1.16.1了,访问下是否有问题:页面还是以前更改的页面,说明配置文件还是以前的,升级成功

重启nginx:
/usr/local/nginx/sbin/nginx -s reload

配置虚拟主机(即一个nginx上搭建多个网站)
vim /usr/local/nginx/conf/nginx.conf
复制一个server,更改server_name和html/wxm2;即可,如:
server {
listen 80;
server_name www.wxm1.com;
location / {
root html/wxm1;
index index.html index.htm;
}
error_page 500 502 503 504 /50x.html;
location = /50x.html {
root html;
}
server {
listen 80;
server_name www.wxm2.com;
location / {
root html/wxm2;
index index.html index.htm;
}
error_page 500 502 503 504 /50x.html;
location = /50x.html {
root html;
}
}
创建文件夹:mkdir -p /usr/local/nginx/html/{wxm1,wxm2}
cd /usr/local/nginx/html/wxm1
echo "www.wxm1.com">>index.html
cd /usr/local/nginx/html/wxm2
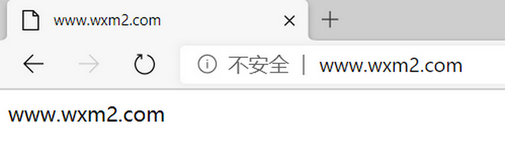
echo "www.wxm2.com">>index.html
重启nginx:/usr/local/nginx/sbin/nginx -s reload
更改本地host文件,然后访问测试:

配置文件内写太多server可读性小,因此优化一下:
在/usr/local/nginx/conf目录下创建文件夹wxm
mkdir -p /usr/local/nginx/conf/wxm
wxm目录下创建wxm1和wxm2文件,用于存放两个server
vim /usr/local/nginx/conf/wxm/wxm1 填入下面的server
server {
listen 80;
server_name www.wx1.comm;
location / {
root html/wxm1;
index index.html index.htm;
}
error_page 500 502 503 504 /50x.html;
location = /50x.html {
root html;
}
}
vim /usr/local/nginx/conf/wxm/wxm2 填入下面的server
server {
listen 80;
server_name www.wx2.comm;
location / {
root html/wxm2;
index index.html index.htm;
}
error_page 500 502 503 504 /50x.html;
location = /50x.html {
root html;
}
}
编辑nginx主配置文件:vim /usr/local/nginx/conf/nginx.conf
把所有的server删除,添加如图所示一行

#user nobody;
worker_processes 1;
events {
worker_connections 1024;
}
http {
include mime.types;
default_type application/octet-stream;
sendfile on;
keepalive_timeout 65;
include /usr/local/nginx/conf/wxm/*;
}
重启nginx:/usr/local/nginx/sbin/nginx -s reload
验证:
效果和方法1一致。
PHP源码编译安装
先安装相应的环境:yum -y install epel-release gcc gcc-c++ make pcre pcre-devel zlib zlib-devel openssl openssl-devel libxml2 libxml2-devel libcurl libcurl-devel libjpeg libjpeg-devel libpng libpng-devel freetype freetype-devel openldap openldap-devel libmcrypt libmcrypt-devel mcrypt mcrypt-devel
上传:rz php-5.6.40.tar.gz
解压:tar -zvxf php-5.6.40.tar.gz
进入解压目录:cd php-5.6.40
预编译:./configure --prefix=/usr/local/php --with-config-file-path=/usr/local/php/etc --enable-ctype --with-mysql=mysqlnd --with-mysqli=mysqlnd --with-freetype-dir --with-jpeg-dir --with-png-dir --with-zlib --with-libxml-dir=/usr --enable-xml --disable-rpath --enable-bcmath --enable-shmop --enable-sysvsem --enable-inline-optimization --with-curl --enable-mbregex --enable-mbstring --with-mcrypt --with-gd --enable-gd-native-ttf --with-openssl --with-mhash --enable-pcntl --enable-sockets --with-ldap-sasl --with-xmlrpc --enable-zip --enable-soap --with-gettext --enable-fpm
编译及安装:make -j4 && make -j4 install
复制配置文件:cp php.ini-production /usr/local/php/etc/php.ini
进入php安装目录:cd /usr/local/php/
mv /usr/local/php/etc/php-fpm.conf.default /usr/local/php/etc/php-fpm.conf
cd /usr/local/php/etc
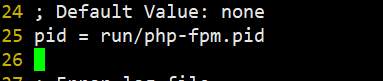
编辑配置文件:vim php-fpm.conf
更改启动php进程用到的用户:

开启错误日志以及pid

设置环境变量:echo "export PATH=$PATH:/usr/local/php/sbin/:/usr/local/php/bin/" >> /etc/profile
刷新环境变量:source /etc/profile
启动php-fpm:php-fpm
结束php-fpm:killall php-fpm(使用killall命令需安装yum install psmisc)
nginx+php-fpm结合
vim /usr/local/nginx/conf/wxm/server
输入以下内容:主要更改标红部分
server {
listen 80;
server_name localhost;
location / {
root html;
index index.html index.htm index.php;
}
error_page 500 502 503 504 /50x.html;
location = /50x.html {
root html;
}
location ~ \.php$ {
root html;
fastcgi_pass 127.0.0.1:9000;
fastcgi_index index.php;
fastcgi_param SCRIPT_FILENAME $document_root$fastcgi_script_name;
include fastcgi_params;
}
}
然后重启:/usr/local/nginx/sbin/nginx -s reload
编辑文件测试:vim /usr/local/nginx/html/test.php
输入:
<?php
echo "nginx and php-fpm is connected successful!";
?>
进行访问测试:192.168.1.198/test.php

验证LNMP环境
使用192.168.1.195做为主库
使用192.168.1.198做nginx和php服务器
编辑文件:vim /usr/local/nginx/html/lnmp.php
输入:
<?php
$link=mysql_connect("192.168.1.195","root","wxm9077");
if(!$link){
echo "LNMP_connect fail";
}else{
echo "LNMP_connect success";
}
?>
测试:192.168.1.198/lnmp.php


 1201
1201


 被折叠的 条评论
为什么被折叠?
被折叠的 条评论
为什么被折叠?
 到【灌水乐园】发言


