


在csdn博客上看到卡片重叠的效果
按照国际惯例,自定义view三部曲走起来:
1.在values文件夹下创建attrs.xml文件,内容如下:
<resources>
<declare-styleable name="MyCustomView2">
<attr name="firstCardColor" format="color" />
<attr name="secCardColor" format="color" />
<attr name="thirdCardColor" format="color" />
</declare-styleable>
</resources>
三个属性分别代表三张卡片的颜色
2.写一个类继承自view,并在构造函数中获取上面定义的属性
public MyCustomView2(Context context, AttributeSet attrs) {
super(context, attrs);
TypedArray ta = context.obtainStyledAttributes(attrs, R.styleable.MyCustomView2);
for(int i=0;i<ta.getIndexCount();i++){
int attr = ta.getIndex(i);
switch(attr){
case R.styleable.MyCustomView2_firstCardColor :
firstCardColor = ta.getColor(attr, Color.BLUE); //未设置颜色的时候默认为蓝色
break;
case R.styleable.MyCustomView2_secCardColor :
secCardColor = ta.getColor(attr, Color.RED); //未设置颜色的时候默认为红色
break;
case R.styleable.MyCustomView2_thirdCardColor :
thirdCardColor = ta.getColor(attr, Color.GREEN);//未设置颜色的时候默认为绿色
break;
}
}
ta.recycle();
mPaint = new Paint();
}
3.重写[onMeasure]onDraw方法
在这里有两种情况,重写onMeasure和不重写onMeasure
a).不重写onMeasure(使用系统自带的测量方法):
@Override
protected void onMeasure(int widthMeasureSpec, int heightMeasureSpec) {
super.onMeasure(widthMeasureSpec, heightMeasureSpec);
}
接着重写onDraw方法
@Override
protected void onDraw(Canvas canvas) {
//将组件宽度的1/4和高度的1/3作为第一张卡片的宽和高
width = getMeasuredWidth() / 4;
height = getMeasuredHeight() / 3;
/**
* 若没有指定android:padding属性,则取组件大小的1/8作为卡片之间的间距
* 否则就取它们四个值的平均值
*/
if(getPaddingLeft() == 0 || getPaddingRight() == 0
|| getPaddingTop() == 0 || getPaddingBottom() == 0){
mStep = getMeasuredWidth() / 8;//将组件的1/8作为卡片之间的间距
}else{
mStep = (getPaddingLeft() + getPaddingRight() + getPaddingTop() + getPaddingBottom()) / 4;//取平均值作为间距
}
//画第一张卡片
mPaint.setColor(firstCardColor);
canvas.drawRect(0, 0, width, height, mPaint);
//画第二张卡片
mPaint.setColor(secCardColor);
canvas.drawRect(mStep, mStep, width + mStep, height + mStep, mPaint);
//画第三张卡片
mPaint.setColor(thirdCardColor);
canvas.drawRect(mStep * 2, mStep * 2, width + mStep * 2, height + mStep * 2, mPaint);
}
在这个方法中,主要就是绘制想要的效果了。绘制的内容始终在通过测量的view大小之中
在画第一个卡片的时候,起始的left和top坐标可以根据需要将其设置到组件的任何位置。
然后就是在布局文件中使用这个自定义的view
注:使用之前需要添加namespace,在这里,我的namespace是:
xmlns:custom="http://schemas.android.com/apk/res/com.example.mycustomview2"
<com.example.mycustom.view.MyCustomView2
android:layout_width="300dp"
android:layout_height="300dp"
android:layout_margin="10dp"
android:layout_centerInParent="true"
android:background="#000000"
custom:firstCardColor="#0066CC"
custom:secCardColor="#ff0000"
custom:thirdCardColor="#009933"/>
此时的效果是:

<com.example.mycustom.view.MyCustomView2
android:layout_width="match_parent"
android:layout_height="match_parent"
android:layout_margin="10dp"
android:layout_centerInParent="true"
android:background="#000000"
custom:firstCardColor="#0066CC"
custom:secCardColor="#ff0000"
custom:thirdCardColor="#009933"/>
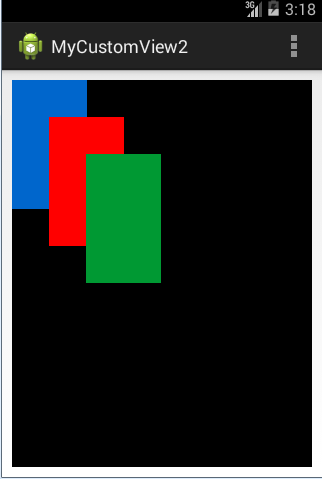
改为warp_parent也是相同的效果
b).重写onMeasure
@Override
protected void onMeasure(int widthMeasureSpec, int heightMeasureSpec) {
super.onMeasure(widthMeasureSpec, heightMeasureSpec);
int width = 0; //组件的宽度
int height = 0; //组件的高度
int widthMode = MeasureSpec.getMode(widthMeasureSpec);
int widthSize = MeasureSpec.getSize(widthMeasureSpec);
int heightMode = MeasureSpec.getMode(heightMeasureSpec);
int heightSize = MeasureSpec.getSize(heightMeasureSpec);
/**
* 组件宽度和高度的布局为MATCH_PARENT或精确的值的时,使用系统测试的结果;
* 否则使用在资源文件中定义的组件的大小
*/
if(widthMode == MeasureSpec.EXACTLY){ //一般为MATCH_PARENT和精确的值
width = widthSize;
}else if(heightMode == MeasureSpec.AT_MOST){ //一般为WARP_PARENT
//从资源文件中获取默认的宽度
width = getResources().getDimensionPixelSize(R.dimen.custom_view_size);
}
if(heightMode == MeasureSpec.EXACTLY){
height = heightSize;
}else if(heightMode == MeasureSpec.AT_MOST){
//从资源文件中获取默认的高度
height = getResources().getDimensionPixelSize(R.dimen.custom_view_size);
}
setMeasuredDimension(width, height);
}
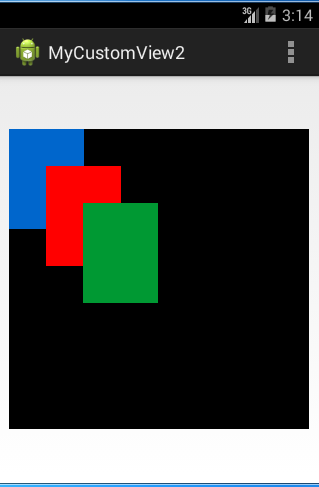
<com.example.mycustom.view.MyCustomView2
android:layout_width="match_parent"
android:layout_height="match_parent"
android:layout_margin="10dp"
android:layout_centerInParent="true"
android:background="#000000"
custom:firstCardColor="#0066CC"
custom:secCardColor="#ff0000"
custom:thirdCardColor="#009933"/>
效果如下:

<com.example.mycustom.view.MyCustomView2
android:layout_width="300dp"
android:layout_height="300dp"
android:layout_margin="10dp"
android:layout_centerInParent="true"
android:background="#000000"
custom:firstCardColor="#0066CC"
custom:secCardColor="#ff0000"
custom:thirdCardColor="#009933"/>
效果如下:
由此可见,不管是否重写onMeasure方法,android:layout_width和android:layout_height为match_parent或者精确值的时候效果是一样的,关键是当为warp_parent的时候。
<com.example.mycustom.view.MyCustomView2
android:layout_width="wrap_content"
android:layout_height="wrap_content"
android:layout_margin="10dp"
android:layout_centerInParent="true"
android:background="#000000"
custom:firstCardColor="#0066CC"
custom:secCardColor="#ff0000"
custom:thirdCardColor="#009933"/>
效果如下:
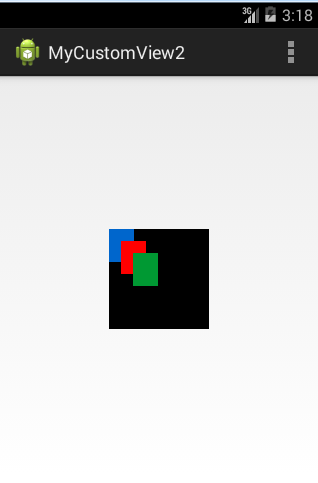
之所以会出现这样的效果是因为,在重写onMeasure方法的时候,如果定义的宽度和高度为warp_parent的话(对应MeasureSpec.AT_MOST),就从dimens.xml文件中获取一个大小,用于决定view的大小。
至此,卡片重叠的效果已经实现。这个案例是将三张卡片作为一个view,而不是单独的由三个view构成,因此,要想还是实现同样的效果,可以自定ViewGroup来实现,所以下一篇就来阐述通过自定义ViewGroup方式来实现,敬请期待!~


 44万+
44万+

 被折叠的 条评论
为什么被折叠?
被折叠的 条评论
为什么被折叠?
 到【灌水乐园】发言


