


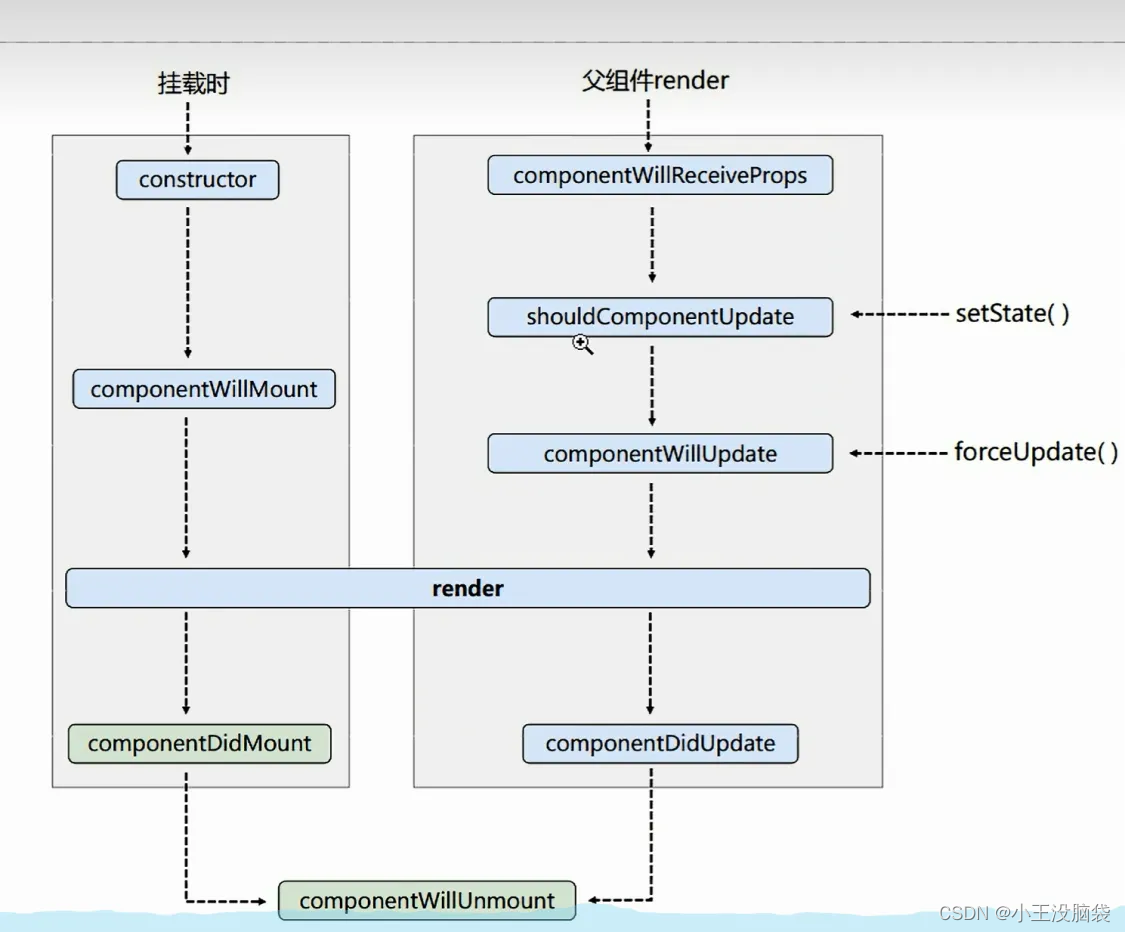
组件从创建到死亡,会经过一些特定的阶段React组件中包含一系列钩子函数{生命周期回调函数},会在特定的时刻调用我们在定义组件的时候,会在特定的声明周期回调函数中,做特定的工作。
旧生命周期总结
旧的生命周期分为三个阶段
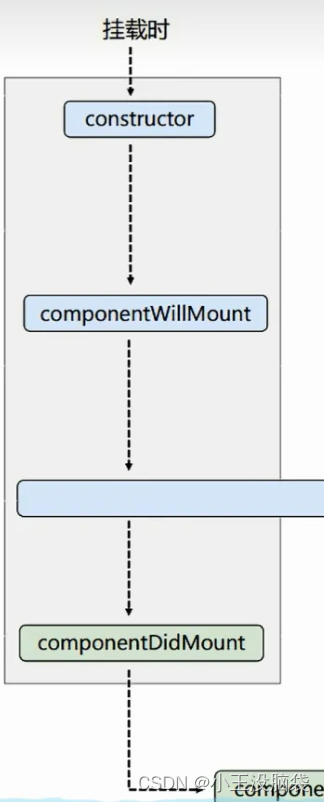
1 初始化阶段 由 ReacrDom.render()触发第一次渲染
构造器 即将挂载 渲染 挂载后
constrctor() componentWillMount() render() componentDidMount()
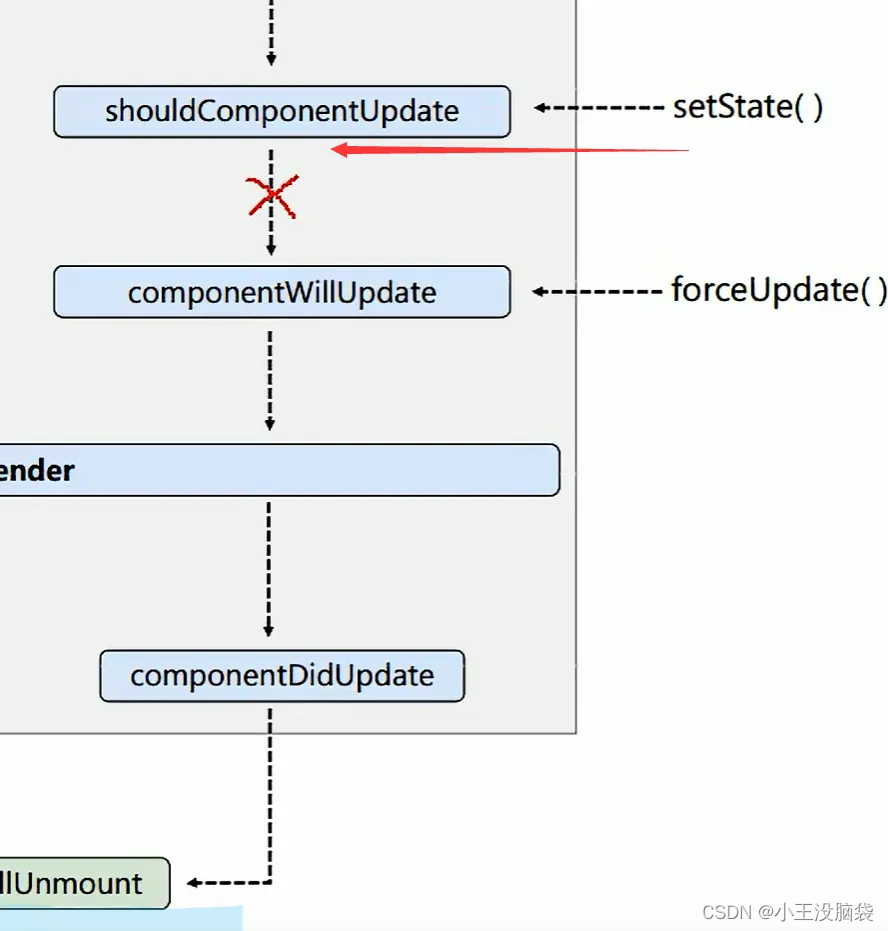
2 更新阶段 由组件内部this.setSate()或父组件重新render()触发
shouldComponentUpdate() componentWillUpdate() render() compinentWillUnmount()
3 卸载 由ReactDom.unmontComponentAtNode()触发
componentWillUnmount()
componentDidMount和componentWillUnmount
下面是个实例展示了透明度的变化
将定时器定义成自身的静态变化 每次挂载后对this.state.time进行操作。
<script type="text/babel">

        class Life extends React.Component {
            //定义透明度
            state = { time: 1 };

            stop = () => {
                //卸载组件
                ReactDOM.unmountComponentAtNode(document.getElementById("test2"))

            }

            //在组建挂载(渲染之后进行)
            //现在属于同级 所以它里面的this指向就是实例
            componentDidMount() {
                //定时器
                this.Inter = setInterval(() => {
                    let { time } = this.state;
                    time -= 0.1;
                    if (time <= 0) {
                        time = 1;
                    }
                    this.setState({ time });
                }, 200);
            }
            //组件被卸载之后执行
            componentWillUnmount() {
                clearInterval(this.Inter);
            }

            render() {
                return (
                    <div>
                        <h2 style={{ opacity: this.state.time }}>声明周期</h2>
                        <button onClick={this.stop}>结束</button>
                    </div>
                )
            }
        }

 ReactDOM.render(<Life />, document.getElementById("test2"))

</script>
旧生命周期挂载渲染过程
旧生命周期的总体流程图如下
下面分析这条线
<script type="text/babel">
        class Count extends React.Component{
            constructor(props){
                console.log("count-constructor");
                super(props)
                this.state={count:0}
            }
            componentWillMount(){
                console.log('count-willmount');
            }
            componentDidMount(){
                console.log('count-didmount');
            }
            add=()=>{
                const {count}=this.state
                this.setState({
                    count:count+1
                })
            }
            render(){
                console.log("count-render");
                const {count}=this.state
                return (
                    <div>
                        <h2>当前求和为{count}</h2>
                        <button onClick={this.add}>点我加一</button>
                        </div>
                )
            }
        }
        ReactDOM.render(<Count />, document.getElementById("test2"))

    </script>
可以得出顺序constructor componentWillMount render componentDidMount
旧生命周期更新操作
要返回布尔值 如果真就会更新 不是真就不会更新
//更新前操作
            shouldComponentUpdate(){
                //控制组件更新
                return true
            }
            //组件将要更新
            componentWillUpdate(){

            }
              //组件更新完毕
              componentWillUpdate(){

            }
强制更新 forceUpdate
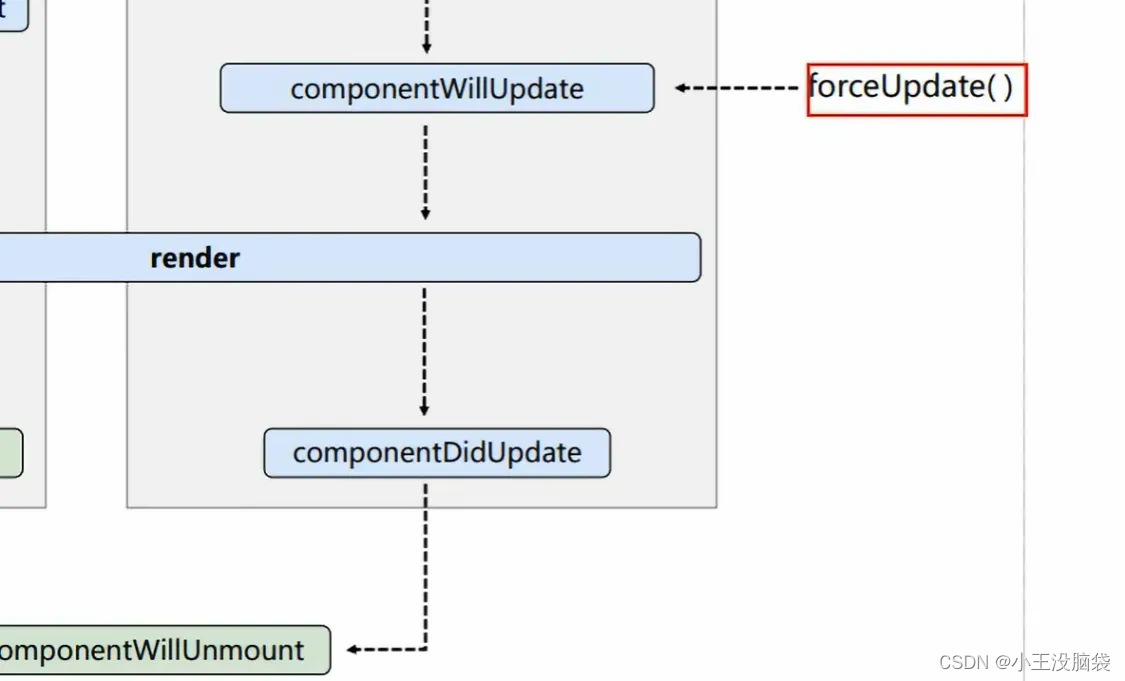
//组件将要更新
            componentWillUpdate(){

            }
              //组件更新完毕
              componentDidUpdate(){
                this.forceUpdate()
            }
子组件收到componentWillReceiveProps
<script type="text/babel">
        class A extends React.Component{
            state={carName:'奔驰'}
            changeCar=()=>{
                this.setState({
                    carName:'奥迪'
                })
            }
            render(){
                return(
                    <div>
                        我是a组件
                    <div>
                        <button onClick={this.changeCar}>点我换车</button>
                        <B carName={this.state.carName}/>
                        </div>
                    </div>
                )
            }
        }
        class B extends React.Component{
            state={}
            //组件将要接受到新的props
            componentWillReceiveProps(props){
                //将要更新收到的props 第一次不会调用 换成奥迪之后才会
                console.log('B----');
            }
            componentWillUpdate(){

            }
              //组件更新完毕
              componentDidUpdate(){
                this.forceUpdate()
            }
            render(){
                return(
                    <div>
                      我是b组件 我接受到的车是{this.props.carName}
                    </div>
                )
            }
        }
        ReactDOM.render(<A />, document.getElementById("test2"))

    </script>
常用的生命周期有有componentWillMount()开启定时器 发送网络请求 发布订阅消息和componentWillUnmount()一般做收尾 取消定时器 取消订阅消息
新的生命周期
含will的三个生命周期 componentWillMount cpomponentWillReceiveProps和componentWillUpdate
即将被废除 引入了getDerivedStateFromProps和getSnapshotBeforeUpdate
getDerivedStateFromProps
必须返回一个对象或者null
//必须是静态的
//必须有返回值(Null或者state对象)
//如果返回的是state对象,里面的将会对原有的state进行覆盖,
//并且不能修改【因为初始化,更新都会经过这个函数】
//给组件传递的参数,可以作为该方法的参数传递过来。因此可以让该参数作为state。
//也可以以props和state作为参数进行传递
static getDerivedStateFromProps(props) {
  //<A count='199'/>
  console.log("A --- getDerivedStateFromProps", props);
  return null;
}
getSnapshotBeforeUpdate
componentDidupdate 可以接受两个参数如下
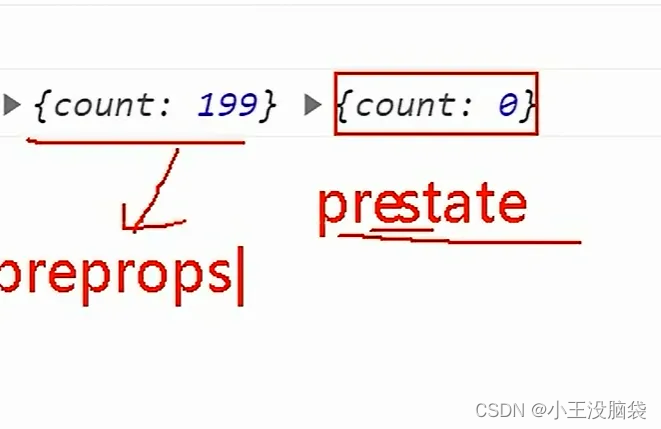
//组件更新之后
componentDidUpdate(preProps,preState) {
  console.log(preProps,preState);
  console.log("A --- componentDidUpdate");
}
下周主要计划
下周主要计划是学习一下直播推拉流 并写页面


 504
504


 被折叠的 条评论
为什么被折叠?
被折叠的 条评论
为什么被折叠?
 到【灌水乐园】发言


