


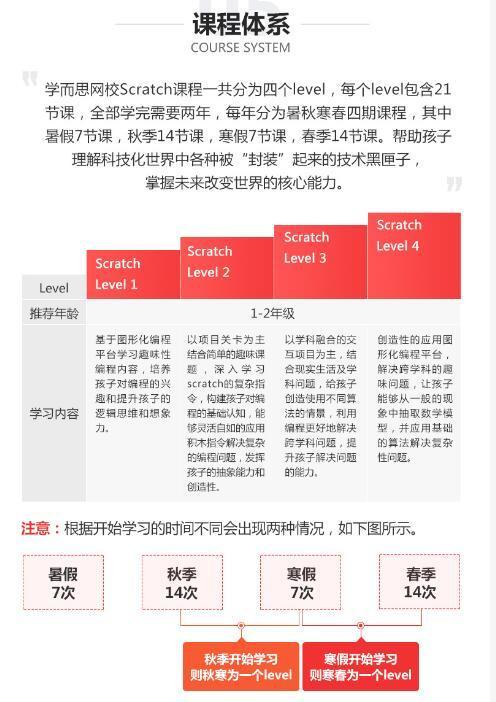
欢迎来到今天的讨论,我们将探讨,学而思五个等级分别是什么 学而思分哪几个等级,让我们开始吧!
本篇文章给大家谈谈如何利用python进行自动化办公?,以及用python自动化办公 做职场高手,希望对各位有所帮助,不要忘了收藏本站喔学而思python分几个level。
目录
一 python办公自动化所需类库
二 python操作excel文件
三 python自动发送邮件
四 python操作word文件
五 python操作PPT文件
一 python办公自动化所需类库
python操作excel、word、ppt所需库如下,
import xlrd3  # 读取表格

import xlwt  # 写入工作表

import xlsxwriter  # 支持大文件写入工作表

import smtplib  # 邮件发送
# 邮件发送格式扩展
from  import MIMEText
from .multipart import MIMEMultipart
from .application import MIMEApplication

# ppt操作
from docx import Document
from docx.shared import Pt, RGBColor
from .style import WD_STYLE_TYPE
from  import *
# word转pdf
from win32com.client import constants, gencache
import os  # 系统常用操作
import random

import pptx  # 操作ppt
from  import Inches, Pt
from .shapes import MSO_SHAPE  # 不影响程序运行
from .color import RGBColor
from  import CategoryChartData
from .chart import XL_CHART_TYPE
from .chart import XL_LEGEND_POSITION
二 python操作excel文件
# 读取excel文件
# data = xlrd3.open_workbook('')
# load=data.sheet_loaded(0) #加载第一个工作表,卸载工作表使用sheet_loaded(0)
# print(load)
# print(data)
# d2=data.sheets()
# print(d2) #根据索引获取工作表
# print(data.sheet_by_name('Sheet1') )#根据名字获取工作表
# print(data.sheet_names()) #获取所有工作表的名称
# print(data.nsheets)  #工作表的个数


# 操作行
# sheet=data.sheet_by_index(0)  #获取工作表
# print(sheet.nrows)  #获取有效行
# print((1)) #第一行的内容
# print(_types(2)) #数据类型,2表示数字
# print((1)[2].value)  #获取单元格的值
# print(_values(1)) #获取指定行的单元格的值
# print(_len(1))  #获取单元格的长度

# 操作列
# sheet=data.sheet_by_index(0)
# print(sheet.nrows) #列数
# print((1)) #指定列的内容
# print((1)[1].value) #指定列的单元格内容
# print(_values(1)) #第一列的内容
# print(_types(1) ) #指定列的数据类型

# 操作单元格
# sheet=data.sheet_by_index(0)
# print((1,1)) #获取指定行列的数据类型
# print(_type(1,2)) #获取指定单元格的数据类型
# print((1,1).ctype) #获取指定单元格的数据类型
# print((1,1).value) #获取值
# print(_value(1,1)) #获取指定单元格的内容

# 初始化字体属性
# titlestyle = xlwt.XFStyle()
#
# # 设置字体
# titlefont = ()
#  = '宋体'
#  = True
# titlefont.height = 11 * 20
# titlefont.colour_index = 0x80
#  = titlefont
#
# # 单元格对齐方式
# cellalient = xlwt.Alignment()
#  = 0x02
#  = 0x01
# titlestyle.alignment = cellalient
#
# # 边框
# borders = xlwt.Borders()
# borders.right = xlwt.Borders.DASHED
# borders.bottom = xlwt.Borders.DOTTED
# titlestyle.borders = borders
#
# # 背景颜色
# datastyle = xlwt.XFStyle()
# bgcolor = xlwt.Pattern()
# bgcolor.pattern = xlwt.Pattern.SOLID_PATTERN
# bgcolor.pattern_fore_colour = 22  # 背景颜色
# datastyle.pattern = bgcolor
#
# # 写入excel
# wb = xlwt.Workbook()  # 表对象
# ws = wb.add_sheet('wsb')  # 添加工作表
# ws.write_merge(0, 1, 0, 5, '货币兑换表', titlestyle)  # 添加内容,0、1是行,0、5是列范围,titlestyle为字体样式
#
# data = (('05', 1, 2, 3, 3), ('06', 2, 1, 1, 4))  # 使用元组保存需要存储的数据
#
# # 遍历元组写入内容
# for i, item in enumerate(data):
#     for j, val in enumerate(item):
#         if j == 0:
#             ws.write(i + 2, j, val, datastyle)  # 以单元格的方式循环写入,datastyle为自定义的样式
#         else:
#             ws.write(i + 2, j, val)  # 以单元格的方式循环写入
#
# # 创建第二个工作表
# wsimage = wb.add_sheet('image')
# # 写入图片: 参数含义为图片名称,行列
# # wsimage.insert_bitmap('a.jpg', 0, 0) #不支持png或jpg格式的图片
#
#
# ('')  # 保存数据,创建工作表,只支持xls格式


# 支持大文件写入模块xlsxwriter的基本使用
# wb = xlsxwriter.Workbook('')  # 获得文件对象
# cell_format = wb.add_format({'bold': True})  # 通过字典设置格式化对象
#
# # 通过对象格式化对象
# cell_format1 = wb.add_format()
# cell_format1.set_bold()  # 设置加粗
# cell_format1.set_font_color('red')  # 颜色
# cell_format1.set_font_size(14)  # 字体大小
# cell_format1.set_align('center')  # 居中显示
#
# cell_format2 = wb.add_format()
# cell_format2.set_bg_color('00FFFF')  # 设置背景颜色
#
# sheet = wb.add_worksheet('newsheet')  # 创建工作表
# # 写入
# sheet.write(0, 0, '2022年', cell_format1)
# sheet.merge_range(1, 0, 2, 2, '销售数据')  # 合并单元格
#
# # 数据
# dt = (
#     ['一月', 100, 200],
#     ['二月', 140, 270],
#     ['三月', 190, 210]
# )
#
# # 写入行
# sheet.write_row(3, 0, ['月份', '预期销售额', '实际销售额'], cell_format2)
# # 遍历并写入数据
# for index, item in enumerate(dt):
#     sheet.write_row(index + 4, 0, item)
# # 写入excel公式,计算结果
# sheet.write(7, 1, '=sum(B5:B7)')
# sheet.write(7, 2, '=sum(C5:C7)')
# # 写入链接
# sheet.write_url(9, 0, '', string='更多数据')
# # 写入图片
# sheet.insert_image(10, 0, '')
#
# # 写入图表
# chart = wb.add_chart({'type': 'column'})
# chart.set_title({'name': '第一季度生产统计'})
# # X,Y描述信息
# chart.set_x_axis({'name': '月份'})
# chart.set_y_axis({'name': '生产统计'})
# # 数据
# chart.add_series({
#     'name': '预期生产',
#     '月份': '=newsheet!$A&5:&A&7',
#     'values': ['newsheet', 4, 1, 6, 1],
#     'data_labels': {'value': True} #显示数据标签
# })
# chart.add_series({
#     'name': '实际生产',
#     '月份': '=newsheet!$A&5:&A&7',
#     'values': ['newsheet', 4, 2, 6, 2],
#     'data_labels': {'value': True}
# })
# sheet.insert_chart('A43', chart)
#
# wb.close()
三 python自动发送邮件
# 邮件发送地址
# host_server = ''  # 主机地址
# sender = ''  # 发件人邮箱
# code = 'dfsfsdfsd'  # 邮箱授权码
# user1 = ''  # 收件人
#
# # 邮件数据
# mail_title = '2月平均收入'  # 邮件标题
# mail_content = '1月平均收入,请查看附件'  # 内容
# attachment = MIMEApplication(open('', 'rb').read())  # 附件
# attachment.add_header('Content-Disposition', 'attachment', filename='')  # 附件属性
#
# smtp = (host_server)  # SMTP
# smtp.login(sender, code)  # 登录
# # 发送
# msg = MIMEMultipart()  # 带附件的实例
# msg['Subject'] = mail_title
# msg['From'] = sender
# msg['To'] = user1
# msg.attach(MIMEText(mail_content))
# msg.attach(attachment)
# smtp.sendmail(sender, user1, msg.as_string())
四 python操作word文件
# docment = Document()  # 创建文档对象
# docment.add_heading('wsb简述', level=4)  # 写入内容,指定标题级别
#
# # 样式
# style = docment.styles.add_style('textstyle', WD_STYLE_TYPE.PARAGRAPH)  # 给段落设置样式
# print(style.style_id)  # 打印样式id
# print()  # 打印样式名称
#  = Pt(5)  # 字体大小
#
# #删除样式
# #docment.styles['textstyle'].delete()
#
# # 段落
# p1 = docment.add_paragraph('这是一个非常努力的小伙子,值得信赖', style='textstyle')
# p1.insert_paragraph_before('hello')  # 插入段落
# # 段部落格式
# format = p1.paragraph_format
# format.left_indent = Pt(20)  # 左侧缩进
# format.right_indent = Pt(20)  # 右侧缩进
# format.first_line_indent = Pt(20)  # 首行缩进
# format.line_spacing = 1.5  # 行间距
#
# run = p1.add_run('hello world hello python')
# run1 = p1.add_run('python是一门有趣的语言')
#
# # 字体、字号、文字颜色
#  = Pt(12)
#  = '微软雅黑'
#  = RGBColor(235, 33, 24)
#
# # 加粗、下划线、斜体
#  = True
# .underline = True
# .italic = True
#
# # 插入图片:指定长宽
# docment.add_picture('a.jpg', Pt(50), Pt(50))
# # 插入表格
# table = docment.add_table(rows=1, cols=3, style='Medium List 2')  # 1行三列
# header_cells = [0].cells
# header_cells[0].text = '月份'
# header_cells[1].text = '预期'
# header_cells[2].text = '实际'
# # 数据
# data = (
#     ['一月', 200, 100],
#     ['二月', 600, 300],
#     ['三月', 800, 900]
# )
# # 写入数据
# for item in data:
#     rows_cells = table.add_row().cells
#     rows_cells[0].text = item[0]
#     rows_cells[1].text = str(item[1])
#     rows_cells[2].text = str(item[2])
#
# # 获取表格
# print(len(docment.tables[0].rows))  # 行数
# print(len(docment.tables[0].columns))  # 列数
# print(docment.tables[0].cell(0, 2).text)  # 单元格内容
#
# ('')  # 保存文档并指定文件的名称


# word转PDF
# def createpdf(wordPath, pdfPath):
#     word = gencache.EnsureDispatch('Word.Application')
#     doc = (wordPath, ReadOnly=1)
#     # 转换方法
#     doc.ExportAsFixedFormat(pdfPath, constants.wdExportFormatPDF)
#     ()
#
#
# #createpdf('H:/1-DOE实验设计-新规划/python/python办公自动化', 'H:/1-DOE实验设计-新规划/python/python办公自动化')
#
# # word转PDF:多个文件的转换
# print(os.listdir("."))  # 当前文件夹下的所有文件
# wordfiles=[]
# for file in os.listdir('.'):
#     if file.endswith(('.doc','.docx')):
#         wordfiles.append(file)
#
# print(wordfiles)
# for file in wordfiles:
#     .abspath(file)
#     index=filepath.rindex('.')
#     pdfpath=filepath[:index]+'.pdf'
#     print(filepath)
#     print(pdfpath)
#     createpdf(filepath,pdfpath)


# 案例:随机生成试卷,使用来生成不同的word试卷
# data = xlrd3.open_workbook('')
# sheet = data.sheet_by_index(0)
# print(data.nsheets)
# print(sheet.nrows)
#
# class Quesition:
#     pass
#
#
# def createQuestion():
#     questionlist = []
#     for i in range(sheet.nrows):
#         if i > 1:
#             obj = Quesition()
#             obj.subject = (i, 1).value  # 题目
#             obj.quesitiontype = (i, 2).value  # 题型
#             # ABCD四个选项
#             obj.option = []
#             obj.option.append((i, 3).value)
#             obj.option.append((i, 4).value)
#             obj.option.append((i, 5).value)
#             obj.option.append((i, 6).value)
#             # 分值
#             obj.score = (i, 7).value
#             questionlist.append(obj)
#     random.shuffle(questionlist)  # 随机排序试题
#     return questionlist
#
#
# # 生成word试卷
# def createPaper(filename, papername, questionlist):
#     document = Document()
#     # 页眉和页脚信息
#     section = document.sections[0]
#     header = section.header
#     p1 = header.paragraphs[0]
#      = papername
#     footer = section.footer
#     p2 = footer.paragraphs[0]
#      = '内部试卷,禁止泄露'
#
#     # 试卷基本信息
#     title = document.add_heading(papername, level=1)
#     # title.alignment = WD_PARAGRAPH_ALIGNMENT.CENTER
#     p3 = document.paragraph()
#     p3.add_run('姓名:_____')
#     p3.add_run('所属部门:_____')
#     # p3.alignment = WD_PARAGRAPH_ALIGNMENT.CENTER
#     # 试题信息
#     for quesiton in questionlist:
#         subject = document.add_paragraph()
#         run = subject.add_run(quesiton.subject)
#          = True
#         subject.add_run('[%s]分' % str(quesiton.score))
#         random.shuffle(quesiton.option)  # 打乱题目顺序
#         for index, option in enumerate(quesiton.option):
#             document.add_paragraph(('ABCD')[index] + str(option))
#     (filename)


# for i in range(10):
#     qss = createQuestion()
#     createPaper('paper' + str(i + 1) + '.docx', '2023计算机考试', qss)
五 python操作PPT文件
# PPT操作
prs = pptx.Presentation('')  # 文件存在时可以写明文件名称
# 新增三张幻灯片
slide = prs.slides.add_slide(prs.slide_layouts[0])
# prs.slides.add_slide(prs.slide_layouts[1])
# prs.slides.add_slide(prs.slide_layouts[2])
# 删除幻灯片
print(len(prs.slides))  # 幻灯片数量
# del prs.slides._sldIdLst[1]  #删除第二张幻灯片
# 设置幻灯片与上下左右的间距为5英寸
text1 = slide.shapes.add_textbox(Inches(5), Inches(5), Inches(5), Inches(5))
 = '我是文本框'
p1 = _frame.add_paragraph()
 = '我是段落1'
p1.add_run().text = 'end'
title_shape = slide.shapes.title
 = '标题1'
slide.shapes.placeholders[1].text = '标题2'

# 添加图形到PPT
shape = slide.shapes.add_shape(MSO_SHAPE.RECTANGLE, Inches(2), Inches(2), Inches(2), Inches(2))  # 矩形
# 填充、边框
fill =
fill.solid()
 = RGBColor(255, 0, 0)
line =
 = RGBColor(44, 22, 67)
line.width = Pt(2)

# 写入表格: 2和3指2行3列,6指间隔左侧与顶部的间隔,4指表格长宽
table = slide.shapes.add_table(3, 3, Inches(6), Inches(6), Inches(4), Inches(4)).table
# 向表格中插入内容
(1, 0).text = 'name'
(1, 1).text = 'age'
(1, 2).text = 'class'

(2, 0).text = '小明'
(2, 1).text = '22'
(2, 2).text = '九年级一班'
# 合并单元格
cell = (0, 0)
cell1 = (0, 2)
cell.merge(cell1)
(0, 0).text = '班级信息'

# 取消合并
if cell.is_merge_origin:  # 判断当前单元格是否已经被合并
    cell.split()

# 写入图表
chart_data = CategoryChartData()
chart_data.categories = ['一月', '二月', '三月']  # X轴
chart_data.add_series('2022', (200, 500, 400))
chart_data.add_series('2020', (300, 800, 600))
chart = slide.shapes.add_chart(XL_CHART_TYPE.COLUMN_CLUSTERED, Inches(2), Inches(2), Inches(6), Inches(4),
                               chart_data).chart
chart.has_title = True
 = '第一季度生产额'
chart.has_legend = True
chart.legend.position = XL_LEGEND_POSITION.RIGHT
('')  # 保存修改
原文地址1:https://blog.csdn.net/Fixf4556/article/details/135113924
python手册 http://www.78tp.com/python/


 被折叠的 条评论
为什么被折叠?
被折叠的 条评论
为什么被折叠?
 到【灌水乐园】发言


