


前面一章,大概了解了下helm的安装,和创建自定义的应用,本章节,来完整演示一下通过helm安装一个mysql应用的方式,了解一下helm的目录结构及作用。
helm的目录结构
上一章,我们创建了一个myapp的自定义应用,并且知道了他的目录结构
# 创建一个myapp的自定义应用
root@k8s-master:~/helm# helm create myapp
Creating myapp

# 进入目录
root@k8s-master:~/helm# cd myapp/

# 查看目录结构
root@k8s-master:~/helm/myapp# tree
.
├── charts
├── Chart.yaml
├── templates
│   ├── deployment.yaml
│   ├── _helpers.tpl
│   ├── hpa.yaml
│   ├── ingress.yaml
│   ├── NOTES.txt
│   ├── serviceaccount.yaml
│   ├── service.yaml
│   └── tests
│       └── test-connection.yaml
└── values.yaml

3 directories, 10 files
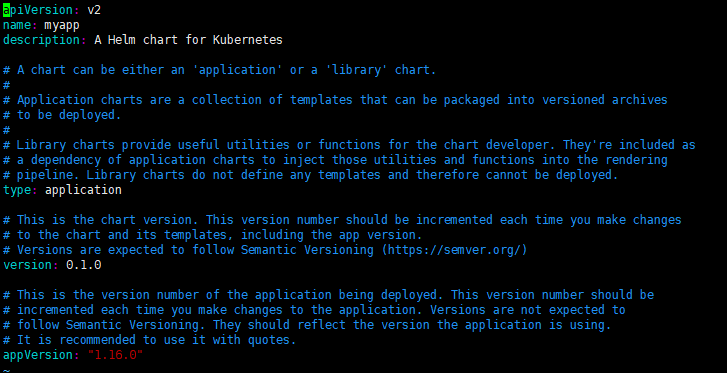
Chart.yaml
YAML 文件,描述 chart 的概要信息。
name和version是必须得,其他为选填
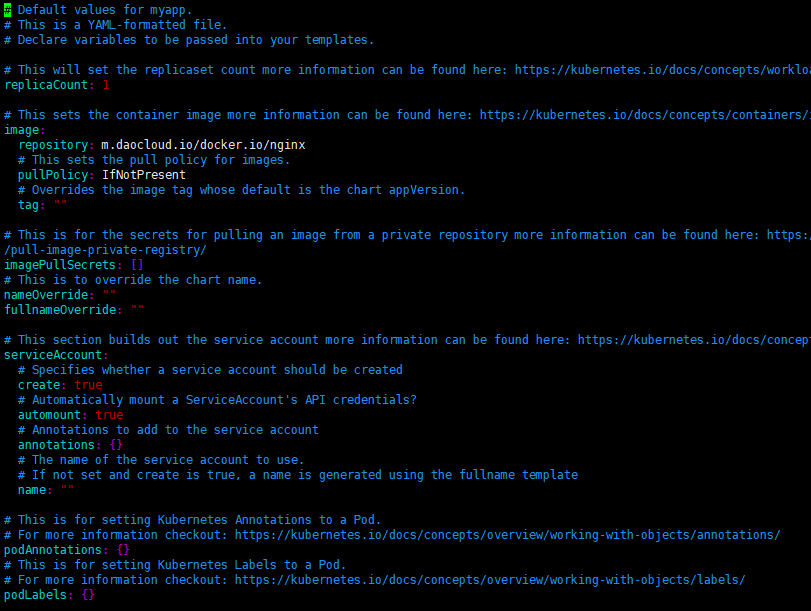
values.yaml
helm的核心文件,定义了对象的制化配置(镜像地址、容器检查、容器数量、卷、资源限制、pvpvc等等),chart 支持在安装的时根据参数进行定制化配置,而 values.yaml 就是提供了这些配置参数的默认值。services,deployment,configmap等配置都是从这个地方取值,然后进行渲染生成
templates 目录
各种 Kubernetes 对象资源的配置模板都放置在这里。Helm 会将 values.yaml 中的参数值注入到模板中进行渲染,最后生成标准的 YAML 配置文件。例如渲染成deployment.yaml,svc.yaml,ingress.yaml等等。
模板是 chart 最重要的部分,也是 Helm 最强大的地方。模板增加了应用部署的灵活性,能够适用不同的环境。
动态字段详解
变量引用
以 templates/deployment.yaml 为例:
单独一眼扫过,其实和之前创建pod时候,自己手动写的deployment.yaml差不多,只是之前我们都是写死,但是这里是通过 {{ include "myapp.fullname" . }} 这种模板方式来定义,这其实是Go 语言的模板来编写 chart。
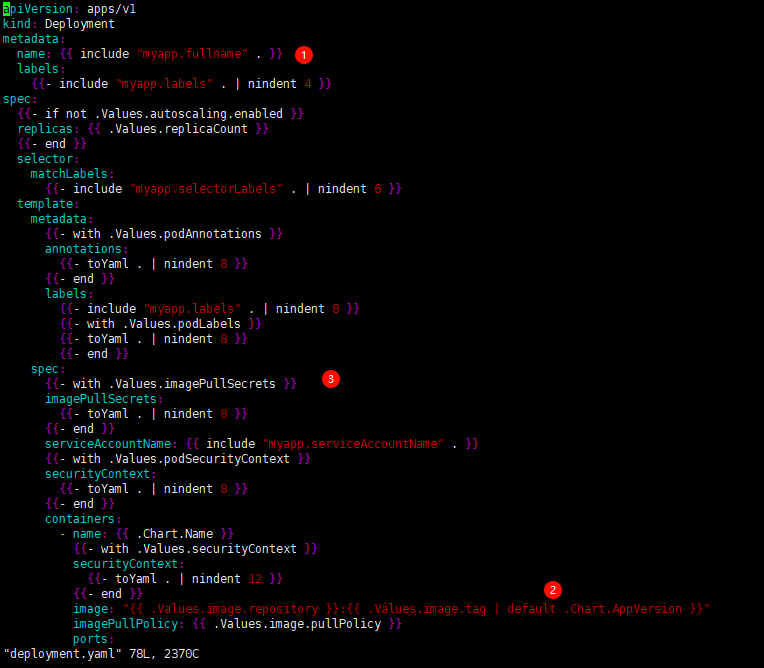
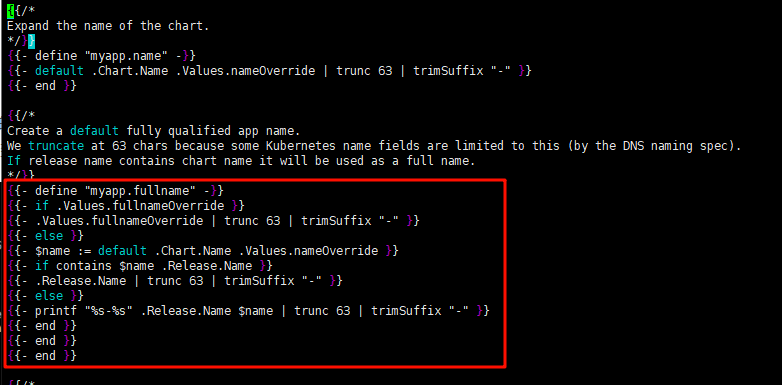
① {{ include "myapp.fullname" . }} 定义 Deployment 的 name。这个fullname。是在 templates/_helpers.tpl 文件中定义的。从下图可以看到,定义fmyapp.fullname又是做了一些判断,如果上一层的Values.yaml文件中有定义fullnameOverride,那就采用这个,如果没定义则继续下面的判断。
② image: "{{ .Values.image.repository }}:{{ .Values.image.tag | default .Chart.AppVersion }}" 定义了deployment.yaml下的镜像下载地址,.Values.image.repository和.Values.image.tag,从
values.yaml 中取值,如果没有定义,则为空。也就是下面的内容
  repository: m.daocloud.io/docker.io/nginx
  # This sets the pull policy for images.
  pullPolicy: IfNotPresent
  # Overrides the image tag whose default is the chart appVersion.
  tag: ""

拼接后内容为
image: m.daocloud.io/docker.io/nginx
③ imagePullSecrets: {{- toYaml . | nindent 8 }} 将输入的数据结构转换为 YAML 格式字符串,并且换行后缩进 8 个空格
如果 values.yaml 中的 imagePullSecrets: [] 有值
则渲染成
    spec:
      imagePullSecrets: xx
条件判断
以 templates/hpa.yaml 为例:
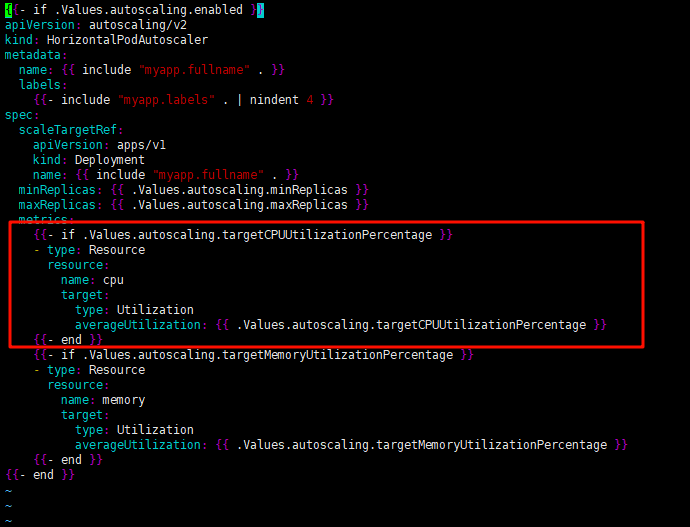
这里的if判断语法以 {{ if xxx }}开始,以最近的{{ end }}结尾
# 下面的语句就是判断.Values.autoscaling.targetCPUUtilizationPercentage是否存在,如果存在则渲染下面几行的内容

    {{- if .Values.autoscaling.targetCPUUtilizationPercentage }}
    - type: Resource
      resource:
        name: cpu
        target:
          type: Utilization
          averageUtilization: {{ .Values.autoscaling.targetCPUUtilizationPercentage }}
    {{- end }}
循环与列表处理
以 templates/ingress.yaml 为例:
这里的if判断语法以 {{ range xxx }}开始,以最近的{{ end }}结尾
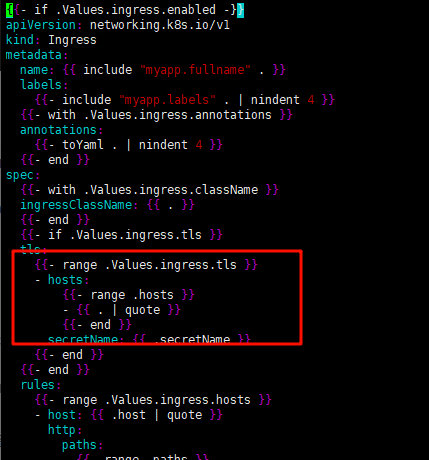
# 下面的循环是根据.Values.ingress.tls下的内容焕然出一个hosts的列表
    {{- range .Values.ingress.tls }}
    - hosts:
        {{- range .hosts }}
        - {{ . | quote }}
        {{- end }}
helm安装mysql演示
上面讲解了许多,还是以一个具体的例子来实践展示,由于helm使用的镜像都是默认从docker.io下载,国内网络可能无法访问,所以还是先下载下来演示
1.helm安装前的准备
安装之前,先通过 helm inspect values azure/mysql 命令查看安装之前需要做哪些准备。其中有一部分是关于存储的。
root@k8s-master:~/longhorn# helm inspect values azure/mysql
## mysql image version
## ref: https://hub.docker.com/r/library/mysql/tags/
....
## Persist data to a persistent volume
persistence:
  enabled: true
  ## database data Persistent Volume Storage Class
  ## If defined, storageClassName: <storageClass>
  ## If set to "-", storageClassName: "", which disables dynamic provisioning
  ## If undefined (the default) or set to null, no storageClassName spec is
  ##   set, choosing the default provisioner.  (gp2 on AWS, standard on
  ##   GKE, AWS & OpenStack)
  ##
  # storageClass: "-"
  accessMode: ReadWriteOnce
  size: 8Gi
  annotations: {}
....
上从面的内容得知,chart 定义了一个 PersistentVolumeClaim,申请 8G 的 PersistentVolume。由于我们的实验环境不支持动态供给,所以得预先创建好相应的 PV
看出来需要8G的磁盘空间。这里可以通过pv/pvc,也可以使用之前演示的longhorn。本文中就直接采用longhorn作为后端来演示。
2.手动创建pv
之前已经在k8s-node01这台服务器安装了nfs服务器,安装步骤可以看之前的pv/pvc章节。
1.创建一个新的文件夹当做mysql的挂载点
# 创建共享目录
sudo mkdir -p /data/my_mysql
sudo chmod 777 /data/my_mysql

# 配置导出规则(/etc/exports)
echo "/data/my_mysql *(rw,sync,no_subtree_check,no_root_squash)" | sudo tee -a /etc/exports

# 应用配置
sudo exportfs -a
sudo systemctl restart nfs-kernel-server
2.编写pv的yaml文件
# 查看pv.yaml
root@k8s-master:~/helm/my_mysql# cat pv.yaml
apiVersion: v1
kind: PersistentVolume
metadata:
  name: mysql-pv
spec:
  capacity:
    storage: 10Gi
  accessModes:
    - ReadWriteMany
#  storageClassName: nfs
  persistentVolumeReclaimPolicy: Retain
  nfs:
    path: /data/my_mysql
    server: 172.21.176.4
    readOnly: false


root@k8s-master:~/helm# kubectl apply -f pv.yaml
persistentvolume/mysql-pv created

# 查看创建的pv
root@k8s-master:~/helm# kubectl get pv
NAME       CAPACITY   ACCESS MODES   RECLAIM POLICY   STATUS      CLAIM   STORAGECLASS   VOLUMEATTRIBUTESCLASS   REASON   AGE
mysql-pv   10Gi       RWX            Retain           Available                          <unset>                          14s
root@k8s-master:~/helm#
3.下载并修改mysql的helm文件
下载并install
# 在线搜索mysql源
root@k8s-master:~/helm# helm search repo mysql
NAME                           	CHART VERSION	APP VERSION	DESCRIPTION
azure/mysql                    	1.6.9        	5.7.30     	DEPRECATED - Fast, reliable, scalable, and easy...

...

# 默认在线mysql安装命令
# helm install my-mysql azure/mysql  #镜像原因,国内无法拉取镜像

# 由于镜像源默认都是用的docker.io,在线安装无法拉去镜像,所以先将azure源下的mysql pull下来到本地
root@k8s-master:~/helm# helm pull azure/mysql
root@k8s-master:~/helm# ls
mysql-1.6.9.tgz

# 解压
root@k8s-master:~/helm# tar -xzvf  mysql-1.6.9.tgz
mysql/Chart.yaml
mysql/values.yaml
mysql/templates/NOTES.txt
mysql/templates/_helpers.tpl
mysql/templates/configurationFiles-configmap.yaml
mysql/templates/deployment.yaml
mysql/templates/initializationFiles-configmap.yaml
mysql/templates/pvc.yaml
mysql/templates/secrets.yaml
mysql/templates/serviceaccount.yaml
mysql/templates/servicemonitor.yaml
mysql/templates/svc.yaml
mysql/templates/tests/test-configmap.yaml
mysql/templates/tests/test.yaml
mysql/.helmignore
mysql/README.md


# 修改values.yaml中镜像地址
image: "mysql"
imageTag: "5.7.30"

busybox:
  image: "busybox"
  tag: "1.32"

======修改为======

image: "m.daocloud.io/docker.io/mysql"
imageTag: "5.7.30"

busybox:
  image: "m.daocloud.io/docker.io/busybox"
  tag: "1.32"


# 修改service部分ClusterIP改为NodePort
service:
  annotations: {}
  ## Specify a service type
  ## ref: https://kubernetes.io/docs/concepts/services-networking/service/#publishing-services---service-types
  type: ClusterIP
  port: 3306
  # nodePort: 32000
======修改为=========
service:
  annotations: {}
  ## Specify a service type
  ## ref: https://kubernetes.io/docs/concepts/services-networking/service/#publishing-services---service-types
  type: NodePort
  port: 3306
  nodePort: 32000


# helm install my-mysql mysql命令开始安装
root@k8s-master:~/helm# helm install my-mysql mysql
WARNING: This chart is deprecated
NAME: my-mysql
LAST DEPLOYED: Mon Apr  7 14:41:03 2025
NAMESPACE: default
STATUS: deployed
REVISION: 1
NOTES:
MySQL can be accessed via port 3306 on the following DNS name from within your cluster:
my-mysql.default.svc.cluster.local

To get your root password run:

    MYSQL_ROOT_PASSWORD=$(kubectl get secret --namespace default my-mysql -o jsonpath="{.data.mysql-root-password}" | base64 --decode; echo)

To connect to your database:

1. Run an Ubuntu pod that you can use as a client:

    kubectl run -i --tty ubuntu --image=ubuntu:16.04 --restart=Never -- bash -il

2. Install the mysql client:

    $ apt-get update && apt-get install mysql-client -y

3. Connect using the mysql cli, then provide your password:
    $ mysql -h my-mysql -p

To connect to your database directly from outside the K8s cluster:
    MYSQL_HOST=127.0.0.1
    MYSQL_PORT=3306

    # Execute the following command to route the connection:
    kubectl port-forward svc/my-mysql 3306

    mysql -h ${MYSQL_HOST} -P${MYSQL_PORT} -u root -p${MYSQL_ROOT_PASSWORD}


# 通过helm list 查看状态
root@k8s-master:~/helm# helm list
NAME    	NAMESPACE	REVISION	UPDATED                                	STATUS  	CHART      	APP VERSION
my-mysql	default  	1       	2025-04-08 16:42:20.457513002 +0800 CST	deployed	mysql-1.6.9	5.7.30


# 通过kubectl查看状态
root@k8s-master:~/helm# kubectl get pod
NAME                        READY   STATUS    RESTARTS   AGE
my-mysql-578494b569-8dwst   1/1     Running   0          68s
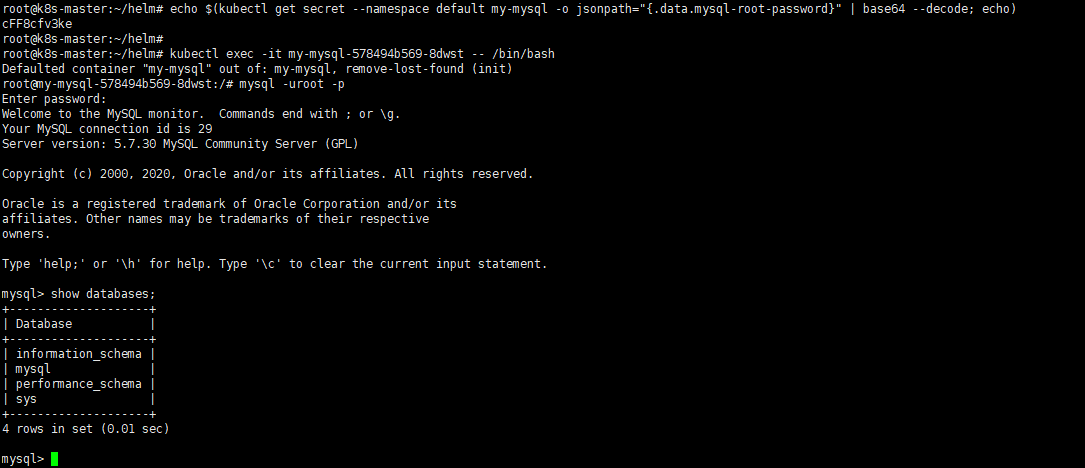
4.验证mysql
根据helm的提示查看密码
# 查看mysql密码
root@k8s-master:~/helm# echo $(kubectl get secret --namespace default my-mysql -o jsonpath="{.data.mysql-root-password}" | base64 --decode; echo)
cFF8cfv3ke


# 进入容器查看mysql状态
root@k8s-master:~/helm# kubectl exec -it my-mysql-578494b569-8dwst -- /bin/bash
Defaulted container "my-mysql" out of: my-mysql, remove-lost-found (init)
root@my-mysql-578494b569-8dwst:/# mysql -uroot -p
Enter password:
Welcome to the MySQL monitor.  Commands end with ; or \g.
Your MySQL connection id is 29
Server version: 5.7.30 MySQL Community Server (GPL)

Copyright (c) 2000, 2020, Oracle and/or its affiliates. All rights reserved.

Oracle is a registered trademark of Oracle Corporation and/or its
affiliates. Other names may be trademarks of their respective
owners.

Type 'help;' or '\h' for help. Type '\c' to clear the current input statement.

mysql> show databases;
+--------------------+
| Database           |
+--------------------+
| information_schema |
| mysql              |
| performance_schema |
| sys                |
+--------------------+
4 rows in set (0.01 sec)

mysql>
5.验证helm的渲染
在上面的例子中,修改过了镜像地址,现在通过 kubectl get deployments.apps -oyaml 命令将deployment生成yaml格式。查看刚才的values.yaml中的值是否渲染到了deployment.yaml中.
root@k8s-master:~/helm# kubectl get deployments.apps -oyaml
apiVersion: v1
items:
- apiVersion: apps/v1
  kind: Deployment
.....
          image: m.daocloud.io/docker.io/mysql:5.7.30
.....
再查看的values.yaml中的service的端口修改是否渲染到了svc.yaml中.是否渲染出了NodePort类型的32000端口
root@k8s-master:~/helm# kubectl get svc
NAME         TYPE        CLUSTER-IP      EXTERNAL-IP   PORT(S)          AGE
kubernetes   ClusterIP   10.96.0.1       <none>        443/TCP          18d
my-mysql     NodePort    10.102.63.219   <none>        3306:32000/TCP   4s


 1338
1338

 被折叠的 条评论
为什么被折叠?
被折叠的 条评论
为什么被折叠?
 到【灌水乐园】发言


