


目录
1.src/components/slideVerify.vue 前端生成验证码
2.src/layout/index.vue (新增页面)布局的入口文件
3.src/layout/components/header.vue(新增页面)页面的头部
5.src/router/routers.ts 相关路由添加修改
6.src/views/home/index.vue 修改 进入的首页,里面放些卡片内容
7.src/views/home/components/news.vue(新增页面)首页的新闻
8.src/views/home/components/actions.vue(新增页面)首页的活动
9.src/views/home/components/scrollbar.vue 滚动加载效果
10.src/views/login/index.vue(新增页面)登录的入口文件
11.src/views/login/components/login.vue(新增页面)登录页面
12.src/views/login/components/register.vue(新增页面)注册页面
13.src/views/login/components/findPassword.vue(新增页面)找回密码页面
14.src/views/login/components/imageShow.vue(新增页面)登录这几个页面的图片展示
myCommponentsStyle.css 文件内容稍作修改
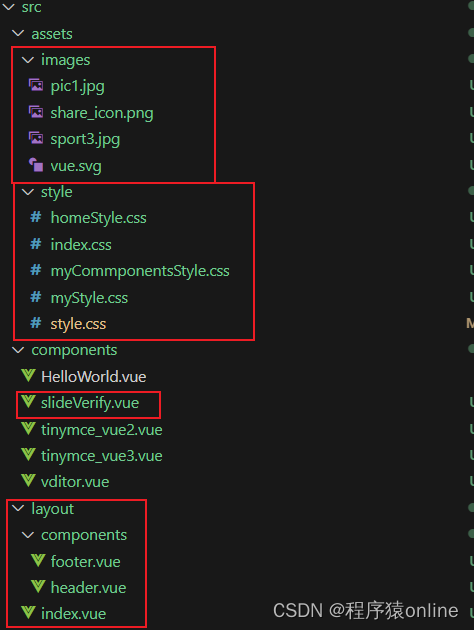
一.目录结构
这里涉及到布局,包含的功能比较多,需要新建的页面比较多,如下
圈起来的都是新增的或是有修改的,需要注意。
最后总体的目录结构

二.页面内容填写
1.src/components/slideVerify.vue 前端生成验证码
<template>
  <div class="canvas-box" :style="{ height: contentHeight + 'px' }">
    <canvas id="id-canvas" class="id-canvas" :width="contentWidth" :height="contentHeight"></canvas>
  </div>
</template>

<script setup lang="ts" name="Identify">
import { onMounted, watch } from "vue";

interface IProps {
  identifyCode?: string; // 默认注册码
  fontSizeMin?: number; // 字体最小值
  fontSizeMax?: number; // 字体最大值
  backgroundColorMin?: number; // 验证码图片背景色最小值
  backgroundColorMax?: number; // 验证码图片背景色最小值
  dotColorMin?: number; // 背景干扰点最小值
  dotColorMax?: number; // 背景干扰点最小值
  contentWidth?: number; // 容器宽度
  contentHeight?: number; // 容器高度
}
const props = withDefaults(defineProps<IProps>(), {
  identifyCode: "8888",
  fontSizeMin: 25,
  fontSizeMax: 35,
  backgroundColorMin: 200,
  backgroundColorMax: 220,
  dotColorMin: 60,
  dotColorMax: 120,
  contentWidth: 100,
  contentHeight: 40
});
// 生成一个随机数
const randomNum = (min: number, max: number) => {
  return Math.floor(Math.random() * (max - min) + min);
};

// 生成一个随机的颜色
const randomColor = (min: number, max: number) => {
  let r = randomNum(min, max);
  let g = randomNum(min, max);
  let b = randomNum(min, max);
  return "rgb(" + r + "," + g + "," + b + ")";
};

const drawPic = () => {
  let canvas = document.getElementById("id-canvas") as HTMLCanvasElement;
  let ctx = canvas.getContext("2d") as CanvasRenderingContext2D;
  ctx.textBaseline = "bottom";
  // 绘制背景
  ctx.fillStyle = "#e6ecfd";
  ctx.fillRect(0, 0, props.contentWidth, props.contentHeight);
  // 绘制文字
  for (let i = 0; i < props.identifyCode.length; i++) {
    drawText(ctx, props.identifyCode[i], i);
  }
  drawLine(ctx);
  drawDot(ctx);
};

const drawText = (ctx: CanvasRenderingContext2D, txt: string, i: number) => {
  ctx.fillStyle = randomColor(50, 160); // 随机生成字体颜色
  ctx.font = randomNum(props.fontSizeMin, props.fontSizeMax) + "px SimHei"; // 随机生成字体大小
  let x = (i + 1) * (props.contentWidth / (props.identifyCode.length + 1));
  let y = randomNum(props.fontSizeMax, props.contentHeight - 5);
  const deg = randomNum(-30, 30);
  // 修改坐标原点和旋转角度
  ctx.translate(x, y);
  ctx.rotate((deg * Math.PI) / 180);
  ctx.fillText(txt, 0, 0);
  // 恢复坐标原点和旋转角度
  ctx.rotate((-deg * Math.PI) / 180);
  ctx.translate(-x, -y);
};

const drawLine = (ctx: any) => {
  // 绘制干扰线
  for (let i = 0; i < 4; i++) {
    ctx.strokeStyle = randomColor(100, 200);
    ctx.beginPath();
    ctx.moveTo(randomNum(0, props.contentWidth), randomNum(0, props.contentHeight));
    ctx.lineTo(randomNum(0, props.contentWidth), randomNum(0, props.contentHeight));
    ctx.stroke();
  }
};

const drawDot = (ctx: any) => {
  // 绘制干扰点
  for (let i = 0; i < 30; i++) {
    ctx.fillStyle = randomColor(0, 255);
    ctx.beginPath();
    ctx.arc(randomNum(0, props.contentWidth), randomNum(0, props.contentHeight), 1, 0, 2 * Math.PI);
    ctx.fill();
  }
};

onMounted(() => {
  drawPic();
});

watch(
  () => props.identifyCode,
  val => {
    drawPic();
  }
);
</script>

<style  scoped>
.canvas-box {
  cursor: pointer;
}

.id-canvas {
  height: 100%;
}
</style>
2.src/layout/index.vue (新增页面)布局的入口文件
<template>
  <div class="layout">
    <el-affix :offset="0" class="top">
      <Header></Header>
    </el-affix>

    <router-view class="layout-main"></router-view>

    <Footer></Footer>
  </div>
</template>

<script setup lang="ts">
// 导入Vue组件
import Header from "./components/header.vue"
import Footer from "./components/footer.vue"


</script>

<style scoped>
.layout-main {
  margin: auto;
  min-height: calc(100vh - 30vh);
}
</style>
3.src/layout/components/header.vue(新增页面)页面的头部
<template>
  <div class="top1">
    <div class="header">
      <!-- 头部主体 -->
      <div class="header_layout layout_width">
        <!-- logo部分 -->
        <div class="logo">
          <div class="pic">
            <!-- <img src=""> -->
          </div>
          <div class="pic_title" @click="goPage('index')">
            <div class="title1">XXXXXXXXXXX</div>
            <div class="title2">XXX系统</div>
          </div>
        </div>
        <!-- 搜索,按钮部分 -->
        <div class="options">
          <div class="options_layout">
            <div class="search_box">
              <el-row>
                <el-input v-model="search" class="w-50 m-2" placeholder="输入查找内容" :prefix-icon="Search" />
              </el-row>
            </div>
            <div class="login_box">
              <div class="user" v-if="user.isLogin">
                <el-dropdown>
                  <span>{{ user.userName }}</span>
                  <template #dropdown>
                    <el-dropdown-menu>
                      <el-dropdown-item @click="goPage('personalSetting')">个人中心</el-dropdown-item>
                      <el-dropdown-item divided @click="goPage('logout')">退出登录</el-dropdown-item>
                    </el-dropdown-menu>
                  </template>
                </el-dropdown>
              </div>
              <div class="login" v-else>
                <el-button type="primary" @click="goPage('login')">login</el-button>
              </div>
            </div>

          </div>
        </div>

      </div>
    </div>
  </div>
</template>

<script setup lang="ts">

import { reactive, ref } from 'vue'
import { Search } from '@element-plus/icons-vue'
import router from '@/router';


const search = ref('')
const user = reactive({
  userName: "user",//后续登陆后从接口获取,储存到Cookie里获取
  isLogin: false
})
// 退出登录
const logout = (pageUrl: string) => {
  console.log('logout', pageUrl);

}
// 跳转页面首页
const goPage = (pageUrl: string) => {
  if (pageUrl === 'logout') {
    logout('index')
  } else if(pageUrl === 'login') {
    router.push({
      name: pageUrl, // 替换为目标路由的名称或路径
      query:{
        path:'login'
      }
    });
  }else {
    router.push({
      name: pageUrl, // 替换为目标路由的名称或路径
    });
  }
}

</script>

<style scoped>
/* 整体头部颜色宽度设置 */
.header {
  z-index: 9;
  background-color: rgba(17, 101, 172, 1);
  /* background: linear-gradient(rgba(17, 101, 172, 0.8), rgba(17, 101, 172, 0.5)); */
  height: 80px;
}

/* 自定义 头部内容排版样式 */
.header_layout {
  height: 80px;
  position: relative;
}

.logo,
.content,
.options {
  height: 100%;
}

.logo {
  color: rgb(255, 255, 255);
  width: 350px;
  cursor: pointer;
}

.logo .pic {
  display: inline-block;
  width: 80px;
  height: 80px;
  position: absolute;
  left: 0;
}

.logo .pic img {
  height: 80px;
}

.logo .pic_title {
  width: 250px;
  height: 80px;
}

.title1,
.title2 {
  position: absolute;
  left: 85px;
  /* 与 .logo .pic_title 的 left 值相同 */
}

.title1 {
  font-size: 26px;
  font-weight: 100;
  height: 45px;
  line-height: 45px;
}

.title2 {
  top: 45px;
  font-size: 16px;
  font-weight: 100;
  height: 35px;
  line-height: 35px;
}

.options {
  position: absolute;
  top: 0;
  right: 0;
  width: 400px;
}

.options .options_layout {
  display: flex;
  align-items: center;
  height: 100%;
}

.options .options_layout .search_box {
  flex: 3;
}

.options .options_layout .login_box {
  flex: 1;
}

.options .options_layout .login_box .login {}

.options .options_layout .login_box .user {
  border: 1px solid;
  border-radius: 50%;
  width: 50px;
  height: 50px;
  background-color: rgb(80 188 221);
  margin: auto;
  overflow: hidden;
  cursor: pointer;
}

.options .options_layout .login_box .user span {
  line-height: 50px;
  font-size: 18px;
  border: none;
  outline: none;
}

.example-showcase .el-dropdown-link {
  cursor: pointer;
  color: var(--el-color-primary);
  display: flex;
  align-items: center;
}
</style>
4.src/layout/components/footer.vue(新增页面)页面的底部
<template>
  <div class="bottom">
      <div class="bottom_layout layout_width">
          <div class="logo border_left" >
              <a href="#" target="_blank">
                  <img src="https://th.bing.com/th/id/OIP.eTqRaFtreoqlJTcC8aX5hgHaHI?rs=1&pid=ImgDetMain" alt="NCEPU">
              </a>
          </div>
          <div class="content border_left border_right">
              <p><a target="_blank" href="https://blog.csdn.net/xhc6666/category_12547285.html?spm=1001.2014.3001.5482">版权所有 © 程序猿online</a></p>
              <p>地址:XXXXXXXXXXXXXX 邮编 XXXXXX</p>
              <p>管理员信箱:2207156200@qq.com</p>
              <p>京公网安备:XXXXXXXXXXXXXXX | 京ICP备:XXXXXXX</p>
          </div>
          <div class="share border_right">
              <ul>
                  <li><a href="#"></a></li>
                  <li><a href="#" style="background-position: -35px 0;"></a></li>
                  <li><a href="#" style="background-position: -70px 0;"></a></li>
                  <li><a href="#" style="background-position: 0 -35px;"></a></li>
                  <li><a href="#" style="background-position: -35px -35px;"></a></li>
                  <li><a href="#" style="background-position: -70px -35px;"></a></li>
              </ul>
          </div>
      </div>
  </div>
</template>

<script setup lang="ts">

</script>

<style scoped>
p a{
  color: white;
}
img{
  width: 150px;
  height: 100px;
}

.bottom {
  color: rgb(255, 255, 255);
  margin-top: 20px;
  height: 130px;
  padding: 15px 0;
  background-image: linear-gradient(to bottom, rgb(20, 90, 155), rgb(15, 105, 180), rgb(17, 116, 200));
}
.bottom_layout{
  display: flex;
}
.logo{
  flex: 1;
  padding: 10px 80px;
}
.content{
  flex: 4;
  width: 500px;
  font-size: 16px;
  line-height: 28px;
  text-align: center;
}
.share{
  flex: 2;
  width: 240px;
}
.share ul{
  display: flex;
  flex-wrap: wrap;

  outline: 0;
  font-size: 100%;
  vertical-align: baseline;
  background: transparent;
  list-style: none;
}
.share li{
  flex: 0 0 33%;
  width: 80px;
  height: 60px;
  text-align: center;
}
.share a{
  display: inline-block;
  width: 30px;
  height: 30px;
  background: #ffffff url(@/assets/images/share_icon.png) no-repeat;
  background-size:100px 135px;
  border-radius:20px;
  margin: 15px 0 0 0;
}
</style>
5.src/router/routers.ts 相关路由添加修改
import { RouteRecordRaw } from 'vue-router'

const routes: Array<RouteRecordRaw> = [
  {
    path: '/',
    redirect: '/index',
    component: () => import('@/layout/index.vue'),
    children: [{
      path: 'index',
      name: 'index',
      component: () => import('@/views/home/index.vue'),
      meta: {
        title: '首页'
      }
    },
    {
      path: '/login',
      name: 'login',
      component: () => import('@/views/login/index.vue'),
      meta: {
        title: '登录',
      },
    },
    ]
  }
]
export default routes
6.src/views/home/index.vue 修改 进入的首页,里面放些卡片内容
<template>
  <div class="common-layout">
    <div class="main-layout">
      <div class="line-first">
        <div class="line-first-one">
          <newsShow></newsShow>
        </div>
        <div class="line-first-two">
          <scoreShow></scoreShow>
        </div>
      </div>
    </div>
  </div>
</template>

<script setup lang="ts">
// import Vditor from "@/components/vditor.vue"
// import Tinymce2 from "@/components/tinymce_vue2.vue" //vue2 写法
// import Tinymce3 from "@/components/tinymce_vue3.vue"
import newsShow from './components/news.vue'
import scoreShow from './components/actions.vue'
</script>

<style scoped>
.common-layout {
  height: 100%;
  overflow: hidden;
}

.line-first {
  margin-bottom: 20px;
  display: flex;
  justify-content: space-between;
}

.line-first-one {
  width: 720px;
}

.line-first-two {
  width: 520px;
}
</style>
7.src/views/home/components/news.vue(新增页面)首页的新闻
<template>
  <div class="newsShow">
    <el-card class="box-card" shadow="never">
      <div class="card-header">
        <span class="text-large">新闻动态</span>
      </div>
      <div class="my-divider-black-middle"></div>

      <div class="content">
        <div class="content-pics">
          <div v-for="o in 2" :key="o" class="pic-item" @click="goDetails">
            <img :src="state.pic">
          </div>
        </div>
        <div class="my-divider-black-middle"></div>

        <div class="content-list">
          <div class="list-item" v-for="o in 5" :key="o" @click="goDetails">
            <div class="text-middle">这是新闻标题或者摘要</div>
            <div class="text-middle date">2023-12-25</div>
          </div>
        </div>

        <div class="my-divider-grey-middle"></div>

        <div class="btn">
          <el-button class="button-more text-middle" text @click="loadMore">
            更多新闻
            <DArrowRight style="width: 1em; height: 1em; margin-right: 8px" />
          </el-button>
        </div>
      </div>


    </el-card>
  </div>
</template>

<script setup lang="ts">
// import router from '@/router';
import pic from "@/assets/images/pic1.jpg"
import { DArrowRight } from '@element-plus/icons-vue';
import { reactive } from "vue";

const state = reactive({
  pic: pic
})
// 加载更多
const loadMore = () => {
  console.log('加载更多');

  // router.push({
  //   name: '',
  //   query: {
  //     path: "",
  //   }
  // })
}
// 跳转详情页
const goDetails = () => {
  console.log('详情页');

  // router.push({
  //   name: '',
  //   query: {
  //     path: "",
  //   }
  // })
}
</script>

<style scoped>
.content {
  height: 540px;
}

.pic-item {
  transition: all 0.6s;
}

/* 鼠标移入 缩放 */
.pic-item:hover {
  transform: scale(1.1);
}
</style>
8.src/views/home/components/actions.vue(新增页面)首页的活动
<template>
  <div class="newsShow">
    <el-card class="box-card" shadow="never">
      <div class="card-header">
        <span class="text-large">活动列表</span>
      </div>
      <div class="my-divider-black-middle"></div>

      <div class="content">
        <div class="content-list">
          <Score></Score>
        </div>
      </div>
    </el-card>
  </div>
</template>

<script setup lang="ts">
import Score from "./scrollbar.vue"

</script>

<style scoped>
.box-card{
  width: 100%;
  height: 540px;
}
</style>
9.src/views/home/components/scrollbar.vue 滚动加载效果
<template>
  <div>
    <el-scrollbar height="420px" ref="scrollbarRef" @scroll.native="scroll">

      <el-table ref="multipleTable" :data="state.data" stripe style="width: 100%">
        <el-table-column prop="title" >
          <template #default="{ row }">
            <div class="clickable-text" @click="goDetails">{{ row.title }}</div>
          </template>
        </el-table-column>

      </el-table>
    </el-scrollbar>

    <div class="my-divider-grey-middle"></div>
    <div class="loadMore">
      <span>
        {{ state.loading ? '加载中...' : (state.data.length > state.total ? '已全部加载' : '加载更多...') }} </span>
    </div>
  </div>
</template>

<script setup lang="ts">
// import router from '@/router';
import { ElScrollbar, ElTable } from 'element-plus';
import { onMounted, reactive, ref } from 'vue';

const state = reactive({
  loading: false,
  total: 100,
  data: [{
    title: '这是标题,而且很长,非常非常非常长'
  }]
})
const list = {
  title: '这是标题,而且很长,非常非常非常长'
}

// 跳转详情页
const goDetails = () => {
  console.log('详情页');

  // router.push({
  //   name: '',
  //   query: {
  //     path: "",
  //   }
  // })
}

// 加载更多学生
const loadMore = () => {
  // 模拟加载更多数据的操作
  state.loading = true
  setTimeout(() => {
    if (state.data.length < state.total) {
      for (let i = 0; i < 20; i++) {
        state.data.push(list)
      }
    }
    state.loading = false
  }, 500)

};

// 滚动加载内容
const scrollbarRef = ref<InstanceType<typeof ElScrollbar>>()
const multipleTable = ref<InstanceType<typeof ElTable>>()
const lastScrollTop = ref(0); // 记录上一次滚动条的位置
const lastLoadTime = ref(0); // 记录上一次加载更多的时间戳
const loadInterval = 500; // 规定的加载更多的时间间隔
// 滚动条监听
const scroll = (target: { scrollTop: number; }) => {
  if (scrollbarRef.value && multipleTable.value?.$el) {
    const scrollbar = scrollbarRef.value.$el;
    const table = multipleTable.value.$el;
    const isAtBottom = target.scrollTop + scrollbar.clientHeight >= table.clientHeight;

    if (isAtBottom && Date.now() - lastLoadTime.value >= loadInterval) {
      lastScrollTop.value = target.scrollTop;
      // 移动滚动条到触底之前的位置
      scrollbarRef.value.scrollTo({
        top: lastScrollTop.value - 5,
        behavior: 'auto', // 使用 'auto' 表示不使用平滑滚动效果
      });
      // 记录加载更多的时间戳
      lastLoadTime.value = Date.now();
      // 加载更多数据
      loadMore();
    }
  }
};

onMounted(() => {
  loadMore()
})
</script>

<style scoped>
.clickable-text:hover {
  cursor: pointer;
  text-decoration: underline;
}
</style>
10.src/views/login/index.vue(新增页面)登录的入口文件
<template>
  <div class="loginCenter">
    <div class="left">
      <ImageShow></ImageShow>
    </div>

    <div class="right">
      <component :is="componentToShow"></component>
    </div>

  </div>
</template>

<script setup lang="ts">
import ImageShow from "./components/imageShow.vue"
import Login from "./components/login.vue"
import Register from "./components/register.vue"
import FindPasswaod from "./components/findPasswaod.vue"
import { useRoute } from "vue-router";
import {  ref, watch } from "vue";

const judgePath = (path: any) => {
  if (path === 'login') {
    return Login
  } else if (path === 'register') {
    return Register
  } else if (path === 'findPassword') {
    return FindPasswaod
  }
}

const route = useRoute()
const componentToShow = ref(judgePath(route.query.path)) // 使用 ref 进行响应式声明
watch(
  () => route.query.path,
  (newPath: any, old: any) => {
    // 当 route.query.path 发生变化时触发
    componentToShow.value = judgePath(newPath)
  }
);


</script>

<style scoped>
.loginCenter {
  width: 1250px;
  margin: auto;
  margin-top: 20px;
  display: flex;
}

.left,
.right {
  margin: auto;
}

.left {
  flex: 3;
  margin-right: 30px;
}

.right {
  flex: 2;
}
</style>
11.src/views/login/components/login.vue(新增页面)登录页面
<template>
  <div class="loginForm">
    <div class="rloginTitle">登录</div>

    <!-- 各个输入框 -->
    <el-form :model="state.formData" :rules="formRules" ref="formRef" label-width="50px">
      <el-form-item prop="username">
        <div class="formInput">
          <el-input v-model="state.formData.username" placeholder="username" clearable autocomplete="off"
            prefix-icon="User"></el-input>

        </div>
      </el-form-item>
      <el-form-item prop="password">
        <div class="formInput">

          <el-input v-model="state.formData.password" placeholder="password" type="password" show-password
            autocomplete="off" prefix-icon="Lock"></el-input>
        </div>
      </el-form-item>

      <!-- 验证码 -->
      <el-form-item>
        <div class="formInput codeLine">
          <el-input class="codeInput" @input="checkCodeFun" v-model="checkCode.code" placeholder="输入验证码" clearable
            maxlength="4" />
          <slideVerify class="codeShow" v-model:identifyCode="identifyCode" @click="refresh()"></slideVerify>
        </div>
      </el-form-item>

      <!-- 登陆界面 -->
      <el-form-item>
        <div class="formInput settings">
          <label class="labelText">
            <input type="checkbox" v-model="rem_pswd" /> 记住密码
          </label>
          <label class="labelText">
            <span @click.stop="go_page('findPassword')">忘记密码?</span>
            <span @click.stop="go_page('register')">注册</span>
          </label>

        </div>
      </el-form-item>

      <!-- 提交按钮 -->
      <el-form-item label-width="0">
        <el-button :loading="state.loading" :disabled="!checkCode.isTrue" type="primary" class="loginButton" round
          @click="handleSubmita(formRef)">登录</el-button>
      </el-form-item>


    </el-form>
  </div>
</template>

<script setup lang="ts">
import { reactive, ref } from 'vue';

const state = reactive({
  loading: false,
  formData: {
    username: "admin",
    password: "admin"
  }
})
const formRef = ref<FormInstance>(); // 创建一个 ref 来引用表单
const formRules = reactive<FormRules<typeof state.formData>>({
  username: [{ required: true, message: 'Please input activity form', trigger: 'blur' }],
  password: [{ required: true, message: 'Please input activity form', trigger: 'blur' }],
})

// 记住密码,true 或 false
const rem_pswd = ref(localStorage.getItem('rem_pswd'))

const go_page = (path:string) => {
  router.push({
    name: 'login', // 替换为目标路由的名称或路径
    query: {
      path: path
    }
  })
}

const handleSubmita = (formEl: FormInstance | undefined) => {
  if (!formEl) return
  formEl.validate((valid: any, fields: any) => {
    if (valid) {
      console.log('login');

    } else {
      console.log('error submit!', fields)
    }
  })
}


// 生成验证码以及检测
import slideVerify from "@/components/slideVerify.vue"
import { FormInstance, FormRules } from 'element-plus';
import router from '@/router';
interface CheckCodeType {
  code: string;
  isTrue: boolean;
}
const checkCode = reactive<CheckCodeType>({
  code: "",
  isTrue: false
})

// 生成随机验证码
const generateCode = () => {
  const code = ref('');
  const characters = "ABCDEFGHIJKLMNOPQRSTUVWXYZ123456789";
  for (let i = 0; i < 4; i++) {
    code.value += characters.charAt(Math.floor(Math.random() * characters.length));
  }
  return code.value;
}
// 传递 验证码给子组件
const identifyCode = ref(generateCode())
// 刷新验证码
const refresh = () => {
  identifyCode.value = generateCode()
}
// 检测输入的验证码,控制提交按钮是否可用
const checkCodeFun = (newValue: string) => {
  if ((newValue as string).toUpperCase() === identifyCode.value) {
    checkCode.isTrue = true
  } else {
    checkCode.isTrue = false
  }
}
</script>

<style scoped>
/* 可以添加一些样式 */
.loginForm {
  height: 400px;
  border: 1px solid;
  border-radius: 10px;
  text-align: center;
  background-color: #f3f3f3;
}

.loginForm .rloginTitle {
  font-size: 23px;
  margin: 5%;
}

.loginButton {
  width: 250px;
  margin: auto;
  margin-top: 20px;
}

.formInput {
  width: 80%;
  min-width: 50px;
}

.codeLine {
  display: flex;
}

.codeLine .codeInput {
  flex: 2;

}

.codeLine .codeShow {
  flex: 1;

}

.settings {
  display: flex;
  justify-content: space-between;
}

.settings label {
  flex: 1;
  font-size: 16px;
}

.settings .labelText {
  cursor: pointer;
}

.btn-base {
  width: 100%;
}

.btn-flex {
  display: flex;
  justify-content: center;
}
</style>
12.src/views/login/components/register.vue(新增页面)注册页面
<template>
  <div class="loginForm">
    <div class="rloginTitle">注册</div>

    <!-- 各个输入框 -->
    <el-form :model="state.formData" :rules="formRules" ref="formRef" label-width="50px">
      <el-form-item prop="username">
        <div class="formInput">
          <el-input v-model="state.formData.username" placeholder="username" clearable autocomplete="off"
            prefix-icon="User"></el-input>

        </div>
      </el-form-item>
      <el-form-item prop="password">
        <div class="formInput">

          <el-input v-model="state.formData.password" placeholder="password" type="password" show-password
            autocomplete="off" prefix-icon="Lock"></el-input>
        </div>
      </el-form-item>
      <el-form-item prop="password1">
        <div class="formInput">

          <el-input v-model="state.formData.password1" placeholder="password" type="password" show-password
            autocomplete="off" prefix-icon="Lock"></el-input>
        </div>
      </el-form-item>


      <!-- 找回密码界面 -->
      <el-form-item >
        <div class="formInput settings">
          <label></label>
          <label class="labelText">
            <span @click.stop="go_page('login')">去登录</span>
          </label>
        </div>
      </el-form-item>


      <!-- 提交按钮 -->
      <el-form-item label-width="0">
        <el-button :loading="state.loading" :disabled="!state.checkPassword" type="primary" class="loginButton" round
          @click="handleSubmita(formRef)">确认</el-button>
      </el-form-item>


    </el-form>
  </div>
</template>

<script setup lang="ts">
import router from '@/router';
import { FormInstance, FormRules } from 'element-plus';
import { reactive, ref } from 'vue';

const state = reactive({
  loading: false,
  formData: {
    username: "",
    password: "",
    password1: "",
  },
  checkPassword:false,
})
const formRef = ref<FormInstance>(); // 创建一个 ref 来引用表单
const formRules = reactive<FormRules<typeof state.formData>>({
  username: [{ required: true, message: 'Please input activity form', trigger: 'blur' }],
  password: [{ required: true, message: 'Please input activity form', trigger: 'blur' }],
  password1: [{ required: true, message: 'Please input activity form', trigger: 'blur' }],
})


const go_page = (path:string) => {
  router.push({
    name: 'login', // 替换为目标路由的名称或路径
    query: {
      path: path
    }
  })
}

const handleSubmita = (formEl: FormInstance | undefined) => {
  if (!formEl) return
  formEl.validate((valid: any, fields: any) => {
    if (valid) {
      console.log('login');

    } else {
      console.log('error submit!', fields)
    }
  })
}

</script>

<style scoped>
/* 可以添加一些样式 */
.loginForm {
  height: 400px;
  border: 1px solid;
  border-radius: 10px;
  text-align: center;
  background-color: #f3f3f3;
}

.loginForm .rloginTitle {
  font-size: 23px;
  margin: 5%;
}

.loginButton {
  width: 250px;
  margin: auto;
  margin-top: 20px;
}

.formInput {
  width: 80%;
  min-width: 50px;
}

.codeLine {
  display: flex;
}

.codeLine .codeInput {
  flex: 2;

}

.codeLine .codeShow {
  flex: 1;

}

.settings {
  display: flex;
  justify-content: space-between;
}

.settings label {
  flex: 1;
  font-size: 16px;
}

.settings .labelText {
  cursor: pointer;
}

.btn-base {
  width: 100%;
}

.btn-flex {
  display: flex;
  justify-content: center;
}
</style>
13.src/views/login/components/findPassword.vue(新增页面)找回密码页面
<template>
  <div class="loginForm">
    <div class="rloginTitle">找回密码</div>

    <!-- 各个输入框 -->
    <el-form :model="state.formData" :rules="formRules" ref="formRef" label-width="50px">

      <el-form-item prop="phone">
        <div class="formInput">
          <el-input v-model="state.formData.phone" placeholder="username" clearable autocomplete="off"
            prefix-icon="User"></el-input>

        </div>
      </el-form-item>
      <el-form-item prop="code">
        <div class="formInput">
          <el-input v-model="state.formData.code" placeholder="username" clearable autocomplete="off"
            prefix-icon="User"></el-input>

        </div>
      </el-form-item>


      <!-- 找回密码界面 -->
      <el-form-item >
        <div class="formInput settings">
          <label></label>
          <label class="labelText">
            <span @click.stop="go_page()">去登录</span>
          </label>
        </div>
      </el-form-item>

      <!-- 提交按钮 -->
      <el-form-item label-width="0">
        <el-button :loading="state.loading" :disabled="!state.isCode" type="primary" class="loginButton" round
          @click="handleSubmita(formRef)">确认</el-button>
      </el-form-item>


    </el-form>
  </div>
</template>

<script setup lang="ts">
import router from '@/router';
import { FormInstance, FormRules } from 'element-plus';
import { reactive, ref } from 'vue';

const state = reactive({
  loading: false,
  formData: {
    phone: "",
    code: ""
  },
  isCode:false
})
const formRef = ref<FormInstance>(); // 创建一个 ref 来引用表单
const formRules = reactive<FormRules<typeof state.formData>>({
  phone: [{ required: true, message: 'Please input activity form', trigger: 'blur' }],
  code: [{ required: true, message: 'Please input activity form', trigger: 'blur' }],
})


const go_page = () => {
  router.push({
    name: 'login', // 替换为目标路由的名称或路径
    query: {
      path: 'login'
    }
  })
}

const handleSubmita = (formEl: FormInstance | undefined) => {
  if (!formEl) return
  formEl.validate((valid: any, fields: any) => {
    if (valid) {
      console.log('findPassword');

    } else {
      console.log('error submit!', fields)
    }
  })
}

</script>

<style scoped>
/* 可以添加一些样式 */
.loginForm {
  height: 400px;
  border: 1px solid;
  border-radius: 10px;
  text-align: center;
  background-color: #f3f3f3;
}

.loginForm .rloginTitle {
  font-size: 23px;
  margin: 5%;
}

.loginButton {
  width: 250px;
  margin: auto;
  margin-top: 20px;
}

.formInput {
  width: 80%;
  min-width: 50px;
}

.codeLine {
  display: flex;
}

.codeLine .codeInput {
  flex: 2;

}

.codeLine .codeShow {
  flex: 1;

}

.settings {
  display: flex;
  justify-content: space-between;
}

.settings label {
  flex: 1;
  font-size: 16px;
}

.settings .labelText {
  cursor: pointer;
}

.btn-base {
  width: 100%;
}

.btn-flex {
  display: flex;
  justify-content: center;
}
</style>
14.src/views/login/components/imageShow.vue(新增页面)登录这几个页面的图片展示
<template>
  <div class="logo">
    <img :src="loginbg" />
  </div>
</template>

<script setup lang="ts">
import loginbg from "@/assets/images/sport3.jpg";
</script>

<style scoped>
img {
max-width: 100%;
height: 500px;
border-radius: 40px;
}

.loginCenter .logo {
margin: auto;
}
</style>
三.一些全局样式设置
说明
因为涉及到布局,所以各个页面都有一些全局的样式需要设置
可以直接添加到已经存在的 src/assets/style/style.css 文件
也可以新建一个 src/assets/style/myStyle.css 用来存放我们自己设置的全局样式
以及src/assets/style/index.css 将别的CSS文件引入到这里,然后再修改main.ts里的引入
同时,新增了一些其他样式
目录结构如下

index.css文件内容
/* 自己的CSS文件
  myStyle.css  一些全局设置
  homeStyle.css  首页相关样式
  myCommponentsStyle.css  一些自定义的样式的枚举
*/
@import url('./myStyle.css');
@import url('./homeStyle.css');
@import url('./myCommponentsStyle.css');

/* 项目搭建后自带的CSS文件 根据需求自行更改 */
@import url('./style.css');
myStyle.css文件内容
/* 网站整体所占宽度 */
.layout_width{
  width: 1250px;
  margin: 0 auto;
}
/* 主体部分布局 */
.main-layout {
  width: 1250px;
  margin: 0 auto;
  margin-top: 10px;
}

.main-layout img{
  width: 1250px;
}

/* a  标签 */
a{
  text-decoration: none;
  color: black;
}

/* 卡片 */
.box-card {
  height: 100%;
}
.box-card-list{
  min-height: 750px;
}

/* 鼠标相关样式 */
.mouse-hover-pointer:hover{
  cursor: pointer;
}
.mouse-hover-default:hover{
  cursor: default
}


/* border  相关 */
.border_left{
  border-left: 1px solid rgba(255, 255, 255, .2);
}
.border_right{
  border-right: 1px solid rgba(255, 255, 255, .2);
}
homeStyle.css 文件内容稍作修改
.card-header {
  display: flex;
  justify-content: space-between;
  align-items: center;
}

.box-card {
  width: 100%;
  height: 540px;
}

.content {}

 .content-pics {
  display: flex;
  flex-wrap: wrap;
  justify-content: space-around;
}

 .content-pics .pic-item img {
  height: 200px;
  width: 300px;
}

 .content-list {}

 .content-list .list-item {
  margin-bottom: 10px;
  display: flex;
  justify-content: space-between;
  overflow: hidden;
}
.pic-item:hover,
.list-item:hover .text-middle {
  cursor: pointer;
  text-decoration: underline;
}
.list-item:hover .text-large{
  cursor: pointer;
color: red;
}

.btn {
  display: flex;
  justify-content: end;
}

.btn .button-more {
  padding: 0;
}
style.css 文件内容稍作修改
/* 设置根元素的全局样式 */
:root {
  font-family: Inter, system-ui, Avenir, Helvetica, Arial, sans-serif;
  line-height: 1.5;
  font-weight: 400;

  color-scheme: light dark;
  color: rgba(255, 255, 255, 0.87); /* 文本颜色 */

  font-synthesis: none;
  text-rendering: optimizeLegibility;
  -webkit-font-smoothing: antialiased;
  -moz-osx-font-smoothing: grayscale;
}

/* 全局样式 */
* {
  margin: 0;
  padding: 0;
}

html,
body {
  font-size: 14px;
  padding: 0;
  margin: 0;
  height: 100%;
}

/* 主应用容器样式 */
#app {
  margin: 0 auto;
  text-align: center;
  min-width: 1250px;
  background-color: rgb(239, 239, 239);

}

/* 媒体查询,检测偏好的颜色方案为浅色时 */
@media (prefers-color-scheme: light) {
  :root {
    color: #213547; /* 浅色模式文本颜色 */
    background-color: #ffffff; /* 浅色模式背景颜色 */
  }
  a:hover {
    color: #747bff; /* 浅色模式超链接悬停颜色 */
  }
  button {
    background-color: #f9f9f9; /* 浅色模式按钮背景颜色 */
  }
}
myCommponentsStyle.css 文件内容稍作修改
/* 字体样式-大小 */
.text-large-up-26 {
  font-size: 26px;
  cursor: default;
}
.text-large-up-24 {
  font-size: 24px;
  cursor: default;
}
.text-large-up-22 {
  font-size: 22px;
  cursor: default;
}
.text-large {
  font-size: 20px;
  cursor: default;
}
.text-middle-up{
  font-size: 18px;
  cursor: default;
}
.text-middle{
  font-size: 16px;
  cursor: default;
}
.text-middle-down{
  font-size: 14px;
  cursor: default;
}
.text-small{
  font-size: 12px;
  cursor: default;
}
/* 分割线 */
.my-divider-black-large{
  width: 100%;
  border: 2px solid black;margin: 10px 0;
}
.my-divider-black-middle{
  width: 100%;
  border: 1.5px solid black;margin: 10px 0;
}
.my-divider-black-small{
  width: 100%;
  border: 1px solid black;margin: 5px 0;
}

.my-divider-grey-large{
  width: 100%;
  border: 2px solid rgb(228, 231, 237);margin: 10px 0;
}
.my-divider-grey-middle{
  width: 100%;
  border: 1.5px solid rgb(228, 231, 237);margin: 10px 0;
}
.my-divider-grey-small{
  width: 100%;
  border: 1px solid rgb(228, 231, 237);margin: 5px 0;
}
main.ts修改
import '@/assets/style/style.css'
更改为
import '@/assets/style/index.css'
四.可能需要用到的图像
footer.vue 底部使用的 /assets/images/share_icon.png

其他几张图片
pic1.jpg

sport3.jpg


 906
906


 被折叠的 条评论
为什么被折叠?
被折叠的 条评论
为什么被折叠?
 到【灌水乐园】发言


