- 编译环境:Windows和Linux都可以,我用的是Windows10和Ubuntu22.04。
- 安装环境:建议Linux,我用的是Ubuntu22.04;在Windows环境会出现更多问题,因很多依赖软件原本是在Linux环境运行的;
- Atlas版本:V2.3.0;
- 安装方式:使用BerkeleyDB和Apache Solr打包安装Apache Atlas。这种方式更适合做功能测试或演示,所以,如果在生产环境安装Atlas,本篇文章的部分内容只能用作参考。
- 安装难点:a、官方不提供现成的安装包,需要自己先编译再安装,有一点难度;b、依赖于Hadoop生态里的一些软件,也增加了难度;
- 按照网上主流声音,采用内置HBase和Solr方式安装,没成功。卡在HBase启动,折腾来折腾去死活没成功。主要在于自己没有安装Hadoop生态的经验,直接上手Atlas,遇到问题,只能死搬网上的解决方式;
一、下载源码
二、环境准备
- Jdk 1.8+
- Maven 3.5+
- Python 2.7+
三、编译Atlas
-
Atlas依赖org.restlet.jee,Maven官方仓库中没有,需要提前在本地仓库安装:
- Windows里,可以直接到Restlet官网下载,然后将jar安装到本地仓库;
- Linux里,下载和安装都通过命令完成:
wget https://download.restlet.talend.com/2.4/restlet-jee-2.4.3.zip unzip restlet-jee-2.4.3.zip cd restlet-jee-2.4.3/lib mvn install:install-file -DgroupId=org.restlet.jee -DartifactId=org.restlet -Dversion=2.4.3 -Dpackaging=jar -Dfile=org.restlet.jar mvn install:install-file -DgroupId=org.restlet.jee -DartifactId=org.restlet.ext.servlet -Dversion=2.4.3 -Dpackaging=jar -Dfile=org.restlet.ext.servlet.jar - 注意:下载的是jee版,不是默认的jse版,否则第二个jar找不到。
-
通过Maven命令编译打包项目,如果本地有HBase和Solr,可以采用第一种,否则建议采用优先级由高到低:第三种 > 第二种 > 第一种:
#cd 进入源码根目录,执行编译命令 mvn clean -DskipTests install # 方式一,不内嵌HBase和Solr,在生产环境采用,需使用本地的HBase和Solr mvn clean -DskipTests package -Pdist # 方式二,使用嵌入式 Apache HBase 和 Apache Solr 打包 Apache Atlas mvn clean -DskipTests package -Pdist,embedded-hbase-solr # 方式三,使用 BerkeleyDB 和 Apache Solr 打包 Apache Atlas mvn clean -DskipTests package -Pdist,berkeley-solr -
编译成功后,类似结果如下:
[INFO] Apache Atlas Server Build Tools .................... SUCCESS [  1.640 s]
[INFO] apache-atlas ....................................... SUCCESS [  5.569 s]
[INFO] Apache Atlas Integration ........................... SUCCESS [  5.596 s]
[INFO] Apache Atlas Test Utility Tools .................... SUCCESS [  2.472 s]
[INFO] Apache Atlas Common ................................ SUCCESS [  2.532 s]
[INFO] Apache Atlas Client ................................ SUCCESS [  0.211 s]
[INFO] atlas-client-common ................................ SUCCESS [  0.685 s]
[INFO] atlas-client-v1 .................................... SUCCESS [  1.200 s]
[INFO] Apache Atlas Server API ............................ SUCCESS [  0.824 s]
[INFO] Apache Atlas Notification .......................... SUCCESS [  5.717 s]
[INFO] atlas-client-v2 .................................... SUCCESS [  1.309 s]
[INFO] Apache Atlas Graph Database Projects ............... SUCCESS [  0.203 s]
[INFO] Apache Atlas Graph Database API .................... SUCCESS [  1.409 s]
[INFO] Graph Database Common Code ......................... SUCCESS [  1.496 s]
[INFO] Apache Atlas JanusGraph-HBase2 Module .............. SUCCESS [  1.452 s]
[INFO] Apache Atlas JanusGraph DB Impl .................... SUCCESS [01:43 min]
[INFO] Apache Atlas Graph DB Dependencies ................. SUCCESS [  1.596 s]
[INFO] Apache Atlas Authorization ......................... SUCCESS [  0.931 s]
[INFO] Apache Atlas Repository ............................ SUCCESS [ 11.452 s]
[INFO] Apache Atlas UI .................................... SUCCESS [02:43 min]
[INFO] Apache Atlas New UI ................................ SUCCESS [ 57.174 s]
[INFO] Apache Atlas Web Application ....................... SUCCESS [04:20 min]
[INFO] Apache Atlas Documentation ......................... SUCCESS [  4.282 s]
[INFO] Apache Atlas FileSystem Model ...................... SUCCESS [  2.904 s]
[INFO] Apache Atlas Plugin Classloader .................... SUCCESS [  1.139 s]
[INFO] Apache Atlas Hive Bridge Shim ...................... SUCCESS [  3.530 s]
[INFO] Apache Atlas Hive Bridge ........................... SUCCESS [  6.569 s]
[INFO] Apache Atlas Falcon Bridge Shim .................... SUCCESS [  2.495 s]
[INFO] Apache Atlas Falcon Bridge ......................... SUCCESS [  3.606 s]
[INFO] Apache Atlas Sqoop Bridge Shim ..................... SUCCESS [  0.243 s]
[INFO] Apache Atlas Sqoop Bridge .......................... SUCCESS [  4.472 s]
[INFO] Apache Atlas Storm Bridge Shim ..................... SUCCESS [  1.417 s]
[INFO] Apache Atlas Storm Bridge .......................... SUCCESS [  3.120 s]
[INFO] Apache Atlas Hbase Bridge Shim ..................... SUCCESS [  1.690 s]
[INFO] Apache Atlas Hbase Bridge .......................... SUCCESS [ 13.040 s]
[INFO] Apache HBase - Testing Util ........................ SUCCESS [  2.732 s]
[INFO] Apache Atlas Kafka Bridge .......................... SUCCESS [  3.119 s]
[INFO] Apache Atlas classification updater ................ SUCCESS [  0.960 s]
[INFO] Apache Atlas index repair tool ..................... SUCCESS [  1.650 s]
[INFO] Apache Atlas Impala Hook API ....................... SUCCESS [  0.228 s]
[INFO] Apache Atlas Impala Bridge Shim .................... SUCCESS [  0.255 s]
[INFO] Apache Atlas Impala Bridge ......................... SUCCESS [  3.157 s]
[INFO] Apache Atlas Distribution .......................... SUCCESS [  16:59 h]
[INFO] atlas-examples ..................................... SUCCESS [  0.399 s]
[INFO] sample-app ......................................... SUCCESS [  8.940 s]
[INFO] ------------------------------------------------------------------------
[INFO] BUILD SUCCESS
[INFO] ------------------------------------------------------------------------
[INFO] Total time:  17:11 h
[INFO] Finished at: 2023-06-17T03:09:37+08:00
[INFO] ------------------------------------------------------------------------
四、启动Atlas
-
在
atlas-release-2.3.0\distro\target下找到apache-atlas-2.3.0-server.tar.gz文件,复制到Atlas部署目录; -
解压安装包,准备启动:
tar -xzvf apache-atlas-2.3.0-server.tar.gz cd apache-atlas-2.3.0 -
运行Atlas,按第三种打包方式使用 BerkeleyDB 和 Apache Solr启动Apache Atlas,执行以下命令启动(注意:需要使用python2):
export MANAGE_LOCAL_SOLR=true #在Ubuntu里,直接运行,提示没有python,可指定python2运行:python2 bin/atlas_start.py bin/atlas_start.py -
执行
jps命令查看,情况如下:jps -m 31915 Atlas -app /home/uxhp/Soft/apache-atlas-2.3.0-server/apache-atlas-2.3.0/server/webapp/atlas 81343 Jps -m 31007 QuorumPeerMain /home/uxhp/Soft/apache-atlas-2.3.0-server/apache-atlas-2.3.0/zk/bin/../../conf/zookeeper/zoo.cfg -
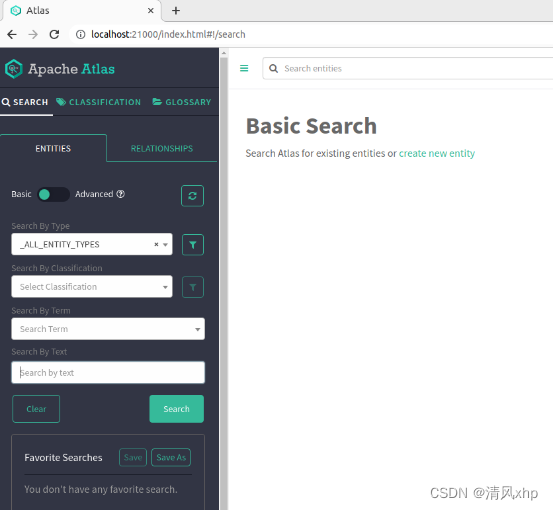
正常启动后,访问”http://localhost:21000“,可看到登陆页面,使用默认用户名/密码(admin/admin)登录进入:

-
如果采用第二种打包方式,使用内嵌的Apache HBase和Apache Solr启动Atlas,执行以下命令启动:
export MANAGE_LOCAL_HBASE=true export MANAGE_LOCAL_SOLR=true #在Ubuntu里,直接运行,提示没有python,可指定python2运行:python2 bin/atlas_start.py bin/atlas_start.py -
执行
jps查看服务启动情况,如果出现HBase和Solr并没有随atlas一起启动,可先停用Atlas后,尝试手动启动HBase和Solr,再启动Atlas,执行以下命令启动HBase和Solr(注意:该方式未验证,因为我启动HBase没成功):# 启动HBase sh hbase/bin/start-hbase.sh # 启动Solr solr/bin/solr start -c -z localhost:2181 -p 8984 -force # 启动Atlas bin/atlas_start.py -
启动后,加载官方示例模型和数据:
bin/quick_start.py # 下方输入默认用户名/密码:admin/admin Enter username for atlas :- Enter password for atlas :- bin/quick_start_v1.py # 下方输入默认用户名/密码:admin/admin Enter username for atlas :- Enter password for atlas :- -
安装工作结束,使用默认用户登录后可看到如下界面:

-
停止Atlas,运行以下命令:
# python2 bin/atlas_stop.py
bin/atlas_stop.py
五、出现的错误
-
编译过程
- 错误一,缺失jar包;原因是缺少上一步的依赖包org.restlet.jee;解决方式:安装上面步骤安装jar包,重新进行编译即可;错误详情如下:
[ERROR] Failed to execute goal on project atlas-testtools: Could not resolve dependencies for project org.apache.atlas:atlas-testtools:jar:2.3.0: Failed to collect dependencies at org.apache.solr:solr-test-framework:jar:8.6.3 -> org.restlet.jee:org.restlet:jar:2.4.3: Failed to read artifact descriptor for org.restlet.jee:org.restlet:jar:2.4.3: Could not transfer artifact org.restlet.jee:org.restlet:pom:2.4.3 from/to maven-restlet (https://maven.restlet.com): Transfer failed for https://maven.restlet.com/org/restlet/jee/org.restlet/2.4.3/org.restlet-2.4.3.pom: PKIX path validation failed: java.security.cert.CertPathValidatorException: validity check failed: NotAfter: Mon Nov 14 01:05:56 CST 2022 -> [Help 1] [ERROR] [ERROR] To see the full stack trace of the errors, re-run Maven with the -e switch. [ERROR] Re-run Maven using the -X switch to enable full debug logging. [ERROR] [ERROR] For more information about the errors and possible solutions, please read the following articles: [ERROR] [Help 1] http://cwiki.apache.org/confluence/display/MAVEN/DependencyResolutionException [ERROR] [ERROR] After correcting the problems, you can resume the build with the command [ERROR] mvn <args> -rf :atlas-testtools - 错误二,安装node失败;解决方式:手动安装node后再次执行编译命令;错误详情如下:
INFO] ------------------------------------------------------------------------
[INFO] BUILD FAILURE
[INFO] ------------------------------------------------------------------------
[INFO] Total time:  01:02 h
[INFO] Finished at: 2023-06-15T18:38:46+08:00
[INFO] ------------------------------------------------------------------------
[ERROR] Failed to execute goal com.github.eirslett:frontend-maven-plugin:1.4:install-node-and-npm (install node and npm) on project atlas-dashboardv2: Could not download Node.js: Got error code 500 from the server. -> [Help 1]
[ERROR]
[ERROR] To see the full stack trace of the errors, re-run Maven with the -e switch.
[ERROR] Re-run Maven using the -X switch to enable full debug logging.
[ERROR]
[ERROR] For more information about the errors and possible solutions, please read the following articles:
[ERROR] [Help 1] http://cwiki.apache.org/confluence/display/MAVEN/MojoFailureException
[ERROR]
[ERROR] After correcting the problems, you can resume the build with the command
[ERROR]   mvn <args> -rf :atlas-dashboardv2
- 错误一,缺失jar包;原因是缺少上一步的依赖包org.restlet.jee;解决方式:安装上面步骤安装jar包,重新进行编译即可;错误详情如下:
-
启动过程
- 错误一,找不到slor的配置文件,解决方式:按照错误描述从安装目录下将文件
apache-atlas-2.3.0\solr\server\solr\solr.xml复制到apache-atlas-2.3.0\data\solr下,然后重新运行启动命令;错误详情如下:Configured for local HBase. Starting local HBase... Local HBase started! Configured for local Solr. Starting local Solr... solr.xml doesn't exist in D:\atlas-2.3.0\apache-atlas-2.3.0\data\solr, copying from D:\atlas-2.3.0\apache-atlas-2.3.0\solr\server\solr\solr.xml Exception: [WinError 2] 系统找不到指定的文件。 Traceback (most recent call last): File "D:\atlas-2.3.0\apache-atlas-2.3.0\bin\atlas_start.py", line 173, in <module> returncode = main() ^^^^^^ File "D:\atlas-2.3.0\apache-atlas-2.3.0\bin\atlas_start.py", line 135, in main mc.run_solr(mc.solrBinDir(atlas_home), "start", mc.get_solr_zk_url(confdir), mc.solrPort(), logdir, True, mc.solrHomeDir(atlas_home)) File "D:\atlas-2.3.0\apache-atlas-2.3.0\bin\atlas_config.py", line 605, in run_solr runProcess(copyCmd, logdir, False, True) File "D:\atlas-2.3.0\apache-atlas-2.3.0\bin\atlas_config.py", line 261, in runProcess p = subprocess.Popen(commandline, stdout=stdoutFile, stderr=stderrFile, shell=shell) ^^^^^^^^^^^^^^^^^^^^^^^^^^^^^^^^^^^^^^^^^^^^^^^^^^^^^^^^^^^^^^^^^^^^^^^^^^^^^^^^ File "D:\Program Files\Python311\Lib\subprocess.py", line 1026, in __init__ self._execute_child(args, executable, preexec_fn, close_fds, File "D:\Program Files\Python311\Lib\subprocess.py", line 1538, in _execute_child hp, ht, pid, tid = _winapi.CreateProcess(executable, args, ^^^^^^^^^^^^^^^^^^^^^^^^^^^^^^^^^^^^^^^ FileNotFoundError: [WinError 2] 系统找不到指定的文件。 - 错误二,执行
jps,发现HBase和Solr并没有随Atlas一起启动,查看日志文件有如下错误;原因是HBase没启动成功,可尝试手动启动HBase:[main:] ~ Retrieve cluster id failed (ConnectionImplementation:576) java.util.concurrent.ExecutionException: org.apache.zookeeper.KeeperException$ConnectionLossException: KeeperErrorCode = ConnectionLoss for /hbase/hbaseid
- 错误一,找不到slor的配置文件,解决方式:按照错误描述从安装目录下将文件


 7188
7188


 被折叠的 条评论
为什么被折叠?


