


如有侵权,请告知,立马删除!
代码:https://github.com/qqwweee/keras-yolo3
修改yolov3.cfg文件:https://blog.csdn.net/lilai619/article/details/79695109
写文章不易,转载请表明本文出处:https://blog.csdn.net/Patrick_Lxc/article/details/80615433
本文介绍如何制作数据集、修改代码、不加载预权重从头跑自己的训练数据
一、简单回顾一下yolo原理:
1、端到端,输入图像,一次性输出每个栅格预测的一种或多种物体
2、坐标x,y代表了预测的bounding box的中心与栅格边界的相对值。
坐标w,h代表了预测的bounding box的width、height相对于整幅图像(或者栅格)width,height的比例。

3、
著作权归作者所有。商业转载请联系作者获得授权,非商业转载请注明出处。
原文: https://www.cnblogs.com/makefile/p/YOLOv3.html © 康行天下
著作权归作者所有。商业转载请联系作者获得授权,非商业转载请注明出处。
原文: https://www.cnblogs.com/makefile/p/YOLOv3.html © 康行天下
著作权归作者所有。商业转载请联系作者获得授权,非商业转载请注明出处。
原文: https://www.cnblogs.com/makefile/p/YOLOv3.html © 康行天下
著作权归作者所有。商业转载请联系作者获得授权,非商业转载请注明出处。
原文: https://www.cnblogs.com/makefile/p/YOLOv3.html © 康行天下
 ,但是最终只会输出IOU占比最高的bounding box 作为输出,所以, 一个格子只能预测一个类别。
4、
考虑各项权重:λcoord = 5, λnoobj = 0.5。因为不包含物体的框较多,需要弱化对应的权重影响,不然会导致包含物体的框贡献低,训练不稳定甚至发散。

5、如果想一个格子预测多个类别,需要Anchors. --yolo2
二、如何使用yolo3,训练自己的数据集进行目标检测
第一步:下载VOC2007数据集,把所有文件夹里面的东西删除,保留所有文件夹的名字。
像这样:

第二步:把你所有的图片都复制到JPEGImages里面
像这样:

第三步:生成Annotations下的文件
工具:LabelImg ,链接:https://pan.baidu.com/s/1GJFYcFm5Zlb-c6tIJ2N4hw 密码:h0i5
像这样:

第四步:生成ImageSets/Main/4个文件。在VOC2007下建个文件test.py,然后运行
像这样:

test.py代码:
import os
import random
trainval_percent = 0.1
train_percent = 0.9
xmlfilepath = ‘Annotations’
txtsavepath = ‘ImageSets\Main’
total_xml = os.listdir(xmlfilepath)
num = len(total_xml)
list = range(num)
tv = int(num * trainval_percent)
tr = int(tv * train_percent)
trainval = random.sample(list, tv)
train = random.sample(trainval, tr)
ftrainval = open(‘ImageSets/Main/trainval.txt’, ‘w’)
ftest = open(‘ImageSets/Main/test.txt’, ‘w’)
ftrain = open(‘ImageSets/Main/train.txt’, ‘w’)
fval = open(‘ImageSets/Main/val.txt’, ‘w’)
for i in list:
name = total_xml[i][:-4] + ‘\n’
if i in trainval:
ftrainval.write(name)
if i in train:
ftest.write(name)
else:
fval.write(name)
else:
ftrain.write(name)
ftrainval.close()
ftrain.close()
fval.close()
ftest.close()
第五步:生成yolo3所需的train.txt,val.txt,test.txt
VOC2007数据集制作完成,但是,yolo3并不直接用这个数据集,开心么?
需要的运行voc_annotation.py ,classes以三个颜色为例,你的数据集记得改

运行之后,会在主目录下多生成三个txt文件,
像这样:

 手动删除2007_,
第六步:修改参数文件yolo3.cfg
注明一下,这个文件是用于转换官网下载的.weights文件用的。训练自己的网络并不需要去管他。详见readme

IDE里直接打开cfg文件,ctrl+f搜 yolo, 总共会搜出3个含有yolo的地方,睁开你的卡姿兰大眼睛,3个yolo!!
每个地方都要改3处,filters:3*(5+len(classes));
classes: len(classes) = 3,这里以红、黄、蓝三个颜色为例
random:原来是1,显存小改为0

第七步:修改model_data下的文件,放入你的类别,coco,voc这两个文件都需要修改。
像这样:


第八步:修改代码,准备训练。代码以yolo3模型为目标,tiny_yolo不考虑。
为什么说这篇文章是从头开始训练?代码原作者在train.py做了两件事情:
1、会加载预先对coco数据集已经训练完成的yolo3权重文件,
像这样:
2、冻结了开始到最后倒数第N层(源代码为N=-2),
像这样: 
但是,你和我想训练的东西,coco里没有啊,所以,就干脆从头开始训练吧
对train.py做了一下修改,直接复制替换原文件就可以了,细节大家自己看吧,直接运行,loss达到10几的时候效果就可以了
"""

Retrain the YOLO model for your own dataset.

“”"

import numpy as np

import keras.backend as K

from keras.layers import Input, Lambda

from keras.models import Model

from keras.callbacks import TensorBoard, ModelCheckpoint, EarlyStopping
from yolo3.model import preprocess_true_boxes, yolo_body, tiny_yolo_body, yolo_loss
from yolo3.utils import get_random_data
def _main():
annotation_path = ‘train.txt’
log_dir = ‘logs/000/’
classes_path = ‘model_data/voc_classes.txt’
anchors_path = ‘model_data/yolo_anchors.txt’
class_names = get_classes(classes_path)
anchors = get_anchors(anchors_path)
input_shape = (416,416) # multiple of 32, hw
model = create_model(input_shape, anchors, len(class_names) )
train(model, annotation_path, input_shape, anchors, len(class_names), log_dir=log_dir)
def train(model, annotation_path, input_shape, anchors, num_classes, log_dir=‘logs/’):
model.compile(optimizer=‘adam’, loss={
‘yolo_loss’: lambda y_true, y_pred: y_pred})
logging = TensorBoard(log_dir=log_dir)
checkpoint = ModelCheckpoint(log_dir + “ep{epoch:03d}-loss{loss:.3f}-val_loss{val_loss:.3f}.h5”,
monitor=‘val_loss’, save_weights_only=True, save_best_only=True, period=1)
batch_size = 10
val_split = 0.1
with open(annotation_path) as f:
lines = f.readlines()
np.random.shuffle(lines)
num_val = int(len(lines)*val_split)
num_train = len(lines) - num_val
print(‘Train on {} samples, val on {} samples, with batch size {}.’.format(num_train, num_val, batch_size))
model.fit_generator(data_generator_wrap(lines[:num_train], batch_size, input_shape, anchors, num_classes),
        <span style="color:#660099;">steps_per_epoch</span>=<span style="color:#000080;">max</span>(<span style="color:#0000ff;">1</span>, num_train//batch_size),
        <span style="color:#660099;">validation_data</span>=data_generator_wrap(lines[num_train:], batch_size, input_shape, anchors, num_classes),
        <span style="color:#660099;">validation_steps</span>=<span style="color:#000080;">max</span>(<span style="color:#0000ff;">1</span>, num_val//batch_size),
        <span style="color:#660099;">epochs</span>=<span style="color:#0000ff;">500</span>,
        <span style="color:#660099;">initial_epoch</span>=<span style="color:#0000ff;">0</span>)
model.save_weights(log_dir + <span style="color:#008080;"><strong>'trained_weights.h5'</strong></span>)<span style="color:#808080;"><em>
def get_classes(classes_path):
with open(classes_path) as f:
class_names = f.readlines()
class_names = [c.strip() for c in class_names]
return class_names
def get_anchors(anchors_path):
with open(anchors_path) as f:
anchors = f.readline()
anchors = [float(x) for x in anchors.split(’,’)]
return np.array(anchors).reshape(-1, 2)
def create_model(input_shape, anchors, num_classes, load_pretrained=False, freeze_body=False,
weights_path=‘model_data/yolo_weights.h5’):
K.clear_session() # get a new session
image_input = Input(shape=(None, None, 3))
h, w = input_shape
num_anchors = len(anchors)
y_true = [Input(shape=(h//{0:32, 1:16, 2:8}[l], w//{0:32, 1:16, 2:8}[l],
num_anchors//3, num_classes+5)) for l in range(3)]
model_body = yolo_body(image_input, num_anchors//<span style="color:#0000ff;">3</span>, num_classes)
<span style="color:#000080;">print</span>(<span style="color:#008080;"><strong>'Create YOLOv3 model with {} anchors and {} classes.'</strong></span>.format(num_anchors, num_classes))

<span style="color:#000080;"><strong>if </strong></span>load_pretrained:
    model_body.load_weights(weights_path, <span style="color:#660099;">by_name</span>=<span style="color:#000080;"><strong>True</strong></span>, <span style="color:#660099;">skip_mismatch</span>=<span style="color:#000080;"><strong>True</strong></span>)
    <span style="color:#000080;">print</span>(<span style="color:#008080;"><strong>'Load weights {}.'</strong></span>.format(weights_path))
    <span style="color:#000080;"><strong>if </strong></span>freeze_body:
        <span style="color:#808080;"><em># Do not freeze 3 output layers.
num = len(model_body.layers)-7
for i in range(num): model_body.layers[i].trainable = False
print(‘Freeze the first {} layers of total {} layers.’.format(num, len(model_body.layers)))
model_loss = Lambda(yolo_loss, <span style="color:#660099;">output_shape</span>=(<span style="color:#0000ff;">1</span>,), <span style="color:#660099;">name</span>=<span style="color:#008080;"><strong>'yolo_loss'</strong></span>,
    <span style="color:#660099;">arguments</span>={<span style="color:#008080;"><strong>'anchors'</strong></span>: anchors, <span style="color:#008080;"><strong>'num_classes'</strong></span>: num_classes, <span style="color:#008080;"><strong>'ignore_thresh'</strong></span>: <span style="color:#0000ff;">0.5</span>})(
    [*model_body.output, *y_true])
model = Model([model_body.input, *y_true], model_loss)
<span style="color:#000080;"><strong>return </strong></span>model
def data_generator(annotation_lines, batch_size, input_shape, anchors, num_classes):
n = len(annotation_lines)
np.random.shuffle(annotation_lines)
i = 0
while True:
image_data = []
box_data = []
for b in range(batch_size):
i %= n
image, box = get_random_data(annotation_lines[i], input_shape, random=True)
image_data.append(image)
box_data.append(box)
i += 1
image_data = np.array(image_data)
box_data = np.array(box_data)
y_true = preprocess_true_boxes(box_data, input_shape, anchors, num_classes)
yield [image_data, *y_true], np.zeros(batch_size)
def data_generator_wrap(annotation_lines, batch_size, input_shape, anchors, num_classes):
n = len(annotation_lines)
if n==0 or batch_size<=0: return None
return data_generator(annotation_lines, batch_size, input_shape, anchors, num_classes)
if name == ‘main’:
_main()
第九步:预测图片。修改了yolo.py下的预测图片的函数,将检测的图片都储存在了outdir里
’’’

def detect_img(yolo):

    while True:

        img = input(‘Input image filename:’)

        try:

            image = Image.open(img)

        except:

            print(‘Open Error! Try again!’)

            continue

        else:

            r_image = yolo.detect_image(image)

            r_image.show()

    yolo.close_session()

‘’’

import glob

def detect_img(yolo):

path = “D:</strong>VOCdevkit\VOC2007\JPEGImages*.jpg”

    outdir = “D:</strong>\VOCdevkit\VOC2007\SegmentationClass”

    for jpgfile in glob.glob(path):

img = Image.open(jpgfile)

img = yolo.detect_image(img)

img.save(os.path.join(outdir, os.path.basename(jpgfile)))

yolo.close_session()
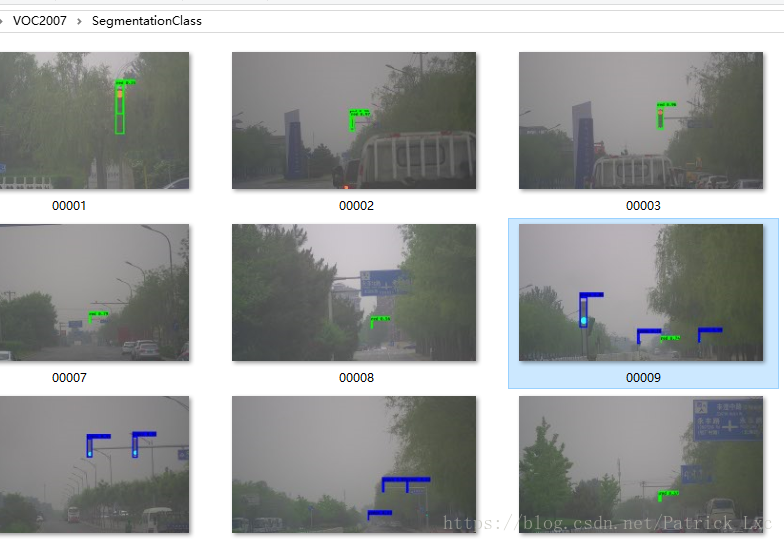
最终效果图:红绿灯检测,100张图片作为训练集

明天写yolo2和yolo3的具体原理。
先声明一下,quick start的步骤:
1、Download YOLOv3 weights from YOLO website.
2、Convert the Darknet YOLO model to a Keras model.(因为官网给出的是darknet的权重文件,所以需要转换成Keras需要的形式)
3、Run YOLO detection.
依次对应:
1、wget https://pjreddie.com/media/files/yolov3.weights
2、python convert.py yolov3.cfg yolov3.weights model_data/yolo.h5
3、python yolo.py OR python yolo_video.py [video_path] [output_path(optional)]
理解以上的步骤之后,回答您的问题:
对于已经存在于coco数据集80个种类之中的一类,就不要自己训练了,官网权重训练的很好了已经;
对于不存在coco数据集的一种,无视convert.py, 无视.cfg文件,不要预加载官方权重,直接用我的train.py代码进行训练就可以了。你预加载官方权重,再去训练一个全新的物种,个人认为是浪费资源完全没意义的


 930
930

 被折叠的 条评论
为什么被折叠?
被折叠的 条评论
为什么被折叠?
 到【灌水乐园】发言


