


SSM主要分为spring,spring-mvc ,mybatis(或mybatis-plus)为了清晰明白每一层的主要作用,在搭建项目时,每一层都要有自己的配置文件。基于maven项目构建工具搭建。
创建项目
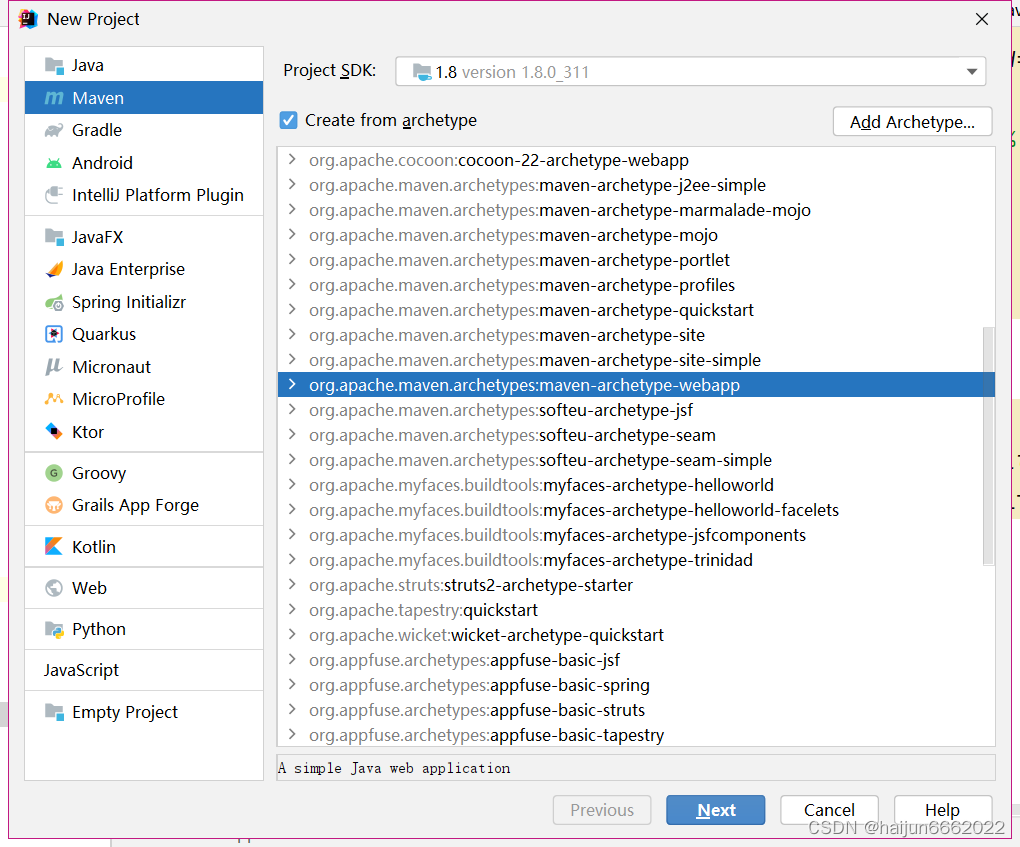
这一块的webapp尽量勾选上,然后下一步就创建完成。直接下一步
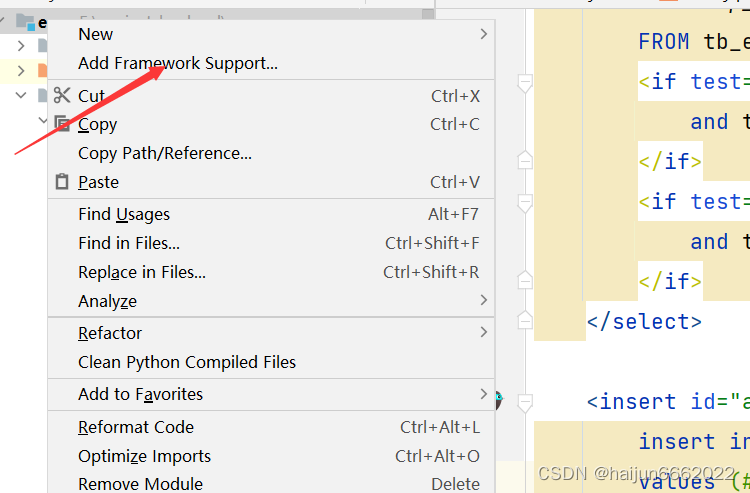
如果忘了没勾选,项目创建好之后可以添加如下图:鼠标右键项目名字点击Add Framework Support
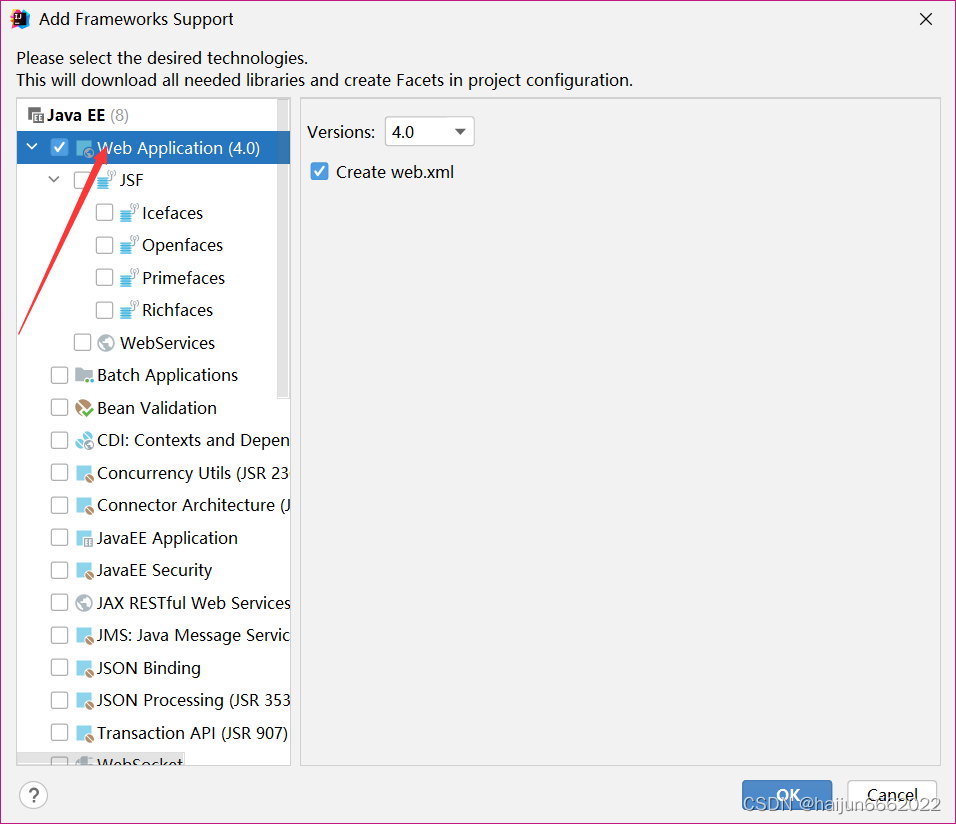
勾选上即可
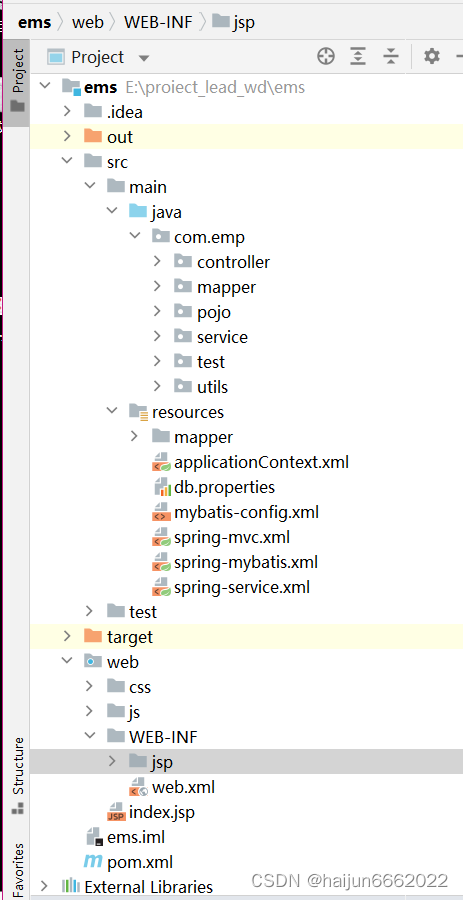
完成之后项目结构如下,包和配置文件先自己创建出来 resources下面的mapper文件夹用来放mapper接口的映射文件这样就不用配置包扫描了
添加依赖
pom.xml添加所需依赖
 <dependencies>
        <dependency>
            <groupId>org.springframework</groupId>
            <artifactId>spring-webmvc</artifactId>
            <version>5.2.6.RELEASE</version>
        </dependency>
        <dependency>
            <groupId>org.mybatis</groupId>
            <artifactId>mybatis</artifactId>
            <version>3.5.9</version>
        </dependency>
        <dependency>
            <groupId>mysql</groupId>
            <artifactId>mysql-connector-java</artifactId>
            <version>8.0.25</version>
        </dependency>
        <dependency>
            <groupId>com.alibaba</groupId>
            <artifactId>druid</artifactId>
            <version>1.2.6</version>
        </dependency>
        <dependency>
            <groupId>org.mybatis</groupId>
            <artifactId>mybatis-spring</artifactId>
            <version>2.0.6</version>
        </dependency>
        <dependency>
            <groupId>org.springframework</groupId>
            <artifactId>spring-jdbc</artifactId>
            <version>5.3.12</version>
        </dependency>
整合mybatis
数据库的信息文件 db.properties
jdbc.driver=com.mysql.cj.jdbc.Driver
jdbc.url=jdbc:mysql://localhost:3306/employee?serverTimezone=UTC
jdbc.username=root
jdbc.password=****
mybatis核心配置文件 mybatis-config.xml
<?xml version="1.0" encoding="UTF-8" ?>
<!DOCTYPE configuration
        PUBLIC "-//mybatis.org//DTD Config 3.0//EN"
        "http://mybatis.org/dtd/mybatis-3-config.dtd">
<configuration>

    <!--    控制台打印日志-->
    <settings>
        <setting name="logImpl" value="org.apache.ibatis.logging.stdout.StdOutImpl"/>
    </settings>
    <!--    别名-->
    <!--    <typeAliases>-->
    <!--        <package name="domain.Books" />-->
    <!--    </typeAliases>-->
</configuration>
spring整合mybatis spring-mybatis.xml
<?xml version="1.0" encoding="UTF-8"?>
<beans xmlns="http://www.springframework.org/schema/beans"
       xmlns:xsi="http://www.w3.org/2001/XMLSchema-instance"
       xmlns:context="http://www.springframework.org/schema/context"
       xsi:schemaLocation="http://www.springframework.org/schema/beans
                           http://www.springframework.org/schema/beans/spring-beans.xsd
                           http://www.springframework.org/schema/context
                           https://www.springframework.org/schema/context/spring-context.xsd">
    <!-- 配置整合mybatis -->
    <!-- 1.关联数据库文件 -->
    <context:property-placeholder location="classpath:db.properties"/>
    <!-- 2.数据库连接池 -->
    <bean id="dataSource" class="com.alibaba.druid.pool.DruidDataSource">
        <!--连接池基本属性-->
        <property name="driverClassName" value="${jdbc.driver}"/>
        <property name="url" value="${jdbc.url}"/>
        <property name="username" value="${jdbc.username}"/>
        <property name="password" value="${jdbc.password}"/>
        <!--其他属性-->
        <property name="maxActive" value="20"/>
        <property name="maxWait" value="9000"/>
    </bean>
    <!-- 3.配置SqlSessionFactory对象 -->
    <bean id="sqlSessionFactory" class="org.mybatis.spring.SqlSessionFactoryBean">
        <!-- 注入数据库连接池 -->
        <property name="dataSource" ref="dataSource"/>
        <!-- 配置MyBaties全局配置文件:mybatis-config.xml -->
        <property name="configLocation" value="classpath:mybatis-config.xml"/>
        <property name="mapperLocations" value="classpath:mapper/*.xml"></property>
    </bean>
    <!-- 4.配置扫描Dao接口包,动态实现mapper接口注入到spring容器中 -->
    <bean class="org.mybatis.spring.mapper.MapperScannerConfigurer">
        <property name="sqlSessionFactoryBeanName" value="sqlSessionFactory"/>
        <property name="basePackage" value="com.emp.mapper"/>
    </bean>
</beans>
整合MVC层
spring-mvc.xml
<?xml version="1.0" encoding="UTF-8"?>
<beans xmlns="http://www.springframework.org/schema/beans"
       xmlns:xsi="http://www.w3.org/2001/XMLSchema-instance"
       xmlns:context="http://www.springframework.org/schema/context"
       xmlns:mvc="http://www.springframework.org/schema/mvc"
       xsi:schemaLocation="http://www.springframework.org/schema/beans
   http://www.springframework.org/schema/beans/spring-beans.xsd
   http://www.springframework.org/schema/context
   http://www.springframework.org/schema/context/spring-context.xsd
   http://www.springframework.org/schema/mvc
   https://www.springframework.org/schema/mvc/spring-mvc.xsd">
    <!-- 配置SpringMVC -->
    <!-- 1.开启SpringMVC注解驱动 -->
    <mvc:annotation-driven/>
    <!-- 2.静态资源默认servlet配置-->
    <mvc:default-servlet-handler/>
    <context:component-scan base-package="com.emp.controller"/>
    <!-- 3.配置jsp 显示ViewResolver视图解析器 -->
    <bean class="org.springframework.web.servlet.view.InternalResourceViewResolver">
        <property name="prefix" value="/WEB-INF/jsp/"/>
        <property name="suffix" value=".jsp"/>
    </bean>

</beans>
Service层
这一层单独出来一个配置文件主要是为了后面业务需要去配置一些事务,日志等等。
spring-service.xml
<?xml version="1.0" encoding="UTF-8"?>
<beans xmlns="http://www.springframework.org/schema/beans"
       xmlns:xsi="http://www.w3.org/2001/XMLSchema-instance"
       xmlns:context="http://www.springframework.org/schema/context"
       xsi:schemaLocation="http://www.springframework.org/schema/beans
   http://www.springframework.org/schema/beans/spring-beans.xsd
   http://www.springframework.org/schema/context
   http://www.springframework.org/schema/context/spring-context.xsd">
    <!--开启service注解-->
    <context:component-scan base-package="com.emp.service"/>
</beans>
最后大整合
配制文件汇总到applicationContext.xml
<?xml version="1.0" encoding="UTF-8"?>
<beans xmlns="http://www.springframework.org/schema/beans"
       xmlns:xsi="http://www.w3.org/2001/XMLSchema-instance"
       xsi:schemaLocation="http://www.springframework.org/schema/beans http://www.springframework.org/schema/beans/spring-beans.xsd">
    <import resource="spring-mvc.xml"/>
    <import resource="spring-mybatis.xml"/>
    <import resource="spring-service.xml"/>
</beans>
最后一步 web.xml
<?xml version="1.0" encoding="UTF-8"?>
<web-app xmlns="http://xmlns.jcp.org/xml/ns/javaee"
         xmlns:xsi="http://www.w3.org/2001/XMLSchema-instance"
         xsi:schemaLocation="http://xmlns.jcp.org/xml/ns/javaee http://xmlns.jcp.org/xml/ns/javaee/web-app_4_0.xsd"
         version="4.0">
    <!--DispatcherServlet-->
    <servlet>
        <servlet-name>dispatcherServlet</servlet-name>
        <servlet-class>org.springframework.web.servlet.DispatcherServlet</servlet-class>
        <init-param>
            <param-name>contextConfigLocation</param-name>
            <param-value>classpath:applicationContext.xml</param-value>
        </init-param>
        <load-on-startup>1</load-on-startup>
    </servlet>

    <servlet-mapping>
        <servlet-name>dispatcherServlet</servlet-name>
        <url-pattern>/</url-pattern>
    </servlet-mapping>
</web-app>
至此SSM就整合完毕了,
第一步创建项目的时候如果勾选了webapp的话现在就可以写测试 开始测试了。
如果没勾选,是项目创建好之后才添加的,要进行下面的操作,不然会报404


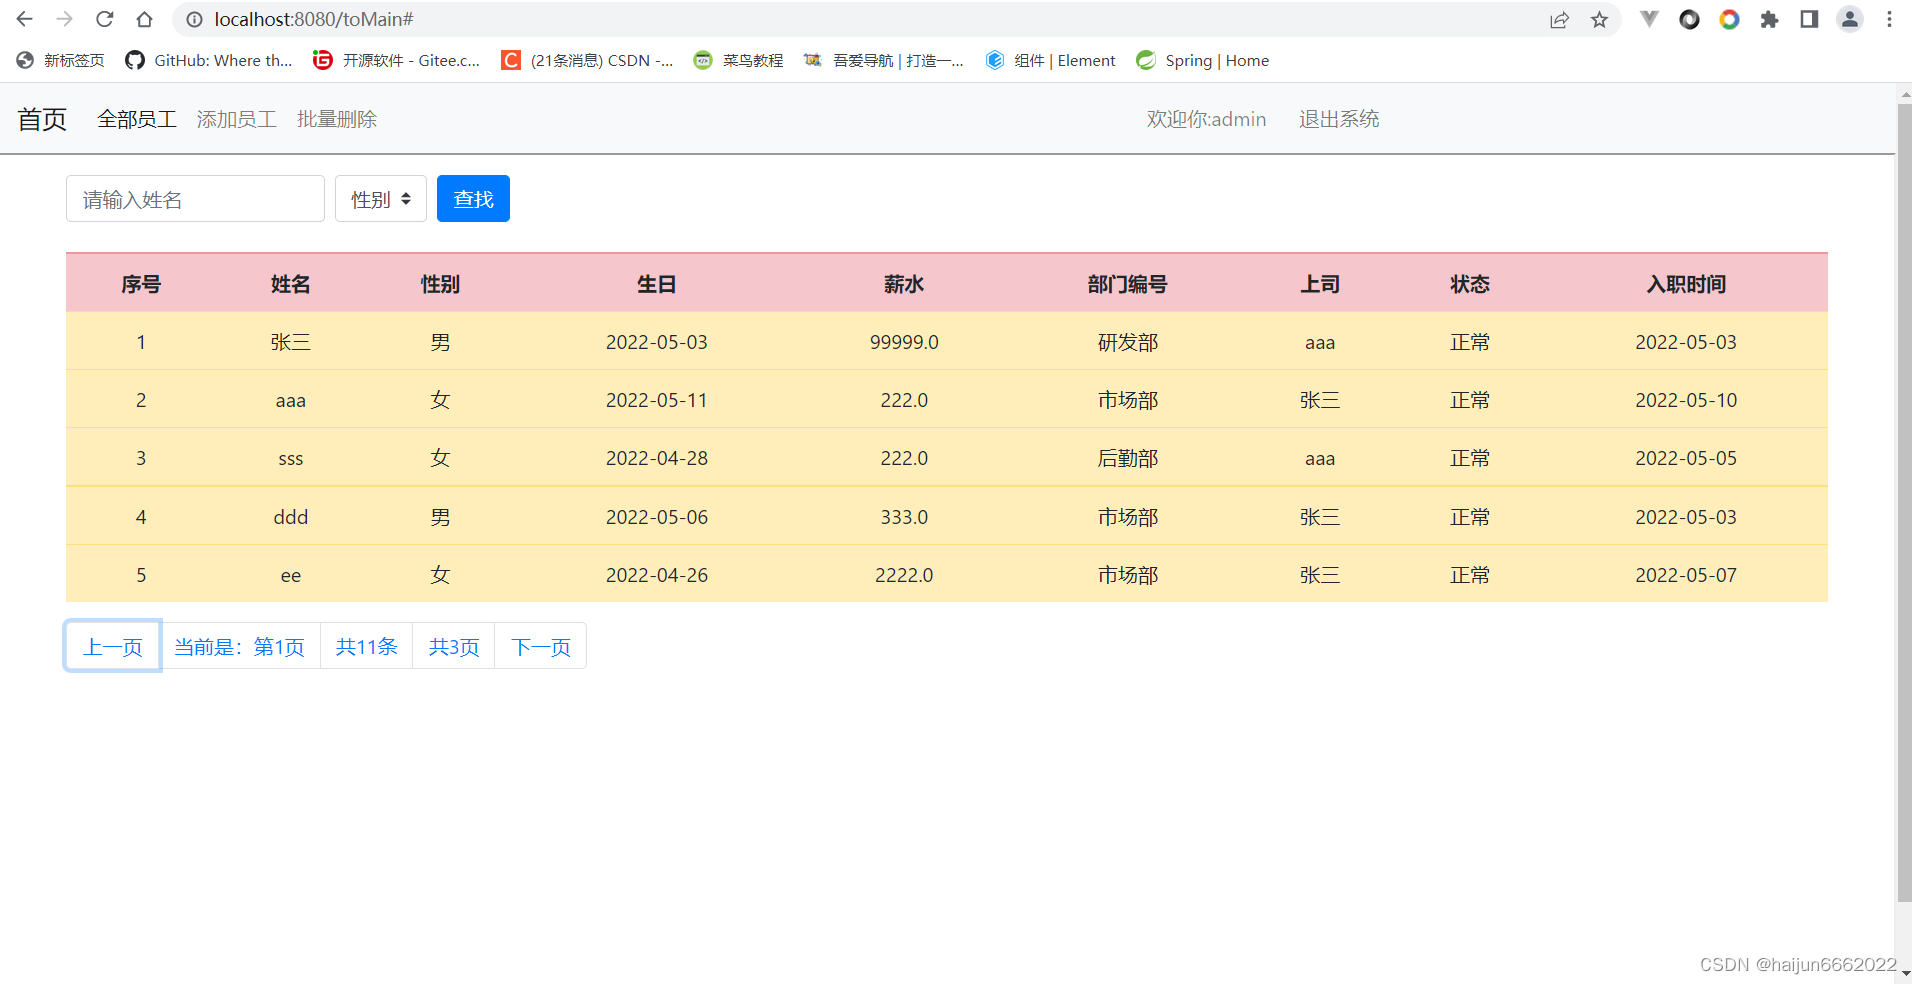
搭建好之后写了一个小demo 效果如下 如果有兴趣可以导入 gitee地址
demo地址


 5160
5160


 被折叠的 条评论
为什么被折叠?
被折叠的 条评论
为什么被折叠?
 到【灌水乐园】发言


