


 本文通过实例介绍C++中工厂模式的基本概念与实现方法,包括抽象产品、具体产品、抽象创建者及具体创建者的定义与作用。
Introduction
This article aims at understanding the Factory Pattern and a basic implementation of Factory pattern in C++.
Background
There are many scenarios when a class needs to create several objects. The class can do so freely but it has to know about each and every class. There is a possibility that the class can't anticipate all the objects it needs to create. The second scenario could be that the class wants to delegate the responsibility of creating the objects to its subclasses or perhaps some helper functions.
If we have any of the above mentioned scenarios, we can have the Factory pattern. The idea of the factory pattern is to have the classes ability to create other classes without them knowing about all the possible classes that exists. This gives us extensibility. With factory pattern, we get the possibility of creating, maintaining and manipulating a collection of different objects that have some common characteristics. The main use of this pattern is in classes that manage a lot of objects like Document Manager, Control manager, Facility Manager.
GOF defines factory pattern as "Define an interface for creating an object, but let subclasses decide which class to instantiate. Factory pattern lets a class defer instantiation to subclasses".
Using the Code
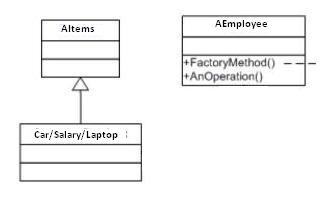
Let us now look at the UML diagram borrowed straight from GOFs book:

Let us try to see what each of these classes represents:
Product: defines the interface of objects the factory pattern createsConcreteProduct: implements theProductinterfaceCreator: declares the factory method, which returns an object of typeProductConcreteCreator: overrides the factory method to return an instance of aConcreteProduct
Now what we have tried to do in our small exercise is that we have created a system that will manage the receivable for different type of employees, i.e.,Manager, Engineer etc. so let's go ahead and look at our implementation of the factory pattern.
Creating the Abstract Product
First of all, we need to define an abstract class that will define the common interface to different type of items available to the employees. These items could be physical receivables likeCars, CellPhones or virtual receivables like insurance.
class AItems
{
    std::string name;
public:
    AItems(std::string n)
        :name(n)
    {

    }

    //This method is for testing only
    std::string GetName()
    {
        return name;
    }
};
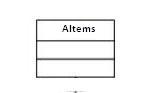
What we have done here is that we have created the abstract Product class that we saw in the diagram. So if we map our implementation now with the GOFs diagram, we have the following classes ready:
Creating the Concrete Products
Now we need to create the real Items (receivables) that the employees can get. We have the interface for the receivables ready so what we need to do now is to use this interface to create the Items that the company offers to its employees.
//Lets declare all the concrete ITEMS
class Car : public AItems
{
public: Car()
        :AItems("Car"){}
};

class CellPhone :public  AItems
{
public: CellPhone()
        :AItems("CellPhone"){}
};

class Computer : public AItems
{
public: Computer()
        :AItems("Computer"){}
};

class LapTop : public AItems
{
public: LapTop()
        :AItems("LapTop"){}
};

class MotorBike : public AItems
{
public: MotorBike()
        :AItems("MotorBike"){}
};

class EntertainmentAllowance : public AItems
{
public: EntertainmentAllowance()
        :AItems("EntertainmentAllowance"){}
};

class TravelAllowance : public AItems
{
public: TravelAllowance()
        :AItems("TravelAllowance"){}
};
class Salary : public AItems
{
public: Salary()
        :AItems("Salary"){}
};

class Incentives : public AItems
{
public: Incentives()
        :AItems("Incentives"){}
};
What we have done here is that we have created the ConcreteProduct class that we saw in the diagram. So if we map our implementation now with the GOFs diagram:

Creating the Abstract Creator
Now we need the abstract class that will have the functionality common to all theEmployees. All the employees are entitled to get some items so this class will provide the functionality to add or remove the items for the particular type ofemployee.
//Header File
class AEmployee
{
public:
    std::vector<AItems> benefits;
    enum EMP_TYPE
    {
        ENGINEER,
        MANAGER
    };

    void CreateAndAddBenefit(AItems ben);

    void PrintBenefits();

    static AEmployee* CreateEmployee(EMP_TYPE empType);
};

//CPP File
AEmployee* AEmployee::CreateEmployee(EMP_TYPE empType)
{
    if(empType == EMP_TYPE::ENGINEER)
    {
        return new Engineer();
    }
    else if(empType == EMP_TYPE::MANAGER)
    {
        return new Manager();
    }
}

void AEmployee::CreateAndAddBenefit(AItems ben)
{
    benefits.push_back(ben);
}

void AEmployee::PrintBenefits()
{
    for(std::vector<AItems>::iterator iter = benefits.begin();
        iter != benefits.end(); ++iter)
    {
        std::cout << (*iter).GetName() << "\n";
    }
}
What we have done here is that we have created the Creator class that we saw in the diagram. So if we map our implementation now with the GOFs diagram:
Creating the Concrete Creators
Now we need the specialization of AEmployee class. These classes will represent the type ofemployees that could exist in the organization.
//Header File
class Manager : public AEmployee
{
public:
    Manager(void);

};

class Engineer : public AEmployee
{
public:
    Engineer(void);
};

//CPP File
Manager::Manager(void)
{
    CreateAndAddBenefit(Car());
    CreateAndAddBenefit(CellPhone());
    CreateAndAddBenefit(LapTop());
    CreateAndAddBenefit(EntertainmentAllowance());
    CreateAndAddBenefit(TravelAllowance());
    CreateAndAddBenefit(Salary());
    CreateAndAddBenefit(Incentives());
}

Engineer::Engineer(void)
{
    CreateAndAddBenefit(Computer());
    CreateAndAddBenefit(MotorBike());
    CreateAndAddBenefit(TravelAllowance());
    CreateAndAddBenefit(Salary());
}
Finally, what we did is to create the ConcreteCreator class that we saw in the diagram. So let's map our implementation now with the GOFs one last time:

Testing the Application
Now let's test the application and see how we can create the various employees and see the receivables they are entitled for.
int main(int argc, char* argv[])
{
    AEmployee *emp = AEmployee::CreateEmployee(AEmployee::EMP_TYPE::MANAGER);
    cout << "Recievables for Manager:\n";
    emp->PrintBenefits();

    getchar();
    delete emp;

    emp = AEmployee::CreateEmployee(AEmployee::EMP_TYPE::ENGINEER);
    cout << "Recievables for Engineer:\n";
    emp->PrintBenefits();

    getchar();
    delete emp;
    return 0;
}
Points of Interest
The major benefit of using the factory pattern is that there is no need for the client code to know the application specific classes. There could be more than a 100 type ofItems in our particular example and the client code still doesn't have to know about any one of them. The client code can simply use the factory to create and use the appropriate type.
This article covers the basics of Factory Pattern and provides a basic implementation in C++. I have a similar implementation for the same pattern in C# too. Let's now just try to find its applicability.
Use the Factory pattern when:
- A class can't anticipate the class of objects it must create.
- A class wants its subclasses to specify the objects it creates.
- Classes delegate responsibility to one of several helper subclasses, and you want to localize the knowledge of which helper subclass is the delegate.


 被折叠的 条评论
为什么被折叠?
被折叠的 条评论
为什么被折叠?
 到【灌水乐园】发言


