


1、LinearLayout
下面介绍LinearLayout的几个基本属性:
1.1 layout_gravity
前面介绍了gravity的属性是控制控件内文字的对齐方式,layout_gravity则指定了该控件相对于父控件的对齐方式。和orientation一样,它也分垂直和水平方向。但是,垂直方向的对齐只有在orientation为horizontal的时候才生效,因为在水平方向的位置是会随着控件的变化而变化,不确定的。
<?xml version="1.0" encoding="utf-8"?><LinearLayout xmlns:android="http://schemas.android.com/apk/res/android"
    android:layout_width="match_parent"
    android:layout_height="match_parent"
    android:orientation="horizontal" >

    <Button
        android:id="@+id/button1"
        android:layout_width="wrap_content"
        android:layout_height="wrap_content"
        android:layout_gravity="top"
        android:text="Button 1" />
    <Button
        android:id="@+id/button2"
        android:layout_width="wrap_content"
        android:layout_height="wrap_content"
        android:layout_gravity="center_vertical"
        android:text="Button 2" />
    <Button
        android:id="@+id/button3"
        android:layout_width="wrap_content"
        android:layout_height="wrap_content"
        android:layout_gravity="bottom"
        android:text="Button 3" />

</LinearLayout>
1.2 android:layout_weight
这个可以说是控制控件大小的非常重要的属性。它控制控件宽度的计算公式为:原来的宽度+剩余宽度*所占比例。下面通过例子来说明:
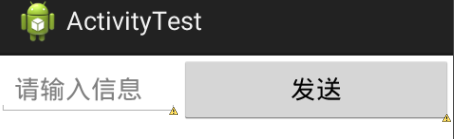
一个信息发送界面一般包括一个文本编辑框和一个发送按钮:
<?xml version="1.0" encoding="utf-8"?>
<LinearLayout xmlns:android="http://schemas.android.com/apk/res/android"
    android:layout_width="match_parent"
    android:layout_height="match_parent"
    android:orientation="horizontal" >

    <EditText android:layout_width="0dp"
        android:layout_height="wrap_content"
        android:layout_weight="1"
        android:hint="请输入信息"/>

    <Button android:layout_width="0dp"
        android:layout_height="wrap_content"
        android:layout_weight="1"
        android:text="发送"/>

</LinearLayout>
因为两者的宽度一开始都为0,所以它们的原有宽度都为0,假设屏幕的宽度为L,剩余宽度就是L,然后各自占有的比例都是1/2,所以最后的效果就是两个控件各占一般的屏幕宽度。
现在把weight调整,EditText为2,Button为3,效果如下:
这是因为EditText的权重变成了2/5,Button变成了3/5,权重大的所占宽度就大。
但是如果我把两个的layout_width都设置成match_parent,又会怎样?

两者最后占的宽度刚好反过来了!我们根据公式算一遍就知道为什么了:首先两者所占宽度都为L(因为是match_parent),所以剩余宽度为L-L-L=-L,然后EditText的权重是2/5,所以最终的宽度为L+(-L)*3/5=2L/5,Button的最终宽度为L+(-L)*2/5=3L/5。发现权重大的,最后的宽度反而更小!
所以当使用layout_weight来控制控件的宽度时,最好将layout_width设置为0dp,这样宽度才是和权重成正比。
更好的效果的实现:button可以不用很大,所以设置它的宽度为wrap_content,然后EditText的权重为1,效果如下:
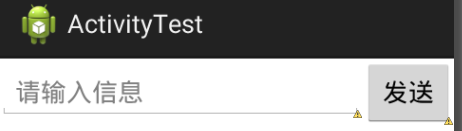
这样看起来是不是更舒服一些呢?
2、RelativeLayout
这个布局和线性布局相比更加随意,因为每一个控件的位置都和其他某些控件有相对的位置关系。所以相对布局可用的属性非常多。
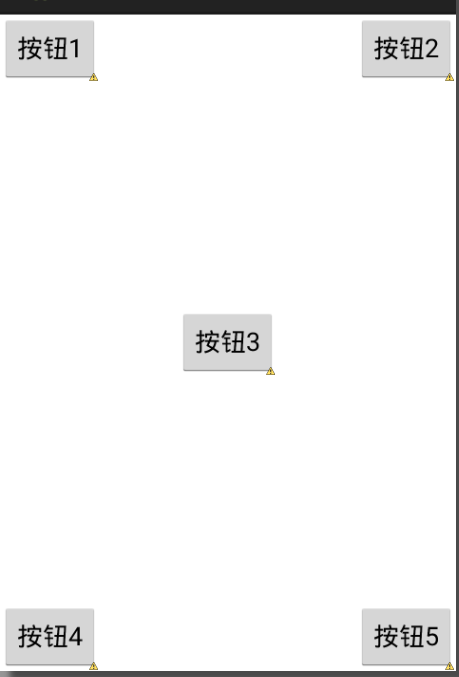
下面这个例子定义了5个button,然后它们和整个RelativeLayout都有相对位置关系:
<?xml version="1.0" encoding="utf-8"?>
<RelativeLayout android:layout_width="match_parent"
    android:layout_height="match_parent"
    xmlns:android="http://schemas.android.com/apk/res/android">
    <Button android:layout_width="wrap_content"
        android:layout_height="wrap_content"
        android:text="按钮1"
        android:layout_alignParentTop="true"
        android:layout_alignParentLeft="true"/>

    <Button android:layout_width="wrap_content"
        android:layout_height="wrap_content"
        android:text="按钮2"
        android:layout_alignParentTop="true"
        android:layout_alignParentRight="true"/>

    <Button android:layout_width="wrap_content"
        android:layout_height="wrap_content"
        android:text="按钮3"
        android:layout_centerInParent="true" />

    <Button android:layout_width="wrap_content"
        android:layout_height="wrap_content"
        android:text="按钮4"
        android:layout_alignParentBottom="true"
        android:layout_alignParentLeft="true"/>

    <Button android:layout_width="wrap_content"
        android:layout_height="wrap_content"
        android:text="按钮5"
        android:layout_alignParentBottom="true"
        android:layout_alignParentRight="true"/>
</RelativeLayout>
效果如下:
前面的例子是相对父控件来定位的,那么相对其他子控件之间怎么定位呢?
<?xml version="1.0" encoding="utf-8"?>
<RelativeLayout android:layout_width="match_parent"
    android:layout_height="match_parent"
    xmlns:android="http://schemas.android.com/apk/res/android">

    <Button android:layout_width="wrap_content"
        android:layout_height="wrap_content"
        android:id="@+id/button3"
        android:text="按钮3"
        android:layout_centerInParent="true" />

    <Button android:layout_width="wrap_content"
        android:layout_height="wrap_content"
        android:text="按钮1"
        android:layout_above="@id/button3"
        android:layout_toLeftOf="@id/button3"/>

    <Button android:layout_width="wrap_content"
        android:layout_height="wrap_content"
        android:text="按钮2"
        android:layout_above="@id/button3"
        android:layout_toRightOf="@id/button3"/>

    <Button android:layout_width="wrap_content"
        android:layout_height="wrap_content"
        android:text="按钮4"
        android:layout_below="@id/button3"
        android:layout_toLeftOf="@id/button3"/>

    <Button android:layout_width="wrap_content"
        android:layout_height="wrap_content"
        android:text="按钮5"
        android:layout_below="@id/button3"
        android:layout_toRightOf="@id/button3"/>
</RelativeLayout>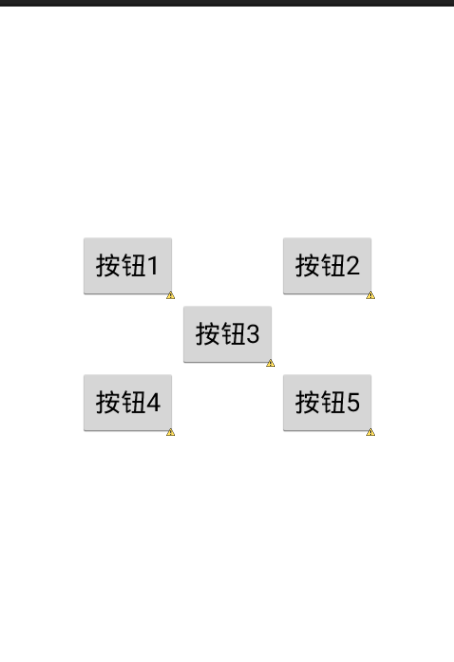
layout_below表示这个控件位于另一个控件的下方;layout_toLeftOf表示位于另一个控件的左边。还有其他的属性比如layout_alignLeft表示该控件的左边界和另一个控件的左边界对齐,注意是同一个边界对齐,所以一般用在文字的显示上。
3、FrameLayout
这种布局是四种布局中最简单的:所有控件默认都会被放到左上角,因此应用场景少了很多。当然也不是不能调节它的位置,比如可以通过layout_gravity设置控件的位置,可以靠左靠右(left/right),也可以位于水平或者竖直方向的中间(center_horizontal/center_vertical)。
当然每个控件都要这么调节位置太麻烦了,这也是FrameLayout不被广泛使用的原因:每一个控件之间默认位置都一样,而且之间也没有任何位置关系。
4、TableLayout
使用表格的方式来控制布局,可以合并列或行。
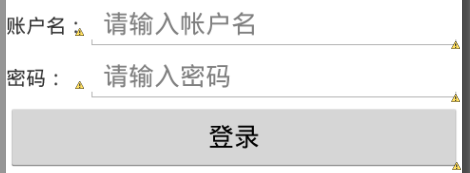
下面这个例子为登录界面:
<?xml version="1.0" encoding="utf-8"?>
<TableLayout xmlns:android="http://schemas.android.com/apk/res/android"
    android:layout_width="match_parent"
    android:layout_height="match_parent">
    <TableRow >
        <TextView
            android:layout_height="wrap_content"
            android:text="账户名:"/>
        <EditText android:layout_height="wrap_content"
            android:hint="请输入帐户名"/>
    </TableRow>

    <TableRow >
        <TextView android:layout_height="wrap_content"
            android:text="密码:"/>
        <EditText android:layout_height="wrap_content"
            android:inputType="textPassword"
            android:hint="请输入密码"/>
    </TableRow>

    <TableRow >
        <Button android:layout_height="wrap_content"
            android:text="登录"
            android:layout_span="2"/>
    </TableRow>
</TableLayout>
可以看到TableLayout的特点:不用定义控件的宽度,每一列的宽度都是一样的,以该列中需要宽度最长的为准。如果需要延伸一列,定义layout_span就可以。(然而我的eclipse不会自动补全这个属性)
但是这两行都没有占满整一行,我们可以设置TableLayout的stretchColumns来让TableRow中的某一列进行拉伸,达到自动适应屏幕宽度的作用。

其实,如果要实现类似表格的效果,用GridLayout是更方便的,而且延伸行和列都可以。下面简单展示一下GridLayout的用法:
<!-- GridLayout -->
<?xml version="1.0" encoding="utf-8"?>
<GridLayout xmlns:android="http://schemas.android.com/apk/res/android"
    android:layout_width="wrap_content"
    android:layout_height="wrap_content"
    android:orientation="horizontal"
    android:columnCount="4"
    android:id="@+id/grid_layout">

    <Button android:id="@+id/one"
        android:text="1"/>
    <Button android:text="2"/>
    <Button android:text="3"/>
    <Button android:text="/"/>
    <Button android:text="4"/>
    <Button android:text="5"/>
    <Button android:text="6"/>
    <Button android:text="*"/>
    <Button android:text="0" android:layout_columnSpan="2" android:layout_gravity="fill"/>
    <Button android:text="." />
    <Button android:text="+" android:layout_rowSpan="2" android:layout_gravity="fill"/>
    <Button android:text="=" android:layout_columnSpan="3" android:layout_gravity="fill" />

</GridLayout>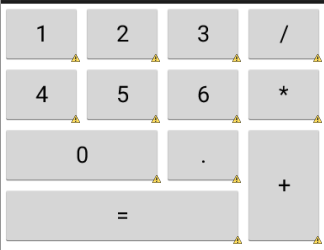


 587
587

 被折叠的 条评论
为什么被折叠?
被折叠的 条评论
为什么被折叠?
 到【灌水乐园】发言


