


内容概述
- 多线程概述
- 多线程实现方案
- 线程调度和线程控制
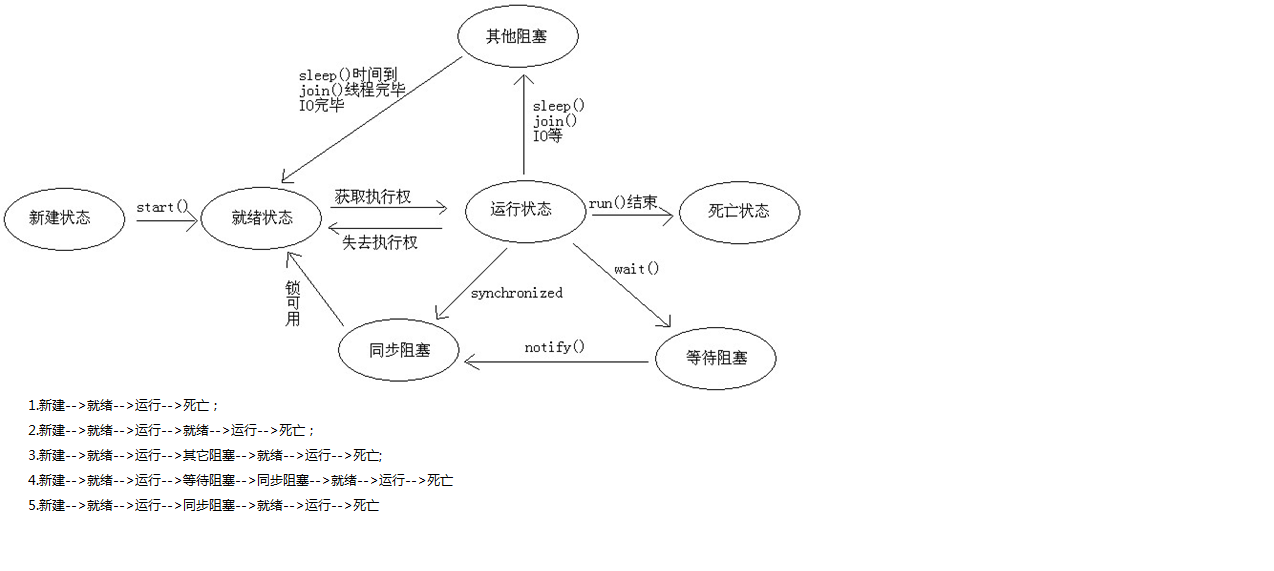
- 线程生命周期
- 线程同步
- 死锁
- 线程间通信
- 线程组、线程池、匿名内部类实现线程
- 定时器的使用
- sleep_wait_yield的区别
- 简单设计模式
一、多线程概述
a.进程:
1.什么是进程:进程是操作系统的概念,它就是指在操作系统中运行的某个程序;
每个程序对于操作系统来说都是一个独立的进程,由操作系统管理,分配内存、CPU执行时间.....
2.什么是多进程:是指操作系统可以同时管理多个应用程序的同时运行;
3.多进程的意义:可以充分利用CPU资源;可以使用户有更好的操作体验,可以同时运行多个程序;
b.线程:
1.什么是线程:线程是指在一个"主进程"中,可以使某段代码以独立于主进程的方式运行。
线程中的代码,与主进程中的代码同时抢占操作系统资源;
2.什么是多线程:多线程是指,一个主进程可以启动多个线程,去独立运行。
3.多线程的意义:多线程也可以充分利用CPU资源;可以使我们的几段代码"同时"运行,提高我们的代码效率;
c.并行和并发:
1.并行:是指多个线程在"某个时间段内"同时运行;
2.并发:是指多个线程在"某个时间点上"同时的访问同一资源;
二、多线程实现方案
多线程程序实现的方式1
public class MyThread extends Thread{
	@Override
	public void run() {
		for(int i = 0; i < 100 ; i++){
			System.out.println("i = " + i);
		}
	}
}
/*
* 多线程程序实现的方式1
* 1.Java中一个线程使用"Thread"类表示;
* 2.实现线程的方式:
* 1).定义一个线程类,继承自Thread;
* 2).重写run()方法;将要在此线程中执行的代码写到这里;
* 3).启动线程:
* 1--实例化一个自定义线程类的对象;
* 2--调用对象的start()方法启动线程;
* 3.注意:
* 1).启动线程,一定要使用start()方法。调用run()不会产生编译错误,但这只是简单的方法调用,
* 不是启动线程;
* 2).不能多次的调用start()方法;
* }
*/
public class Demo {
public static void main(String[] args) {
MyThread t = new MyThread();
t.start();
// t.run();//这不是启动线程,这只是简单的方法调用;
for(int k = 0;k < 100 ; k++){
System.out.println("k = " + k);
}
}
}public class MyRunnable implements Runnable {
public void run() {
for(int i = 0;i < 100 ; i++){
System.out.println("i = " + i);
}
}
}/*
* 线程实现的方式二:
* 1.自定义实现Runnable接口;
* 2.重写run()方法;
* 3.启动线程:
* 1).实例化我们自定义类的对象;
* 2).实例化一个Thread对象,将我们的自定义对象作为参数传递给Thread的构造方法;
* 3).调用Thread对象的start()方法启动线程
*/
public class Demo {
public static void main(String[] args) {
MyRunnable myRun = new MyRunnable();
Thread t = new Thread(myRun);
t.start();
for(int k = 0 ;k < 100 ; k++){
System.out.println("k = " + k);
}
}
}public class MyCallable implements Callable{
public Object call() throws Exception {
for(int i = 0; i < 100 ; i++){
System.out.println("i = " + i);
}
return null;
}
}/*
* JDK5实现线程的方式3:
* 1.自定义类,实现Callable接口;
* 2.重写:call()方法;
* 3.使用"线程池"的方式去启动线程;
*/
public class Demo {
public static void main(String[] args) {
ExecutorService service = Executors.newFixedThreadPool(2);
MyCallable myCall = new MyCallable();
service.submit(myCall);
service.shutdown();
for(int j = 0;j < 100; j++){
System.out.println("j = " + j);
}
}
} 三、线程调度和线程控制
1).线程名称:
setName(String n):设置线程名称:
getName():获取线程名称;
setName(String n):设置线程名称:
getName():获取线程名称;
public class MyThread extends Thread {
	@Override
	public void run() {
		for(int i = 0;i < 100 ; i++){
			System.out.println(this.getName() + "(i = " + i + ")");
		}
	}
}
/*
* 获取和设置线程对象名称
* 1.一个线程类,可以实例化多个对象,每个对象都可以以单独的线程去执行;
* 2.每个线程,都有一个默认的名称,格式:"Thread-索引":
* 3.设置线程名称:setName(String name):
* 获取线程名称:getName();
*/
public class Demo {
public static void main(String[] args) {
MyThread t1 = new MyThread();
MyThread t2 = new MyThread();
MyThread t3 = new MyThread();
t1.setName("001");
t2.setName("002");
t3.setName("003");
t1.start();
t2.start();
t3.start();
}
}2).线程优先级:低-->高:1--10。默认:5
setPriority(int n):设置优先级。如果不在1--10的范围内,则抛出异常;
getPriority():获取线程的优先级;
public class MyThread extends Thread{
	public void run() {
		double sum = 0;
		for(int i = 1 ; i <= 10 ; i++){
			for(int j = 1 ; j <= 20000000 ; j++){
				sum += (Math.PI + Math.E) / j;
				if(j % 20000 == 0){
					Thread.yield();//退回到就绪状态
				}
			}
		}
		System.out.println(this.getName() + " 执行完毕!");
	};
}
/*
* 1.Java中的线程优先级:从低到高:1--10
* 2.默认的优先级是:5
* 3.设置优先级:
* setPriority(int p):设置优先级:一定要在1--10的范围内,否则抛出异常;
* getPriority():获取线程的优先级;
* 4.注意:
* 1).较高的优先级,只代表有机会先被执行,但仍由操作系统管理,仍然有很多的不确定性;
* 2).所以,大家不要利用"优先级"的技术,去试图向让某个线程先执行完毕;
* 3).如果线程内,有较少的代码,执行逻辑很简单,那么优先级的效果就不会明显;
*/
public class Demo {
public static void main(String[] args) {
MyThread t1 = new MyThread();
MyThread t2 = new MyThread();
MyThread t3 = new MyThread();
MyThread t4 = new MyThread();
MyThread t5 = new MyThread();
MyThread t6 = new MyThread();
//设置优先级
// t1.setPriority(100);//一定要在1--10的范围内,否则抛出异常;
t1.setPriority(2);
t2.setPriority(6);//最高优先级
t3.setPriority(10);
t4.setPriority(8);
t5.setPriority(8);
t6.setPriority(1);
//设置线程名称
t1.setName("线程1");
t2.setName("线程2");
t3.setName("线程3");
t4.setName("线程4");
t5.setName("线程5");
t6.setName("线程6");
//启动线程
t1.start();
t2.start();
t3.start();
t4.start();
t5.start();
t6.start();
}
}sleep(int n):静态方法。单位:毫秒;
public class MyThread extends Thread{
	@Override
	public void run() {
		for(int i = 0; i < 10 ;i++){
			Date date = new Date();
			SimpleDateFormat sdf = new SimpleDateFormat("yyyy-MM-dd HH:mm:ss");
			String str = sdf.format(date);
			System.out.println(str);
			//休息一秒
			try {
				Thread.sleep(1000);//休眠1秒
			} catch (InterruptedException e) {
				e.printStackTrace();
			}
		}
	}
}
/*
* 线程的休眠:
* 1.public static void sleep(long millis):
*/
public class Demo {
public static void main(String[] args) {
new MyThread().start();
for(int i = 0; i < 10 ;i++){
Date date = new Date();
SimpleDateFormat sdf = new SimpleDateFormat("yyyy-MM-dd HH:mm:ss");
String str = sdf.format(date);
System.out.println("主线程:" + str);
//休息一秒
try {
Thread.sleep(1000);//休眠1秒
} catch (InterruptedException e) {
e.printStackTrace();
}
}
}
}join():普通方法。其它线程会等待此线程执行完毕再执行;
public class MyThread extends Thread{
	public void run() {
		for(int i = 0;i < 100 ; i++){
			System.out.println(this.getName() + " 正在杀敌 i = " + i);
		}
	};
}
public class Demo {
public static void main(String[] args) {
MyThread t1 = new MyThread();
MyThread t2 = new MyThread();
t1.setName("兵1");
t2.setName("兵2");
t1.start();
try {
t1.join();//t2要等待t1执行完毕,再start();
} catch (InterruptedException e) {
e.printStackTrace();
}
t2.start();
}
}yield():静态方法。退回到"就绪"状态。很可能会被操作系统再次分配运行;
public class MyThread extends Thread{
	public void run() {
		for(int i = 0;i < 1000 ; i++){
			if(this.getName().equals("001")){
				Thread.yield();//礼让:退回到"就绪"状态,有可能会被操作系统再次分配执行;
			}
			System.out.println(this.getName() + " i = " + i);
		}
	}
}
/*
* 线程的礼让:
* public static void yield()
* 注意:礼让后,很可能会被操作系统再次分配执行,所以,不能利用这个技术
* 试图让某个线程最后执行完毕;
*/
public class Demo {
public static void main(String[] args) {
MyThread t1 = new MyThread();
MyThread t2 = new MyThread();
t1.setName("001");
t2.setName("002");
t1.start();
t2.start();
}
}setDaemon(boolean n):如果true,则为"守护线程"。当主线程结束时,守护线程也会跟着结束(但不会立即结束,会有个小缓冲)
public class MyThread extends Thread {
	public void run() {
		for(int i = 0;i < 1000 ; i++){
			System.out.println(this.getName() + " 正在杀敌......i = " + i);
		}
	}
}
/*
* 守护线程:
*
* 1.默认情况下,当主进程开出一个线程后,都会等待线程结束后,主进程才会结束;
* 这个就是非守护线程;
* 2.我们可以将线程设为"守护线程":当主进程完毕时,开出的所有守护线程也跟着结束;但是不会立即结束,会有个小缓冲;
* public final void setDaemon(boolean on)
*/
public class Demo {
public static void main(String[] args) {
MyThread t1 = new MyThread();
t1.setName("小兵");
//将线程设为守护线程
t1.setDaemon(true);
t1.start();
for(int i = 0; i < 100 ;i++){
System.out.println("将军正在杀敌...i = " + i);
}
System.out.println("将军杀敌完毕,打道回府!!");
}
}stop():不建议使用。
interrupt():在线程内部,当处于以下三种情况:
Object-->wait():
Thread-->join():
Thread-->sleep():
会触发一个异常的产生;
public class MyThread extends Thread {
	public void run() {
		for(int i = 0;i < 10 ; i++){
			System.out.println("我不停:i = " + i);
			try {
				Thread.sleep(1000);
			} catch (InterruptedException e) {
				System.out.println("线程出现异常了,可能是外部试图停掉我,那么好吧,拜拜......");
				return;
			}
		}
	}
}
/*
* 线程的中断:
*
* public final void stop():
* public void interrupt():基于在线程的内部,当处于以下三种阻塞状态时,才可以促使其停止:
* 1.Object--wait():
* 2.Thread--join():
* 3.Thread--sleep():
*/
public class Demo {
public static void main(String[] args) {
MyThread t1 = new MyThread();
t1.start();
//主进程等待3秒钟,如果线程不结束,这里给它干掉
System.out.println("主进程等待3秒...");
try {
Thread.sleep(1000 * 3);
} catch (InterruptedException e) {
e.printStackTrace();
}
System.out.println("主进程醒来,干掉线程......");
t1.stop();
// t1.interrupt();
}
}四、线程生命周期
五、线程同步
1.并发性问题产生的原因
* 1.是否是多线程环境
* 2.是否有共享数据
* 3.是否有多条语句操作共享数据
* 2.是否有共享数据
* 3.是否有多条语句操作共享数据
使用同步解决并发访问的问题
public class Tickets {
	private int ticketNo = 100;
	public int getTicket(){//窗口1
		synchronized (this) {
			if(this.ticketNo > 0){//窗口1
				return this.ticketNo--;//窗口1
			}else{
				return 0;
			}
		}
	}
}
public class MyThread extends Thread{
private Tickets tic;
private int count;
private TreeSet<Integer> tree = new TreeSet<>();
public MyThread(Tickets t){
this.tic = t;
};
public void run() {
while(true){
int t = this.tic.getTicket();
if(t > 0){
tree.add(t);
}else{
break;
}
}
System.out.println(this.getName() + " 共抢到 : " + tree.size() + " 张票,明细:" + tree);
}
}/*
* 使用同步解决并发访问的问题:
* 1.在共享资源上(一般是一些方法)使用关键字:synchronized
* 2.作用:当一个线程访问时,其它线程全部列队等待;这种机制保证了这个方法在同一时刻
* 只能被一个线程访问;
* 3.synchronized语法:
* 1.同步代码块:
* synchronized(被锁的对象){
* //同步代码
* }
* 注:被锁的对象:当一个线程访问此段代码时,会将这个对象中所有的"同步代码块"和"同步方法"加锁,
* 也就意味着,一个线程访问一段同步代码块,其它线程不能访问"被锁对象"的其它"同步代码块"和"同步方法";
*/
public class Demo {
public static void main(String[] args) {
//1.实例化一个票池;
Tickets tic = new Tickets();
//2.实例化三个线程,模拟三个窗口售票
MyThread t1 = new MyThread(tic);
MyThread t2 = new MyThread(tic);
MyThread t3 = new MyThread(tic);
//3.设置线程名称
t1.setName("窗口1");
t2.setName("窗口2");
t3.setName("窗口3");
//4.启动线程
t1.start();
t2.start();
t3.start();
}
}public class Account {
private int balance = 15000000;
//********同步代码块的方式**************//
/*
public void set(int n){
synchronized (this) {
this.balance += n;
}
}
public void get(int n){
synchronized (this) {
this.balance -= n;
}
}
*/
//********同步方法的形式**************//
public synchronized void set(int n){
this.balance += n;
}
public synchronized void get(int n){
this.balance -= n;
}
//静态方法中可以包含同步代码块么?可以。一般锁的是这个类的Class对象(在内存中存在的,由JVM自动实例化的,每个类都对应有一个Class对象)
public static void show(){
synchronized (Account.class) {
// synchronized (this.getClass()) {
}
}
//静态方法,可以并声明为同步方法么?可以的。
public synchronized static void show2(){
}
public int getBalance(){
return this.balance;
}
}public class GetThread extends Thread {
private Account acc;
public GetThread(Account acc){
this.acc = acc;
}
@Override
public void run() {
for(int i = 0;i < 1000 ;i++){
this.acc.get(10000);
}
System.out.println("取钱结束!");
}
}public class SetThread extends Thread {
private Account acc;
public SetThread(Account acc){
this.acc = acc;
}
@Override
public void run() {
for(int i = 0;i < 1000 ;i++){
acc.set(10000);
}
System.out.println("存钱结束!");
}
}/*
* 同步的分类:
* 1.同步代码块:在某个方法内使用如下语法:
* synchronized(被锁的对象){
* }
* 2.同步方法:
* 可以在方法声明时,添加关键字:synchronized,表示这个方法内部的所有
* 代码都是同步的。
*/
public class Demo {
public static void main(String[] args) {
Account acc= new Account();
SetThread setThread = new SetThread(acc);
GetThread getThread = new GetThread(acc);
setThread.start();
getThread.start();
try {
Thread.sleep(1000);//为了让两个线程执行完毕
} catch (InterruptedException e) {
e.printStackTrace();
}
System.out.println("最终余额:" + acc.getBalance());
}
}
* StringBuffer和StringBuilder区别:
* 1.StringBuffer(线程安全的):
* 2.StringBuilder(线程不安全的):
* ArrayList:线程不安全的
* Vector:线程安全的;
JDK5的Lock锁
* 1.StringBuffer(线程安全的):
* 2.StringBuilder(线程不安全的):
* ArrayList:线程不安全的
* Vector:线程安全的;
JDK5的Lock锁
public class Account {
	private int balance = 100000;
	//为了所有的方法共同使用同一把锁,所以"锁"的对象,定义在成员位置
	private Lock lock = new ReentrantLock();
	public  void set(int m){
		//加锁
		lock.lock();
		try{
			this.balance+=m;
		}finally{
			lock.unlock();//释放锁
		}
	}
	public  void get(int m){
		lock.lock();
		try{
			this.balance -= m;
		}finally{
			lock.unlock();
		}
	}
	public int getBalance(){
		return this.balance;
	}
}
public class GetThread extends Thread {
private Account acc;
public GetThread(Account acc){
this.acc = acc;
}
@Override
public void run() {
for(int i = 0 ;i < 10000 ; i++){
this.acc.get(1000);//取1百万
}
System.out.println("取钱完毕!");
}
}public class SetThread extends Thread {
private Account acc;
public SetThread(Account acc){
this.acc = acc;
}
@Override
public void run() {
for(int i = 0 ;i < 10000 ; i++){
this.acc.set(1000);//存1百万
}
System.out.println("存钱完毕!");
}
}
/*
* JDK5的Lock锁:
*
* 1.java.util.concurrent.locks.Lock(接口);Lock 实现提供了比使用 synchronized 方法和语句可获得的更广泛的锁定操作。
* 此实现允许更灵活的结构
* 2.示例程序:
* Lock l = new 子类对象();
l.lock(); //加锁
try {
// 同步的代码
} finally {
l.unlock(); //解锁
}
*/
public class Demo {
public static void main(String[] args) {
Account acc = new Account();
SetThread setT = new SetThread(acc);
GetThread getT = new GetThread(acc);
setT.start();
getT.start();
try {
Thread.sleep(1000);
} catch (InterruptedException e) {
e.printStackTrace();
}
System.out.println("最终余额:" + acc.getBalance());
}
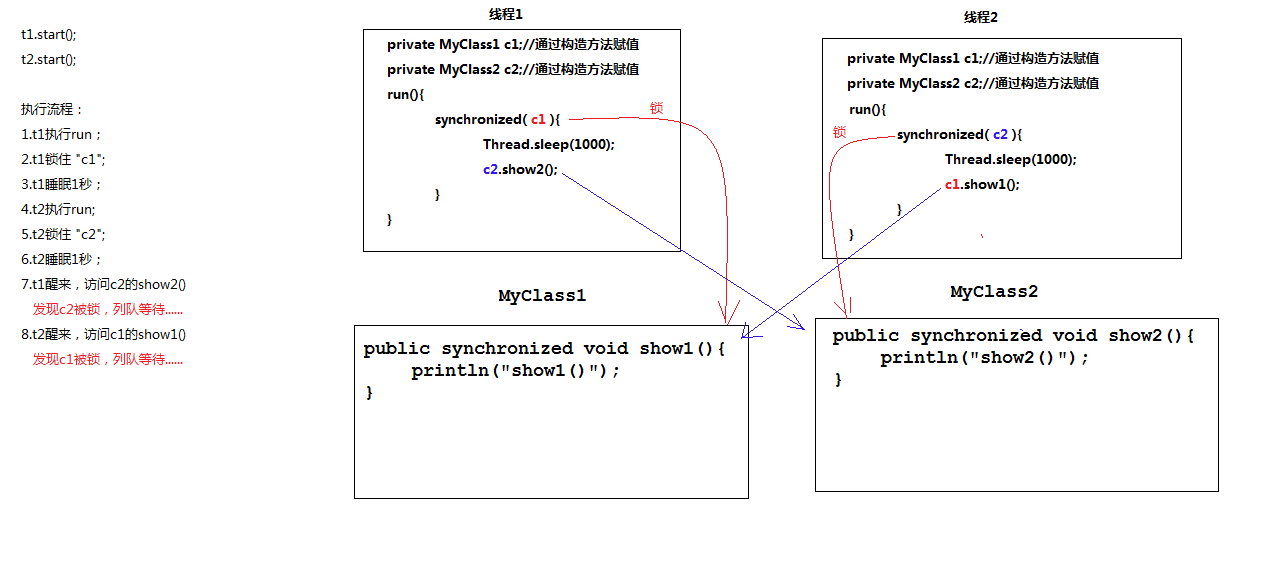
}六、死锁
public class MyClass1 {
	public synchronized void show1(){
		System.out.println("show1()");
	}
}
public class MyClass2 {
public synchronized void show2(){
System.out.println("show2()");
}
}public class MyThread1 extends Thread {
private MyClass1 c1;
private MyClass2 c2;
public MyThread1(MyClass1 c1 , MyClass2 c2){
this.c1 = c1;
this.c2 = c2;
}
public void run() {
synchronized (c1) {
System.out.println("t1锁住c1......");
try {
Thread.sleep(1000);
} catch (InterruptedException e) {
e.printStackTrace();
}
System.out.println("t1即将访问show2()......");
c2.show2();
}
System.out.println("t1释放了c1的锁......");
}
}public class MyThread2 extends Thread{
private MyClass1 c1;
private MyClass2 c2;
public MyThread2(MyClass1 c1 , MyClass2 c2){
this.c1 = c1;
this.c2 = c2;
}
public void run() {
synchronized (c2) {
System.out.println("t2锁住c2......");
try {
Thread.sleep(1000);
} catch (InterruptedException e) {
e.printStackTrace();
}
System.out.println("t2即将访问show1()......");
c1.show1();
}
System.out.println("t2释放了c2的锁......");
}
}public class Demo {
public static void main(String[] args) {
MyClass1 c1 = new MyClass1();
MyClass2 c2 = new MyClass2();
MyThread1 t1 = new MyThread1(c1,c2);
MyThread2 t2 = new MyThread2(c1,c2);
t1.start();
t2.start();
}
}
七、线程间通信
public class BaoziPu {
	private List<String> bzList = new ArrayList<>();
	public synchronized void setBaozi(String s){
		this.bzList.add(s);
		System.out.println("唤醒所有等待的消费者......");
		notifyAll();//notify()
	}
	public synchronized String getBaozi(){
		if(this.bzList.size() == 0){
			//让消费方等待
			try {
				System.out.println("没包子了,等会......");
				wait();
				System.out.println("来包子啦......");
			} catch (InterruptedException e) {
				e.printStackTrace();
			}
		}
		//取包子
		String s = bzList.get(0);
		bzList.remove(0);
		return s;
	}
}
public class GetThread extends Thread{
private BaoziPu bzp;
public GetThread(BaoziPu bzp){
this.bzp = bzp;
}
@Override
public void run() {
while(true){
String s = this.bzp.getBaozi();
System.out.println(s);
}
}
}public class SetThread extends Thread{
private BaoziPu bzp;
public SetThread(BaoziPu b){
this.bzp = b;
}
@Override
public void run() {
while(true){
try {
Thread.sleep(1000);
} catch (InterruptedException e) {
e.printStackTrace();
}
bzp.setBaozi("包子");
}
}
}/*
* 生产和消费者线程:
*
* 1.此例只适用于:"单生产者" 和 "单消费者" "模式";(至于多生产和多消费,可以上网搜索相关资料)
* 2.让当前访问的线程等待:Object-->wait();
* 唤醒当前所有等待的线程:Object --> notify()或notifyAll()
* 3.wait()以及notify()和notifyAll()语句,必须放在"同步代码块"或"同步方法"内,否则抛出异常;
*/
public class Demo {
public static void main(String[] args) {
BaoziPu bzp = new BaoziPu();
SetThread setThread = new SetThread(bzp);
GetThread getThread = new GetThread(bzp);
setThread.start();
getThread.start();
}
}八、线程组、线程池、匿名内部类实现线程
线程组
/*
 * 线程组:
 * 1.我们可以将多个线程,进行分组管理;好处:可以对组内的线程进行统一操作;
 * 2.所有的线程,默认都属于"主线程组";
 * 3.我们可以为线程进行分组;
 */
public class Demo {
	public static void main(String[] args) {
		MyThread t1 = new MyThread();
		MyThread t2 = new MyThread();
		ThreadGroup grp1 = t1.getThreadGroup();
		ThreadGroup grp2 = t2.getThreadGroup();
		System.out.println("线程1的所在的组:" + grp1.getName());
		System.out.println("线程2的所在的组:" + grp2.getName());
		//为线程分组
		MyThread t3 = new MyThread();
		MyThread t4 = new MyThread();
		//实例化一个"线程组"对象
		ThreadGroup group = new ThreadGroup("我的第一小队");
		//跟线程组关联
		Thread th1 = new Thread(group,t3);
		Thread th2 = new Thread(group,t4);
		th1.start();
		th2.start();
		//主进程睡眠3秒钟
		try {
			System.out.println("主进程睡眠3秒......");
			Thread.sleep(1000 * 3);
		} catch (InterruptedException e) {
			// TODO Auto-generated catch block
			e.printStackTrace();
		}
		System.out.println("主进程醒来,一次停止组内所有线程......");
		//可以一次停止组内的所有线程
		group.interrupt();
	}
}
public class MyThread extends Thread{
@Override
public void run() {
for(int i = 0 ;i < 10; i++){
System.out.println(this.getName() + " i = " + i);
try {
Thread.sleep(1000);
} catch (InterruptedException e) {
break;
}
}
}
}public class MyThread extends Thread{
public MyThread(){
System.out.println("实例化一个我的对象,很耗时哟,需要5秒钟......");
for(int i = 0;i < 5 ; i++){
System.out.println(i + 1);
try {
Thread.sleep(1000);
} catch (InterruptedException e) {
e.printStackTrace();
}
}
}
@Override
public void run() {
System.out.println("线程打印:run()......");
}
}
/*
 * 线程池:
 * 1.当使用继承Thread的方式实现线程,如果想反复的使用此线程,不能多次调用start();
 *   可以多次实例化此类的对象,然后再启动线程。
 * 2.如果线程的启动,或者构造比较耗时,那么就大大的影响效率;
 * 3.JDK5之后,提供了一个"线程池",这个"线程池"可以缓存一些"线程对象",
 *   如果需要再次使用时,无需重复构造,直接从"池"中取出线程对象使用即可;
 * 4.JDK5新增了一个Executors工厂类来产生线程池,有如下几个方法
		public static ExecutorService newCachedThreadPool():创建一个可根据需要创建新线程的线程池
		public static ExecutorService newFixedThreadPool(int nThreads):创建一个可重用固定线程数的线程池
		public static ExecutorService newSingleThreadExecutor():创建一个使用单个 worker 线程的 Executor
	 ExecutorService对象,该对象表示一个线程池,可以执行Runnable对象或者Callable对象代表的线程。它提供了如下方法
		Future<?> submit(Runnable task)
		<T> Future<T> submit(Callable<T> task)

 */
public class Demo {
	public static void main(String[] args) {
		/*MyThread t1 = new MyThread();//需要5秒
		t1.start();
		System.out.println("主进程等待2秒......");
		try {
			Thread.sleep(1000 * 2);
		} catch (InterruptedException e) {
			e.printStackTrace();
		}
		System.out.println("再次启动MyThread");
		t1 = new MyThread();//再次需要5秒
		t1.start();*/
		//获取一个"线程池"对象
		ExecutorService service = Executors.newFixedThreadPool(2);
		MyThread t3 = new MyThread();//需要5秒
		//执行线程t3
		service.submit(t3);
		System.out.println("主进程休息2秒钟......");
		try {
			Thread.sleep(1000 * 2);
		} catch (InterruptedException e) {
			e.printStackTrace();
		}
		System.out.println("主进程再次启动线程......");
		service.submit(t3);//无需再次构造
		//将线程池停止
		service.shutdown();
	}
}public class MyCallable implements Callable{
public Object call() throws Exception {
//计算1--100的累加和
int sum = 0;
for(int i = 1 ;i <= 100 ;i++){
sum += i;
}
return sum;//自动装箱-->Integer
}
}/*
* 1.获取一个线程池对象:
* ExecutorService service = Executors.newFixedThreadPool(2);
* 2.调用线程池的submit()方法执行线程:
* 3.接收返回值:
* Future<Integer> result = service.submit(new MyCallable());
* Integer val = result.get();
*/
public class Demo {
public static void main(String[] args) {
ExecutorService service = Executors.newFixedThreadPool(2);
Future<Integer> result = service.submit(new MyCallable());
try {
System.out.println("返回值:" + result.get());
} catch (InterruptedException e) {
e.printStackTrace();
} catch (ExecutionException e) {
e.printStackTrace();
}
service.shutdown();
}
}
/*
 * 匿名内部类的方式实现线程:以下三种形式都是基于:new Thread(){};
 *
 * 1.new Thread(){Thread匿名子类};
 * 2.new Thread(new Runnable(){}){};
 * 3.new Thread(new Runnable(){}){Thread匿名子类};
 */
public class Demo {
	public static void main(String[] args) {
		new Thread(){
			//重写run()方法
			@Override
			public void run() {
				System.out.println("a");
			}
		}.start();

		new Thread(new Runnable(){
			@Override
			public void run() {
				System.out.println("b");

			}

		}){}.start();

		new Thread(new Runnable(){
			@Override
			public void run() {
				System.out.println("c");

			}

		}){
			//重写run()方法
			@Override
			public void run() {
				System.out.println("d");
			}
		}.start();
	}
}
九、定时器的使用
定时器
/*
 * 定时器:
 * 作用:
 * 1.可以在指定的时间做指定的事情;
 * 2.可以从指定的时间开始,每间隔指定的时间,做指定的事情;
 * Java中的定时器:
 * 1.java.util.TimerTask(抽象类):定义任务;
 * 		1).自定义类,继承自TimerTask;
 * 		2).重写run()方法;
 * 2.java.util.Timer(类):定义"定时器":
 * 		1).构造方法:Timer();
 * 		2).定时器方法:
 * 			public void schedule(TimerTask task, long delay):是在指定的delay延迟之后,启动task
 * 			public void schedule(TimerTask task,long delay,long period):在指定的delay延迟之后,开始,并每隔period时间重复的做task
 */
class MyTimerTask extends TimerTask{
	private Timer timer;
	public MyTimerTask(Timer t){
		this.timer = t;
	}
	@Override
	public void run() {
		for(int i = 0;i < 10 ;i ++){
			System.out.println("i = " + i);
		}
	//	this.timer.cancel();//如果要指定"重复",就不能停止;
	}
}
public class Demo {
	public static void main(String[] args) {
		Timer timer = new Timer();
		System.out.println("启动定时器,2秒后开始......");
//		timer.schedule(new MyTimerTask(timer), 1000 * 2);
		timer.schedule(new MyTimerTask(timer), 1000 * 2,1000);
	}
}/*
* 练习:在指定的时间,删除C:\\20150822 - 副本\\目录
* 1.制作一个任务:
* 1).定义类,继承自TimerTask
* 2).重写run;
* 递归删除目录
* 2.定义"定时器"
*/
class MyTimerTask extends TimerTask{
private Timer timer;
public MyTimerTask(Timer t){
this.timer = t;
}
@Override
public void run() {
File file = new File("C:\\20150822 - 副本");
deleteFile(file);
System.out.println("删除完毕!");
this.timer.cancel();
}
private void deleteFile(File file) {
if(file == null){
return;
}
if(file.isFile()){//文件
//直接删除
file.delete();
}else{//目录
//获取目录下所有的文件和目录
File[] fileArray = file.listFiles();
for(File f : fileArray){
deleteFile(f);
}
//删除目录
file.delete();
}
}
}
public class Demo {
public static void main(String[] args) throws ParseException {
Timer timer = new Timer();
String str = "2015-09-26 15:00:00";
SimpleDateFormat sdf = new SimpleDateFormat("yyyy-MM-dd HH:mm:ss");
Date date = sdf.parse(str);
timer.schedule(new MyTimerTask(timer), date);
}
}十、sleep_wait_yield的区别
public class Account {
	public synchronized void show(String threadName){
		//************sleep方法****************//
//		try {
//			System.out.println(threadName + " 休眠2秒......");
//			Thread.sleep(1000 * 2);
//			System.out.println(threadName + " 休眠醒来!");
//		} catch (InterruptedException e) {
//			e.printStackTrace();
//		}
		//*************wait()方法******************//
		try {
			System.out.println(threadName + " 开始等待......");
			wait();
			System.out.println(threadName + " 被唤醒!");
		} catch (InterruptedException e) {
			e.printStackTrace();
		}
		//*************yield()方法******************//
//		System.out.println(threadName + " 礼让......");
//		Thread.yield();
//		System.out.println(threadName + " 继续执行......");
	}
	public synchronized void show2(){
		notifyAll();
	}
}
public class MyThread extends Thread{
private Account acc;
public MyThread(Account acc){
this.acc = acc;
}
@Override
public void run() {
for(int i = 0;i < 10 ;i++){
acc.show(this.getName());
try {
Thread.sleep(1000);
} catch (InterruptedException e) {
e.printStackTrace();
}
}
}
}/*
* sleep,wait,yield的区别:
* 1.sleep:
* 1).Thread的方法;
* 2).表示让当前的线程休眠指定的时间;
* 3).休眠时间到,自动醒来;
* 4).如果在"同步方法内",不释放锁;
* 2.wait:
* 1).Object的方法;
* 2).可以指定时间,也可以不指定时间;
* 3).如果指定时间,当时间到,会自动醒来; 如果不指定时间,需要使用notify()或者notifyAll()来唤醒;
* 4).在"同步方法内",会释放锁;
* 3.yield:
* 1).Thread的方法;
* 2).不指定时间;
* 3).无需唤醒,会到"就绪"状态;
* 4).在"同步方法内",不释放锁;
*/
public class Demo {
public static void main(String[] args) {
Account acc = new Account();
MyThread t1 = new MyThread(acc);
MyThread t2 = new MyThread(acc);
MyThread t3 = new MyThread(acc);
t1.start();
t2.start();
t3.start();
//为了测试wait(),10次唤醒
for(int i = 0;i < 10;i++){
acc.show2();//唤醒的方法;
try {
Thread.sleep(1000);
} catch (InterruptedException e) {
e.printStackTrace();
}
}
}
}十一、简单设计模式
简单工厂模式概述和使用public class Animal {
}public class Cat extends Animal{
}public class Dog extends Animal{
}public class AnimalFactory {
//*********简单工厂模式:方式一************//
public static Cat getCat(){
return new Cat();
}
public static Dog getDog(){
return new Dog();
}
//*********简单工厂模式:方式二***********//
public static Animal getAnimal(String type){
if(type.equals("dog")){
return new Dog();
}else if(type.equals("cat")){
return new Cat();
}
return null;
}
} /*
* 简单工厂模式概述和使用
* 1.之前我们实例化对象,都是前端直接new一个某类的对象;这种方式会使我们的前端
* 与对象紧密的耦合在一起;
* 2.使用"简单工厂模式",将实例化对象的工作放到"工厂"内部,前端任何时候需要对象,都
* 通过"工厂"来获取。
*/
public class Demo {
public static void main(String[] args) {
Cat c = new Cat();
Dog d = new Dog();
Cat c1 = AnimalFactory.getCat();
Dog d1 = AnimalFactory.getDog();
Cat c2 = (Cat)AnimalFactory.getAnimal("cat");
Dog d2 = (Dog)AnimalFactory.getAnimal("dog");
}
}public interface IAnimal {
void show();
}public class Cat implements IAnimal {
public void show() {
System.out.println("小猫喵喵......");
}
}public interface IFactory {
public IAnimal getAnimal();
}public class CatFactory implements IFactory {
public IAnimal getAnimal() {
return new Cat();
}
}/*
* 工厂方法模式的概述和使用
* 1.之前的"简单工厂模式"的弊端:当需要新的动物时,要更改"工厂"的代码;
* 2."工厂方法模式",可以在新增"具体产品"时,无需更改原有代码;
* 优点:当增加新的产品时,无需改动之前的任何类;
* 缺点:类太多。
*/
public class Demo {
public static void main(String[] args) {
IFactory factory = new CatFactory();
Cat c1 = (Cat)factory.getAnimal();
c1.show();
}
}public class Student {
private static Student stu = new Student();
private Student(){
}
public static Student getInstance(){
return stu;
}
}/*
* 单例模式:
* 1.单例:一个对象;
* 单:一个
* 例:实例(对象)
* 2.有些类,在整个应用程序运行期间,只需要一个对象;这个类就可以设计为"单例模式"
* 3.设计单例模式的原则:
* 1).不能允许任何类来任意的实例化此类对象;将构造方法"私有化";
* 2).定义私有、静态的本类类型的成员变量,并初始化(饿汉式);
* 3).提供一个公有的、静态的get方法,获取此成员变量的引用;
* 此例:是"单例模式--饿汉式"
*/
public class Demo {
public static void main(String[] args) {
/*Student stu= new Student();
Student stu2 = new Student();*/
Student stu = Student.getInstance();
Student stu2 = Student.getInstance();
Student stu3 = Student.getInstance();
System.out.println(stu == stu2);
System.out.println(stu == stu3);
}
}public class Student {
private static Student stu;
private Student(){
}
public static synchronized Student getInstance(){
if(stu == null){
stu = new Student();
}
return stu;
}
}public class Demo {
public static void main(String[] args) {
Student stu1 = Student.getInstance();
Student stu2 = Student.getInstance();
Student stu3 = Student.getInstance();
System.out.println(stu1 == stu2);
System.out.println(stu1 == stu3);
}
}
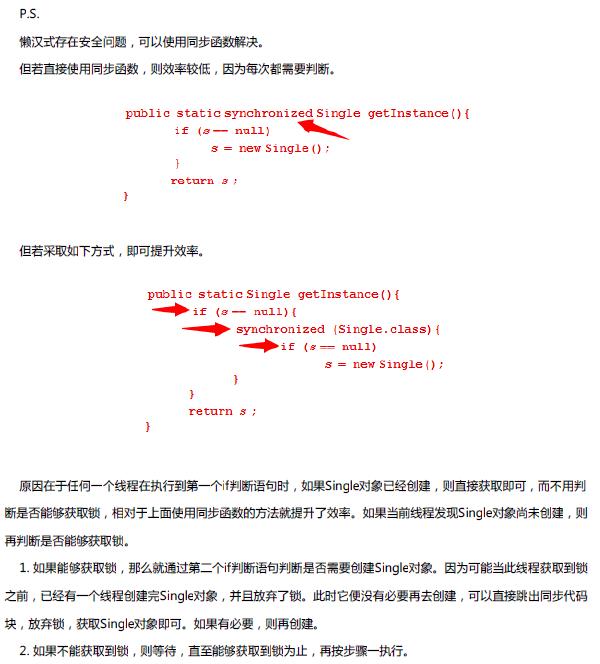
多线程下的单例模式_懒汉式
public class Single {
	private static Single single = null;
	private Single(){

	}
	public static Single getInstance(){
		if(single == null){
			synchronized(Single.class){
				if(single == null){
					single = new Single();
				}
			}
		}
		return single;
	}
}
/*
 * java.lang.Runtime类:每个 Java 应用程序都有"一个" Runtime 类实例
 */
public class Demo {
	public static void main(String[] args) throws IOException {
		Runtime run = Runtime.getRuntime();
		run.exec("notepad");
		run.exec("calc");
	}
}


 1536
1536

 被折叠的 条评论
为什么被折叠?
被折叠的 条评论
为什么被折叠?
 到【灌水乐园】发言


