使用线性布局实现如下界面的设计

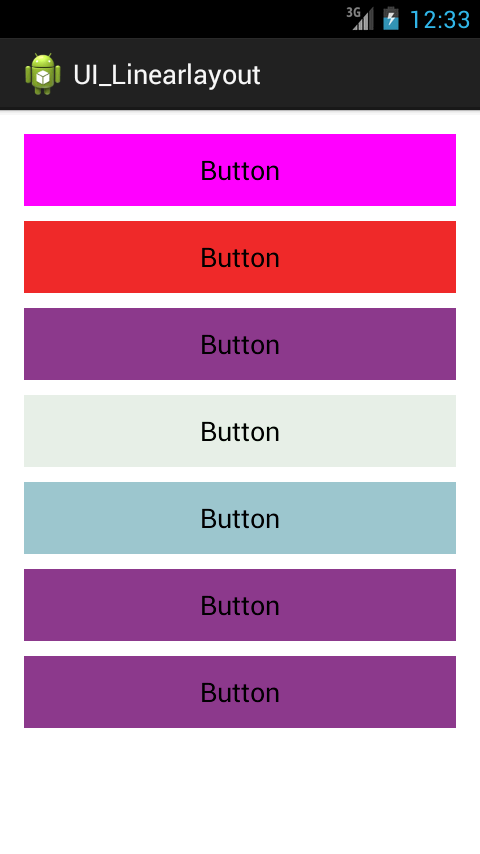
1.在 activity_main.xml
添加几个button按钮。

这里写图片描述

<LinearLayout xmlns:android="http://schemas.android.com/apk/res/android"
    xmlns:tools="http://schemas.android.com/tools"
    android:layout_width="match_parent"
    android:layout_height="match_parent"
    android:paddingBottom="@dimen/activity_vertical_margin"
    android:paddingLeft="@dimen/activity_horizontal_margin"
    android:paddingRight="@dimen/activity_horizontal_margin"
    android:paddingTop="@dimen/activity_vertical_margin"
    tools:context=".MainActivity" 
    android:orientation="vertical">

    <Button
        android:id="@+id/button1"
        android:layout_width="fill_parent"
        android:layout_height="wrap_content"
       android:background="#FF00FF"

        android:text="Button" />

    <Button
        android:id="@+id/button2"
        android:layout_width="fill_parent"
        android:layout_height="wrap_content"
        android:layout_alignParentLeft="true"
        android:layout_alignParentTop="true"
        android:background="#EE2C2C"
        android:text="Button"
        android:layout_marginTop="10dp" />
      <Button
        android:id="@+id/button3"
        android:layout_width="fill_parent"
        android:layout_height="wrap_content"
        android:background="#8E388E"
        android:text="Button"
         android:layout_marginTop="10dp"  />
      <Button
        android:id="@+id/button4"
        android:layout_width="fill_parent"
        android:layout_height="wrap_content"
        android:background="#E0EEE0"
        android:text="Button"
         android:layout_marginTop="10dp"  />
      <Button
        android:id="@+id/button5"
        android:layout_width="fill_parent"
        android:layout_height="wrap_content"
        android:background="#9AC0CD"
        android:text="Button"
         android:layout_marginTop="10dp"  />
      <Button
        android:id="@+id/button6"
        android:layout_width="fill_parent"
        android:layout_height="wrap_content"
        android:background="#8E388E"
        android:text="Button" 
         android:layout_marginTop="10dp" />
       <Button
        android:id="@+id/button7"
        android:layout_width="fill_parent"
        android:layout_height="wrap_content"
        android:background="#8E388E"
        android:text="Button"
         android:layout_marginTop="10dp"  />
</LinearLayout>
  • 0
    点赞
  • 3
    收藏
    觉得还不错? 一键收藏
  • 0
    评论
### 回答1: 1)完成Logo页面到Main页面的跳转功能(自动跳转及手动跳转); 可以使用Android Studio中的Intent实现页面跳转功能,具体实现方法可以参考相关的教程和文档。 2)完成线性布局和相对布局界面设计; 可以使用Android Studio中的布局编辑器进行线性布局和相对布局设计,也可以手动编写XML文件实现布局。 3)完成从Main页面通过Button分别到线性布局和相对布局跳转的功能; 可以在Main页面中添加Button控件,并在其点击事件中使用Intent实现跳转到相应的布局页面。具体实现方法可以参考相关的教程和文档。 ### 回答2: 1)完成Logo页面到Main页面的跳转功能,可以通过以下步骤实现: 在Logo页面的代码中,使用Intent将要跳转的页面指定为Main页面,并设置启动模式为自动跳转。具体代码如下: Intent intent = new Intent(LogoActivity.this, MainActivity.class); startActivity(intent); 同时,还可以为Logo页面设置一个延时任务,通过Handler的postDelayed方法,在一定的时间后自动跳转到Main页面。具体代码如下: new Handler().postDelayed(new Runnable() { public void run() { Intent intent = new Intent(LogoActivity.this, MainActivity.class); startActivity(intent); finish(); } }, 2000); //延时2秒后跳转 而对于手动跳转,可以为Logo页面添加一个按钮或者点击Logo图片触发跳转到Main页面的事件,具体代码如下: Button button = findViewById(R.id.button); button.setOnClickListener(new View.OnClickListener() { @Override public void onClick(View v) { Intent intent = new Intent(LogoActivity.this, MainActivity.class); startActivity(intent); finish(); } }); 2)完成线性布局和相对布局界面设计,可以在布局文件中使用LinearLayout和RelativeLayout标签进行布局设计。具体代码如下: -线性布局: <LinearLayout xmlns:android="http://schemas.android.com/apk/res/android" android:orientation="vertical" android:layout_width="match_parent" android:layout_height="match_parent"> <!-- 在这里添加线性布局的子视图 --> </LinearLayout> -相对布局: <RelativeLayout xmlns:android="http://schemas.android.com/apk/res/android" android:layout_width="match_parent" android:layout_height="match_parent"> <!-- 在这里添加相对布局的子视图 --> </RelativeLayout> 在布局文件中添加对应的子视图,并根据需要设置它们的位置和间距。 3)完成从Main页面通过Button分别到线性布局和相对布局跳转的功能, 可以在Main页面的代码中,为对应的Button设置点击事件,并在事件处理方法中使用Intent跳转到目标页面。具体代码如下: Button linearLayoutButton = findViewById(R.id.linear_layout_button); linearLayoutButton.setOnClickListener(new View.OnClickListener() { @Override public void onClick(View v) { Intent intent = new Intent(MainActivity.this, LinearLayoutActivity.class); startActivity(intent); } }); Button relativeLayoutButton = findViewById(R.id.relative_layout_button); relativeLayoutButton.setOnClickListener(new View.OnClickListener() { @Override public void onClick(View v) { Intent intent = new Intent(MainActivity.this, RelativeLayoutActivity.class); startActivity(intent); } }); 在相应的跳转目标页面的代码中,完成布局设计和其他的功能实现。 ### 回答3: 1) 要完成从Logo页面到Main页面的跳转功能,可以使用以下方法: a) 自动跳转:在Logo页面中设置一个定时器,定时结束后跳转到Main页面。可以使用Handler类的postDelayed()方法来实现延迟跳转。 b) 手动跳转:在Logo页面的布局中添加一个按钮,设置点击事件,在点击事件中使用Intent跳转到Main页面。 2) 要完成线性布局和相对布局界面设计,可以按照以下步骤: a) 线性布局:在布局文件中使用LinearLayout标签,设置orientaion属性为"vertical"或"horizontal",根据需要可以添加子视图并设置它们的布局参数。 b) 相对布局:在布局文件中使用RelativeLayout标签,通过设置子视图的相对位置属性,如alignParentTop、alignParentLeft、below等来实现布局。 3) 要完成从Main页面通过Button分别跳转到线性布局和相对布局的功能,可以采用以下方法: a) 在Main页面的布局文件中添加两个按钮,分别用来跳转到线性布局和相对布局页面。 b) 在Main页面中添加按钮的点击事件,并在点击事件中使用Intent来跳转到对应的线性布局或相对布局页面。 c) 跳转过程中可以使用Activity类的startActivity()方法,并传递布局文件所对应的Activity类作为参数来实现页面跳转。 希望以上回答能够解决您的问题。

“相关推荐”对你有帮助么?

  • 非常没帮助
  • 没帮助
  • 一般
  • 有帮助
  • 非常有帮助
提交
评论
添加红包

请填写红包祝福语或标题

红包个数最小为10个

红包金额最低5元

当前余额3.43前往充值 >
需支付:10.00
成就一亿技术人!
领取后你会自动成为博主和红包主的粉丝 规则
hope_wisdom
发出的红包
实付
使用余额支付
点击重新获取
扫码支付
钱包余额 0

抵扣说明:

1.余额是钱包充值的虚拟货币,按照1:1的比例进行支付金额的抵扣。
2.余额无法直接购买下载,可以购买VIP、付费专栏及课程。

余额充值