ASimpleCache框架源码链接
https://github.com/yangfuhai/ASimpleCache
杨神作品,大家最熟悉他的应该是afinal框架吧
官方介绍
ASimpleCache 是一个为Android制定的 轻量级的 开源缓存框架。轻量到只有一个Java文件(由十几个类精简而来)。
1、它可以缓存什么东西?
普通的字符串、JsonObject、JsonArray、Bitmap、Drawable、序列化的java对象,和 byte数据。
2、它有什么特色?
特色主要是:
1:轻,轻到只有一个JAVA文件。
2:可配置,可以配置缓存路径,缓存大小,缓存数量等。
3:可以设置缓存超时时间,缓存超时自动失效,并被删除。
4:支持多进程。
3、它在android中可以用在哪些场景?
1、替换SharePreference当做配置文件
2、可以缓存网络请求数据,比如oschina的android客户端可以缓存http请求的新闻内容,缓存时间假设为1个小时,超时后自动失效,让客户端重新请求新的数据,减少客户端流量,同时减少服务器并发量。
3、您来说…
4、如何使用 ASimpleCache?
以下有个小的demo,希望您能喜欢:
ACache mCache = ACache.get(this)
mCache.put("test_key1", "test value")
mCache.put("test_key2", "test value", 10)
mCache.put("test_key3", "test value", 2 * ACache.TIME_DAY)
获取数据
ACache mCache = ACache.get(this);
String value = mCache.getAsString("test_key1");
源码分析
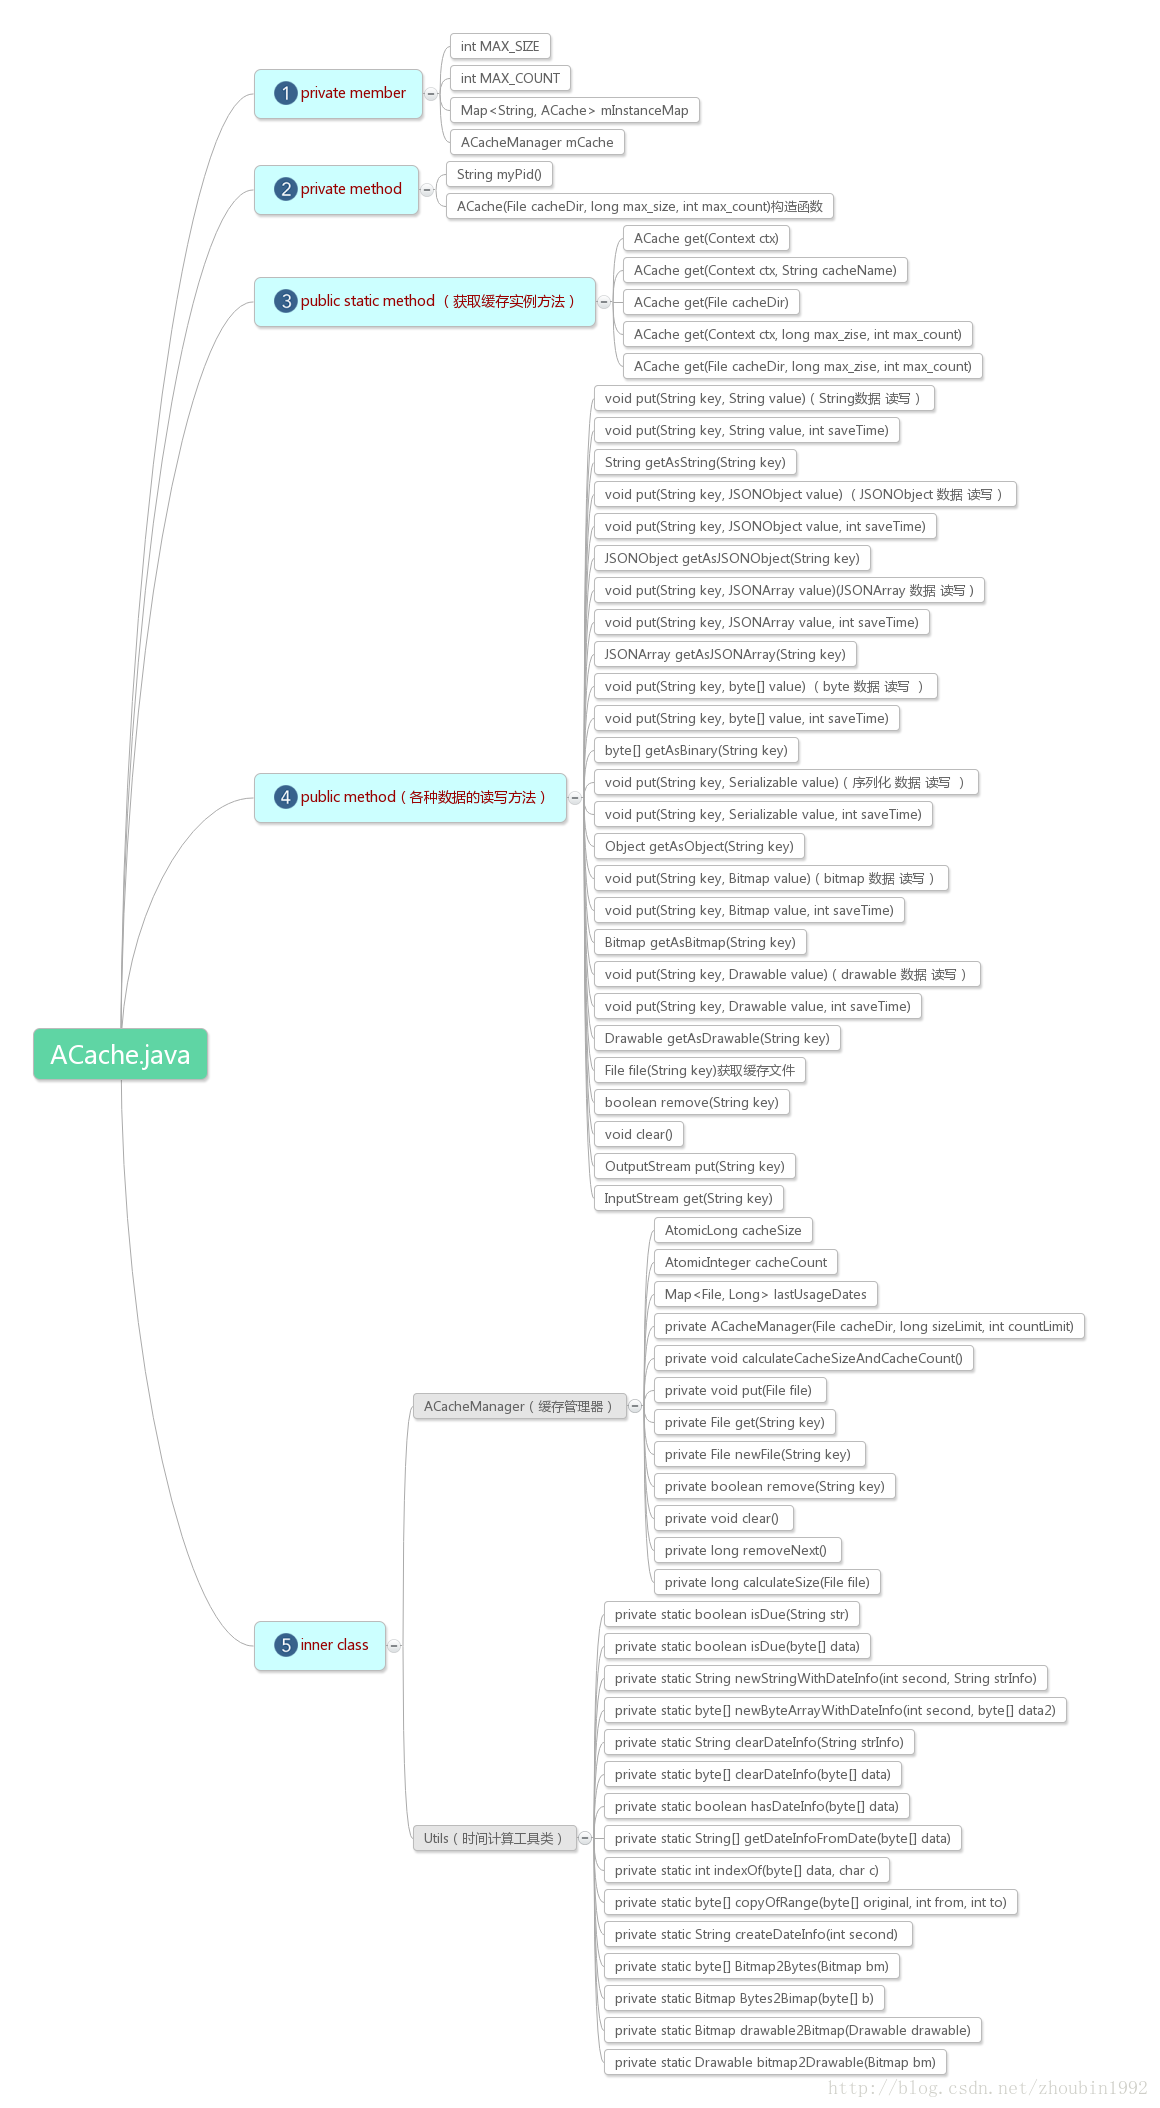
一、ACache类结构图
ASimpleCache里只有一个JAVA文件——ACache.java
首先我用思维导图制作了ACache类的详细结构图:
二、官方demo分析
通过分析官方给的demo来驱动源码分析吧
以字符串存储为例(官方给的demo里给出了很多种数据读取的例子,其实方法相似),打开SaveStringActivity.java:
package com.yangfuhai.asimplecachedemo;
import org.afinal.simplecache.ACache;
import android.app.Activity;
import android.os.Bundle;
import android.view.View;
import android.widget.EditText;
import android.widget.TextView;
import android.widget.Toast;
/**
*
* @ClassName: SaveStringActivity
* @Description: 缓存string
* @Author Yoson Hao
* @WebSite www.haoyuexing.cn
* @Email haoyuexing@gmail.com
* @Date 2013-8-7 下午9:59:43
*
*/
public class SaveStringActivity extends Activity {
private EditText mEt_string_input;
private TextView mTv_string_res;
private ACache mCache;
@Override
protected void onCreate(Bundle savedInstanceState) {
super.onCreate(savedInstanceState);
setContentView(R.layout.activity_save_string);
initView();
mCache = ACache.get(this);
}
/**
* 初始化控件
*/
private void initView() {
mEt_string_input = (EditText) findViewById(R.id.et_string_input);
mTv_string_res = (TextView) findViewById(R.id.tv_string_res);
}
/**
* 点击save事件
*
* @param v
*/
public void save(View v) {
if (mEt_string_input.getText().toString().trim().length() == 0) {
Toast.makeText(
this,
"Cuz u input is a nullcharacter ... So , when u press \"read\" , if do not show any result , plz don't be surprise",
Toast.LENGTH_SHORT).show();
}
mCache.put("testString", mEt_string_input.getText().toString(),300);
}
/**
* 点击read事件
*
* @param v
*/
public void read(View v) {
String testString = mCache.getAsString("testString");
if (testString == null) {
Toast.makeText(this, "String cache is null ...", Toast.LENGTH_SHORT)
.show();
mTv_string_res.setText(null);
return;
}
mTv_string_res.setText(testString);
}
/**
* 点击clear事件
*
* @param v
*/
public void clear(View v) {
mCache.remove("testString");
}
}
- 1
- 2
- 3
- 4
- 5
- 6
- 7
- 8
- 9
- 10
- 11
- 12
- 13
- 14
- 15
- 16
- 17
- 18
- 19
- 20
- 21
- 22
- 23
- 24
- 25
- 26
- 27
- 28
- 29
- 30
- 31
- 32
- 33
- 34
- 35
- 36
- 37
- 38
- 39
- 40
- 41
- 42
- 43
- 44
- 45
- 46
- 47
- 48
- 49
- 50
- 51
- 52
- 53
- 54
- 55
- 56
- 57
- 58
- 59
- 60
- 61
- 62
- 63
- 64
- 65
- 66
- 67
- 68
- 69
- 70
- 71
- 72
- 73
- 74
- 75
- 76
- 77
- 78
- 79
- 80
- 81
- 82
- 83
- 84
- 85
- 86
- 87
- 88
- 89
可以看到缓存字符串的读取方法很简单!!!
- 在onCreate里通过get方式获取缓存实例
mCache = ACache.get(this); - 在save按钮的点击事件里,通过put方法往缓存实例里保存字符串
mCache.put(“testString”, mEt_string_input.getText().toString(),300); - 在read按钮的点击事件里,通过getAsString方法从缓存实例里读取字符串
mCache.getAsString(“testString”);
其他数据读取,方法相似,也是这三个步骤。300为保存时间300秒。
三、ACache源码分析
1、获取缓存实例
那我们就从ACache.get()开始吧,其实查看上面的思维导图,ACache类的构造方法为private的,所以新建缓存实例只能通过ACache.get方式获取。
public static ACache get(Context ctx) {
return get(ctx, "ACache");
}
public static ACache get(Context ctx, String cacheName) {
File f = new File(ctx.getCacheDir(), cacheName);
return get(f, MAX_SIZE, MAX_COUNT);
}
public static ACache get(File cacheDir, long max_zise, int max_count) {
ACache manager = mInstanceMap.get(cacheDir.getAbsoluteFile() + myPid());
if (manager == null) {
manager = new ACache(cacheDir, max_zise, max_count);
mInstanceMap.put(cacheDir.getAbsolutePath() + myPid(), manager);
}
return manager;
}
- 1
- 2
- 3
- 4
- 5
- 6
- 7
- 8
- 9
- 10
- 11
- 12
- 13
- 14
- 15
- 16
- 17
- 18
- 19
- 20
- 21
- 1
- 2
- 3
- 4
- 5
- 6
- 7
- 8
- 9
- 10
- 11
- 12
- 13
- 14
- 15
- 16
- 17
- 18
- 19
- 20
- 21
在调用ACache.get(Context)方法过程中,其实执行了三个get方法
(1)get(Context ctx)->(2)get(Context ctx, String cacheName)->(3)get(File cacheDir, long max_zise, int max_count)
在(2)中新建了缓存目录,路径为:
/data/data/app-package-name/cache/ACache
缓存大小MAX_SIZE和数量MAX_COUNT均由final变量控制。
其实最终调用(3)获取实例:
mInstanceMap的key为缓存目录+每次应用开启的进程id,value为ACache.
初次运行,mInstanceMap没有任何键值对,所以manager == null。故通过ACache构造方法构造新实例,最后将该实例引用存入mInstanceMap。
接下来我们来看看ACache构造方法:
private ACache(File cacheDir, long max_size, int max_count) {
if (!cacheDir.exists() && !cacheDir.mkdirs()) {
throw new RuntimeException("can't make dirs in " + cacheDir.getAbsolutePath());
}
mCache = new ACacheManager(cacheDir, max_size, max_count);
}
缓存目录不存在并且无法创建时,抛出异常,否则实例化ACacheManager内部类实例(缓存管理器)。ACacheManager内部类的构造函数如下:
private ACacheManager(File cacheDir, long sizeLimit, int countLimit) {
this.cacheDir = cacheDir;
this.sizeLimit = sizeLimit;
this.countLimit = countLimit;
cacheSize = new AtomicLong();
cacheCount = new AtomicInteger();
calculateCacheSizeAndCacheCount();
}
构造函数得到原子类实例cacheSize和cacheCount,通过calculateCacheSizeAndCacheCount();方法计算cacheSize和cacheCount如下:
/**
* 计算 cacheSize和cacheCount
*/
private void calculateCacheSizeAndCacheCount() {
new Thread(new Runnable() {
@Override
public void run() {
long size = 0;
int count = 0;
File[] cachedFiles = cacheDir.listFiles();
if (cachedFiles != null) {
for (File cachedFile : cachedFiles) {
size += calculateSize(cachedFile);
count += 1;
lastUsageDates.put(cachedFile, cachedFile.lastModified());
}
cacheSize.set(size);
cacheCount.set(count);
}
}
}).start();
}
- 1
- 2
- 3
- 4
- 5
- 6
- 7
- 8
- 9
- 10
- 11
- 12
- 13
- 14
- 15
- 16
- 17
- 18
- 19
- 20
- 21
- 22
- 23
- 1
- 2
- 3
- 4
- 5
- 6
- 7
- 8
- 9
- 10
- 11
- 12
- 13
- 14
- 15
- 16
- 17
- 18
- 19
- 20
- 21
- 22
- 23
calculateCacheSizeAndCacheCount方法中开启线程进行大小和数量的计算。计算完后存入cacheSize和cacheCount,cacheSize和cacheCount在内部类中定义为AtomicLong和AtomicInteger量子类,也就是线程安全的。其基本的特性就是在多线程环境下,当有多个线程同时执行这些类的实例包含的方法时,具有排他性,即当某个线程进入方法,执行其中的指令时,不会被其他线程打断,而别的线程就像自旋锁一样,一直等到该方法执行完成,才由JVM从等待队列中选择一个另一个线程进入。
到这里获取缓存实例工作完成,主要完成了如下工作:
- 新建了缓存目录
- 通过ACache构造方法构造新实例,并且将该实例引用插入mInstanceMap
- 实例化ACacheManager,计算cacheSize和cacheCount
接下来就是数据存取操作。
2、往缓存实例存入数据
从上面的思维导图public method(各种数据的读写方法)中,有各种public的put和get等方法来缓存各种数据类型的数据。由上面的demo的put方法
mCache.put(“testString”, mEt_string_input.getText().toString(),300);我们找到原形:
    /**
     * 保存 String数据 到 缓存中
     *
     * @param key
     *            保存的key
     * @param value
     *            保存的String数据
     * @param saveTime
     *            保存的时间,单位:秒
     */
    public void put(String key, String value, int saveTime) {
        put(key, Utils.newStringWithDateInfo(saveTime, value));
    }
这里的put方法可以指定缓存时间。调用他自身的另一个put方法:
/**
* 保存 String数据 到 缓存中
*
* @param key
* 保存的key
* @param value
* 保存的String数据
*/
public void put(String key, String value) {
File file = mCache.newFile(key);
BufferedWriter out = null;
try {
out = new BufferedWriter(new FileWriter(file), 1024);
out.write(value);
} catch (IOException e) {
e.printStackTrace();
} finally {
if (out != null) {
try {
out.flush();
out.close();
} catch (IOException e) {
e.printStackTrace();
}
}
mCache.put(file);
}
}
- 1
- 2
- 3
- 4
- 5
- 6
- 7
- 8
- 9
- 10
- 11
- 12
- 13
- 14
- 15
- 16
- 17
- 18
- 19
- 20
- 21
- 22
- 23
- 24
- 25
- 26
- 27
- 28
- 1
- 2
- 3
- 4
- 5
- 6
- 7
- 8
- 9
- 10
- 11
- 12
- 13
- 14
- 15
- 16
- 17
- 18
- 19
- 20
- 21
- 22
- 23
- 24
- 25
- 26
- 27
- 28
在put(String key, String value)方法中首先调用mCache.newFile(key)新建一个文件:
private File newFile(String key) {
return new File(cacheDir, key.hashCode() + "");
}
新建的文件名为key的整型哈希码。回到put(String key, String value)中,然后通过out.write(value);将数据存入文件。最后调用mCache.put(file);进行ACacheManager实例的更新操作:
private void put(File file) {
int curCacheCount = cacheCount.get();
while (curCacheCount + 1 > countLimit) {
long freedSize = removeNext();
cacheSize.addAndGet(-freedSize);
curCacheCount = cacheCount.addAndGet(-1);
}
cacheCount.addAndGet(1);
long valueSize = calculateSize(file);
long curCacheSize = cacheSize.get();
while (curCacheSize + valueSize > sizeLimit) {
long freedSize = removeNext();
curCacheSize = cacheSize.addAndGet(-freedSize);
}
cacheSize.addAndGet(valueSize);
Long currentTime = System.currentTimeMillis();
file.setLastModified(currentTime);
lastUsageDates.put(file, currentTime);
}
- 1
- 2
- 3
- 4
- 5
- 6
- 7
- 8
- 9
- 10
- 11
- 12
- 13
- 14
- 15
- 16
- 17
- 18
- 19
- 20
- 21
- 22
- 23
- 24
- 25
- 26
- 27
- 1
- 2
- 3
- 4
- 5
- 6
- 7
- 8
- 9
- 10
- 11
- 12
- 13
- 14
- 15
- 16
- 17
- 18
- 19
- 20
- 21
- 22
- 23
- 24
- 25
- 26
- 27
分析完ACacheManager的put()后,我们回到put(key, Utils.newStringWithDateInfo(saveTime, value))
其中第二个参数value传入的是Utils.newStringWithDateInfo(saveTime, value),而newStringWithDateInfo是ACache的内部工具类的一个方法,在value内容前面加上了时间信息:
private static String newStringWithDateInfo(int second, String strInfo) {
return createDateInfo(second) + strInfo;
}
返回拼接createDateInfo(second)和value的字符串。createDateInfo()如下:
private static String createDateInfo(int second) {
String currentTime = System.currentTimeMillis() + "";
while (currentTime.length() < 13) {
currentTime = "0" + currentTime;
}
return currentTime + "-" + second + mSeparator;
}
返回字符串格式为 当前时间-保存时间“ ”
3、从缓存实例读取数据
由上面的demo的get方法mCache.getAsString(“testString”);我们找到原形:
/**
* 读取 String数据
*
* @param key
* @return String 数据
*/
public String getAsString(String key) {
File file = mCache.get(key);
if (!file.exists())
return null;
boolean removeFile = false;
BufferedReader in = null;
try {
in = new BufferedReader(new FileReader(file));
String readString = "";
String currentLine;
while ((currentLine = in.readLine()) != null) {
readString += currentLine;
}
if (!Utils.isDue(readString)) {
return Utils.clearDateInfo(readString);
} else {
removeFile = true;
return null;
}
} catch (IOException e) {
e.printStackTrace();
return null;
} finally {
if (in != null) {
try {
in.close();
} catch (IOException e) {
e.printStackTrace();
}
}
if (removeFile)
remove(key);
}
}
- 1
- 2
- 3
- 4
- 5
- 6
- 7
- 8
- 9
- 10
- 11
- 12
- 13
- 14
- 15
- 16
- 17
- 18
- 19
- 20
- 21
- 22
- 23
- 24
- 25
- 26
- 27
- 28
- 29
- 30
- 31
- 32
- 33
- 34
- 35
- 36
- 37
- 38
- 39
- 40
- 41
- 1
- 2
- 3
- 4
- 5
- 6
- 7
- 8
- 9
- 10
- 11
- 12
- 13
- 14
- 15
- 16
- 17
- 18
- 19
- 20
- 21
- 22
- 23
- 24
- 25
- 26
- 27
- 28
- 29
- 30
- 31
- 32
- 33
- 34
- 35
- 36
- 37
- 38
- 39
- 40
- 41
getAsString(String key)方法里首先通过缓存管理器的mCache.get(key)方法获取文件,然后用Utils.isDue(readString)**判断是否字符串数据到期,未到期返回去除时间信息的字符串内容;到期则移除缓存,返回空。**Utils.isDue(readString)调用了isDue(byte[] data)判断:
        /**
         * 判断缓存的byte数据是否到期
         *
         * @param data
         * @return true:到期了 false:还没有到期
         */
        private static boolean isDue(byte[] data) {
            String[] strs = getDateInfoFromDate(data);
            if (strs != null && strs.length == 2) {
                String saveTimeStr = strs[0];
                while (saveTimeStr.startsWith("0")) {
                    saveTimeStr = saveTimeStr.substring(1, saveTimeStr.length());
                }
                long saveTime = Long.valueOf(saveTimeStr);
                long deleteAfter = Long.valueOf(strs[1]);
                if (System.currentTimeMillis() > saveTime + deleteAfter * 1000) {
                    return true;
                }
            }
            return false;
        }
- 1
- 2
- 3
- 4
- 5
- 6
- 7
- 8
- 9
- 10
- 11
- 12
- 13
- 14
- 15
- 16
- 17
- 18
- 19
- 20
- 21
- 22
- 1
- 2
- 3
- 4
- 5
- 6
- 7
- 8
- 9
- 10
- 11
- 12
- 13
- 14
- 15
- 16
- 17
- 18
- 19
- 20
- 21
- 22
至此整个缓存字符串读取过程在ACache的源码分析完成,其他缓存数据类型读取方法分析过程一样。
JsonObject、JsonArray、Bitmap、Drawable、序列化的存入缓存都是转化为字符串/byte格式,再调用函数put(String key, String value)即可。
比如BitMap的保存:
    /**
     * 保存 bitmap 到 缓存中,有保存时间
     *
     * @param key
     *            保存的key
     * @param value
     *            保存的 bitmap 数据
     * @param saveTime
     *            保存的时间,单位:秒
     */
    public void put(String key, Bitmap value, int saveTime) {
        put(key, Utils.Bitmap2Bytes(value), saveTime);
    }
Bitmap的读取:
    /**
     * 读取 bitmap 数据
     *
     * @param key
     * @return bitmap 数据
     */
    public Bitmap getAsBitmap(String key) {
        if (getAsBinary(key) == null) {
            return null;
        }
        return Utils.Bytes2Bimap(getAsBinary(key));
    }
思想就是把bitmap转化为byte[], 再调用缓存byte的函数 。通过Utils.Bitmap2Bytes(value)完成Bitmap → byte[] 的转换。通过Utils.Bytes2Bimap(getAsBinary(key))完成byte[] → Bitmap的转换。
private static byte[] Bitmap2Bytes(Bitmap bm) {
if (bm == null) {
return null;
}
ByteArrayOutputStream baos = new ByteArrayOutputStream();
bm.compress(Bitmap.CompressFormat.PNG, 100, baos);
return baos.toByteArray();
}
private static Bitmap Bytes2Bimap(byte[] b) {
if (b.length == 0) {
return null;
}
return BitmapFactory.decodeByteArray(b, 0, b.length);
}
- 1
- 2
- 3
- 4
- 5
- 6
- 7
- 8
- 9
- 10
- 11
- 12
- 13
- 14
- 15
- 16
- 17
- 18
- 19
- 20
- 21
- 1
- 2
- 3
- 4
- 5
- 6
- 7
- 8
- 9
- 10
- 11
- 12
- 13
- 14
- 15
- 16
- 17
- 18
- 19
- 20
- 21
很简单吧。Drawable的缓存就是先转化为Bitmap,之后就是上面的步骤转换成byte。
总结
该开源库类简单,容易理解。
- 可以使用ACache把那些不需要实时更新的数据缓存起来,一来减少网络请求,二来本地加载速度也快。
- 可以设置缓存时间。
- 可以替换SharePreference当做配置文件,保存多种数据类型,比如可以保存头像信息。


 2万+
2万+

 被折叠的 条评论
为什么被折叠?
被折叠的 条评论
为什么被折叠?
 到【灌水乐园】发言


