


http://blog.csdn.net/wangjinyu501/article/details/9008261
一、概述
关于android线程间的通信其实是很重要的一个问题,所以必有要对此有一个清晰的认识。题目并不完整,还应该加上Thread以及Runnable,下面开始分别介绍。
二、介绍
1、Message
Message定义一个消息包含一个描述和任意的数据对象,可以发送给一个Handler。这个对象包含两个额外的int字段和一个额外的对象字段。这个类有几个比较重要的字段:
a.arg1和arg2:我们可以使用两个字段用来存放我们需要传递的整型值。
b.obj:该字段是Object类型,我们可以让该字段传递某个多项到消息的接受者中。
c.what:这个字段可以说是消息的标志,在消息处理中,我们可以根据这个字段的不同的值进行不同的处理,类似于我们在处理Button事件时,通过switch(v.getId())判断是点击了哪个按钮。
在使用Message时,我们可以通过new Message()创建一个Message实例,但是Android 更推荐我们通过Message.obtain()或者Handler.obtainMessage()获取Message对象。这并不一定是直接创建一个新的实例,而是先从消息池中看有没有可用的Message实例,存在则直接取出并返回这个实例。反之如果消息池中没有可用的Message实例,则根据给定的参数new一个新Message对象。通过分析源码可得知,Android系统默认情况下在消息池中实例化10个Message对象。
2、MessageQueue
消息队列,用来存放Message对象的数据结构,按照“先进先出”的原则存放消息。存放并非实际意义的保存,而是将Message对象以链表的方式串联起来的。MessageQueue对象不需要我们自己创建,而是有Looper对象对其进行管理,一个线程最多只可以拥有一个 MessageQueue。我们可以通过Looper.myQueue()获取当前线程中的MessageQueue。
3、Looper
Looper是用于给一个线程添加一个消息队列(MessageQueue),并且循环等待,当有消息时会唤起线程来处理消息的一个工具,直到线程结束为止。通常情况下不会用到Looper,因为对于Activity,Service等系统组件,Frameworks已经为我们初始化好了线程(俗称的UI线程或主线程),在其内含有一个Looper,和由Looper创建的消息队列,所以主线程会一直运行,处理用户事件,直到某些事件(BACK)退出。MessageQueue的管理者,在一个线程中,如果存在Looper对象,则必定存在MessageQueue对象,并且只存在一个Looper对象和一个MessageQueue对象。在Android 系统中,除了主线程有默认的Looper对象,其它线程默认是没有Looper对象。如果想让我们新创建的线程拥有Looper对象时,我们首先应调用Looper.prepare()方法,然后再调用Looper.loop()方法。
如果,我们需要新建一个线程,并且这个线程要能够循环处理其他线程发来的消息事件,或者需要长期与其他线程进行复杂的交互,这时就需要用到Looper来给线程建立消息队列。
使用Looper也非常的简单,它的方法比较少,最主要的有四个:
public static prepare();
public static myLooper();
public static loop();
public void quit();
使用方法如下:
1. 在每个线程的run()方法中的最开始调用Looper.prepare(),这是为线程初始化消息队列。
2. 之后调用Looper.myLooper()获取此Looper对象的引用。这不是必须的,但是如果你需要保存Looper对象的话,一定要在prepare()之后,否则调用在此对象上的方法不一定有效果,如looper.quit()就不会退出。
3. 在run()方法中添加Handler来处理消息
4. 添加Looper.loop()调用,这是让线程的消息队列开始运行,可以接收消息了。
5. 在想要退出消息循环时,调用Looper.quit()注意,这个方法是要在对象上面调用,很明显,用对象的意思就是要退出具体哪个Looper。如果run()中无其他操作,线程也将终止运行。
在API是这样介绍使用的,大多数与一个消息循环交互 是通过handler来实现的。官方给出一个很典型的例子,如下:
- <span style="font-family:SimSun;"> class LooperThread extends Thread {
- public Handler mHandler;
- public void run() {
- Looper.prepare();
- mHandler = new Handler() {
- public void handleMessage(Message msg) {
- // process incoming messages here
- }
- };
- Looper.loop();
- }
- }</span>
- <span style="font-family:SimSun;">public class LooperDemoActivity extends Activity {
- private WorkerThread mWorkerThread;
- private TextView mStatusLine;
- private Handler mMainHandler;
- @Override
- public void onCreate(Bundle icicle) {
- super.onCreate(icicle);
- setContentView(R.layout.looper_demo_activity);
- mMainHandler = new Handler() {
- @Override
- public void handleMessage(Message msg) {
- String text = (String) msg.obj;
- if (TextUtils.isEmpty(text)) {
- return;
- }
- mStatusLine.setText(text);
- }
- };
- mWorkerThread = new WorkerThread();
- final Button action = (Button) findViewById(R.id.looper_demo_action);
- action.setOnClickListener(new View.OnClickListener() {
- public void onClick(View v) {
- mWorkerThread.executeTask("please do me a favor");
- }
- });
- final Button end = (Button) findViewById(R.id.looper_demo_quit);
- end.setOnClickListener(new View.OnClickListener() {
- public void onClick(View v) {
- mWorkerThread.exit();
- }
- });
- mStatusLine = (TextView) findViewById(R.id.looper_demo_displayer);
- mStatusLine.setText("Press 'do me a favor' to execute a task, press 'end of service' to stop looper thread");
- }
- @Override
- public void onDestroy() {
- super.onDestroy();
- mWorkerThread.exit();
- mWorkerThread = null;
- }
- private class WorkerThread extends Thread {
- protected static final String TAG = "WorkerThread";
- private Handler mHandler;
- private Looper mLooper;
- public WorkerThread() {
- start();
- }
- public void run() {
- // Attention: if you obtain looper before Looper#prepare(), you can still use the looper
- // to process message even after you call Looper#quit(), which means the looper does not
- //really quit.
- Looper.prepare();
- // So we should call Looper#myLooper() after Looper#prepare(). Anyway, we should put all stuff between Looper#prepare()
- // and Looper#loop().
- // In this case, you will receive "Handler{4051e4a0} sending message to a Handler on a dead thread
- // 05-09 08:37:52.118: W/MessageQueue(436): java.lang.RuntimeException: Handler{4051e4a0} sending message
- // to a Handler on a dead thread", when try to send a message to a looper which Looper#quit() had called,
- // because the thread attaching the Looper and Handler dies once Looper#quit() gets called.
- mLooper = Looper.myLooper();
- // either new Handler() and new Handler(mLooper) will work
- mHandler = new Handler(mLooper) {
- @Override
- public void handleMessage(Message msg) {
- /*
- * Attention: object Message is not reusable, you must obtain a new one for each time you want to use it.
- * Otherwise you got "android.util.AndroidRuntimeException: { what=1000 when=-15ms obj=it is my please
- * to serve you, please be patient to wait!........ } This message is already in use."
- */
- // Message newMsg = Message.obtain();
- StringBuilder sb = new StringBuilder();
- sb.append("it is my please to serve you, please be patient to wait!\n");
- Log.e(TAG, "workerthread, it is my please to serve you, please be patient to wait!");
- for (int i = 1; i < 100; i++) {
- sb.append(".");
- Message newMsg = Message.obtain();
- newMsg.obj = sb.toString();
- mMainHandler.sendMessage(newMsg);
- Log.e(TAG, "workthread, working" + sb.toString());
- SystemClock.sleep(100);
- }
- Log.e(TAG, "workerthread, your work is done.");
- sb.append("\nyour work is done");
- Message newMsg = Message.obtain();
- newMsg.obj = sb.toString();
- mMainHandler.sendMessage(newMsg);
- }
- };
- Looper.loop();
- }
- public void exit() {
- if (mLooper != null) {
- mLooper.quit();
- mLooper = null;
- }
- }
- // This method returns immediately, it just push an Message into Thread's MessageQueue.
- // You can also call this method continuously, the task will be executed one by one in the
- // order of which they are pushed into MessageQueue(they are called).
- public void executeTask(String text) {
- if (mLooper == null || mHandler == null) {
- Message msg = Message.obtain();
- msg.obj = "Sorry man, it is out of service";
- mMainHandler.sendMessage(msg);
- return;
- }
- Message msg = Message.obtain();
- msg.obj = text;
- mHandler.sendMessage(msg);
- }
- }
- }</span>
如果想要终止服务线程,在mLooper对象上调用quit(),就会退出消息循环,因为线程无其他操作,所以整个线程也会终止。要注意的是当一个线程的消息循环已经退出后,不能再给其发送消息,否则会有异常抛出"RuntimeException: Handler{4051e4a0} sending message to a Handler on a dead thread"。所以,建议在Looper.prepare()后,调用Looper.myLooper()来获取对此Looper的引用,一来是用于终止(quit()必须在对象上面调用); 另外就是用于接收消息时检查消息循环是否已经退出(如上例)。
4、Handler
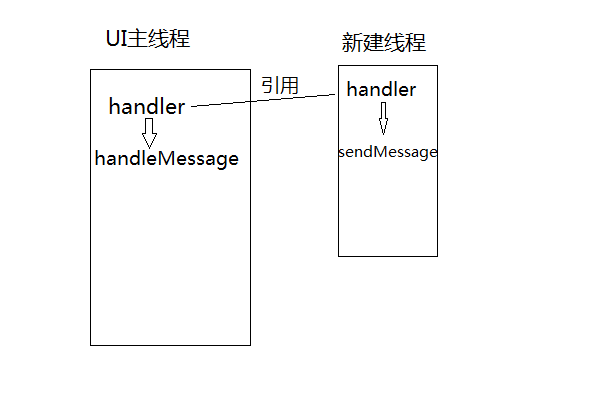
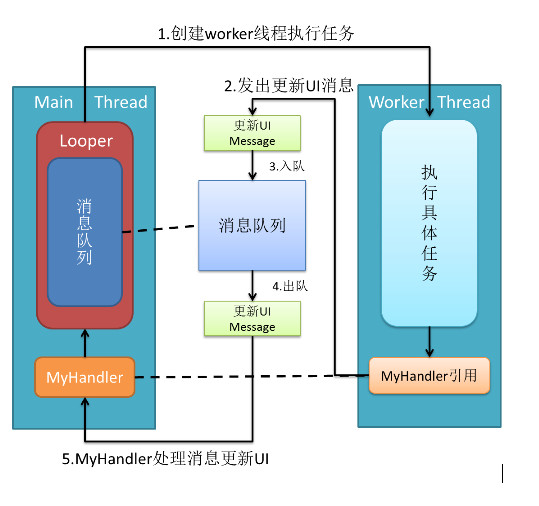
一个Handler允许你发送和处理一个与一个线程的MessageQueue相关联的Message和Runnable对象。每一个Handler实例都和一个单一线程以及这个线程的MesageQueue相关联。当你创建一个新的Handler实例 ,它被绑定到创建它的线程/消息队列的线程——从那时起,它将处理这个MessageQueue 里面的消息和runnables,执行MessageQueue 面出来的消息。它是消息(Message)的处理者。通过Handler对象我们可以封装Message对象,然后通过sendMessage(msg)把Message对象添加到 MessageQueue中;当MessageQueue循环到该Message时,就会调用该Message对象对应的handler对象的 handleMessage()方法对其进行处理。由于是在handleMessage()方法中处理消息,因此我们应该编写一个类继承自 Handler,然后在handleMessage()处理我们需要的操作。
对于Handler来说,主要有两个功能:1、计划messages and runnables在将来某个时刻被执行 2、将一个要在其他线程执行的动作放入到队列里面。handler扮演了往MQ上添加消息和处理消息的角色(只处理由自己发出的消息),即通知MQ它要执行一个任务(sendMessage),并在loop到自己的时候执行该任务(handleMessage),整个过程是异步的。handler创建时会关联一个looper,默认的构造方法将关联当前线程的looper,不过这也是可以set的.android的主线程也是一个looper线程(looper在android中运用很广),我们在其中创建的handler默认将关联主线程MQ。因此,利用handler的一个solution就是在activity中创建handler并将其引用传递给worker thread,worker thread执行完任务后使用handler发送消息通知activity更新UI。(过程如图)。
- import android.os.Message;
- public class SonThread extends Thread {
- private int i = 0;
- @Override
- public void run() {
- while (i < 100) {
- i = i + 10;
- Message msg = new Message();
- msg.arg1 = i;
- try {
- Thread.sleep(1000);
- } catch (InterruptedException e) {
- e.printStackTrace();
- }
- HandlerTestActivity.myHandler.sendMessage(msg);
- }
- if (i == 100) {
- HandlerTestActivity.myHandler.removeCallbacks(this);
- }
- }
- }
- import android.app.Activity;
- import android.os.Bundle;
- import android.os.Handler;
- import android.os.Message;
- import android.widget.ProgressBar;
- public class HandlerTestActivity extends Activity {
- private ProgressBar progressBar;
- private SonThread myThread;
- public static Handler myHandler;
- public void init() {
- progressBar = (ProgressBar) findViewById(R.id.progressBar1);
- myThread = new SonThread();
- myThread.start();
- myHandler = new Handler() {
- @Override
- public void handleMessage(Message msg) {
- super.handleMessage(msg);
- progressBar.setProgress(msg.arg1);
- }
- };
- }
- @Override
- public void onCreate(Bundle savedInstanceState) {
- super.onCreate(savedInstanceState);
- setContentView(R.layout.main);
- init();
- }
- }
Activity.runOnUiThread( Runnable )
View.post( Runnable )
View.postDelayed( Runnable, long )
Hanlder


 2833
2833

 被折叠的 条评论
为什么被折叠?
被折叠的 条评论
为什么被折叠?
 到【灌水乐园】发言


