ElasticSearch 安装使用
提示:ElasticSearch是基于Lucene 做了一下封装和增强
文章目录
一、Windows下安装和启动
下载地址:https://www.elastic.co/cn/downloads/
历史版本下载:https://www.elastic.co/cn/downloads/past-releases/
解压即可(尽量将ElasticSearch相关工具放在统一目录下)

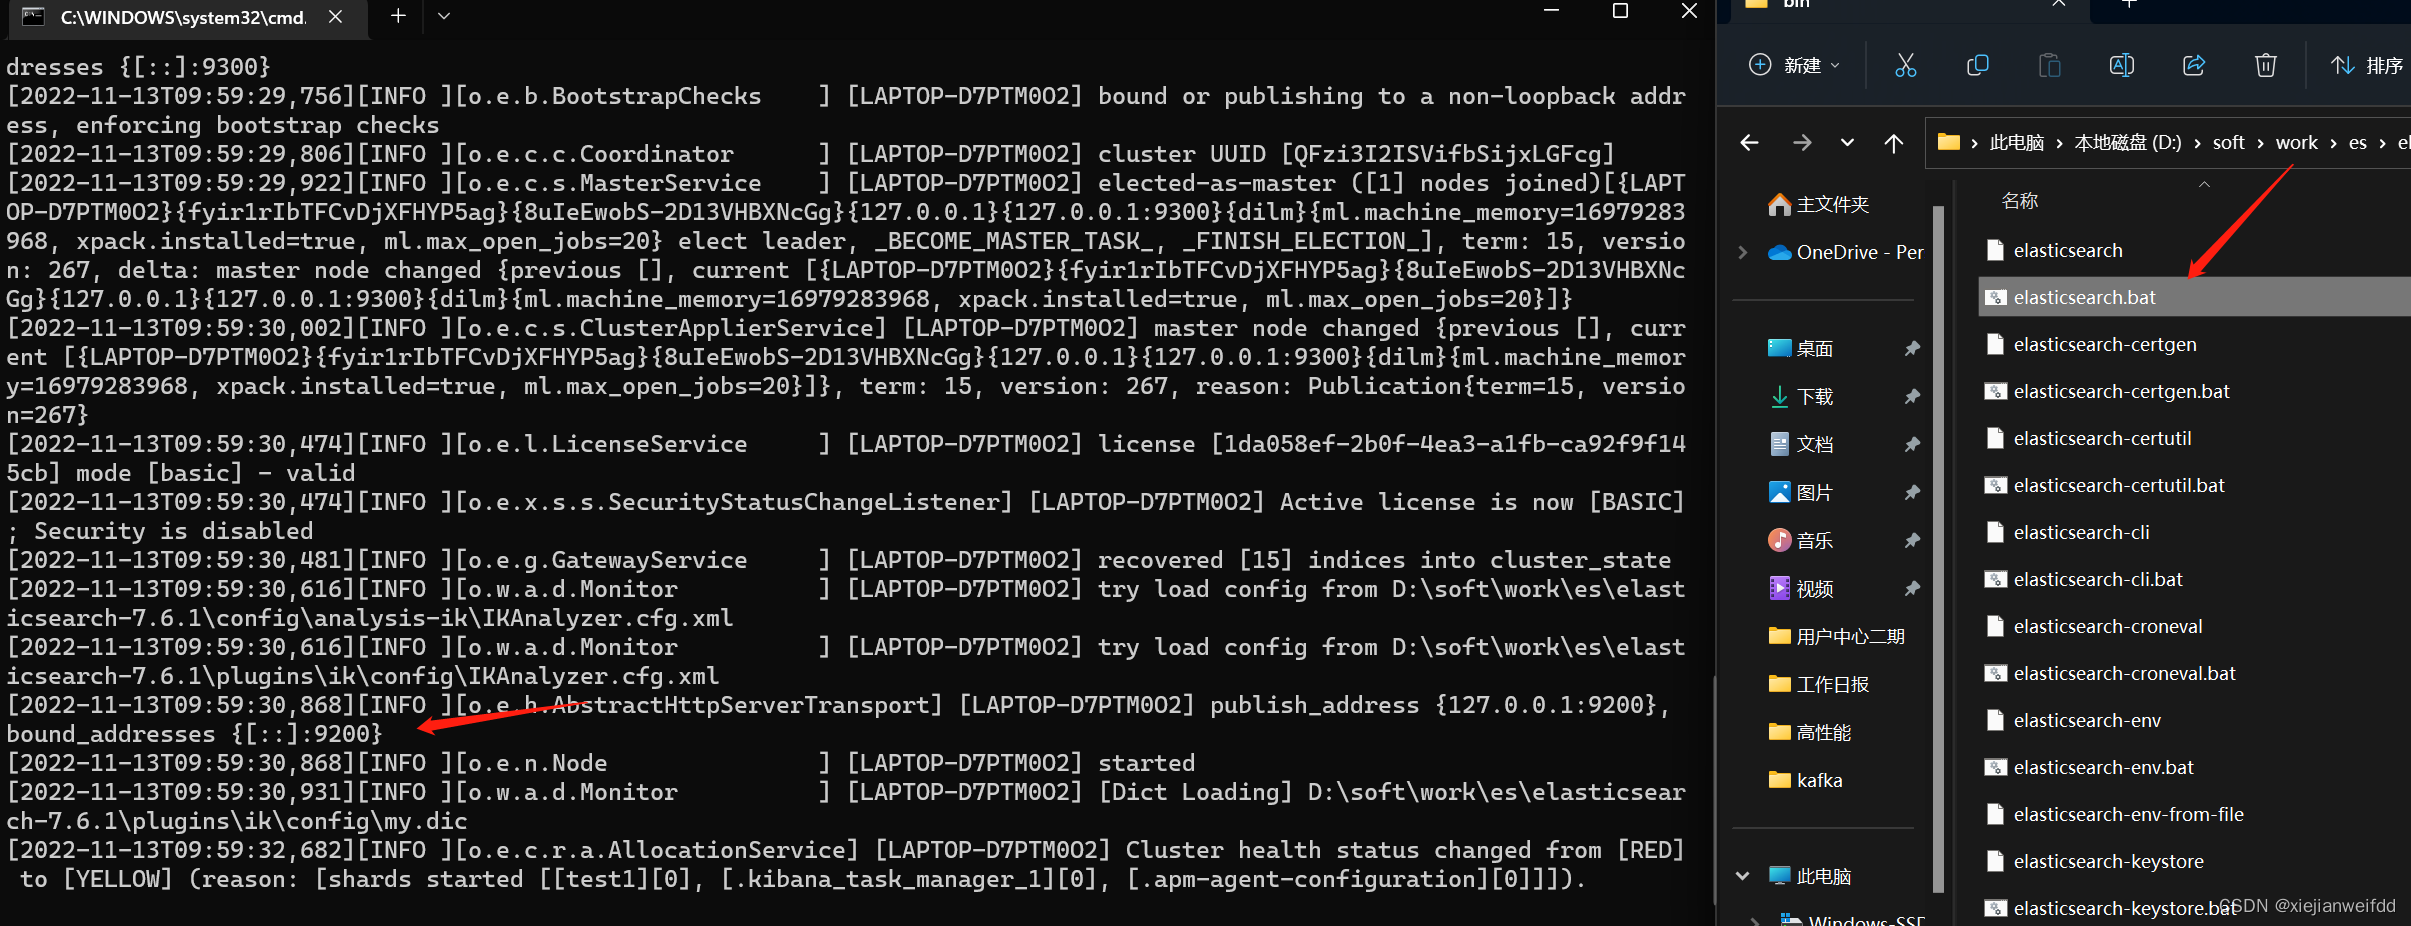
启动es

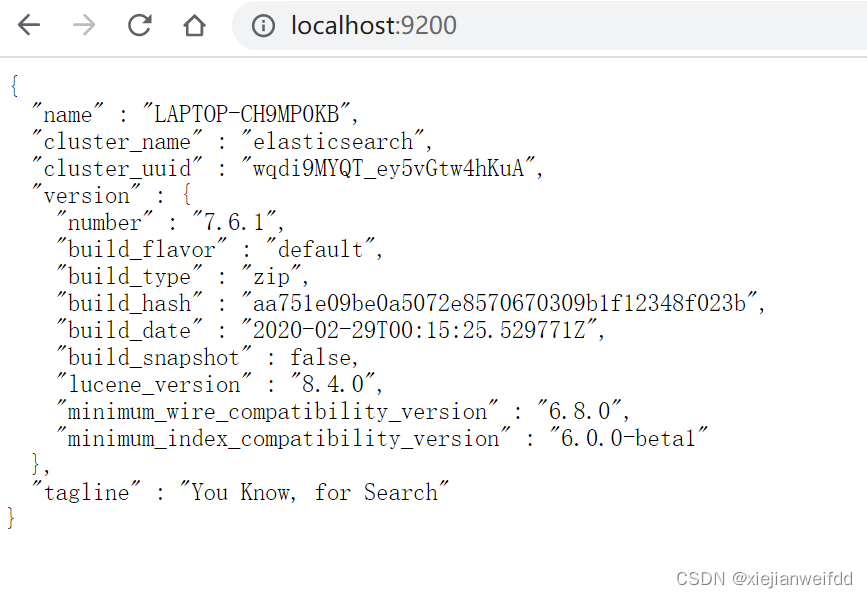
启动成功

参考配置
# 开启跨域
http.cors.enabled: true
# 所有人访问
http.cors.allow-origin: "*"
# 可以ip访问
network.bind_host: 0.0.0.0
discovery.seed_hosts: ["0.0.0.0", "[::1]"]
二、kibana 安装使用
https://www.elastic.co/cn/downloads/
历史版本下载:https://www.elastic.co/cn/downloads/past-releases/
解压

启动


访问
localhost:5601


DELETE /my_jcbase

PUT /my_jcbase
{
  "settings": {
    "index": {
      "number_of_shards": "2",
      "number_of_replicas": "0"
    }
  },
  "mappings": {
    "properties": {
      "id": {
        "type": "keyword"
      },
      "content": {
        "type": "text",
        "analyzer": "ik_max_word"
      }
    }
  }
}


GET my_jcbase/_search


POST /my_jcbase/_search
{
  "query": {
    "match": {
      "content": "1"
    }
  }
}
三、常用命令
创建索引指定字段的类型
PUT /test2
{
  "mappings": {
    "properties": {
      "name": {
        "type": "text"
      },
      "age":{
        "type": "long"
      },
      "birthday":{
        "type": "date"
      }
    }
  }
}
设置数据
PUT /test2/_doc/1
{
  "name": "流柚",
  "age": 18,
  "birth": "1999-10-10"
}
GET test2
①旧的(使用put覆盖原来的值)
版本+1(_version)
但是如果漏掉某个字段没有写,那么更新是没有写的字段 ,会消失
PUT /test2/_doc/1
{
  "name" : "我的大哥",
  "age" : 18,
  "birth" : "1999-10-10"
}
GET /test2/_doc/1
// 修改会有字段丢失
PUT /test2/_doc/1
{
  "name" : "大哥"
}
GET /test2/_doc/1
②新的(使用post的update)
version不会改变
需要注意doc
不会丢失字段
POST /test2/_doc/1/_update
{
  "doc":{
    "name" : "post修改,version不会加一",
    "age" : 2
  }
}
GET /test2/_doc/1
删除
DELETE /test2
查询(简单条件)
GET /test1/_doc/_search?q=name:大哥
复杂查询
  // 查询匹配
  GET /blog/user/_search
  {
    "query":{
      "match":{
        "name":"大"
      }
    }
    ,
    "_source": ["name","desc"]
    ,
    "sort": [
      {
        "age": {
          "order": "asc"
        }
      }
    ]
    ,
    "from": 0
    ,
    "size": 1
  }
多条件查询(bool)
must 相当于 and
should 相当于 or
must_not 相当于 not (… and …)
filter 过滤
/// bool 多条件查询
 must <==> and
 should <==> or
 must_not <==> not (... and ...)
 filter数据过滤
 boost
 minimum_should_match
GET /blog/user/_search
{
  "query":{
    "bool": {
      "must": [
        {
          "match":{
            "age":3
          }
        },
        {
          "match": {
            "name": "哥"
          }
        }
      ],
      "filter": {
        "range": {
          "age": {
            "gte": 1,
            "lte": 3
          }
        }
      }
    }
  }
}
匹配数组
貌似不能与其它字段一起使用
可以多关键字查(空格隔开)— 匹配字段也是符合的
match 会使用分词器解析(先分析文档,然后进行查询)
// 匹配数组 貌似不能与其它字段一起使用
// 可以多关键字查(空格隔开)
// match 会使用分词器解析(先分析文档,然后进行查询)
GET /blog/user/_search
{
  "query":{
    "match":{
      "desc":"年龄 哥 大"
    }
  }
}
精确查询
term 直接通过 倒排索引 指定词条查询
适合查询 number、date、keyword ,不适合text
// 精确查询(必须全部都有,而且不可分,即按一个完整的词查询)
// term 直接通过 倒排索引 指定的词条 进行精确查找的
GET /blog/user/_search
{
  "query":{
    "term":{
      "desc":"哥 "
    }
  }
}
text和keyword
text:
支持分词,全文检索、支持模糊、精确查询,不支持聚合,排序操作;
text类型的最大支持的字符长度无限制,适合大字段存储;
keyword:
不进行分词,直接索引、支持模糊、支持精确匹配,支持聚合、排序操作。
keyword类型的最大支持的长度为——32766个UTF-8类型的字符,可以通过设置ignore_above指定自持字符长度,超过给定长度后的数据将不被索引,无法通过term精确匹配检索返回结果。
// 测试keyword和text是否支持分词
// 设置索引类型
PUT /test
{
  "mappings": {
    "properties": {
      "text":{
        "type":"text"
      },
      "keyword":{
        "type":"keyword"
      }
    }
  }
}
// 设置字段数据
PUT /test/_doc/1
{
  "text":"测试keyword和text是否支持分词",
  "keyword":"测试keyword和text是否支持分词"
}
// text 支持分词
// keyword 不支持分词
GET /test/_doc/_search
{
  "query":{
   "match":{
      "text":"测试"
   }
  }
}// 查的到
GET /test/_doc/_search
{
  "query":{
   "match":{
      "keyword":"测试"
   }
  }
}// 查不到,必须是 "测试keyword和text是否支持分词" 才能查到
GET _analyze
{
  "analyzer": "keyword",
  "text": ["测试liu"]
}// 不会分词,即 测试liu
GET _analyze
{
  "analyzer": "standard",
  "text": ["测试liu"]
}// 分为 测 试 liu
GET _analyze
{
  "analyzer":"ik_max_word",
  "text": ["测试liu"]
}// 分为 测试 liu
高亮查询
/// 高亮查询
GET blog/user/_search
{
  "query": {
    "match": {
      "name":"流"
    }
  }
  ,
  "highlight": {
    "fields": {
      "name": {}
    }
  }
}
// 自定义前缀和后缀
GET blog/user/_search
{
  "query": {
    "match": {
      "name":"流"
    }
  }
  ,
  "highlight": {
    "pre_tags": "<p class='key' style='color:red'>",
    "post_tags": "</p>",
    "fields": {
      "name": {}
    }
  }
}
四、SpringBoot整合
依赖
<properties>
    <java.version>1.8</java.version>
    <!-- 统一版本 -->
    <elasticsearch.version>7.6.1</elasticsearch.version>
</properties>
<dependency>
    <groupId>org.springframework.boot</groupId>
    <artifactId>spring-boot-starter-data-elasticsearch</artifactId>
</dependency>

<dependency>
    <groupId>com.alibaba</groupId>
    <artifactId>fastjson</artifactId>
    <version>1.2.70</version>
</dependency>
<!-- lombok需要安装插件 -->
<dependency>
    <groupId>org.projectlombok</groupId>
    <artifactId>lombok</artifactId>
    <optional>true</optional>
</dependency>
创建配置类
@Configuration
public class ElasticSearchConfig {
    // 注册 rest高级客户端
    @Bean
    public RestHighLevelClient restHighLevelClient(){
        RestHighLevelClient client = new RestHighLevelClient(
                RestClient.builder(
                        new HttpHost("127.0.0.1",9200,"http")
                )
        );
        return client;
    }
}
创建实体类
@Data
@NoArgsConstructor
@AllArgsConstructor
public class User implements Serializable {
    private static final long serialVersionUID = -3843548915035470817L;
    private String name;
    private Integer age;
}
索引的操作
@Autowired
public RestHighLevelClient restHighLevelClient;
// 测试索引的创建, Request PUT liuyou_index
@Test
public void testCreateIndex() throws IOException {
    CreateIndexRequest request = new CreateIndexRequest("liuyou_index");
    CreateIndexResponse response = restHighLevelClient.indices().create(request, RequestOptions.DEFAULT);
    System.out.println(response.isAcknowledged());// 查看是否创建成功
    System.out.println(response);// 查看返回对象
    restHighLevelClient.close();
}
索引的获取,并判断其是否存在
// 测试获取索引,并判断其是否存在
@Test
public void testIndexIsExists() throws IOException {
    GetIndexRequest request = new GetIndexRequest("index");
    boolean exists = restHighLevelClient.indices().exists(request, RequestOptions.DEFAULT);
    System.out.println(exists);// 索引是否存在
    restHighLevelClient.close();
}
索引删除
// 测试索引删除
@Test
public void testDeleteIndex() throws IOException {
    DeleteIndexRequest request = new DeleteIndexRequest("liuyou_index");
    AcknowledgedResponse response = restHighLevelClient.indices().delete(request, RequestOptions.DEFAULT);
    System.out.println(response.isAcknowledged());// 是否删除成功
    restHighLevelClient.close();
}
文档添加
// 测试添加文档(先创建一个User实体类,添加fastjson依赖)
@Test
public void testAddDocument() throws IOException {
    // 创建一个User对象
    User liuyou = new User("liuyou", 18);
    // 创建请求
    IndexRequest request = new IndexRequest("liuyou_index");
    // 制定规则 PUT /liuyou_index/_doc/1
    request.id("1");// 设置文档ID
    request.timeout(TimeValue.timeValueMillis(1000));// request.timeout("1s")
    // 将我们的数据放入请求中
    request.source(JSON.toJSONString(liuyou), XContentType.JSON);
    // 客户端发送请求,获取响应的结果
    IndexResponse response = restHighLevelClient.index(request, RequestOptions.DEFAULT);
    System.out.println(response.status());// 获取建立索引的状态信息 CREATED
    System.out.println(response);// 查看返回内容 IndexResponse[index=liuyou_index,type=_doc,id=1,version=1,result=created,seqNo=0,primaryTerm=1,shards={"total":2,"successful":1,"failed":0}]
}
文档信息的获取
// 测试获得文档信息
@Test
public void testGetDocument() throws IOException {
    GetRequest request = new GetRequest("liuyou_index","1");
    GetResponse response = restHighLevelClient.get(request, RequestOptions.DEFAULT);
    System.out.println(response.getSourceAsString());// 打印文档内容
    System.out.println(request);// 返回的全部内容和命令是一样的
    restHighLevelClient.close();
}
文档的获取,并判断其是否存在
// 获取文档,判断是否存在 get /liuyou_index/_doc/1
@Test
public void testDocumentIsExists() throws IOException {
    GetRequest request = new GetRequest("liuyou_index", "1");
    // 不获取返回的 _source的上下文了
    request.fetchSourceContext(new FetchSourceContext(false));
    request.storedFields("_none_");
    boolean exists = restHighLevelClient.exists(request, RequestOptions.DEFAULT);
    System.out.println(exists);
}
文档的更新
// 测试更新文档内容
@Test
public void testUpdateDocument() throws IOException {
    UpdateRequest request = new UpdateRequest("liuyou_index", "1");
    User user = new User("lmk",11);
    request.doc(JSON.toJSONString(user),XContentType.JSON);
    UpdateResponse response = restHighLevelClient.update(request, RequestOptions.DEFAULT);
    System.out.println(response.status()); // OK
    restHighLevelClient.close();
}
文档的删除
// 测试删除文档
@Test
public void testDeleteDocument() throws IOException {
    DeleteRequest request = new DeleteRequest("liuyou_index", "1");
    request.timeout("1s");
    DeleteResponse response = restHighLevelClient.delete(request, RequestOptions.DEFAULT);
    System.out.println(response.status());// OK
}
文档查询
// 查询
// SearchRequest 搜索请求
// SearchSourceBuilder 条件构造
// HighlightBuilder 高亮
// TermQueryBuilder 精确查询
// MatchAllQueryBuilder
// xxxQueryBuilder ...
@Test
public void testSearch() throws IOException {
    // 1.创建查询请求对象
    SearchRequest searchRequest = new SearchRequest();
    // 2.构建搜索条件
    SearchSourceBuilder searchSourceBuilder = new SearchSourceBuilder();
    // (1)查询条件 使用QueryBuilders工具类创建
    // 精确查询
    TermQueryBuilder termQueryBuilder = QueryBuilders.termQuery("name", "liuyou");
    //        // 匹配查询
    //        MatchAllQueryBuilder matchAllQueryBuilder = QueryBuilders.matchAllQuery();
    // (2)其他<可有可无>:(可以参考 SearchSourceBuilder 的字段部分)
    // 设置高亮
    searchSourceBuilder.highlighter(new HighlightBuilder());
    //        // 分页
    //        searchSourceBuilder.from();
    //        searchSourceBuilder.size();
    searchSourceBuilder.timeout(new TimeValue(60, TimeUnit.SECONDS));
    // (3)条件投入
    searchSourceBuilder.query(termQueryBuilder);
    // 3.添加条件到请求
    searchRequest.source(searchSourceBuilder);
    // 4.客户端查询请求
    SearchResponse search = restHighLevelClient.search(searchRequest, RequestOptions.DEFAULT);
    // 5.查看返回结果
    SearchHits hits = search.getHits();
    System.out.println(JSON.toJSONString(hits));
    System.out.println("=======================");
    for (SearchHit documentFields : hits.getHits()) {
        System.out.println(documentFields.getSourceAsMap());
    }
}
前面的操作都无法批量添加数据
// 上面的这些api无法批量增加数据(只会保留最后一个source)
@Test
public void test() throws IOException {
    IndexRequest request = new IndexRequest("bulk");// 没有id会自动生成一个随机ID
    request.source(JSON.toJSONString(new User("liu",1)),XContentType.JSON);
    request.source(JSON.toJSONString(new User("min",2)),XContentType.JSON);
    request.source(JSON.toJSONString(new User("kai",3)),XContentType.JSON);
    IndexResponse index = restHighLevelClient.index(request, RequestOptions.DEFAULT);
    System.out.println(index.status());// created
}
批量添加数据
// 特殊的,真的项目一般会 批量插入数据
@Test
public void testBulk() throws IOException {
    BulkRequest bulkRequest = new BulkRequest();
    bulkRequest.timeout("10s");
    ArrayList<User> users = new ArrayList<>();
    users.add(new User("liuyou-1",1));
    users.add(new User("liuyou-2",2));
    users.add(new User("liuyou-3",3));
    users.add(new User("liuyou-4",4));
    users.add(new User("liuyou-5",5));
    users.add(new User("liuyou-6",6));
    // 批量请求处理
    for (int i = 0; i < users.size(); i++) {
        bulkRequest.add(
                // 这里是数据信息
                new IndexRequest("bulk")
                        .id(""+(i + 1)) // 没有设置id 会自定生成一个随机id
                        .source(JSON.toJSONString(users.get(i)),XContentType.JSON)
        );
    }
    BulkResponse bulk = restHighLevelClient.bulk(bulkRequest, RequestOptions.DEFAULT);
    System.out.println(bulk.status());// ok
}


 5514
5514


 被折叠的 条评论
为什么被折叠?


