


 本文提供了一套全面的Linux服务器优化方案,从系统安装到软件配置,再到安全与性能调优,涵盖更新yum源、防火墙配置、用户权限管理、定时同步时间、减少自启动服务、文件描述符调整、字符集配置、内核参数优化等多个方面。
目录
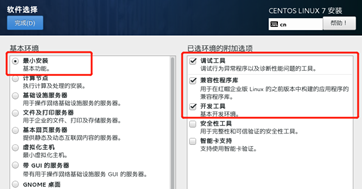
01.系统安装
02.更新yum源及必要软件安装
#安装wget
[root@localhost ~]# yum -y install wget
#备份CentOS-Base.repo
[root@localhost ~]# mv /etc/yum.repos.d/CentOS-Base.repo /etc/yum.repos.d/CentOS-Base.repo.backup
#下载新的CentOS-Base.repo到/etc/yum.repos.d/
[root@localhost ~]# wget -O /etc/yum.repos.d/CentOS-Base.repo http://mirrors.aliyun.com/repo/Centos-7.repo
#生成缓存
[root@localhost ~]# yum makecache
#安装必要软件
[root@localhost ~]# yum -y install gcc glibc gcc-c++ make net-tools screen vim lrzsz tree dos2unix lsof tcpdump bash-completion ntp
03.主机配置
#修改主机名
[root@localhost ~]# hostnamectl set-hostname master_150

#修改ip地址、网关、DNS等
[root@localhost ~]# vi /etc/sysconfig/network-scripts/ifcfg-ens33
TYPE="Ethernet"
BOOTPROTO="static"  #静态IP地址获取状态 如:DHCP表示自动获取IP地址
DEFROUTE="yes"
IPV4_FAILURE_FATAL="no"
IPV6INIT="yes"
IPV6_AUTOCONF="yes"
IPV6_DEFROUTE="yes"
IPV6_FAILURE_FATAL="no"
IPV6_ADDR_GEN_MODE="stable-privacy"
NAME="ens33"
UUID="44bb938b-5155-4a09-833f-ddb632650c9a"
DEVICE="ens33"   #网卡名字
ONBOOT="yes"   #引导时是否激活
IPADDR="192.168.1.150"    #IP地址
NETMASK="255.255.255.0"   #子网掩码
PREFIX="24"
GATEWAY="192.168.1.1"    #网关
DNS1="192.168.1.1"
IPV6_PEERDNS="yes"
IPV6_PEERROUTES="yes"
IPV6_PRIVACY="no"

[root@localhost ~]# vi /etc/sysconfig/network
HOSTNAME=master_150
GATEWAY=192.168.1.1

[root@localhost ~]# vi /etc/resolv.conf
nameserver 114.114.114.114
nameserver 8.8.8.8

#重启网卡生效
[root@localhost ~]# service network restart
04.防火墙配置
安装iptables防火墙
#查询防火墙状态
[root@localhost ~]# getenforce

#SELINUX=enforcing改为SELINUX=disabled  重启生效
[root@localhost ~]# vi /etc/selinux/config

#查看防火墙状态
[root@localhost ~]# firewall-cmd --state

#关闭firewall,禁止开机启动
[root@localhost ~]# systemctl stop firewalld.service
[root@localhost ~]# systemctl disable firewalld.service

#安装iptables防火墙
[root@localhost ~]# yum install iptables-services

#开启iptables,并设置为开机启动
[root@localhost ~]# systemctl start iptables.service
[root@localhost ~]# systemctl enable iptables.service
配置iptables防火墙
#查看iptables现有规则
[root@localhost ~]# iptables -L -n

#先允许所有,不然有可能会杯具
[root@localhost ~]# iptables -P INPUT ACCEPT

#清空所有默认规则
[root@localhost ~]# iptables -F

#清空所有自定义规则
[root@localhost ~]# iptables -X

#所有计数器归0
[root@localhost ~]# iptables -Z

#允许来自于io接口的数据包(本地访问)
[root@localhost ~]# iptables -A INPUT -i lo -j ACCEPT

#开放22端口
[root@localhost ~]# iptables -A INPUT -p tcp --dport 22 -j ACCEPT

#开放21端口(FTP)
[root@localhost ~]# iptables -A INPUT -p tcp --dport 21 -j ACCEPT

#开放80端口(HTTP)
[root@localhost ~]# iptables -A INPUT -p tcp --dport 80 -j ACCEPT

#开放443端口(HTTPS)
[root@localhost ~]# iptables -A INPUT -p tcp --dport 443 -j ACCEPT

#允许ping
[root@localhost ~]# iptables -A INPUT -p icmp --icmp-type 8 -j ACCEPT

#允许接受本机请求之后的返回数据 RELATED,是为FTP设置的
[root@localhost ~]# iptables -A INPUT -m state --state  RELATED,ESTABLISHED -j ACCEPT

#其他入站一律丢弃
[root@localhost ~]# iptables -P INPUT DROP

#所有出站一律绿灯
[root@localhost ~]# iptables -P OUTPUT ACCEPT

#所有转发一律丢弃
[root@localhost ~]# iptables -P FORWARD DROP
指令生效
#保存上述规则
[root@localhost ~]# service iptables save

#重启iptables
[root@localhost ~]# systemctl restart iptables.service
策略配置文件位置
[root@localhost ~]# vim /etc/sysconfig/iptables05.创建用户并授权
#创建新用户
[root@localhost ~]# adduser mysql

#创建密码
[root@localhost ~]# passwd mysql
输入密码:

#授权
[root@localhost ~]# sudo chown -R zkyw:zkyw /htdocs/
[root@localhost ~]# sudo chmod -R 777 /htdocs/
06.定时自动更新服务器时间
#安装ntpdate
[root@localhost ~]# yum -y install ntpdate

#查看当前时间
[root@localhost ~]# date

#同步当前时间
[root@localhost ~]# ntpdate cn.ntp.org.cn

#加入定时任务,每一小时执行一次时间同步
[root@localhost ~]# crontab -e
* */1 * * * ntpdate cn.ntp.org.cn
07.精简开机自启动服务
在Linux服务器运行的过程中,也会有很多无用的软件服务默认就在运行,这些服务占用了很多系统资源,而且带来了安全隐患,因此要关掉。
查询自启项
[root@localhost ~]# systemctl list-unit-files | grep enable
abrt-ccpp.service        enabled   abrt为auto bug report的缩写 用于bug报告 关闭
abrt-oops.service        enabled   abrt为auto bug report的缩写 用于bug报告 关闭
abrt-vmcore.service      enabled   abrt为auto bug report的缩写 用于bug报告 关闭
abrt-xorg.service        enabled   abrt为auto bug report的缩写 用于bug报告 关闭
abrtd.service            enabled   abrt为auto bug report的缩写 用于bug报告 关闭
atd.service                                 enabled
auditd.service                              enabled   安全审计 保留
autovt@.service                             enabled   登录相关 保留
chronyd.service                             enabled
crond.service                               enabled   定时任务 保留
dbus-org.freedesktop.NetworkManager.service enabled   桌面网卡管理 关闭
dbus-org.freedesktop.nm-dispatcher.service  enabled   桌面网卡管理 关闭
dmraid-activation.service                   enabled
getty@.service                              enabled   tty控制台相关 保留
iptables.service                            enabled
irqbalance.service                          enabled   优化系统中断分配 保留
iscsi.service                               enabled
kdump.service                               enabled   内核崩溃信息捕获  自定
ksm.service                                 enabled
ksmtuned.service                            enabled
libstoragemgmt.service                      enabled
libvirtd.service                            enabled
lvm2-monitor.service                        enabled
mdmonitor.service                           enabled
microcode.service                           enabled   处理器稳定性增强 保留
multipathd.service                          enabled
NetworkManager-dispatcher.service           enabled   网卡守护进程 关闭
NetworkManager.service                      enabled   网卡守护进程 关闭
ntpd.service                                enabled
postfix.service                             enabled   邮件服务 关闭
rngd.service                                enabled
rsyslog.service                             enabled   日志服务 保留
smartd.service                              enabled
sshd.service                                enabled   ssh登录 保留
sysstat.service                             enabled
systemd-readahead-collect.service           enabled   内核调用--预读取 保留
systemd-readahead-drop.service              enabled   内核调用--预读取 保留
systemd-readahead-replay.service            enabled   内核调用--预读取 保留
tuned.service                               enabled
vmtoolsd.service                            enabled
dm-event.socket                             enabled
iscsid.socket                               enabled
iscsiuio.socket                             enabled
lvm2-lvmetad.socket                         enabled
lvm2-lvmpolld.socket                        enabled
pcscd.socket                                enabled
rpcbind.socket                              enabled
virtlockd.socket                            enabled
virtlogd.socket                             enabled
default.target                        enabled   默认启动项 multi-user.target的软连接 保留
multi-user.target                           enabled   启动用户命令环境 保留
nfs-client.target                           enabled
remote-fs.target                            enabled   集合远程文件挂载点 自定
runlevel2.target                            enabled   运行级别 用于兼容6的SysV 保留
runlevel3.target                            enabled   运行级别 用于兼容6的SysV 保留
runlevel4.target                            enabled   运行级别 用于兼容6的SysV 保留
开启开机自启(示例 可不运行)
[root@localhost ~]# systemctl enable apache.service关闭开机自启,依次执行
[root@localhost ~]# systemctl disable abrt-ccpp.service
[root@localhost ~]# systemctl disable abrt-oops.service
[root@localhost ~]# systemctl disable abrt-vmcore.service
[root@localhost ~]# systemctl disable abrt-xorg.service
[root@localhost ~]# systemctl disable abrtd.service
[root@localhost ~]# systemctl disable dbus-org.freedesktop.NetworkManager.service
[root@localhost ~]# systemctl disable dbus-org.freedesktop.nm-dispatcher.service
[root@localhost ~]# systemctl disable NetworkManager-dispatcher.service
[root@localhost ~]# systemctl disable NetworkManager.service
[root@localhost ~]# systemctl disable postfix.service
修改系统启动级别
#查询启动级别
[root@master_150 ~]# systemctl get-default
multi-user.target

#修改启动级别
[root@master_150 ~]# systemctl set-default multi-user.target
[root@master_150 ~]# reboot   重启
08.锁定关键系统文件
#加锁
[root@master_150 ~]# chattr +i /etc/passwd /etc/shadow /etc/group /etc/gshadow /etc/inittab
#查看效果
[root@jokerpro ~]# lsattr /etc/passwd /etc/shadow /etc/group /etc/gshadow /etc/inittab
----i----------- /etc/passwd
----i----------- /etc/shadow
----i----------- /etc/group
----i----------- /etc/gshadow
----i----------- /etc/inittab
#解锁
[root@master_150 ~]# chattr -i /etc/passwd /etc/shadow /etc/group /etc/gshadow /etc/inittab09.调整文件描述符大小
文件描述符是由无符号整数表示的句柄,进程使用它来标识打开的文件。文件描述符与包括相关信息(文件的打开模式,文件的位置类型,文件的出始类型等)的文件对象相关联,这些信息被称作文件的上下文。文件描述符的有效范围是0到OPEN_MAX。对于内核而言,所有打开的文件都是通过文件描述符引用的,当打开一个现有文件或创建一个新文件时,内核向进程返回一个文件描述符。当读或写一个文件时,使用open或create返回的文件描述符标识该文件,并将其作为参数传递给read或write。
可通过ulimit -a查看当前设置
默认文件描述符就是1024,对于高并发业务来讲,默认值肯定不够
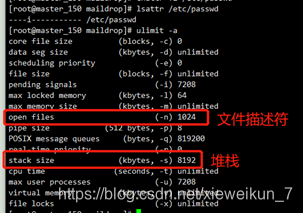
#查看
[root@master_150 ~]# ulimit -a

#调整
#nofile是代最大文件打开数
#nproc代表最大进程数
#在这个文件的最后增加:
[root@master_150 ~]# vim /etc/security/limits.conf
* soft core unlimit
* hard core unlimit
* soft fsize unlimited
* hard fsize unlimited
* soft data unlimited
* hard data unlimited
* soft nproc 65535
* hard nproc 63535
* soft stack unlimited
* hard stack unlimited
* soft nofile 65535
* hard nofile 65535
[root@master_150 ~]# reboot
10.调整字符集,使其支持中文
#修改该文件之前,可以先查看已经安装的语言包:
[root@master_150 ~]# locale -a
#如果没有语言包
[root@master_150 ~]# yum install kde-l10n-Chinese
[root@master_150 ~]# yum reinstall glibc-common
#编辑配置文件
[root@master_150 ~]# vim /etc/locale.conf
LANG="zh_CN.UTF-8"
[root@master_150 ~]# source /etc/locale.conf11.去除系统及内核版本登录前的屏幕显示
#清空/etc/redhat-release和/etc/issue的文件内容
[root@master_150 ~]# vim /etc/redhat-release
CentOS Linux release 7.4.1708 (Core)

[root@master_150 ~]# vim /etc/issue
\S
Kernel \r on an \m
12.内核参数优化
修改配置
[root@master_150 ~]# vim /etc/sysctl.d/99-sysctl.conf

#在文件最后增加如下内容
#关闭ipv6
net.ipv6.conf.all.disable_ipv6 = 1
net.ipv6.conf.default.disable_ipv6 = 1

#避免放大攻击
net.ipv4.icmp_echo_ignore_broadcasts = 1

#开启恶意icmp错误消息保护
net.ipv4.icmp_ignore_bogus_error_responses = 1

#关闭路由转发
net.ipv4.ip_forward = 0
net.ipv4.conf.all.send_redirects = 0
net.ipv4.conf.default.send_redirects = 0

#开启反向路径过滤
net.ipv4.conf.all.rp_filter = 1
net.ipv4.conf.default.rp_filter = 1

#处理无源路由的包
net.ipv4.conf.all.accept_source_route = 0
net.ipv4.conf.default.accept_source_route = 0

#关闭sysrq功能
kernel.sysrq = 0

#core文件名中添加pid作为扩展名
kernel.core_uses_pid = 1
net.ipv4.tcp_syncookies = 1

#修改消息队列长度
kernel.msgmnb = 65536
kernel.msgmax = 65536

#设置最大内存共享段大小bytes
kernel.shmmax = 68719476736
kernel.shmall = 4294967296

#timewait的数量,默认180000
net.ipv4.tcp_max_tw_buckets = 6000
net.ipv4.tcp_sack = 1
net.ipv4.tcp_window_scaling = 1
net.ipv4.tcp_rmem = 4096        87380   4194304
net.ipv4.tcp_wmem = 4096        16384   4194304
net.core.wmem_default = 8388608
net.core.rmem_default = 8388608
net.core.rmem_max = 16777216
net.core.wmem_max = 16777216
net.core.netdev_max_backlog = 262144

#限制仅仅是为了防止简单的DoS攻击
net.ipv4.tcp_max_orphans = 3276800

#未收到客户端确认信息的连接请求的最大值
net.ipv4.tcp_max_syn_backlog = 262144
net.ipv4.tcp_timestamps = 0

#内核放弃建立连接之前发送SYNACK包的数量
net.ipv4.tcp_synack_retries = 1

#内核放弃建立连接之前发送SYN包的数量
net.ipv4.tcp_syn_retries = 1

#启用timewait快速回收
net.ipv4.tcp_tw_recycle = 1

#开启重用。允许将TIME-WAIT sockets 重新用于新的TCP 连接
net.ipv4.tcp_tw_reuse = 1
net.ipv4.tcp_mem = 94500000 915000000 927000000
net.ipv4.tcp_fin_timeout = 1

#当keepalive 起用的时候,TCP 发送keepalive 消息的频度。缺省是2 小时
net.ipv4.tcp_keepalive_time = 30

#允许系统打开的端口范围
net.ipv4.ip_local_port_range = 1024    65000

#修改防火墙表大小,默认65536
net.netfilter.nf_conntrack_max=655350
net.netfilter.nf_conntrack_tcp_timeout_established=1200

#确保无人能修改路由表
net.ipv4.conf.all.accept_redirects = 0
net.ipv4.conf.default.accept_redirects = 0
net.ipv4.conf.all.secure_redirects = 0
net.ipv4.conf.default.secure_redirects = 0
配置永久生效
[root@master_150 ~]# sysctl -p
net.ipv6.conf.all.disable_ipv6 = 1
net.ipv6.conf.default.disable_ipv6 = 1
net.ipv4.icmp_echo_ignore_broadcasts = 1
net.ipv4.icmp_ignore_bogus_error_responses = 1
net.ipv4.ip_forward = 0
net.ipv4.conf.all.send_redirects = 0
net.ipv4.conf.default.send_redirects = 0
net.ipv4.conf.all.rp_filter = 1
net.ipv4.conf.default.rp_filter = 1
net.ipv4.conf.all.accept_source_route = 0
net.ipv4.conf.default.accept_source_route = 0
kernel.sysrq = 0
kernel.core_uses_pid = 1
net.ipv4.tcp_syncookies = 1
kernel.msgmnb = 65536
kernel.msgmax = 65536
kernel.shmmax = 68719476736
kernel.shmall = 4294967296
net.ipv4.tcp_max_tw_buckets = 6000
net.ipv4.tcp_sack = 1
net.ipv4.tcp_window_scaling = 1
net.ipv4.tcp_rmem = 4096        87380   4194304
net.ipv4.tcp_wmem = 4096        16384   4194304
net.core.wmem_default = 8388608
net.core.rmem_default = 8388608
net.core.rmem_max = 16777216
net.core.wmem_max = 16777216
net.core.netdev_max_backlog = 262144
net.ipv4.tcp_max_orphans = 3276800
net.ipv4.tcp_max_syn_backlog = 262144
net.ipv4.tcp_timestamps = 0
net.ipv4.tcp_synack_retries = 1
net.ipv4.tcp_syn_retries = 1
net.ipv4.tcp_tw_recycle = 1
net.ipv4.tcp_tw_reuse = 1
net.ipv4.tcp_mem = 94500000 915000000 927000000
net.ipv4.tcp_fin_timeout = 1
net.ipv4.tcp_keepalive_time = 30
net.ipv4.ip_local_port_range = 1024    65000
net.netfilter.nf_conntrack_max = 655350
net.netfilter.nf_conntrack_tcp_timeout_established = 1200
net.ipv4.conf.all.accept_redirects = 0
net.ipv4.conf.default.accept_redirects = 0
net.ipv4.conf.all.secure_redirects = 0
net.ipv4.conf.default.secure_redirects = 0
13.Linux清理内存缓存
查看系统缓存使用情况
[root@master_150 ~]# free -m

仅清除页面缓存PageCache命令:
[root@master_150 ~]# echo 1 > /proc/sys/vm/drop_caches

仅清除文件目录缓存bufferCache命令:
[root@master_150 ~]# echo 2 > /proc/sys/vm/drop_caches

清理PageCache和BufferCache命令:
[root@master_150 ~]# echo 3 > /proc/sys/vm/drop_caches
14.JDK安装
#前期准备
[root@master_150 ~]# tar -zxvf jdk-8u171-linux-x64.tar.gz
[root@master_150 ~]# mv jdk-8u171-linux-x64 /opt/jdk1.8
#设置环境变量
[root@master_150 ~]# vi /etc/profile
export JAVA_HOME=/opt/jdk1.8
export JRE_HOME=${JAVA_HOME}/jre
export CLASSPATH=.:${JAVA_HOME}/lib:${JRE_HOME}/lib
export PATH=${JAVA_HOME}/bin:$PATH
#生效
[root@master_150 ~]# source /etc/profile
#检查
[root@master_150 ~]# java -version
java version "1.8.0_171"
Java(TM) SE Runtime Environment (build 1.8.0_171-b11)
Java HotSpot(TM) 64-Bit Server VM (build 25.171-b11, mixed mode)欢迎各位大神评论和点赞!


 202
202

 被折叠的 条评论
为什么被折叠?
被折叠的 条评论
为什么被折叠?
 到【灌水乐园】发言


