


转自:http://blog.csdn.net/guolin_blog/article/details/8881711
Fragment初探
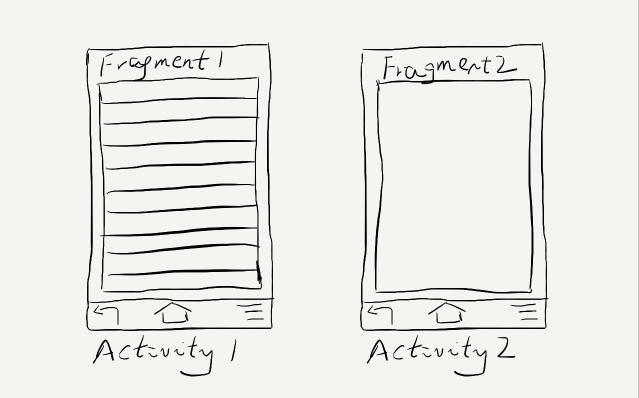
为了让界面可以在平板上更好地展示,Android在3.0版本引入了Fragment(碎片)功能,它非常类似于Activity,可以像Activity一样包含布局。Fragment通常是嵌套在Activity中使用的,现在想象这种场景:有两个Fragment,Fragment 1包含了一个ListView,每行显示一本书的标题。Fragment 2包含了TextView和ImageView,来显示书的详细内容和图片。
如果现在程序运行竖屏模式的平板或手机上,Fragment 1可能嵌入在一个Activity中,而Fragment 2可能嵌入在另一个Activity中,如下图所示:
而如果现在程序运行在横屏模式的平板上,两个Fragment就可以嵌入在同一个Activity中了,如下图所示:
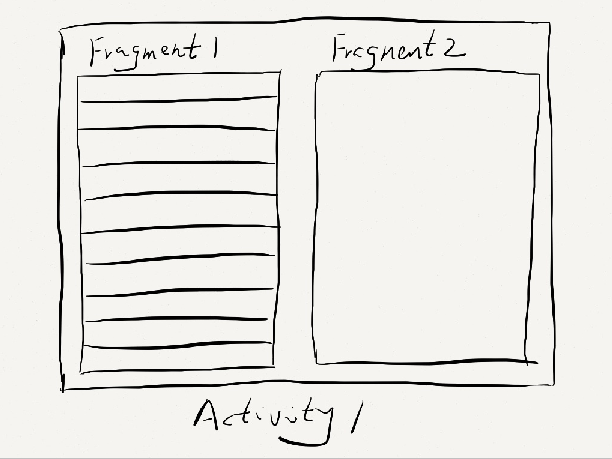
由此可以看出,使用Fragment可以让我们更加充分地利用平板的屏幕空间,下面我们一起来探究下如何使用Fragment。
首先需要注意,Fragment是在3.0版本引入的,如果你使用的是3.0之前的系统,需要先导入android-support-v4的jar包才能使用Fragment功能。
新建一个项目叫做Fragments,然后在layout文件夹下新建一个名为fragment1.xml的布局文件:
- <LinearLayout xmlns:android="http://schemas.android.com/apk/res/android"
- android:layout_width="match_parent"
- android:layout_height="match_parent"
- android:background="#00ff00" >
- <TextView
- android:layout_width="wrap_content"
- android:layout_height="wrap_content"
- android:text="This is fragment 1"
- android:textColor="#000000"
- android:textSize="25sp" />
- </LinearLayout>
可以看到,这个布局文件非常简单,只有一个LinearLayout,里面加入了一个TextView。我们如法炮制再新建一个fragment2.xml :
- <LinearLayout xmlns:android="http://schemas.android.com/apk/res/android"
- android:layout_width="match_parent"
- android:layout_height="match_parent"
- android:background="#ffff00" >
- <TextView
- android:layout_width="wrap_content"
- android:layout_height="wrap_content"
- android:text="This is fragment 2"
- android:textColor="#000000"
- android:textSize="25sp" />
- </LinearLayout>
然后新建一个类Fragment1,这个类是继承自Fragment的:
- public class Fragment1 extends Fragment {
- @Override
- public View onCreateView(LayoutInflater inflater, ViewGroup container, Bundle savedInstanceState) {
- return inflater.inflate(R.layout.fragment1, container, false);
- }
- }
- public class Fragment2 extends Fragment {
- @Override
- public View onCreateView(LayoutInflater inflater, ViewGroup container, Bundle savedInstanceState) {
- return inflater.inflate(R.layout.fragment2, container, false);
- }
- }
- <LinearLayout xmlns:android="http://schemas.android.com/apk/res/android"
- android:layout_width="match_parent"
- android:layout_height="match_parent"
- android:baselineAligned="false" >
- <fragment
- android:id="@+id/fragment1"
- android:name="com.example.fragmentdemo.Fragment1"
- android:layout_width="0dip"
- android:layout_height="match_parent"
- android:layout_weight="1" />
- <fragment
- android:id="@+id/fragment2"
- android:name="com.example.fragmentdemo.Fragment2"
- android:layout_width="0dip"
- android:layout_height="match_parent"
- android:layout_weight="1" />
- </LinearLayout>
- public class MainActivity extends Activity {
- @Override
- protected void onCreate(Bundle savedInstanceState) {
- super.onCreate(savedInstanceState);
- setContentView(R.layout.activity_main);
- }
- }
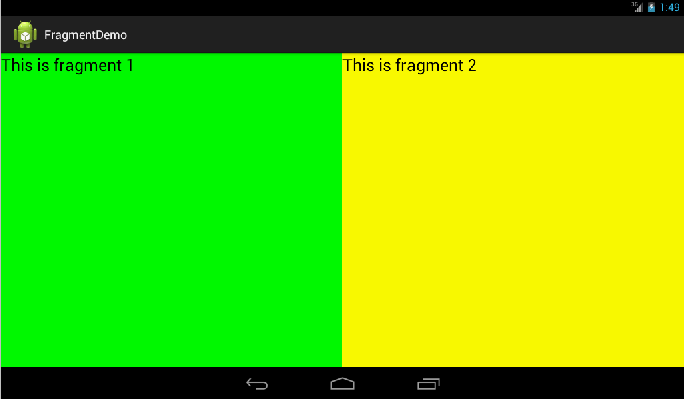
现在我们来运行一次程序,就会看到,一个Activity很融洽地包含了两个Fragment,这两个Fragment平分了整个屏幕,效果图如下:
动态添加Fragment
你已经学会了如何在XML中使用Fragment,但是这仅仅是Fragment最简单的功能而已。Fragment真正的强大之处在于可以动态地添加到Activity当中,因此这也是你必须要掌握的东西。当你学会了在程序运行时向Activity添加Fragment,程序的界面就可以定制的更加多样化。下面我们立刻来看看,如何动态添加Fragment。
还是在上一节代码的基础上修改,打开activity_main.xml,将其中对Fragment的引用都删除,只保留最外层的LinearLayout,并给它添加一个id,因为我们要动态添加Fragment,不用在XML里添加了,删除后代码如下:
- <LinearLayout xmlns:android="http://schemas.android.com/apk/res/android"
- android:id="@+id/main_layout"
- android:layout_width="match_parent"
- android:layout_height="match_parent"
- android:baselineAligned="false" >
- </LinearLayout>
- public class MainActivity extends Activity {
- @Override
- protected void onCreate(Bundle savedInstanceState) {
- super.onCreate(savedInstanceState);
- setContentView(R.layout.activity_main);
- Display display = getWindowManager().getDefaultDisplay();
- if (display.getWidth() > display.getHeight()) {
- Fragment1 fragment1 = new Fragment1();
- getFragmentManager().beginTransaction().replace(R.id.main_layout, fragment1).commit();
- } else {
- Fragment2 fragment2 = new Fragment2();
- getFragmentManager().beginTransaction().replace(R.id.main_layout, fragment2).commit();
- }
- }
- }
首先,我们要获取屏幕的宽度和高度,然后进行判断,如果屏幕宽度大于高度就添加fragment1,如果高度大于宽度就添加fragment2。动态添加Fragment主要分为4步:
1.获取到FragmentManager,在Activity中可以直接通过getFragmentManager得到。
2.开启一个事务,通过调用beginTransaction方法开启。
3.向容器内加入Fragment,一般使用replace方法实现,需要传入容器的id和Fragment的实例。
4.提交事务,调用commit方法提交。
现在运行一下程序,效果如下图所示:
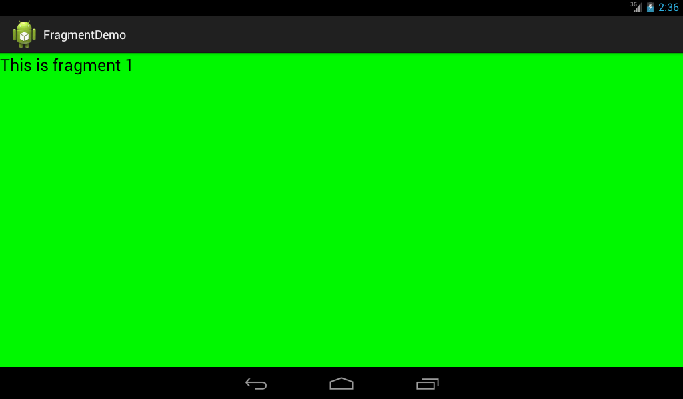
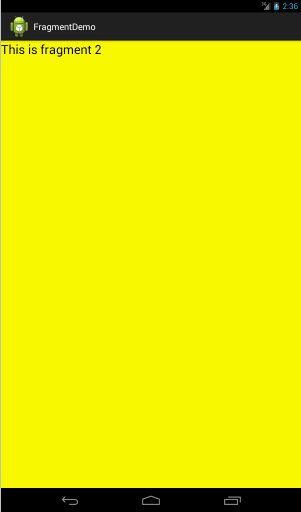
如果你是在使用模拟器运行,按下ctrl + F11切换到竖屏模式。效果如下图所示:
Fragment的生命周期
和Activity一样,Fragment也有自己的生命周期,理解Fragment的生命周期非常重要,我们通过代码的方式来瞧一瞧Fragment的生命周期是什么样的:
- public class Fragment1 extends Fragment {
- public static final String TAG = "Fragment1";
- @Override
- public View onCreateView(LayoutInflater inflater, ViewGroup container, Bundle savedInstanceState) {
- Log.d(TAG, "onCreateView");
- return inflater.inflate(R.layout.fragment1, container, false);
- }
- @Override
- public void onAttach(Activity activity) {
- super.onAttach(activity);
- Log.d(TAG, "onAttach");
- }
- @Override
- public void onCreate(Bundle savedInstanceState) {
- super.onCreate(savedInstanceState);
- Log.d(TAG, "onCreate");
- }
- @Override
- public void onActivityCreated(Bundle savedInstanceState) {
- super.onActivityCreated(savedInstanceState);
- Log.d(TAG, "onActivityCreated");
- }
- @Override
- public void onStart() {
- super.onStart();
- Log.d(TAG, "onStart");
- }
- @Override
- public void onResume() {
- super.onResume();
- Log.d(TAG, "onResume");
- }
- @Override
- public void onPause() {
- super.onPause();
- Log.d(TAG, "onPause");
- }
- @Override
- public void onStop() {
- super.onStop();
- Log.d(TAG, "onStop");
- }
- @Override
- public void onDestroyView() {
- super.onDestroyView();
- Log.d(TAG, "onDestroyView");
- }
- @Override
- public void onDestroy() {
- super.onDestroy();
- Log.d(TAG, "onDestroy");
- }
- @Override
- public void onDetach() {
- super.onDetach();
- Log.d(TAG, "onDetach");
- }
- }
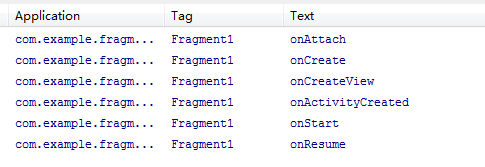
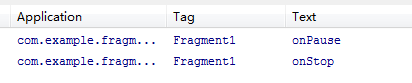
这时点击一下home键,打印日志如下:
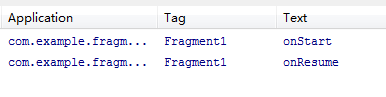
如果你再重新进入进入程序,打印日志如下:
然后点击back键退出程序,打印日志如下:
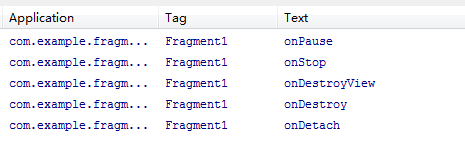
看到这里,我相信大多数朋友已经非常明白了,因为这和Activity的生命周期太相似了。只是有几个Activity中没有的新方法,这里需要重点介绍一下:
- onAttach方法:Fragment和Activity建立关联的时候调用。
- onCreateView方法:为Fragment加载布局时调用。
- onActivityCreated方法:当Activity中的onCreate方法执行完后调用。
- onDestroyView方法:Fragment中的布局被移除时调用。
- onDetach方法:Fragment和Activity解除关联的时候调用。
Fragment之间进行通信
通常情况下,Activity都会包含多个Fragment,这时多个Fragment之间如何进行通信就是个非常重要的问题了。我们通过一个例子来看一下,如何在一个Fragment中去访问另一个Fragment的视图。
还是在第一节代码的基础上修改,首先打开fragment2.xml,在这个布局里面添加一个按钮:
- <LinearLayout xmlns:android="http://schemas.android.com/apk/res/android"
- android:layout_width="match_parent"
- android:layout_height="match_parent"
- android:orientation="vertical"
- android:background="#ffff00" >
- <TextView
- android:layout_width="wrap_content"
- android:layout_height="wrap_content"
- android:text="This is fragment 2"
- android:textColor="#000000"
- android:textSize="25sp" />
- <Button
- android:id="@+id/button"
- android:layout_width="wrap_content"
- android:layout_height="wrap_content"
- android:text="Get fragment1 text"
- />
- </LinearLayout>
- <LinearLayout xmlns:android="http://schemas.android.com/apk/res/android"
- android:layout_width="match_parent"
- android:layout_height="match_parent"
- android:background="#00ff00" >
- <TextView
- android:id="@+id/fragment1_text"
- android:layout_width="wrap_content"
- android:layout_height="wrap_content"
- android:text="This is fragment 1"
- android:textColor="#000000"
- android:textSize="25sp" />
- </LinearLayout>
- public class Fragment2 extends Fragment {
- @Override
- public View onCreateView(LayoutInflater inflater, ViewGroup container, Bundle savedInstanceState) {
- return inflater.inflate(R.layout.fragment2, container, false);
- }
- @Override
- public void onActivityCreated(Bundle savedInstanceState) {
- super.onActivityCreated(savedInstanceState);
- Button button = (Button) getActivity().findViewById(R.id.button);
- button.setOnClickListener(new OnClickListener() {
- @Override
- public void onClick(View v) {
- TextView textView = (TextView) getActivity().findViewById(R.id.fragment1_text);
- Toast.makeText(getActivity(), textView.getText(), Toast.LENGTH_LONG).show();
- }
- });
- }
- }
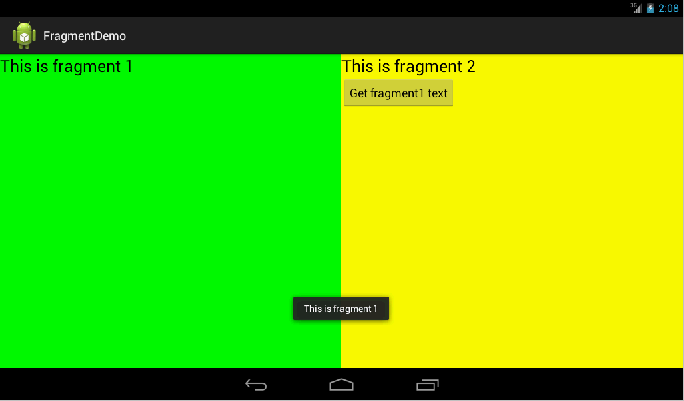
我们可以看到,在fragment2中成功获取到了fragment1中的视图,并弹出Toast。这是怎么实现的呢?主要都是通过getActivity这个方法实现的。getActivity方法可以让Fragment获取到关联的Activity,然后再调用Activity的findViewById方法,就可以获取到和这个Activity关联的其它Fragment的视图了。
好了,以上就是关于Fragment你所须知道的一切。如果想要切身体验一下Fragment的实战,请继续阅读 Android手机平板两不误,使用Fragment实现兼容手机和平板的程序 以及 Android Fragment应用实战,使用碎片向ActivityGroup说再见 。
---------------------------------------------------------------------------------------------------------分界线--------------------------------------------------------------------------------------------------------------------
原创部分,Fragment结合ListView使用
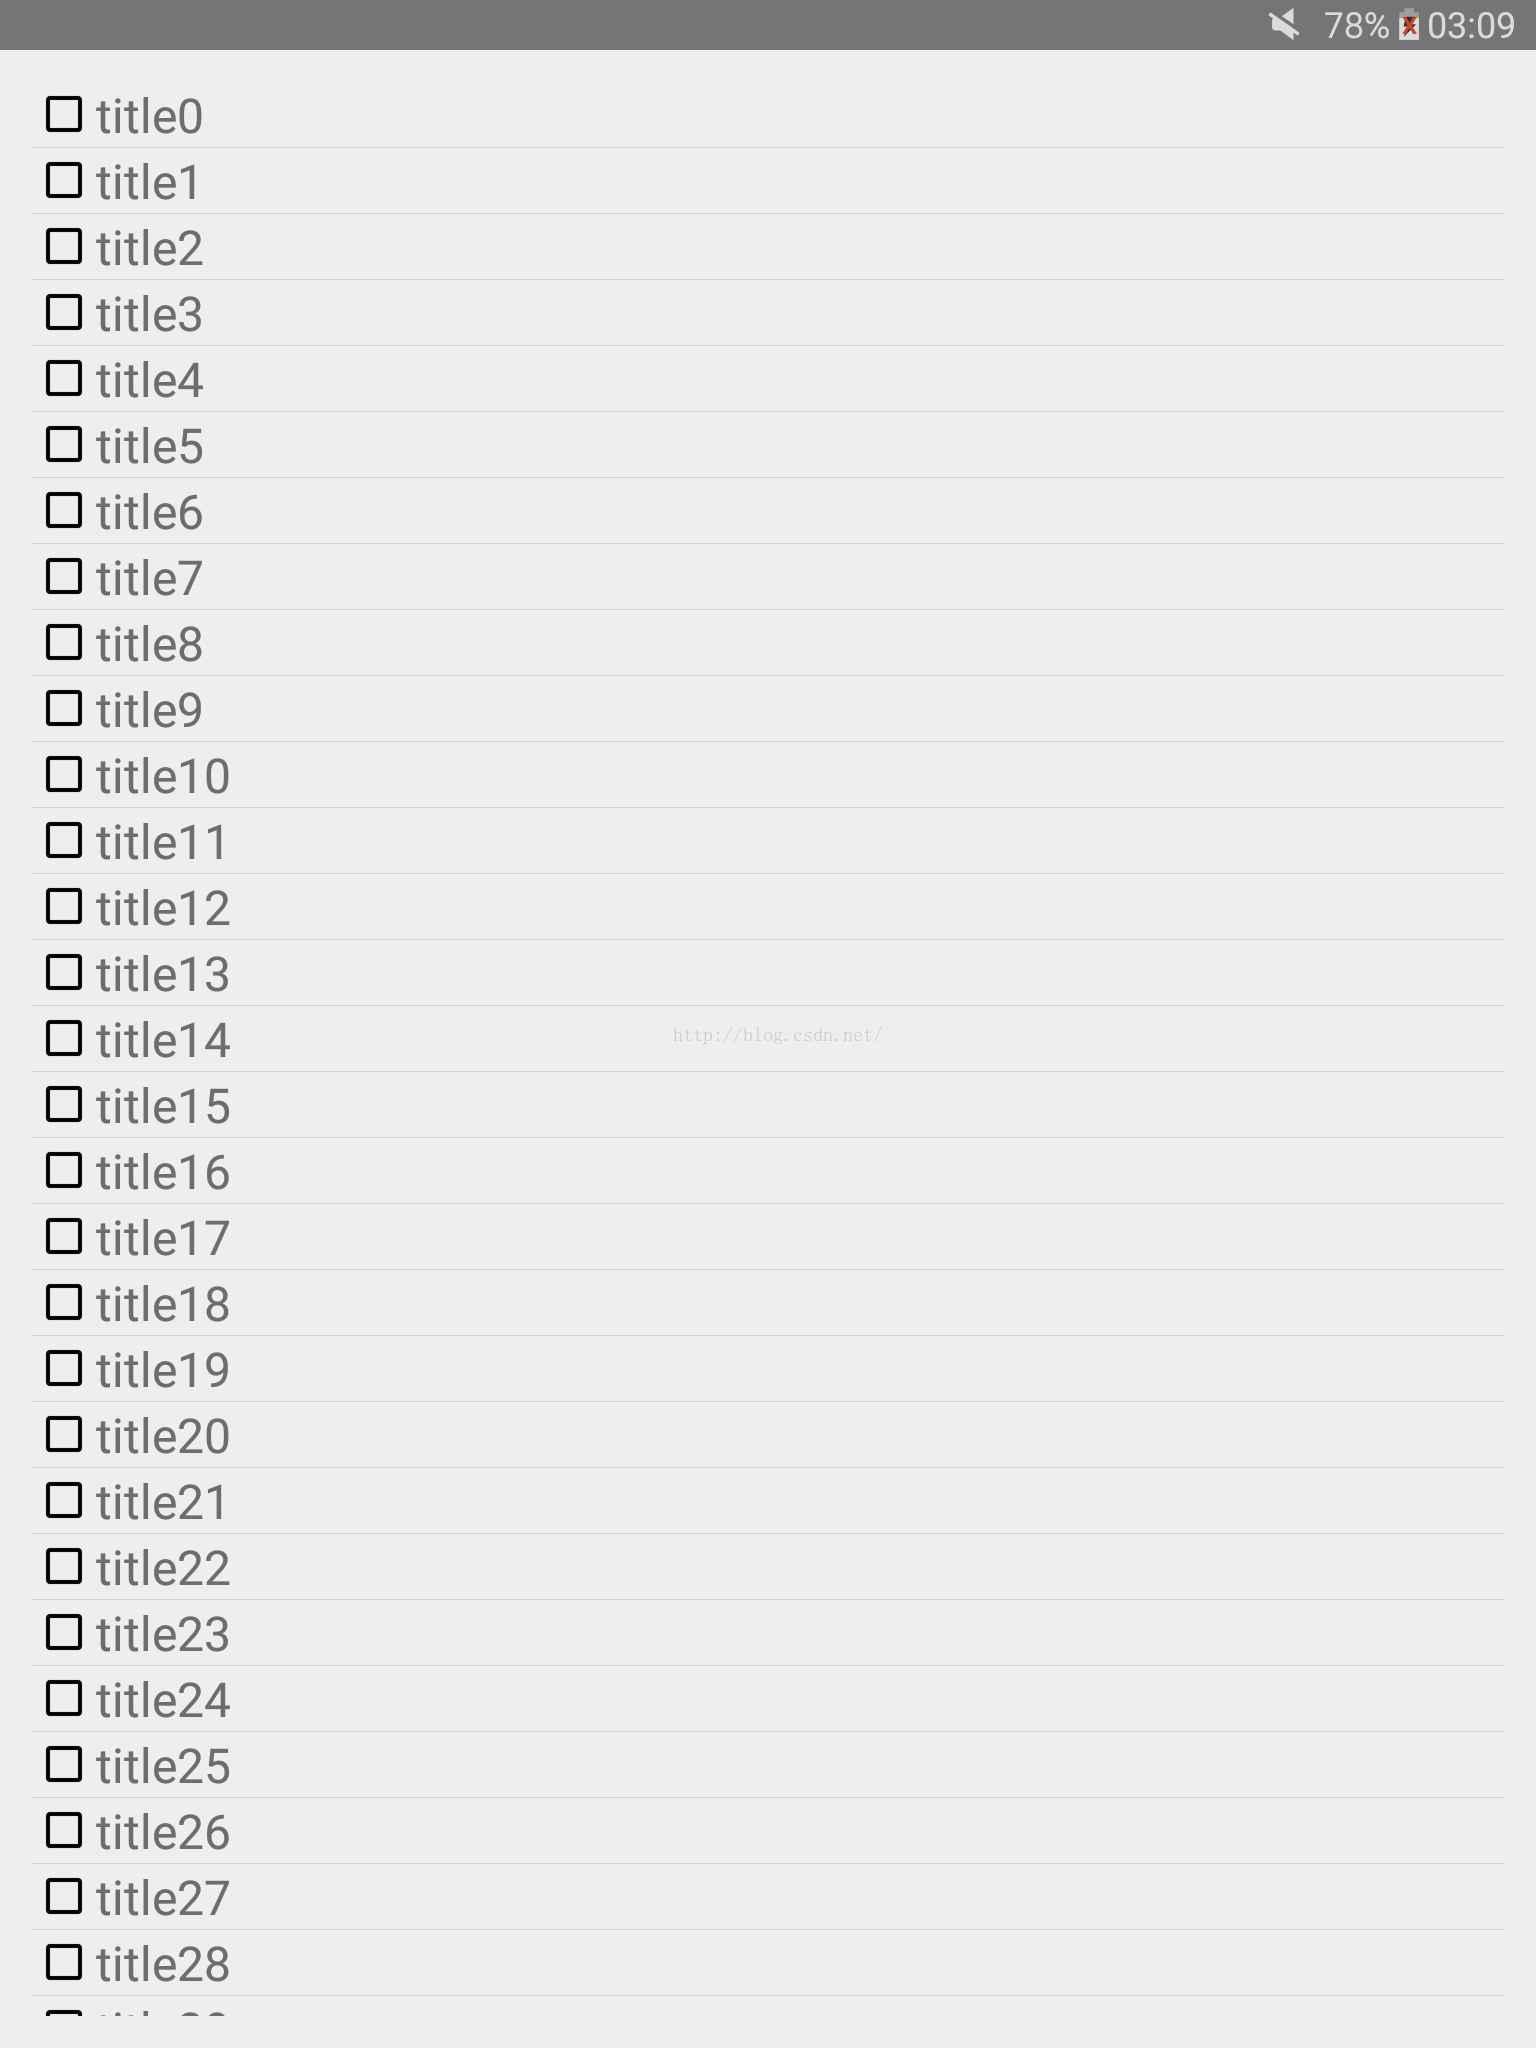
有两个Fragment,,分别显示文章title(TitleFragment)和文章内容(ArticleFragment):
TitleFragment使用listView显示title列表:
fragment_title.xml
<LinearLayout xmlns:android="http://schemas.android.com/apk/res/android"
    xmlns:tools="http://schemas.android.com/tools"
    android:layout_width="match_parent"
    android:layout_height="match_parent"
    tools:context="com.silion.fragmentsample.TitleFragment">

    <ListView
        android:id="@+id/titleListView"
        android:layout_width="match_parent"
        android:layout_height="wrap_content"
        android:layout_weight="1" />

</LinearLayout><?xml version="1.0" encoding="utf-8"?>
<LinearLayout xmlns:android="http://schemas.android.com/apk/res/android"
android:layout_width="match_parent"
android:layout_height="match_parent"
android:orientation="horizontal">
<ImageView
android:id="@+id/titleImageView"
android:layout_width="wrap_content"
android:layout_height="wrap_content" />
<TextView
android:id="@+id/titleTextView"
android:layout_width="wrap_content"
android:layout_height="wrap_content"
android:textSize="24sp"/>
</LinearLayout>TitleFragment.java
package com.silion.fragmentsample;


import android.graphics.drawable.Drawable;
import android.media.Image;
import android.os.Bundle;
import android.app.Fragment;
import android.view.LayoutInflater;
import android.view.View;
import android.view.ViewGroup;
import android.widget.Adapter;
import android.widget.AdapterView;
import android.widget.BaseAdapter;
import android.widget.ImageView;
import android.widget.ListView;
import android.widget.TextView;

import java.util.ArrayList;
import java.util.List;


/**
 * A simple {@link Fragment} subclass.
 */
public class TitleFragment extends Fragment {
    private ListView mListView;
    private TitleAdapter mTitleAdapter;
    private List<TitleData> mTitleDataList;

    AdapterView.OnItemClickListener mTitleListener = new AdapterView.OnItemClickListener() {
        @Override
        public void onItemClick(AdapterView<?> parent, View view, int position, long id) {
            String title = null;
            TitleData titleData = (TitleData) mTitleAdapter.getItem(position);
            if(titleData != null) {
                title = titleData.getmTitle();
                if(title != null) {
                    ((MainActivity) getActivity()).viewDetail(title);
                }
            }
        }
    };
    @Override
    public View onCreateView(LayoutInflater inflater, ViewGroup container,
                             Bundle savedInstanceState) {
        View titleView =  inflater.inflate(R.layout.fragment_title, container, false);
        mTitleDataList = getTitleDataList();
        mListView = (ListView) titleView.findViewById(R.id.titleListView);
        mTitleAdapter = new TitleAdapter();
        mListView.setAdapter(mTitleAdapter);
        mListView.setOnItemClickListener(mTitleListener);
        return titleView;
    }

    @Override
    public void onActivityCreated(Bundle savedInstanceState) {
        super.onActivityCreated(savedInstanceState);
    }

    public List<TitleData> getTitleDataList() {
        List<TitleData> listItem = new ArrayList<TitleData>();
        for(int i = 0; i < 30; i++) {
            TitleData data = new TitleData("title" + i, getActivity().getResources().getDrawable(R.drawable.abc_btn_check_material));
            listItem.add(data);
        }
        return listItem;
    }

    class TitleData {
        private String mTitle;
        private Drawable mIcon;

        public TitleData(String title, Drawable icon) {
            this.mTitle = title;
            this.mIcon = icon;
        }

        public String getmTitle() {
            return mTitle;
        }

        public Drawable getmIcon() {
            return mIcon;
        }
    }

    class TitleAdapter extends BaseAdapter {

        @Override
        public int getCount() {
            return mTitleDataList.size();
        }

        @Override
        public Object getItem(int position) {
            return mTitleDataList.get(position);
        }

        @Override
        public long getItemId(int position) {
            return position;
        }

        @Override
        public View getView(int position, View convertView, ViewGroup parent) {
            ViewHolder viewHolder;
            View view = convertView;

            if(view == null) {
                view = getActivity().getLayoutInflater().inflate(R.layout.listitem_title, null);
                viewHolder = new ViewHolder();
                viewHolder.mTitleImageView = (ImageView) view.findViewById(R.id.titleImageView);
                viewHolder.mTitleTextView = (TextView) view.findViewById(R.id.titleTextView);
                view.setTag(viewHolder);
            } else {
                viewHolder = (ViewHolder) view.getTag();
            }

            final TitleData titleData = (TitleData) getItem(position);
            viewHolder.mTitleTextView.setText(titleData.getmTitle());
            viewHolder.mTitleImageView.setImageDrawable(titleData.getmIcon());

            return view;
        }

        class ViewHolder {
            protected ImageView mTitleImageView;
            protected TextView mTitleTextView;
        }
    }
}
ArticleFragment显示文章内容:
fragment_article.xml
<LinearLayout xmlns:android="http://schemas.android.com/apk/res/android"
    xmlns:tools="http://schemas.android.com/tools"
    android:layout_width="match_parent"
    android:layout_height="match_parent"
    tools:context="com.silion.fragmentsample.ArticleFragment">

    <TextView
        android:id="@+id/articleTextView"
        android:layout_width="wrap_content"
        android:layout_height="wrap_content"
        android:text="@string/article"
        android:textSize="30sp"/>

</LinearLayout>
ArticleFragment.java
package com.silion.fragmentsample;


import android.os.Bundle;
import android.app.Fragment;
import android.view.LayoutInflater;
import android.view.View;
import android.view.ViewGroup;


/**
 * A simple {@link Fragment} subclass.
 */
public class ArticleFragment extends Fragment {


    public ArticleFragment() {
        // Required empty public constructor
    }

    @Override
    public View onCreateView(LayoutInflater inflater, ViewGroup container,
                             Bundle savedInstanceState) {
        // Inflate the layout for this fragment
        return inflater.inflate(R.layout.fragment_article, container, false);
    }


}
手机或者平板竖屏时只显示一个Fragment,
res/values/layouts.xml
<?xml version="1.0" encoding="utf-8"?>
<resources>
    <item name="main_layout" type="layout">@layout/activity_main</item>
    <bool name="has_two_panes">false</bool>
</resources><?xml version="1.0" encoding="utf-8"?>
<resources>
<item name="main_layout" type="layout">@layout/activity_main</item>
<bool name="has_two_panes">false</bool>
</resources><LinearLayout xmlns:android="http://schemas.android.com/apk/res/android"
xmlns:tools="http://schemas.android.com/tools" android:layout_width="match_parent"
android:layout_height="match_parent" android:paddingLeft="@dimen/activity_horizontal_margin"
android:paddingRight="@dimen/activity_horizontal_margin"
android:paddingTop="@dimen/activity_vertical_margin"
android:paddingBottom="@dimen/activity_vertical_margin"
tools:context="com.silion.fragmentsample.MainActivity">
<LinearLayout
android:id="@+id/mainLayout"
android:layout_width="0dp"
android:layout_height="match_parent"
android:layout_weight="1"
android:orientation="vertical">
</LinearLayout>
</LinearLayout>
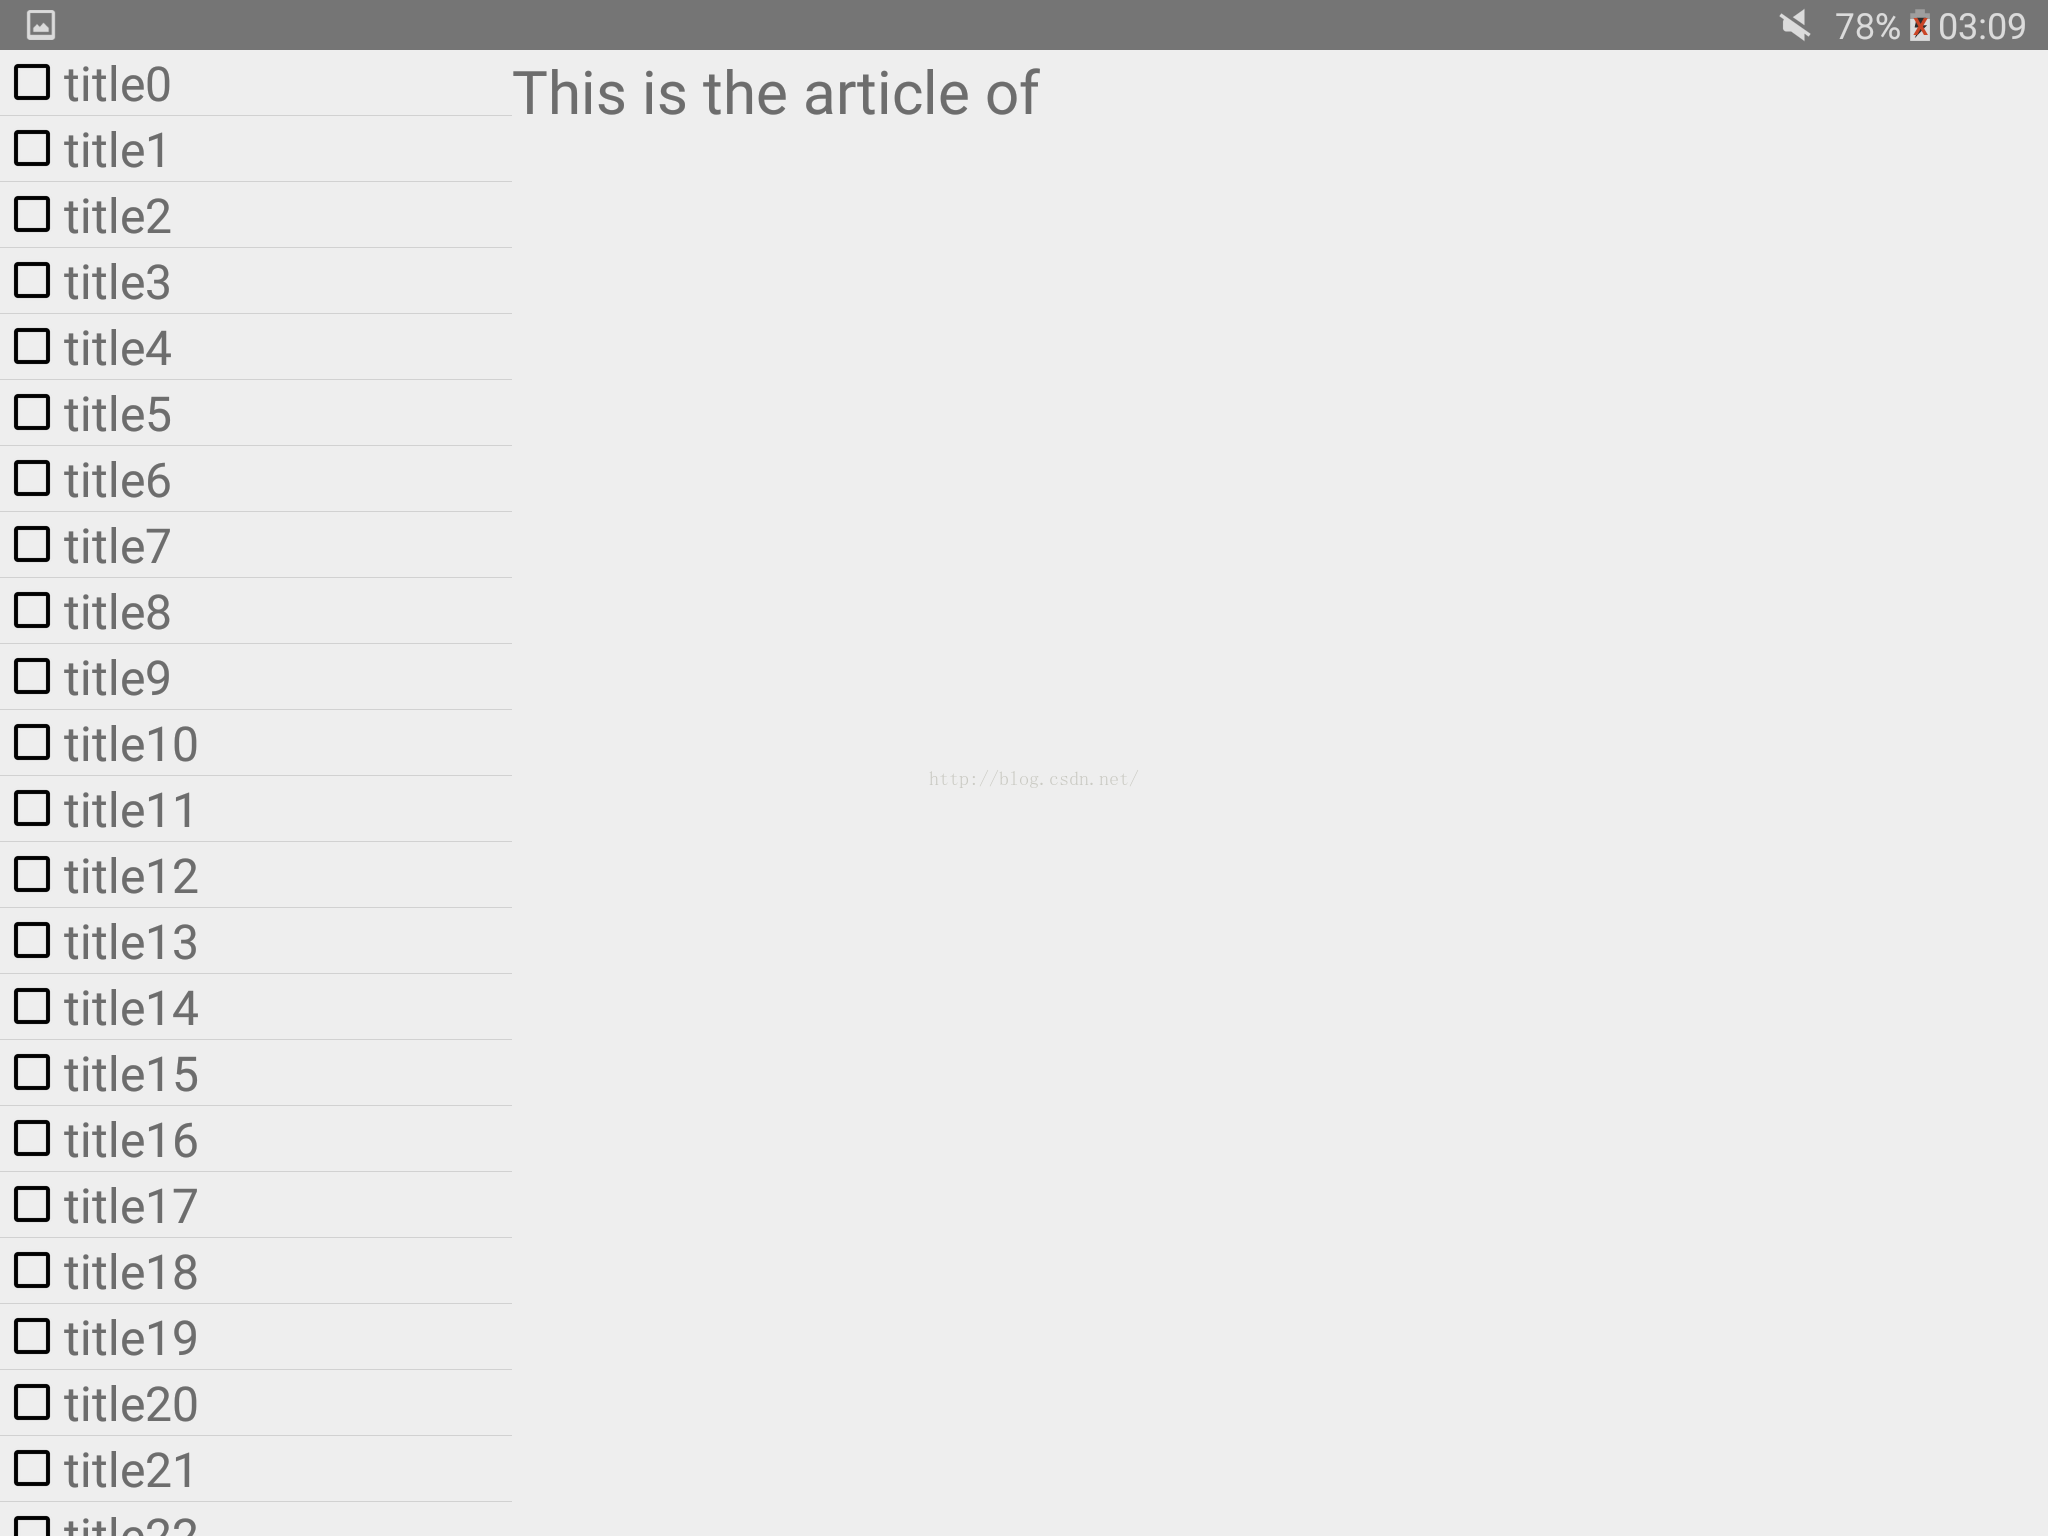
平板横屏时同时显示两个Fragment:
res/values-sw600dp-land/layouts.xml
<?xml version="1.0" encoding="utf-8"?>
<resources>
    <item name="main_layout" type="layout">@layout/activity_main_twopanes</item>
    <bool name="has_two_panes">true</bool>
</resources><?xml version="1.0" encoding="utf-8"?>
<LinearLayout xmlns:android="http://schemas.android.com/apk/res/android"
android:layout_width="match_parent"
android:layout_height="match_parent"
android:orientation="horizontal">
<LinearLayout
android:id="@+id/titleLayout"
android:layout_width="0dp"
android:layout_height="match_parent"
android:layout_weight="1"
android:orientation="vertical">
</LinearLayout>
<LinearLayout
android:id="@+id/articleLayout"
android:layout_width="0dp"
android:layout_height="match_parent"
android:layout_weight="3"
android:orientation="vertical">
</LinearLayout>
</LinearLayout>package com.silion.fragmentsample;
import android.app.Activity;
import android.app.Fragment;
import android.app.FragmentManager;
import android.app.FragmentTransaction;
import android.os.Bundle;
import android.widget.TextView;
public class MainActivity extends Activity{
FragmentManager mFragmentManager;
private Boolean mIsTwoPanes = false;
@Override
protected void onCreate(Bundle savedInstanceState) {
super.onCreate(savedInstanceState);
setContentView(R.layout.main_layout);
mFragmentManager = getFragmentManager();
FragmentTransaction fragmentTransaction = mFragmentManager.beginTransaction();
mIsTwoPanes = getResources().getBoolean(R.bool.has_two_panes);
if(mIsTwoPanes) {
fragmentTransaction.add(R.id.titleLayout, new TitleFragment());
fragmentTransaction.add(R.id.articleLayout, new ArticleFragment());
fragmentTransaction.commit();
} else {
fragmentTransaction.add(R.id.mainLayout, new TitleFragment(), "TitleFragment");
fragmentTransaction.add(R.id.mainLayout, new ArticleFragment(), "ArticleFragment");
fragmentTransaction.commit();
}
}
public void viewDetail (String title) {
if(mIsTwoPanes) {
TextView articleTextView = (TextView) findViewById(R.id.articleTextView);
articleTextView.setText(getResources().getString(R.string.article) + title);
} else {
TextView articleTextView = (TextView) findViewById(R.id.articleTextView);
articleTextView.setText(getResources().getString(R.string.article) + title);
ArticleFragment articleFragment = (ArticleFragment) mFragmentManager.findFragmentByTag("ArticleFragment");
TitleFragment titleFragment = (TitleFragment) mFragmentManager.findFragmentByTag("TitleFragment");
mFragmentManager.beginTransaction().hide(titleFragment).show(articleFragment).commit();
}
}
}
平板横屏:


 1288
1288

 被折叠的 条评论
为什么被折叠?
被折叠的 条评论
为什么被折叠?
 到【灌水乐园】发言


