


无论前端框架多么复杂, 最基本的技术是不变的:
- HTML, Javascript , CSS ;
- Json , Javascript 函数与面向对象, 原型继承机制。
Extjs 对数据如何与组件交互和组件展现数据的层次性划分是比较清晰的, 值得学习和借鉴。
数据展现基本机制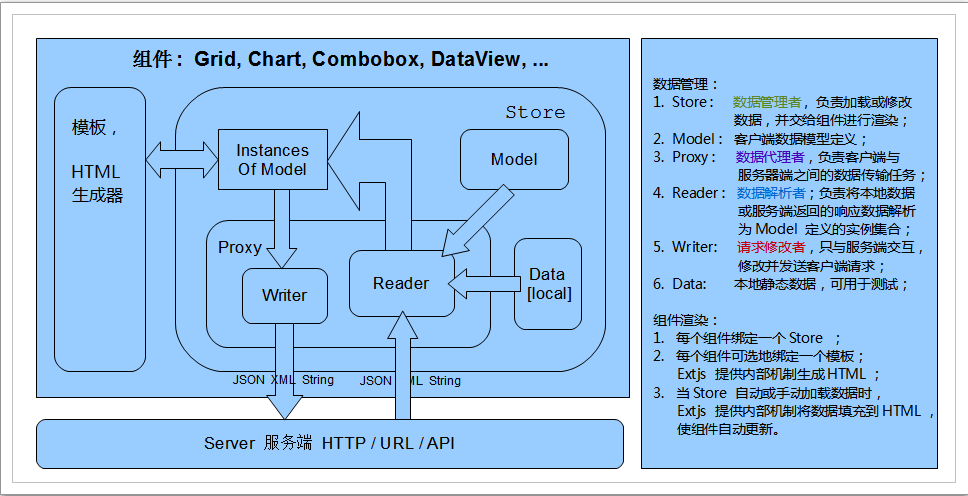
关于其中的实现原理, 应该与服务端相应技术类似, 只是使用 Javascript 实现而已:
- Model : 类似于 Java 端的 DataObject, 或 JavaBean;
- Reader: 其核心技术应该是 JSON 解析。 使用一个 JSON 工具包, 解析传入的字符串,并转化为 Model 实例集
- Writer: 将 Model 实例数据及请求进行修改、拼接、编码并发送, 也是使用 JSON 工具包;
同 Reader 相似, 过程相逆; - Proxy: 接收服务端的数据并委托 Reader 进行解析, 或者接收客户端的数据,委托 Writer 进行处理;
从图中可以看出, 它是枢纽角色; - Store: 数据的最大管理者, 它封装 Proxy, Model , Data 及解析而得的 Model 实例集, 单独与组件进行交互;
Store 的实现 在 Java 端应该是不难模拟的, 可以练练手。
组件展示:
- 组件展示主要是将 Store 里的数据与 HTML 片段, 生成最终的HTML文本,并交给浏览器进行显示;
- HTML 生成: 使用模板 或 DOM 元素生成器;
- 模板生成HTML: 可以使用正则表达式来匹配和填充;
- DOM元素生成器: 为原生的HTML标签提供一层封装, 变成 Extjs 组件。
示例代码:
目录:
应用启动: app.js
Ext.Loader.setConfig({enabled:true, disableCache:true});

Ext.application({
    name:'Extjstudy',
    appFolder:"app",
    autoCreateViewport: true,
    requires:[
        'Extjstudy.global.ExtjstudyTemplates'
    ],
    stores:['VmSnapshot'],
    launch:function()
    {
    }
});
总视图文件: Viewport.js
Ext.define('Extjstudy.view.Viewport', {
    extend:'Ext.container.Viewport',
    layout:'border',
    requires:[
        'Extjstudy.view.Entrance'
    ],
    items: [
        {
            xtype: 'container',
            region: 'north',
            html:'<div>Extjs Study and Explore </div>',
            style: {
                padding: '10px',
                font: '1.2em'
            }
        },
        {
            xtype:'entrance',
            region: 'center'
        }
    ]

});
视图文件: Entrance.js
Ext.define('Extjstudy.view.Entrance', {
    extend: 'Ext.panel.Panel',
    alias: 'widget.entrance',
    title: 'Customized View Demo',
    layout: 'fit',
    items: [
        {
            xtype: 'dataview',
            store: 'VmSnapshot',
            tpl: et.deviceSnapshotTpl,
            itemSelector: 'div.vmdeviceSnapshots',
            width: '800'
        }
    ]
});
模板文件: ExtjstudyTemplates.js
Ext.define('Extjstudy.global.ExtjstudyTemplates', {

    deviceSnapshotTpl: new Ext.XTemplate(
       '<tpl for=".">',
       '<div class="vmdeviceSnapshots" style="margin:15px 10px 30px 15px">',
           '<p>磁盘: {device_no} ( {device_type}, {device_size}G ) </p>',
           '<p>快照详情:</p>',
           '<table border="1" width="95%" cellpadding="3" class="moonmmTable">',
              '<tr><th>快照ID</th><th>创建时间</th><th>进度</th><th>Image_no</th><th>所属用户</th></tr>',
                 '<tpl for="snapshotExts">',
                     '<tr align="center"><td> {snapshot_id}</td><td>{create_time}</td><td>{progress}</td><td>{image_no}</td><td>{owner}</td> </tr>',
                 '</tpl>',
            '</table>',
       '</div></tpl><br/><br/>'
    ),

});

var et = Ext.create('Extjstudy.global.ExtjstudyTemplates');
Model: VmSnapshot.js
Ext.define('Extjstudy.model.VmSnapshot', {
    extend: 'Ext.data.Model',

    fields:[
        {   name: 'vm_name', type: 'string' } ,
        {   name: 'vm_status', type: 'string' } ,
        {   name: 'device_no', type: 'string' } ,
        {   name: 'device_type', type: 'string' } ,
        {   name: 'device_size', type: 'string' } ,
        {   name: 'snapshotExts', type: 'auto' } ,
        {   name: 'snapshots', type: 'auto' }
    ]
});
Store: VmSnapshot.js
Ext.define('Extjstudy.store.VmSnapshot', {
    extend: 'Ext.data.Store',
    model: 'Extjstudy.model.VmSnapshot',
    data:[
         {"vm_name":"change-test01","vm_status":"Shutting","device_no":"3-10057140","mode":"system","device_size":60,"device_type":"system","safety_quota":1,
                      "snapshotExts":[{"snapshot_id":"3-10057140-607877","snapshot_name":"","progress":"100%","create_time":"2013-05-22 18:02:57","image_no":"redhat54.64.20120823.qa_rpc.vhd","owner":"229"},
                                      {"snapshot_id":"3-10057140-607881","snapshot_name":"","progress":"100%","create_time":"2013-05-22 19:05:31","image_no":"redhat54.64.20120823.qa_rpc.vhd","owner":"229"},
                                      {"snapshot_id":"3-10057140-607884","snapshot_name":"","progress":"100%","create_time":"2013-05-22 19:53:02","image_no":"redhat54.64.20120823.qa_rpc.vhd","owner":"229"}],
                       "snapshots":[{"snapshot":"3-10057140-607877"},{"snapshot":"3-10057140-607881"},{"snapshot":"3-10057140-607884"}]},
         {"vm_name":"change-test01","vm_status":"Shutting","device_no":"3-10057141","mode":"data","device_size":40,"device_type":"data","safety_quota":1,
                       "snapshotExts":[{"snapshot_id":"3-10057141-607879","snapshot_name":"","progress":"100%","create_time":"2013-05-22 18:06:01","image_no":"","owner":"229"}],
                       "snapshots":[{"snapshot":"3-10057141-607879"}]}

    ]
})
结果: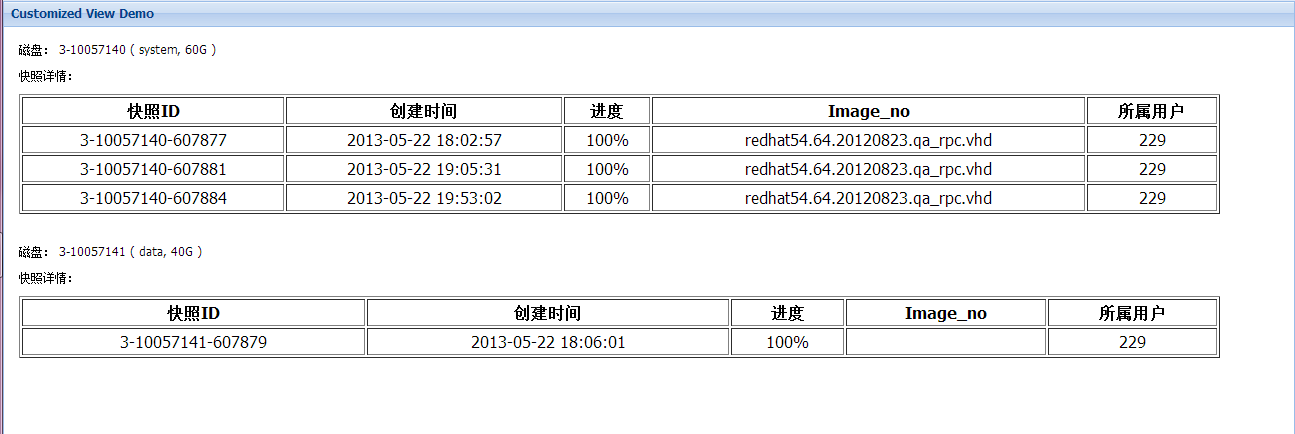


 443
443


 被折叠的 条评论
为什么被折叠?
被折叠的 条评论
为什么被折叠?
 到【灌水乐园】发言


