


一、自动化运维定义
自动化--- 自动化运维:
- 服务的自动化部署
- 操作系统的日常运维:日志的备份、临时文件清理、服务器日常状态巡检、(几乎包括了linux服务管理、linux 系统管理以及在docker 容器课程中涉及的所有内容)
- 服务架构的自动化部署: web架构的部署、数据库主从架构的维护
- CICD (应用的持续集成持续部署):自动化的任务部署在CICD的整个流程中扮演较为重要的一环
ansible定义
定义:一款开源的自动化运维工具,使用简单易懂且好上手的语言,采用声明式语法编写自动化运维的相关任务,保证所有托管至ansible的节点呈现目标管理状态的工具。
主要作用:
- 将运维人员从繁琐复杂且重复性的劳动中解放出来
- 在目前的应用开发的趋势之下。,DEVOPS 就是是开发和运维人员的之间的交互逐渐增加,需要一款自动化工具,能够更好地链接开发和运维的工作。
- 使用“基础设施既代码”概念,复用性和泛用性更强
架构/ ansible 是如何实现远程节点的控制的?
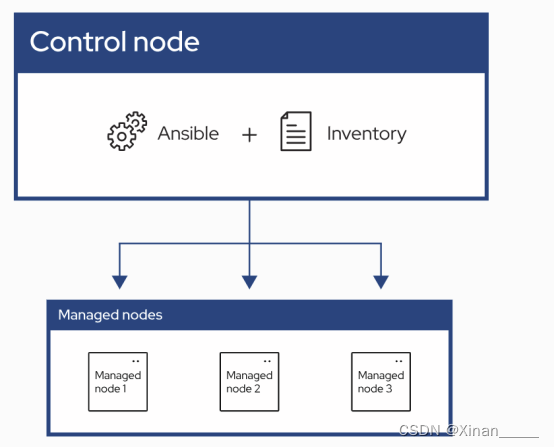
在ansible的架构中:
所有的节点的角色被划分成两个:控制节点(ansible的核心节点)和被控制节点(自动执行管理任务的节点)
被控制节点(远程节点/托管节点/业务节点等):因为ansible采用了无代理的结构,因此被控制节点无需进行任何额外软件的安装,只需要进行简单的环境检查和配置即可
控制节点:安装ansible的核心软件,ansible软件的核心程序都安装在这个地方。
ansible的软件架构:
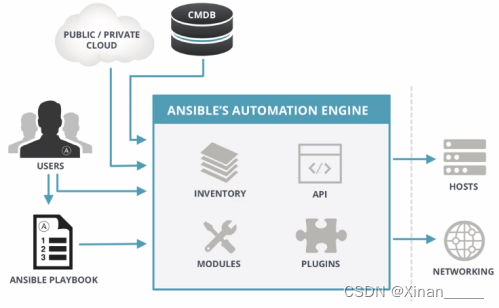
竖虚线右边代表的是收管节点
竖虚线的左边代表控制节点
蓝色方框中间(ansible核心程序):
- inventory: 资产清单,ansible被控制节点的清单/名单
- module: 模块,ansible实际任务的执行由模块来支持
- plugins:插件,ansbile一些扩展功能的实现(任务的循环控制,文本数据的预处理)
- api: ansible 可以直接被调用的应用接口,目前暂时不做要求
蓝色方框左边,所用通过箭头指向ansbile核心程序的图标都代表对于ansible的一种调用方式。这里有一个接近实验环境的箭头路径:
users -> ansbile playbook --> ansible --> hosts(受管节点)
ansible的安装:
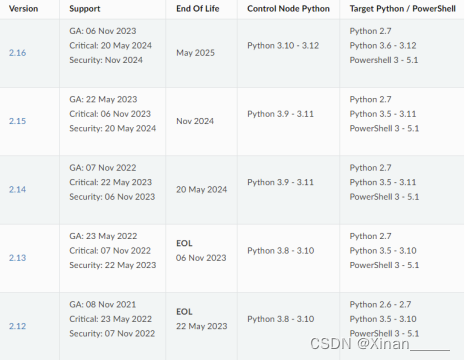
ansible 的控制节点以及被控制节点对于python的版本有所要求:
# 此处演示环境使用的操作系统采用最小化安装,默认未安装python环境
目前centos stream 8 自动集成的python环境的版本是: 3.6.8
查看系统python版本
[root@control-ansible ~]# python3 --version
Python 3.11.7
基于不同的linux发行版适用的安装教程
Installing Ansible on specific operating systems — Ansible Community Documentation
首先ansible 本身可以通过类似于python模块的方式完成安装,这种安装方式一般适用于ansible的开发人员,本课程依旧采用二进制包的方式进行安装。
centos stream 需要扩展epel镜像,完成ansible安装。目前提供两个ansbile的安装包:
ansible-core: 仅包括部分ansbile的核心模块和ansible程序。后续需要安装额外的包来扩展模块的数量
ansible: 在ansible核心程序的基础上,集成了大部分模块,后续使用中不太需要安装额外扩展包。
安装教程
[root@control-ansible ~]# dnf config-manager --set-enabled powertools
[root@control-ansible ~]# dnf install epel-release epel-next-release
[root@control-ansible ~]# dnf repolist
repo id                                                          repo name
appstream                                                        CentOS Stream 8 - AppStream
baseos                                                           CentOS Stream 8 - BaseOS
epel                                                             Extra Packages for Enterprise Linux 8 - x86_64
epel-modular                                                     Extra Packages for Enterprise Linux Modular 8 - x86_64
epel-next                                                        Extra Packages for Enterprise Linux 8 - Next - x86_64
extras                                                           CentOS Stream 8 - Extras
extras-common                                                    CentOS Stream 8 - Extras common packages
powertools                                                       CentOS Stream 8 - PowerTools
[root@control-ansible ~]#  dnf install -y  ansible
[root@control-ansible ~]# ansible --version
ansible [core 2.16.2]
  config file = /etc/ansible/ansible.cfg
  configured module search path = ['/root/.ansible/plugins/modules', '/usr/share/ansible/plugins/modules']
  ansible python module location = /usr/lib/python3.11/site-packages/ansible
  ansible collection location = /root/.ansible/collections:/usr/share/ansible/collections
  executable location = /usr/bin/ansible
  python version = 3.11.7 (main, Jan 26 2024, 19:22:20) [GCC 8.5.0 20210514 (Red Hat 8.5.0-21)] (/usr/bin/python3.11)
  jinja version = 3.1.2
  libyaml = True
被控制节点的python是满足目前环境的最低要求的,可以不做任何配置就开始后续的使用。
ansible如何连接被控制节点,并执行相关的自动化任务。
清单:必须是一个可以被ansible 解析文件。
今天来简单聊一下ini风格的清单如何进行编写
清单使用的简介:
被控节点在被列入清单时,可以使用任何可以通信名称即可(主机名、FQDN、ip地址)
[root@control-ansible ~]# vim inventory
[root@control-ansible ~]# cat inventory
# 一行代表一个主机(被控节点)
192.168.110.129
192.168.110.134
ansible控制节点和被控制节点之间的通信,通过SSH实现。
- 控制节点和被控制节点之间的ssh通信时正常
- SSH通信在首次建立连接的时候,需要ssh的客户端,接受并记录服务端的主机指纹,以避免可能发生的中间人攻击等,需要注意在ansible的通信场景下,ansible的控制节点是ssh通信的常规客户端,被控节点才是ssh通信的服务端。
- 这个配置可以在ansible的配置文件中覆盖,即跳过主机指纹的检查
[root@control-ansible ~]# ansible all -m ping -i inventory --ask-pass
ansible  			// ansible 自动化程序
all				// 说明命令对应的收管节点都有哪些,all 指主机清单中所有列出主机
-m		// 说明调用的模块  这个命令调用了ping模块,ping模块的作用就是测试连通性
-i		// 指定清单文件的路径
--ask-pass		// 提供输入ssh身份验证口令的交互式输入接口
ansible 执行环境的优化:
1.设置专门用于ansible管理的普通用户 automation
模块:ansible.builtin.user 实现系统用户账号的管理,作用等同于 useradd /usermod/userdel/passwd
参数:
name : 用户账号名
state: 用户账号是否存在,present 确保用户账号是存在的, absent 确保用户账号被移除
password: 给定用户的密码,ansible 不会自动对口令加密,所以需要调用加密插件完成用户口令的加密。
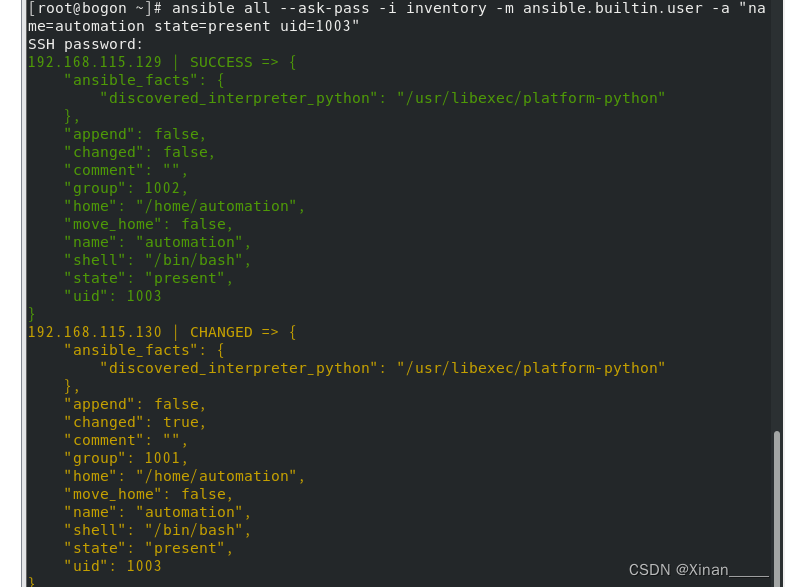
ansible的核心模块具备幂等性特质,所谓幂等性是一个高数的概念,ansible在这里借用这个概念表示ansible是一个基于状态管理的工具,简而言之,ansible在执行任何管理命令之前,会优先确定目标主机是否已经存在对应的状态,如果目标主机已经存在对应的状态,则不进行任何修改指令,返回任务执行成功的信息,但是目标主机不在指定的状态,则执行对应的指令,并给出执行的结果。
[root@control-ansible ~]# ansible all --ask-pass -i inventory -m ansible.builtin.user -a "name=automation state=present"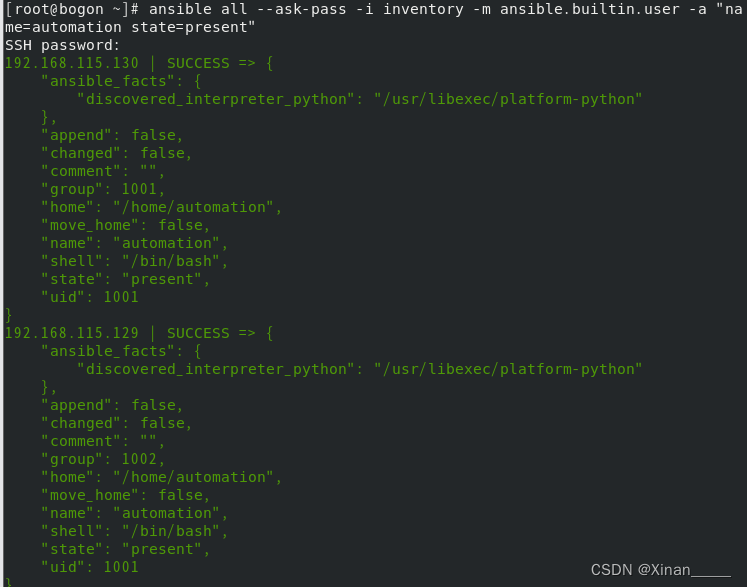
[root@control-ansible ~]# ansible all --ask-pass -i inventory -m ansible.builtin.user -a "name=automation state=present uid=1003"
给用户添加uid
设置用户的密码
[root@control-ansible ~]# ansible all --ask-pass -i inventory -m ansible.builtin.user -a "name=automation state=present uid=1003
> password={{ 'redhat' | password_hash('sha512') }}"设置密码 为 redhat 密码的格式为 sha512
针对这个普通用户设置ssh免密
[root@control-ansible ~]# ssh-keygen
#ssh-keygen 是一个用于生成、管理和转换 SSH 认证密钥的工具。
Generating public/private rsa key pair.
Enter file in which to save the key (/root/.ssh/id_rsa):
Enter passphrase (empty for no passphrase):
Enter same passphrase again:
Your identification has been saved in /root/.ssh/id_rsa.
Your public key has been saved in /root/.ssh/id_rsa.pub.
The key fingerprint is:
SHA256:F84LSphviZov3deY0KhabbHDprCUf/B7b5Wdqgn9Z3Y root@control-ansible
The key's randomart image is:
+---[RSA 3072]----+
|                 |
|                 |
|          .      |
|     o   o .     |
|    o ooS +  o . |
|   ..*o=.+ .o o  |
|  +.o=%..+o. .   |
| ..Bo=+.=.oo. + E|
|  =++..+ o+..+ . |
+----[SHA256]-----+
[root@control-ansible ~]#
[root@control-ansible ~]# ls .ssh/
id_rsa  id_rsa.pub  known_hosts
[root@control-ansible ~]# ssh-copy-id -i .ssh/id_rsa.pub  automation@192.168.110.129
/usr/bin/ssh-copy-id: INFO: Source of key(s) to be installed: ".ssh/id_rsa.pub"
/usr/bin/ssh-copy-id: INFO: attempting to log in with the new key(s), to filter out any that are already installed
/usr/bin/ssh-copy-id: INFO: 1 key(s) remain to be installed -- if you are prompted now it is to install the new keys
automation@192.168.110.129's password:

Number of key(s) added: 1

Now try logging into the machine, with:   "ssh 'automation@192.168.110.129'"
and check to make sure that only the key(s) you wanted were added.

[root@control-ansible ~]# ssh-copy-id -i .ssh/id_rsa.pub  automation@192.168.110.134
/usr/bin/ssh-copy-id: INFO: Source of key(s) to be installed: ".ssh/id_rsa.pub"
/usr/bin/ssh-copy-id: INFO: attempting to log in with the new key(s), to filter out any that are already installed
/usr/bin/ssh-copy-id: INFO: 1 key(s) remain to be installed -- if you are prompted now it is to install the new keys
automation@192.168.110.134's password:

Number of key(s) added: 1

Now try logging into the machine, with:   "ssh 'automation@192.168.110.134'"
and check to make sure that only the key(s) you wanted were added.
设置普通用户的提权配置(su /sudo)
sudo相关提权配置: /etc/sudoers ;/etc/sudoers.d/*
user MACHINE=COMMANDS
用户名 执行命令的主机 授权可以获得root管理权限的命令
%wheel ALL=(ALL) ALL
%wheel //%开头代表是一个组账号
ALL=(ALL) //可以在所有的主机执行任何命令
ALL //命令可以使用所有的参数
NOPASSWD: ALL // 和上面的all代表参数使用 NOPASSWD代表普通用户使用sudo提权 跳过输入密码的步骤
[root@control-ansible ~]# cat a-sudo
automation ALL=(ALL) NOPASSWD: ALL
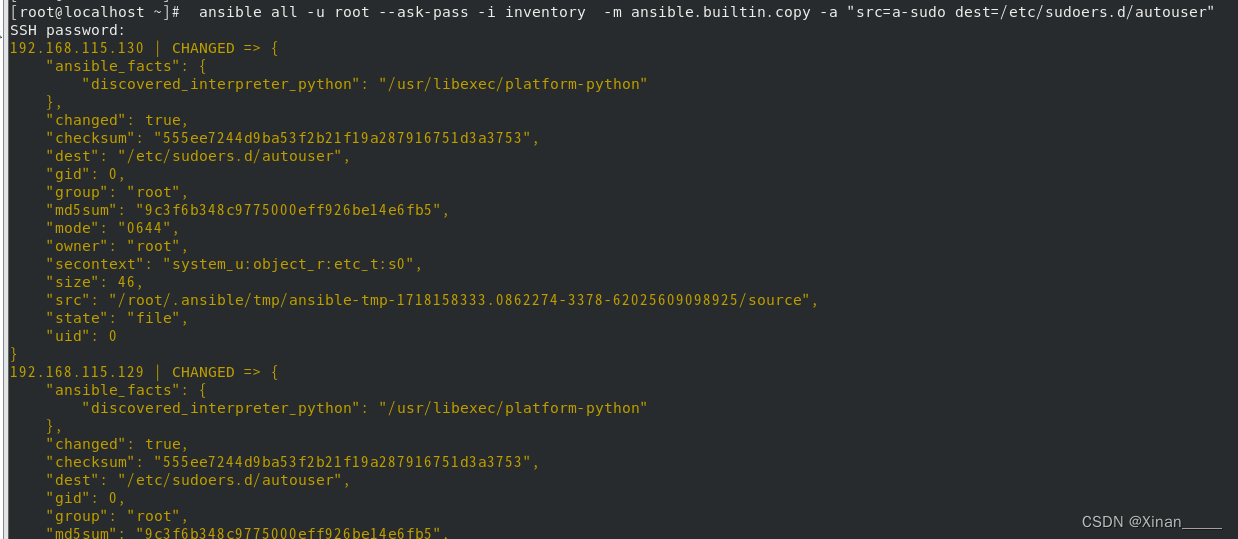
[root@control-ansible ~]# ansible all -u root --ask-pass -i inventory -m ansible.builtin.copy -a "src=a-sudo dest=/etc/sudoers.d/autouser"
#-i inventory: 指定 inventory 文件的路径。Inventory 文件包含 Ansible 需要连接的主机的列表。
#-m ansible.builtin.copy: 指定要使用的模块为
ansible.builtin.copy,这是 Ansible 的内置模块,用于将文件从本地复制到远程主机。-m或--module-name参数用于指定要执行的模块#-a "src=a-sudo dest=/etc/sudoers.d/autouser": 这是
ansible.builtin.copy模块的参数。src=a-sudo指定本地源文件(假设在当前工作目录中有一个名为a-sudo的文件),dest=/etc/sudoers.d/autouser指定远程主机上的目标路径。[root@control-ansible ~]# ansible all -u automation -i inventory -m user -a "name=test state=present" --become
#
--become: 在远程主机上提升权限。这通常意味着命令将在root权限下执行,尽管具体提升到的用户可以通过--become-user选项来指定(默认为root)
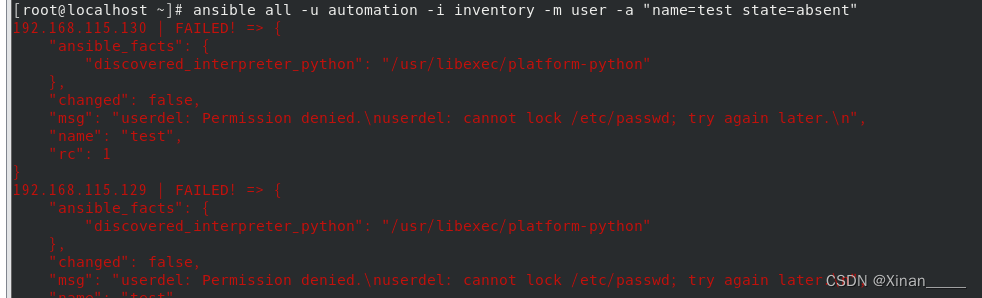
[root@control-ansible ~]# ansible all -u automation -i inventory -m user -a "name=test state=absent"
#删除一个已存在的用户
-u automation: 使用automation这个用户来连接远程主机。-i inventory: 指定 inventory 文件的路径。-m user: 使用 Ansible 的user模块。-a "name=test state=absent": 传递给user模块的参数,指定要删除的用户名为test,并设置状态为absent(即删除用户)。
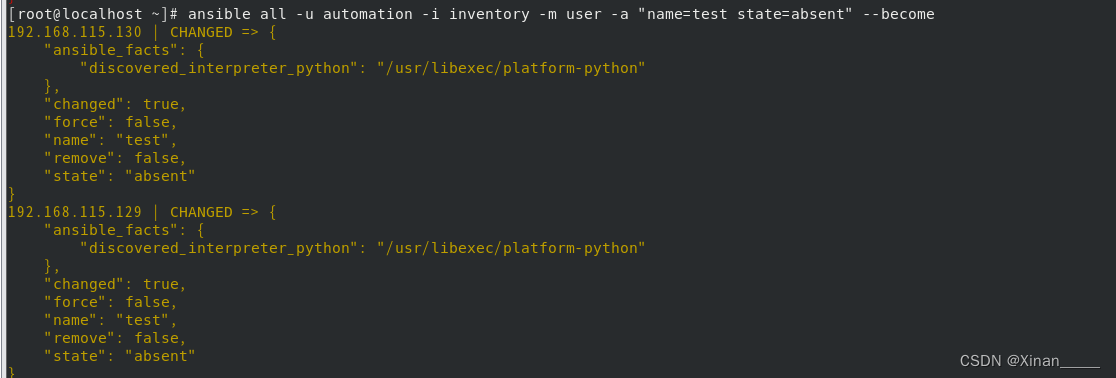
提升权限后成功删除
[root@control-ansible ~]# ansible all -u automation -i inventory -m user -a "name=test state=absent" --become


 898
898

 被折叠的 条评论
为什么被折叠?
被折叠的 条评论
为什么被折叠?
 到【灌水乐园】发言


