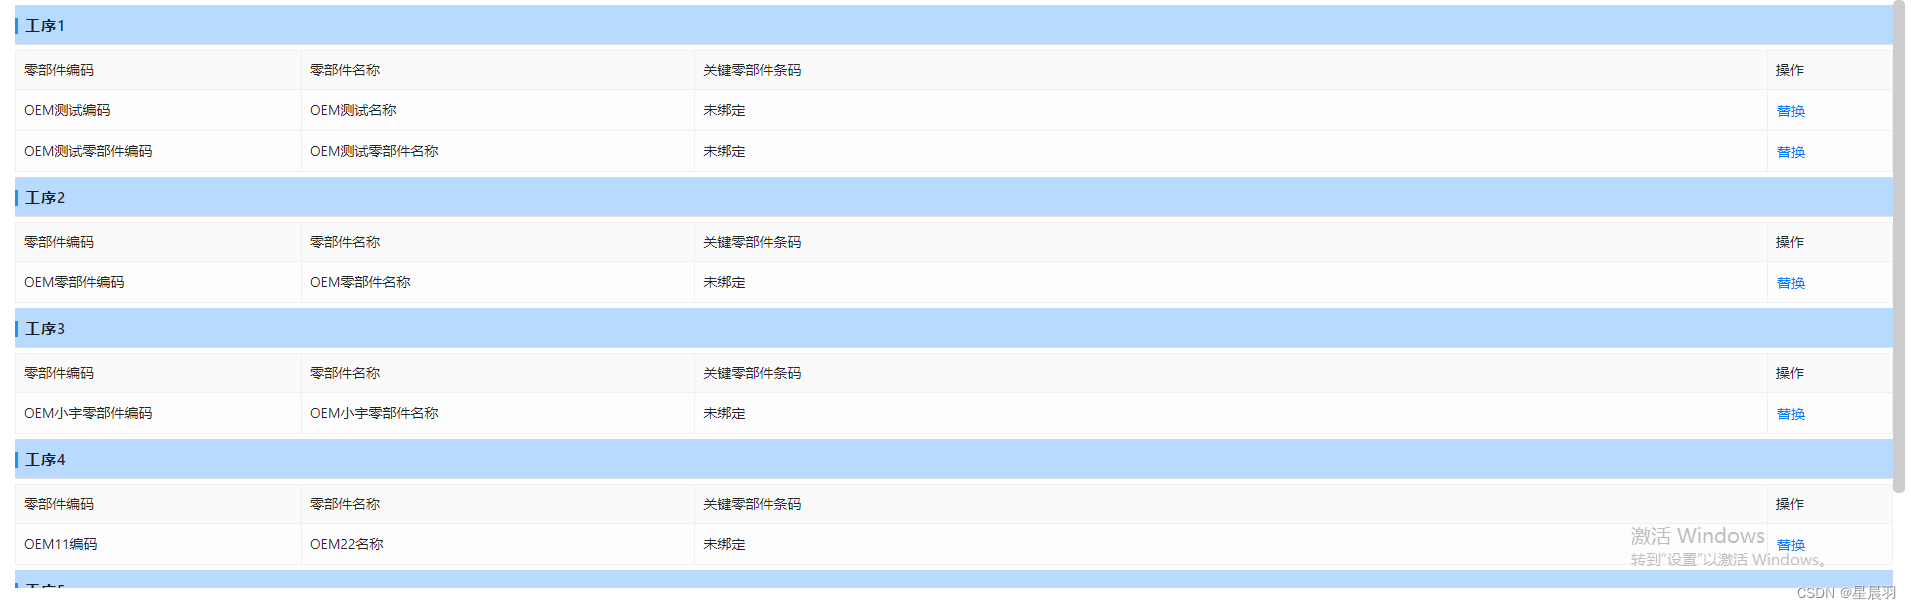
基于vue实现动态table

1、代码

        <div style="height: 600px; overflow: scroll;">
<!-- height: 600px; overflow: scroll;作用是超出页面可以滑动 -->
            <div ng-repeat="row in entity.procedureList">
                <cb-title title="工序{{row.procedireLocation}}" class="table-primary"></cb-title>
                <table class='table table-bordered'>
                    <thead>
                    <tr>
                        <th style='width: 160px;'>零部件编码</th>
                        <th style='width: 220px;'>零部件名称</th>
                        <th style='width: 600px;'>关键零部件条码</th>
                        <th style='width: 70px;'>操作</th>
                    </tr>
                    </thead>
                    <tbody>
                    <tr ng-repeat='dto in row.procedureList'>
                        <td class="table-light">
                            {{dto.oemCode}}
                        </td>
                        <td class="table-light">
                            {{dto.oemName}}
                        </td>
                        <td class="table-light">
                            {{dto.componentBarcode}}
                        </td>
                        <td class="table-light">
                            <button class='btn btn-link btn-warning' ng-click='ctrl.replace(dto)' type='button'
                                    style="color: #007bff;">
                                替换
                            </button>
                        </td>
                    </tr>
                    </tbody>
                </table>
            </div>
        </div>

2、效果

3、源数据

  • 3
    点赞
  • 0
    收藏
    觉得还不错? 一键收藏
  • 0
    评论
下面是一个基于 Vue 2 实现简单购物车的示例代码: HTML: ``` <div id="app"> <h2>商品列表</h2> <ul> <li v-for="item in goods" :key="item.id"> {{ item.name }} - {{ item.price }}元 <button @click="addToCart(item)">加入购物车</button> </li> </ul> <h2>购物车</h2> <table> <thead> <tr> <th>名称</th> <th>单价</th> <th>数量</th> <th>小计</th> <th>操作</th> </tr> </thead> <tbody> <tr v-for="(item, index) in cart" :key="item.id"> <td>{{ item.name }}</td> <td>{{ item.price }}元</td> <td> <button @click="minusFromCart(index)" :disabled="item.quantity === 1">-</button> {{ item.quantity }} <button @click="addToCart(item)">+</button> </td> <td>{{ item.price * item.quantity }}元</td> <td> <button @click="removeFromCart(index)">删除</button> </td> </tr> </tbody> </table> <p>总价:{{ totalPrice }}元</p> </div> ``` JavaScript: ``` new Vue({ el: '#app', data: { goods: [ { id: 1, name: '商品1', price: 10 }, { id: 2, name: '商品2', price: 20 }, { id: 3, name: '商品3', price: 30 } ], cart: [] }, methods: { addToCart(item) { let index = this.cart.findIndex(cartItem => cartItem.id === item.id) if (index !== -1) { this.cart[index].quantity++ } else { this.cart.push({ id: item.id, name: item.name, price: item.price, quantity: 1 }) } }, minusFromCart(index) { if (this.cart[index].quantity > 1) { this.cart[index].quantity-- } }, removeFromCart(index) { this.cart.splice(index, 1) } }, computed: { totalPrice() { return this.cart.reduce((total, item) => total + item.price * item.quantity, 0) } } }) ``` 在这个示例中,首先定义了一个商品列表和一个购物车列表,其中商品列表包含了每个商品的名称、价格和 ID,购物车列表为空。在页面上展示商品列表时,为每个商品添加了一个加入购物车的按钮,并在点击按钮时调用 `addToCart` 方法将对应商品信息加入购物车列表中。在页面上展示购物车列表时,使用了一个表格来展示每个商品的名称、价格、数量和小计金额,并为每个商品添加了加减和删除按钮,同时使用了一个计算属性来计算购物车中所有商品的总价。在 `addToCart` 方法中还实现了判断购物车中是否已存在该商品的逻辑,如果存在则将对应商品的数量加 1,否则将该商品添加到购物车列表中。在 `minusFromCart` 方法中实现了减少购物车中商品数量的逻辑,并且如果商品数量已经为 1,则减少按钮会被禁用。在 `removeFromCart` 方法中通过 `splice` 方法实现了删除购物车列表中的商品的逻辑。

“相关推荐”对你有帮助么?

  • 非常没帮助
  • 没帮助
  • 一般
  • 有帮助
  • 非常有帮助
提交
评论
添加红包

请填写红包祝福语或标题

红包个数最小为10个

红包金额最低5元

当前余额3.43前往充值 >
需支付:10.00
成就一亿技术人!
领取后你会自动成为博主和红包主的粉丝 规则
hope_wisdom
发出的红包
实付
使用余额支付
点击重新获取
扫码支付
钱包余额 0

抵扣说明:

1.余额是钱包充值的虚拟货币,按照1:1的比例进行支付金额的抵扣。
2.余额无法直接购买下载,可以购买VIP、付费专栏及课程。

余额充值