


 本文详细介绍了如何使用Go库excelize创建和应用样式,包括边框、填充、字体、对齐方式、自定义数字格式,以及如何在单元格、列和行中应用这些样式。通过实例展示了边线类型、渐变填充、字体样式设置和文本对齐的完整过程。
文章目录
1. 样式设置
1.1 创建样式
func (f *File) NewStyle(style interface{}) (int, error)
1.2 Style 结构体
type Style struct {
    Border        []Border    `json:"border"`
    Fill          Fill        `json:"fill"`
    Font          *Font       `json:"font"`
    Alignment     *Alignment  `json:"alignment"`
    Protection    *Protection `json:"protection"`
    NumFmt        int         `json:"number_format"`
    DecimalPlaces int         `json:"decimal_places"`
    CustomNumFmt  *string     `json:"custom_number_format"`
    Lang          string      `json:"lang"`
    NegRed        bool        `json:"negred"`
}
- 成员说明
Border:边界Fill:填充色Font:字体Alignment:对齐Protection: ?NumFmt:自定义格式DecimalPlaces:小数点位置CustomNumFmt:自定义数字格式Lang: 谁的长度NegRed:是否粗体?
几个常用成员(如
Border、Fill等)使用的结构体我们接下来将做说明:
1.2.1 Border结构体(边框设置)
结构体语法
type Border struct {
    Type  string `json:"type"`
    Color string `json:"color"`
    Style int    `json:"style"`
}
- 成员说明
- Type:边线方向
- left
- right
- top
- bottom
- diagonalDown:左上到右下
- diagonalUP:左下到右上
- Color:颜色
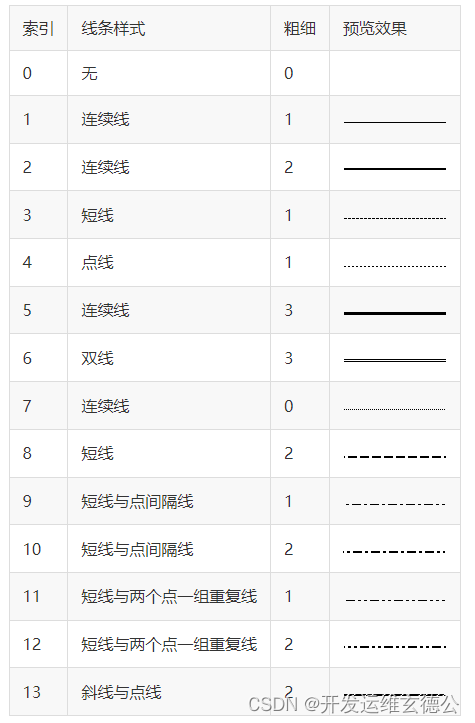
- Style:边线类型
- Type:边线方向
Style边线类型效果如下:
完整示例
- 代码
package main

import (
	"fmt"
	"github.com/xuri/excelize/v2"
)

func main() {
	f := excelize.NewFile()

	styleId, err := f.NewStyle(&excelize.Style{
		Border: []excelize.Border{
			{Type: "left", Color: "000000", Style: 1},
			{Type: "top", Color: "000000", Style: 2},
			{Type: "bottom", Color: "000000", Style: 3},
			{Type: "right", Color: "000000", Style: 4},
			{Type: "diagonalDown", Color: "000000", Style: 5},
			{Type: "diagonalUp", Color: "A020F0", Style: 6},
		},
	})
	if err != nil {
		fmt.Println(err)
	}
	err = f.SetCellStyle("Sheet1", "B4", "D2", styleId)
	if err = f.SaveAs("sanGuo.xlsx"); err != nil {
		fmt.Println(err)
	}
}
- 结果显示
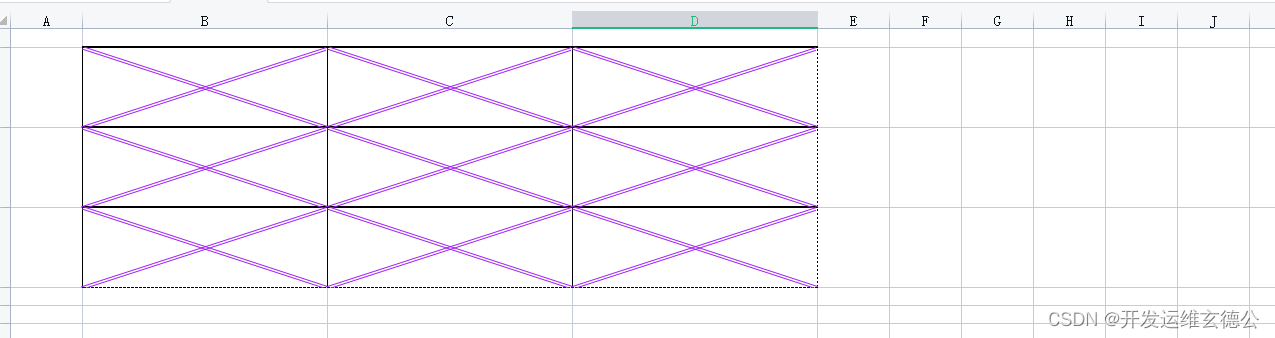
注意:
diagonalDown和diagonalUp同时设置,如果二者样式不同,则diagonalDown会被diagonalUp的样式覆盖。
1.2.2 Fill结构体(填充设置)
结构体语法
type Fill struct {
    Type    string   `json:"type"`
    Pattern int      `json:"pattern"`
    Color   []string `json:"color"`
    Shading int      `json:"shading"`
}
- 说明:
- Type
gradient:渐变pattern:填充图
- Shading(Type为
gradient时生效)- 1:横向填充
- 2:纵向填充
- 3:对角线向下填充
- 4:对角线向上填充
- 5:从内向外填充
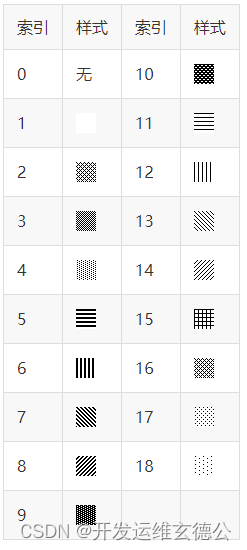
- Pattern(Type为
pattern时生效)- 值从1~18(图片“Pattern值”)。
- 1 表示纯色填充
- Color
- Type为
gradient时,Color 有两个值,Pattern不生效 - 切片只有一个成员时,Shading 不生效。
- Type为
- Type
Pattern值:
完整示例(渐变填充)
- 代码
package main

import (
	"fmt"
	"github.com/xuri/excelize/v2"
)

func main() {
	f := excelize.NewFile()

	styleId, err := f.NewStyle(&excelize.Style{
		Border: []excelize.Border{
			{Type: "left", Color: "000000", Style: 2},
			{Type: "top", Color: "000000", Style: 2},
			{Type: "bottom", Color: "000000", Style: 2},
			{Type: "right", Color: "000000", Style: 2},
		},
		Fill:  excelize.Fill{
			Type: "gradient",
			Color: []string{"FFFF00", "00FF00"},
			Shading: 1,
		},

	})
	if err != nil {
		fmt.Println(err)
	}
	err = f.SetCellStyle("Sheet1", "B4", "D2", styleId)
	if err = f.SaveAs("sanGuo.xlsx"); err != nil {
		fmt.Println(err)
	}
}
- 结果显示

示例(纯色填充)
style, err := f.NewStyle(&excelize.Style{
    Fill: excelize.Fill{Type: "pattern", Color: []string{"FF0000"}, Pattern: 1},
})
1.2.3 Font结构体(字体设置)
结构体语法
type Font struct {
    Bold      bool    `json:"bold"`
    Italic    bool    `json:"italic"`
    Underline string  `json:"underline"`
    Family    string  `json:"family"`
    Size      float64 `json:"size"`
    Strike    bool    `json:"strike"`
    Color     string  `json:"color"`
    VertAlign string  `json:"vertAlign"`
}
- 说明:
Bold:是否粗体Italic:是否斜体Underline: 下划线- single :单线
- double:双线
Family:字体样式Size:字体大小Color:字体颜色
完整示例
- 代码
package main
import (
"fmt"
"github.com/xuri/excelize/v2"
)
func main() {
f := excelize.NewFile()
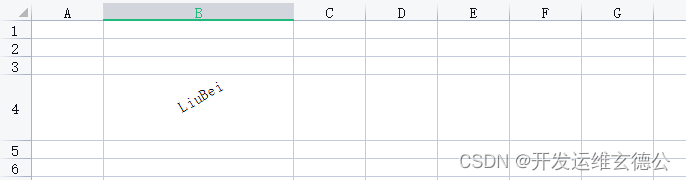
styleId, err := f.NewStyle(&excelize.Style{
Font: &excelize.Font{
Bold: true,
Italic: true,
Family: "Times New Roman",
Size: 36,
Color: "微软雅黑",
},
})
if err != nil {
fmt.Println(err)
}
f.SetCellStyle("Sheet1", "B4", "B4", styleId)
f.SetCellValue("Sheet1","B4","LiuBei")
if err = f.SaveAs("sanGuo.xlsx"); err != nil {
fmt.Println(err)
}
}
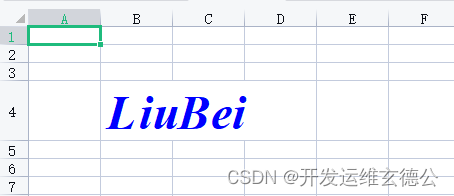
- 结果显示
1.2.4 Alignment结构体(对齐方式)
结构体语法
type Alignment struct {
    Horizontal      string `json:"horizontal"`
    Indent          int    `json:"indent"`
    JustifyLastLine bool   `json:"justify_last_line"`
    ReadingOrder    uint64 `json:"reading_order"`
    RelativeIndent  int    `json:"relative_indent"`
    ShrinkToFit     bool   `json:"shrink_to_fit"`
    TextRotation    int    `json:"text_rotation"`
    Vertical        string `json:"vertical"`
    WrapText        bool   `json:"wrap_text"`
}
- 说明
Horizontal:水平对齐- right
- left
- center
Indent:缩进JustifyLastLine:两端对齐ReadingOrder:文字方向RelativeIndent:相对缩进ShrinkToFit:缩小字体TextRotation:文字旋转Vertical:垂直对齐- top
- bottom
- center
WrapText:自动换行
完整示例
package main

import (
	"fmt"
	"github.com/xuri/excelize/v2"
)

func main() {
	f := excelize.NewFile()

	styleId, err := f.NewStyle(&excelize.Style{
		Alignment: &excelize.Alignment{
			Horizontal:      "center",
			Indent:          1,
			JustifyLastLine: true,
			ReadingOrder:    2,
			RelativeIndent:  1,
			ShrinkToFit:     true,
			TextRotation:    30,
			Vertical:        "top",
			WrapText:        true,
		},

	})
	if err != nil {
		fmt.Println(err)
	}
	f.SetCellStyle("Sheet1", "B4", "B4", styleId)
	f.SetCellValue("Sheet1","B4","LiuBei")
	if err = f.SaveAs("sanGuo.xlsx"); err != nil {
		fmt.Println(err)
	}
}
结果显示
1.2.4 NumFmt编号(自定义格式)
参数
| 索引 | 类型 |
|---|---|
| 27 | yyyy"年"m"月" |
| 28 | m"月"d"日" |
| 29 | m"月"d"日" |
| 30 | m-d-yy |
| 31 | yyyy"年"m"月"d"日" |
| 32 | h"时"mm"分" |
| 33 | h"时"mm"分"ss"秒" |
| 34 | 上午/下午 h"时"mm"分" |
| 35 | 上午/下午 h"时"mm"分"ss"秒 |
| 36 | yyyy"年"m"月 |
| 50 | yyyy"年"m"月 |
| 51 | m"月"d"日 |
| 52 | yyyy"年"m"月 |
| 53 | m"月"d"日 |
| 54 | m"月"d"日 |
| 55 | 上午/下午 h"时"mm"分 |
| 56 | 上午/下午 h"时"mm"分"ss"秒 |
| 57 | yyyy"年"m"月 |
| 58 | m"月"d"日" |
完整示例
import (
"fmt"
"github.com/xuri/excelize/v2"
"time"
)
func main() {
f := excelize.NewFile()
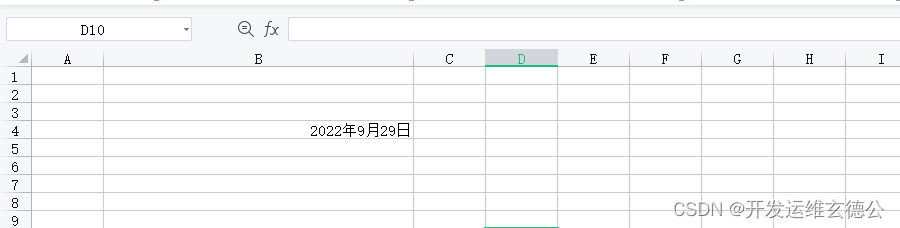
numFmt := "yyyy\"年\"m\"月\"d\"日\""
styleId, err := f.NewStyle(&excelize.Style{
CustomNumFmt: &numFmt,
})
if err != nil {
fmt.Println(err)
}
f.SetCellStyle("Sheet1", "B4", "B4", styleId)
f.SetCellValue("Sheet1","B4",time.Now())
if err = f.SaveAs("sanGuo.xlsx"); err != nil {
fmt.Println(err)
}
}
- 效果
1.2.5 CustomNumFmt编号(自定义数字)
参数
| 索引 | 类型 |
|---|---|
| 0 | General |
| 1 | 0 |
| 2 | 0.00 |
| 3 | #,##0 |
| 4 | #,##0.00 |
| 5 | (KaTeX parse error: Expected 'EOF', got '#' at position 1: #̲,##0_);(#,##0) |
| 6 | (KaTeX parse error: Expected 'EOF', got '#' at position 1: #̲,##0_);[Red](#,##0) |
| 7 | (KaTeX parse error: Expected 'EOF', got '#' at position 1: #̲,##0.00_);(#,##0.00) |
| 8 | (KaTeX parse error: Expected 'EOF', got '#' at position 1: #̲,##0.00_);[Red]…#,##0.00) |
| 9 | 0% |
| 10 | 0.00% |
| 11 | 0.00E+00 |
| 12 | # ?/? |
| 13 | # ??/?? |
| 14 | m/d/yy |
| 15 | d-mmm-yy |
| 16 | d-mmm |
| 17 | mmm-yy |
| 18 | h:mm AM/PM |
| 19 | h:mm:ss AM/PM |
| 20 | h:mm |
| 21 | h:mm:ss |
| 22 | m/d/yy h:mm |
| … | … |
| 37 | (#,##0_) ; (#,##0) |
| 38 | (#,##0_);Red |
| 39 | (#,##0.00_); (#,##0.00) |
| 40 | (#,##0.00_);Red |
| 41 | (* #,##0);(* (#,##0);(* “-”);(@_) |
| 42 | (KaTeX parse error: Expected 'EOF', got '#' at position 3: * #̲,##0_);_(* (#,##0);($* “-”);(@_) |
| 43 | (* #,##0.00);(* (#,##0.00);(* “-”??);(@_) |
| 44 | (KaTeX parse error: Expected 'EOF', got '#' at position 3: * #̲,##0.00_);_(* (#,##0.00);($* “-”??);(@_) |
| 45 | mm:ss |
| 46 | [h]:mm:ss |
| 47 | mm:ss.0 |
| 48 | ##0.0E+0 |
| 49 | @ |
完整示例(指定小数位)
显示为五位小数
import (
"fmt"
"github.com/xuri/excelize/v2"
)

func main() {
	f := excelize.NewFile()
	customNumFmt := "0.00000"
	styleId, err := f.NewStyle(&excelize.Style{
		CustomNumFmt: &customNumFmt,

	})
	if err != nil {
		fmt.Println(err)
	}
	f.SetCellStyle("Sheet1", "B4", "B4", styleId)
	f.SetCellValue("Sheet1","B4",1)
	if err = f.SaveAs("sanGuo.xlsx"); err != nil {
		fmt.Println(err)
	}
}
- 效果

完整示例(显示节)
- 代码
import (
"fmt"
"github.com/xuri/excelize/v2"
)
func main() {
f := excelize.NewFile()
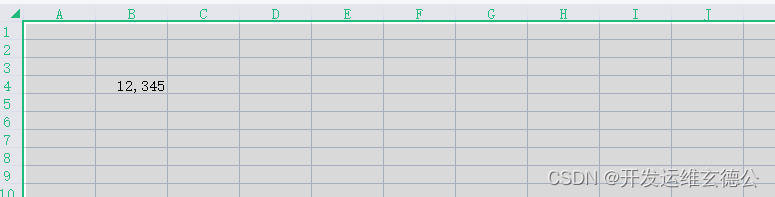
customNumFmt := "#,##0"
styleId, err := f.NewStyle(&excelize.Style{
CustomNumFmt: &customNumFmt,
})
if err != nil {
fmt.Println(err)
}
f.SetCellStyle("Sheet1", "B4", "B4", styleId)
f.SetCellValue("Sheet1","B4",12345)
if err = f.SaveAs("sanGuo.xlsx"); err != nil {
fmt.Println(err)
}
}
- 效果
2. 样式使用
2.1 单元格使用样式
- 语法
func (f *File) SetCellStyle(sheet string, hCell string, vCell string, styleID int) error
2.2 列使用样式
- 语法
func (f *File) SetColStyle(sheet, columns string, styleID int) error
- 语法示例
err = f.SetColStyle("Sheet1", "H", style)
err = f.SetColStyle("Sheet1", "C:F", style)
2.3 行使用样式
- 语法
func (f *File) SetRowStyle(sheet string, start int, end int, styleID int) error
- 语法示例
err = f.SetRowStyle("Sheet1", 1,3,style)


 被折叠的 条评论
为什么被折叠?
被折叠的 条评论
为什么被折叠?
 到【灌水乐园】发言


