


Kivy tutorial 007: Introducing kv language – Kivy Blog
DECEMBER 18, 2019 BY ALEXANDER TAYLOR
Kivy tutorial 007: Introducing kv language
Kivy 导师课007: 介绍kv语言
Central themes: kv language, building a gui, integration with Python
中心主题: kv语言, 建立一个gui, 和python 结合
The goal of this tutorial will be to build up a simple gui around the DrawingWidget built in the last two tutorials. A nice simple goal would be to let the user select the colour of the lines. Kivy actually has a ColorPicker Widget for this purpose (see the documentation), but we’ll skip that for now in order to continue demonstrating Kivy widget construction.
这节导师课的目的将是建立一个简单地gui围绕着 DrawingWidget 上两次导师课建立的。 一个好的简单地目标将是让用户选择颜色的线。 kivy 的确有一个ColorPicler 颜色选择器 组件 为了这个目的(看这个文档), 但是我们现在将跳过为了继续演示Kivy组件的结构。
Note
Since all Kivy widgets are built out of other Widgets and canvas instructions, you might like to think about how you’d build the ColorPicker from scratch.
自从kivy组件都是由其他的组件们 和画布结构构成的, 你可能像如何你从划拉中如何构建ColorPicker。
Let’s start with the code from last time, minus the now-unnecessary red Rectangle:
让我们同上次最后的代码开始, 略低于标准的现在不怎么必要的 红色矩形:
from kivy.app import App
from kivy.uix.boxlayout import BoxLayout
from kivy.uix.slider import Slider

from kivy.uix.widget import Widget
from kivy.graphics import Rectangle, Color, Line

from random import random

class DrawingWidget(Widget):
    def __init__(self):
        super(DrawingWidget, self).__init__()

        with self.canvas:
            Color(1, 1, 1, 1)
            self.rect = Rectangle(size=self.size,
                                  pos=self.pos)
        self.bind(pos=self.update_rectangle,
                  size=self.update_rectangle)


    def update_rectangle(self, instance, value):
        self.rect.pos = self.pos
        self.rect.size = self.size

    def on_touch_down(self, touch):
        super(DrawingWidget, self).on_touch_down(touch)

        with self.canvas:
            Color(random(), random(), random())
            self.line = Line(points=[touch.pos[0], touch.pos[1]], width=2)

    def on_touch_move(self, touch):
        self.line.points = self.line.points + [touch.pos[0], touch.pos[1]]


class DrawingApp(App):

    def build(self):
        root_widget = DrawingWidget()
        return root_widget

DrawingApp().run()
I’ll demonstrate adding the new gui components in two ways; first in pure Python as has been demonstrated in previous tutorials, and second using kv language instead. So, here’s a Python implementation of the new features we want, beginning with importing the Widget classes we’ll need:
我将证明增加新的gui 组件在2种方式; 第一种是纯Python 作为在之前导师课中被证明的, 并且第二种使用kv语言相替代。 因此, 这是一个python我们想要的新特征的执行, 这从import我们需要导入widget类开始。
from kivy.uix.boxlayout import BoxLayout
from kivy.uix.label import Label
from kivy.uix.slider import Slider
Slider is a previously-unseen Widget displaying a draggable marker. We’ll be using a Slider for each primary colour (red, blue, green), and using this to set the Color when a Line is drawn.
slider 是一个以前地-不可见的 组件演示着一个可拖拽的制造者。 我们将使用一个Slider 给每个最基本的颜色(红,蓝,绿)并且使用这来设置颜色当一个线被绘画的时候。
We can now update the build method of DrawingApp, replacing the root widget and adding the new gui components:
我们现在可以更新DrawingApp绘画APP的build方法, 替代widget基类 和增加新的gui组件:
class DrawingApp(App):

    def build(self):
        root_widget = BoxLayout(orientation='vertical')

        drawing_widget = DrawingWidget()
        #To create a slider from 0 to 1 starting from 0.5:
        red_slider = Slider(min=0, max=1, value=0.5,
                            size_hint_y=None, height=80)
        green_slider = Slider(min=0, max=1, value=0.5,
                            size_hint_y=None, height=80)
        blue_slider = Slider(min=0, max=1, value=0.5,
                            size_hint_y=None, height=80)

        colour_row = BoxLayout(orientation='horizontal',
                               size_hint_y=None, height=80)
        colour_label = Label(text='output colour:')
        colour_widget = Widget()

        # We draw a Rectangle on colour_widget exactly the same way as
        # with DrawingWidget, just without making a new class
        with colour_widget.canvas:
            output_colour = Color(red_slider.value,
                                  green_slider.value,
                                  blue_slider.value)
            output_rectangle = Rectangle()
        def update_colour_widget_rect(instance, value):
            output_rectangle.pos = colour_widget.pos
            output_rectangle.size = colour_widget.size
        colour_widget.bind(pos=update_colour_widget_rect,
                           size=update_colour_widget_rect)

        def update_colour_widget_colour(instance, value):
            output_colour.rgb = (red_slider.value,
                                 green_slider.value,
                                 blue_slider.value)
        red_slider.bind(value=update_colour_widget_colour)
        green_slider.bind(value=update_colour_widget_colour)
        blue_slider.bind(value=update_colour_widget_colour)

        root_widget.add_widget(drawing_widget)
        root_widget.add_widget(red_slider)
        root_widget.add_widget(green_slider)
        root_widget.add_widget(blue_slider)
        root_widget.add_widget(colour_row)

        colour_row.add_widget(colour_label)
        colour_row.add_widget(colour_widget)

        return root_widget
This is a lot of code to drop all at once, but read it carefully and you’ll see that it’s only the same concepts already introduced: we instantiate Widgets, add them to one another, and create bindings so that things automatically happen when Kivy properties are changed. In this case, we make use of the value Kivy property of the Slider widget, which gives its current value (changing automatically when the slider is moved).
这是一次中途卸货的一些代码,但是阅读它谨慎地 并且 你将看到它只是已经介绍的相同的概念:我们举例说明组件, 增加它们给另一个, 并且创造bind关联因此物件儿们自动地发生当kivy 属性被改变的时候。 在这个案例中,我们利用了kivy slider组件的属性值, 这值提供它当前值(当slider被移动时,值自动地改变)。
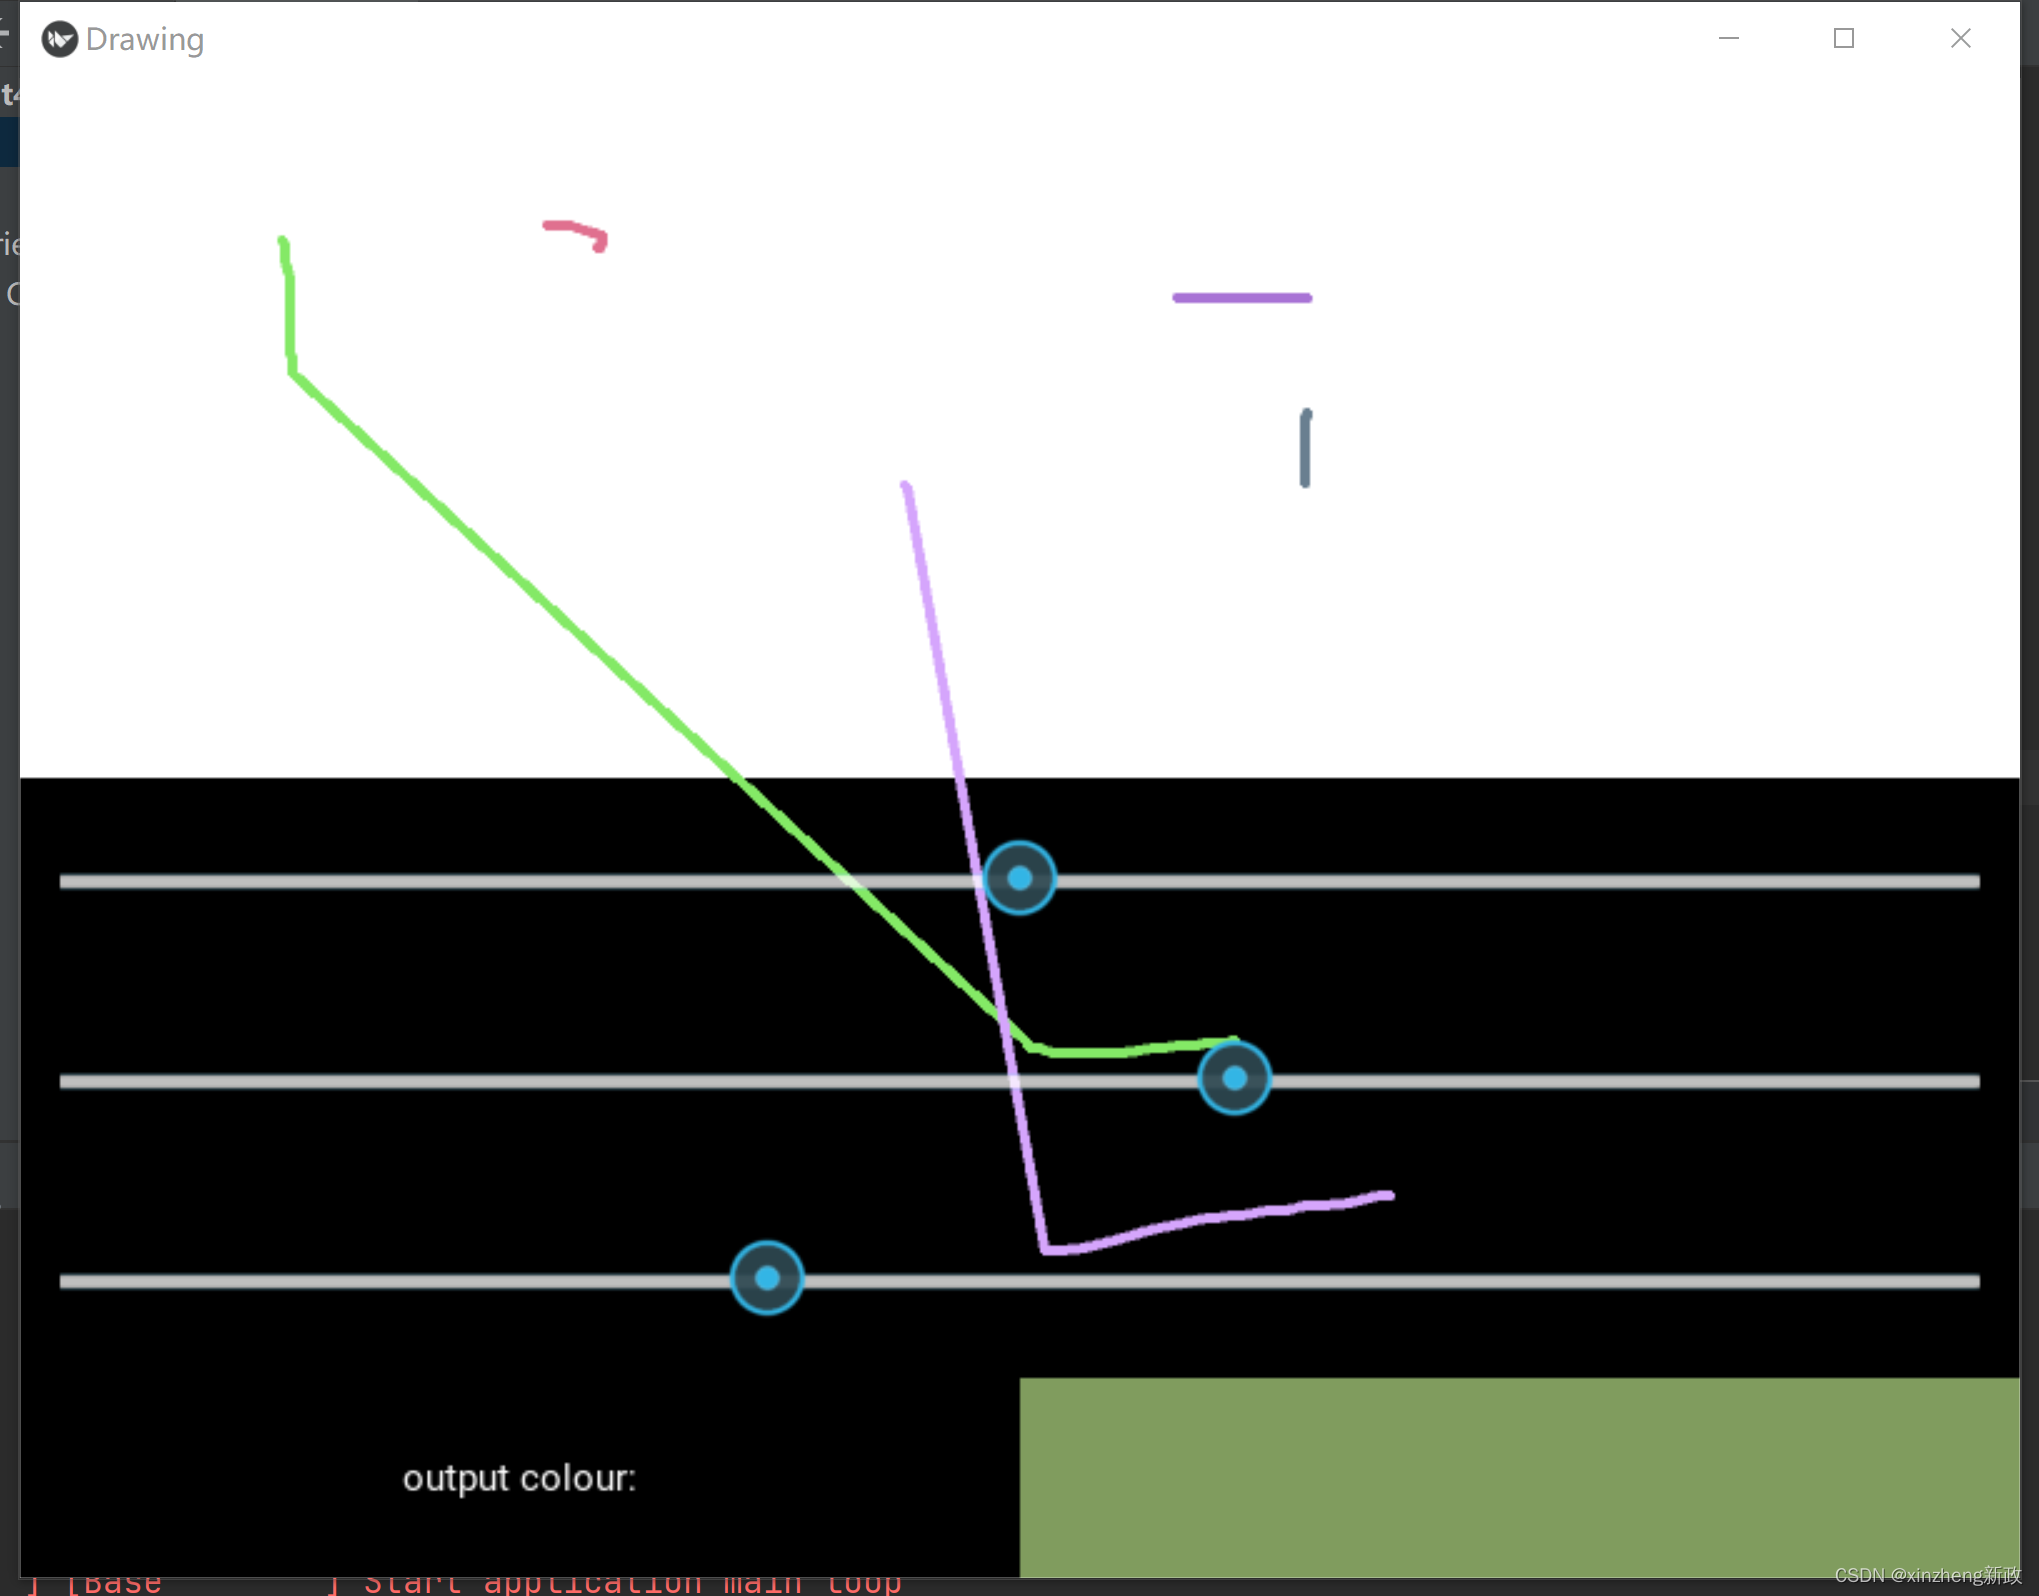
Run the code and you should see something like the image below. You can update the colour in the bottom right by moving the sliders. Cool.
运行code 并且第你应该看到某事像下面图片一样。你可以更新颜色通过移动sliders在底部的右边, 帅。
A problem now becoming obvious is that all this code is kind of verbose, and also it can be a little unclear what is happening - Widget instantiation is in a different place to where the Widgets are added to one another, which is different again to where their events are bound. You can mitigate this with a careful app structure and following whatever coding conventions you like, but some of it is unavoidable given how Python works.
现在紧随而来的明显的问题是所有的代码是冗长啰嗦的一种,并且它也可以是一些不太清晰的当下发生的- 组件实例化时在一个不同的地方组件们被添加到另一个种, 这又不一样被加到它们事件被绑定的。 你可以缓和这同一个谨慎的app结构 并且跟随 你想插入的任何代码,但是它们的的一些是不可避免地被给出有关如何python运行的。
It’s for this reason that Kivy comes with kv language, a simple but powerful language specifically designed for creating Kivy widget trees. If learning a new language sounds worrying…don’t be concerned! Kv doesn’t have much special syntax and is targeted specifically at Kivy widgets, and much of the code you write is actually normal Python (we’ll see that soon).
因这个原因kivy有了kv语言,一个简单但是功能强大的语言被特别设计来创建kivy组件树。 如果学习一个新的语言听起来坏极了, 不需要考虑! kv 没有很多的特殊语法 并且在kivy组件中被 定为目标, 并且一些代码你写的 是真正的常见的python。
All of the kv language stuff discussed below is documented on the Kivy website; I’ll cover the basics, but you can find more information there.
所有的kv语言物件儿 在下面的kivy网页文档中被讨论, 我将涉及基础的,但是你可以发现更多的信息在这。
First, get rid of all the Python code from above, and replace the root widget return with the following:
首先, 摆脱所有的python代码从上述的代码中, 并且替代root widget 返回在下面:
class Interface(BoxLayout):
    pass

class DrawingApp(App):

    def build(self):
        root_widget = Interface()
        return root_widget
kv language works by writing rules for Widget classes, which will be automatically applied every time you instantiate one. We can use kv for almost everything added to the app so far, but this time we’ll construct the gui step by step to see how each part is added with the new kv syntax. We’ll be writing a kv rule for the new Interface class.
kv 语言通过编写给Widget 组件类的规则工作, 每次你实例化这组件类 将被自动地应用。我们可以使用kv 给最常用的每个物件增加到app, 但是这次我们将组成gui 一步又一步的来看看被添加的每部分伴随着新的kv语法。我们将给新的界面类编写新的kv规则。
To start using kv language, write the following code in a file named drawing.kv. This name comes from the name of the App class, minus the App at the end if present, and in lowercase (e.g. if you named your App MySuperKivyApp you’d need to name the file mysuperkivy.kv). This is only necessary if you want the file to be automatically loaded, you can also load files or string manually. Our first kv code is:
为了开始使用kv语言,编写接下来的代码在一个名为drawing.kv的文件种。 这名字从App类获得,如果存在的话最终略低于标准的App, 并且在一个小写的(例如: 如果你命名你的App MySuperKivyApp, 你需要命名这个文件为 mysuperkivy.kv) 如果你想这文件被自动加载,这是唯一必须的, 你也可以 加载文件 或者字符串管理。 我们第一个kv编码是:
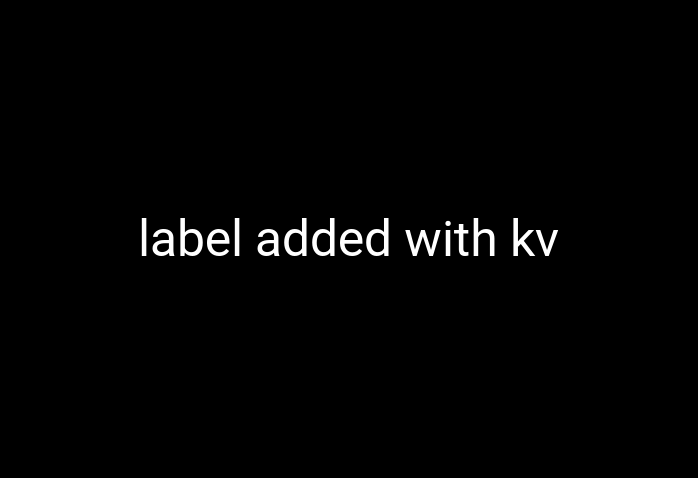
<Interface>:
    orientation: 'vertical'
    Label:
        text: 'label added with kv'
        font_size: 50
Run the code again, and you should see the a Label with the given text, as the kv file is automatically loaded and its <Interface> rule applied.
再次运行代码, 并且你应该看到标签同时被给予了text文本, 作为kv文件时自动加载的并且它的 <Interface>规则应用。
This demonstrates the core rules of kv syntax. A kv rule is created with the <WidgetName>: syntax. You can make a rule for any widget, including built in ones (Kivy internally has a large kv file), and if you make multiple rules for the same Widget then all of them are applied one by one.
这证明了kv语法的代码规则。 一个kv 规则同<>: 语法被创造。 你可以为任何组件指定一个规则,包括内置的一个(kivy内部有一个巨大的kv文件), 并且如果你制造多个规则给相同一个组件,然后所有的规则会一个接一个应用。
Below the rule creation, we indent by 4 spaces and define values for Kivy properties of the widget, and add child widgets. Lines like orientation: 'vertical' set Kivy properties just like we did previously in the Python code. Note that everything to the right of the colon is normal Python code - that doesn’t matter here, but for instance we could equally well write orientation: ''.join(['v', 'e', 'r', 't', 'i', 'c', 'a', 'l']) and it would be exactly the same. You can set any Kivy property of a widget in this way, finding the available options in the documentation as previously discussed.
下面是规则创建,我们缩进4个空格 并且 给kivy的组件定义值, 并且添加子类组件。 Lines 像orientation:'vertical' 设置Kivy属性就像我们之前在python代码中做的一样。 注意冒号:的右边的任何事是常见的Python代码, 这并不是很重要,但是例如 我们也可以写orientation: ''.join(['v', 'e', 'r', 't', 'i', 'c', 'a', 'l']) 并且他可能是真的一样。 在这方式你可以设置一个组件的任何kivy属性, 在之前讨论的文件中找到适合的选择。
We can also add child widgets by writing the widget name with a colon, then indenting by a further 4 spaces, as is done here with the Label. After this you can keep going as deep as you like, setting properties or adding more child widgets.
我们也可以增加子类组件通过编写 冒号:和组件名字,然后进一步的缩进4个空格,像这儿这已经写得Label标签一样。 在这之后你可以继续所心所欲的探索,设置多个属性 或者添加更多的子类组件。
We can use these pieces of syntax to construct the previous Python interface entirely in kv:
我们可以使用这些语法囫囵地来组建先前的python 界面在kv中:
<Interface>:
    orientation: 'vertical'
    DrawingWidget:
    Slider:
        min: 0
        max: 1
        value: 0.5
        size_hint_y: None
        height: 80
    Slider:
        min: 0
        max: 1
        value: 0.5
        size_hint_y: None
        height: 80
    Slider:
        min: 0
        max: 1
        value: 0.5
        size_hint_y: None
        height: 80
    BoxLayout:
        orientation: 'horizontal'
        size_hint_y: None
        height: 80
        Label:
            text: 'output colour:'
        Widget:
This hasn’t yet set up the event binding, but the full widget tree has been constructed entirely using the kv syntax described above. The immediate advantage of this is that kv language directly expresses the widget tree - there are no longer separate steps for instantiating Widgets, setting their properties and adding them to one another. Instead, you get to see everything at once.
这还没设置任何bind绑定,但是整个组件树已经在上述中被使用kv语法整个创建了。kv语言直接表达组件树 是kv语言最直觉的优势, 在组件树种没有更长独立的步骤给实例组件,设置它们的属性,并且增加它们到另一个种。 反而, 你开始一次看到任何事物。
This gui doesn’t yet have the behaviour of the Python one (i.e. having the sliders control output colour), but in the interest of keeping these tutorials relatively short, I’ll stop here for now. In the next tutorial will see how kv language also makes event binding very easy.
这个gui没有python行为(有sliders 控制output颜色),但是保持这导师课的相对较短,我将在这就停止了,在下面的导师课中将看到如何kv语言并且使事件相绑定,非常简单。
Full code
main.py:
from kivy.app import App
from kivy.uix.boxlayout import BoxLayout
from kivy.uix.slider import Slider

from kivy.uix.boxlayout import BoxLayout
from kivy.uix.label import Label
from kivy.uix.slider import Slider

from kivy.uix.widget import Widget
from kivy.graphics import Rectangle, Color, Line

from random import random

class DrawingWidget(Widget):
    def __init__(self):
        super(DrawingWidget, self).__init__()

        with self.canvas:
            Color(1, 1, 1, 1)
            self.rect = Rectangle(size=self.size,
                                  pos=self.pos)
        self.bind(pos=self.update_rectangle,
                  size=self.update_rectangle)

    def update_rectangle(self, instance, value):
        self.rect.pos = self.pos
        self.rect.size = self.size

    def on_touch_down(self, touch):
        super(DrawingWidget, self).on_touch_down(touch)

        if not self.collide_point(*touch.pos):
            return

        with self.canvas:
            Color(random(), random(), random())
            self.line = Line(points=[touch.pos[0], touch.pos[1]], width=2)

    def on_touch_move(self, touch):
        if not self.collide_point(*touch.pos):
            return

        self.line.points = self.line.points + [touch.pos[0], touch.pos[1]]


class Interface(BoxLayout):
    pass

class DrawingApp(App):

    def build(self):
        root_widget = Interface()
        return root_widget

DrawingApp().run()
drawing.kv:
<Interface>:
    orientation: 'vertical'
    DrawingWidget:
    Slider:
        min: 0
        max: 1
        value: 0.5
        size_hint_y: None
        height: 80
    Slider:
        min: 0
        max: 1
        value: 0.5
        size_hint_y: None
        height: 80
    Slider:
        min: 0
        max: 1
        value: 0.5
        size_hint_y: None
        height: 80
    BoxLayout:
        orientation: 'horizontal'
        size_hint_y: None
        height: 80
        Label:
            text: 'output colour:'
        Widget:


 5万+
5万+

 被折叠的 条评论
为什么被折叠?
被折叠的 条评论
为什么被折叠?
 到【灌水乐园】发言


