


Kivy tutorial 009: Finishing the drawing app – Kivy Blog
Central themes: Passing data between widgets, creating Kivy properties
中心主题: 在两个组件之间传递数据data, 创造kivy属性
This tutorial directly follows on from the previous, so start by retrieving the previous code, as below:
这节导师课紧跟之前的导师课,因此从获取之前的代码开始。
main.py:
from kivy.app import App
from kivy.uix.boxlayout import BoxLayout
from kivy.uix.slider import Slider

from kivy.uix.boxlayout import BoxLayout
from kivy.uix.label import Label
from kivy.uix.slider import Slider

from kivy.uix.widget import Widget
from kivy.graphics import Rectangle, Color, Line

from random import random

class DrawingWidget(Widget):
    def on_touch_down(self, touch):
        super(DrawingWidget, self).on_touch_down(touch)

        if not self.collide_point(*touch.pos):
            return

        with self.canvas:
            Color(random(), random(), random())
            self.line = Line(points=[touch.pos[0], touch.pos[1]], width=2)

    def on_touch_move(self, touch):
        if not self.collide_point(*touch.pos):
            return

        self.line.points = self.line.points + [touch.pos[0], touch.pos[1]]


class Interface(BoxLayout):
    pass

class DrawingApp(App):

    def build(self):
        root_widget = Interface()
        return root_widget

DrawingApp().run()
drawing.kv:
<DrawingWidget>:
canvas:
Color:
rgba: 1, 1, 1, 1
Rectangle:
pos: self.pos
size: self.size
<ColourSlider@Slider>:
min: 0
max: 1
value: 0.5
size_hint_y: None
height: 50
<Interface>:
orientation: 'vertical'
DrawingWidget:
ColourSlider:
id: red_slider
ColourSlider:
id: green_slider
ColourSlider:
id: blue_slider
BoxLayout:
orientation: 'horizontal'
size_hint_y: None
height: 50
Label:
text: 'output colour:'
Widget:
canvas:
Color:
rgb: red_slider.value, green_slider.value, blue_slider.value
Rectangle:
size: self.size
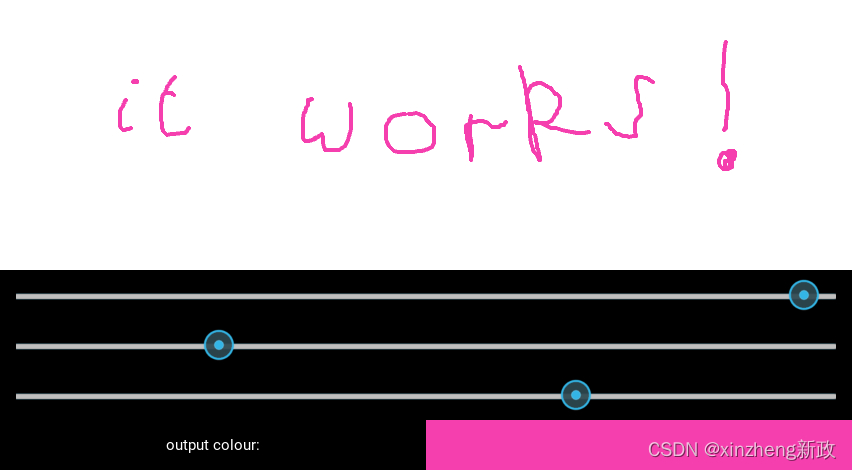
pos: self.posWith this code, you should still be able to draw in the DrawingWidget region of the app interface, but the lines still have a random colour each time. Our final task is to make the lines use the colour selected via the sliders.
在这代码中,你应该仍然能够在DrawingWidget这个app界面的区域内画画, 但是每次画出的线仍然是随机的颜色。我们最终的任务是让线使用通过sliders选择的颜色。
Let’s start by reassessing where the app’s state should be held. For a start, we need to store somewhere the target colour for the lines. It’s natural to put this inside the DrawingWidget, since this class is what does the drawing and needs to know what colour to use.
让我们通过重新评估一下 app的状态应该保存在哪。 为了一个开始, 我们需要在某处存储目标颜色给线。它是比较贴的放在DrawingWidget组件内, 因为这个类就是 这幅画的意思 和 什么颜色来使用。
The best way to store this data is to use a Kivy property of our own. We’ve made use of many Kivy properties of other widgets already, but this time there isn’t one already created to hold the colour, so it’s time to create one.
存贮这个数据最好的方式是使用一个我们自己个的kivy属性。我们已经利用许多了其他组件的kivy属性了, 但是这次那儿还没有一个被创建的kivy属性来存储这个要使用的颜色,因此是时候来创造一个了。
Change the DrawingWidget code as follows:
DrawingWidg的改变代码在下面:
from kivy.properties import ListProperty

class DrawingWidget(Widget):

    target_colour_rgb = ListProperty([0, 0, 0])

    def on_touch_down(self, touch):
        super(DrawingWidget, self).on_touch_down(touch)

        if not self.collide_point(*touch.pos):
            return

        with self.canvas:
            Color(random(), random(), random())
            self.line = Line(points=[touch.pos[0], touch.pos[1]], width=2)

    def on_touch_move(self, touch):
        if not self.collide_point(*touch.pos):
            return

        self.line.points = self.line.points + [touch.pos[0], touch.pos[1]]
That’s all it takes to define a new Kivy property, and it automatically has all the behaviour you’ve seen so far. For instance, if you change the target_colour_rgb of a DrawingWidget instance, an event is automatically dispatched. In fact because this is a ListProperty an event will be dispatched even if we just change the value of an item of the list! There are other types of Kivy property for ensuring correct event dispatching with different types of object (list, dict, int/float, generic objects etc.), which you can find in the documentation.
那就是它采用的全部来定义一个新的Kivy属性,并且它自动地拥有所有到目前为止你见过的的behaviour。作为一个案例, 如果你改变 DrawingWidget实例的target_colour_rgb, 一个事件被自动地执行。事实是因为这是一个ListProperty, 一个事件将被执行即使我们只是改变了这个里表中的一个item地值。 那是kivy属性的另一种类型来确保根据不同的对象类型(list, dict, int/float, generic objects 等等)正确地 事件执行,这你可以在文档中找找。
Note: It may look a little strange that we’ve defined the property at the class level (no reference to self.target_colour_rgb), and it is clearly a ListProperty and not an actual list so how does accessing its values work? The answer is that Kivy properties are descriptors, which are defined at the class level but here are coded to behave like normal lists/ints/whatever when accessed from a class instance. You don’t need to worry about these details, just consider the properties as normal attributes of your objects when accessing them.
注意: 我们已经定义了属性在类级别(没有标记给 self.target_colour_rgb),这或许看起来有点陌生,并且它的确是一个 ListProperty 并且不是一个怔怔地 lsit列表因此如何获取它地值? 答案是Kivy属性是 描述符号descriptors, 这描述符号定义在类级别, 但是这描述符号被编码来像常见的lists/ints/等等 一样表现 当从一个类实例获取值时。你不需要考虑这些细节,只需要考虑当获取值时这属性作为你对象的常见的属性。
As an example of what that really means, lets hook up the property to change so that we can respond to these events. Change your kv file <Interface> rule to read as follows:
作为一个真的有意义的案例,让我们讲属性连接在一起来改变,因此我们可以响应这些事件们。像下面这样改变你的kv文件的<Interface>:
<Interface>:
    orientation: 'vertical'
    DrawingWidget:
        target_colour_rgb: red_slider.value, green_slider.value, blue_slider.value  # <- new line
    ColourSlider:
        id: red_slider
    ColourSlider:
        id: green_slider
    ColourSlider:
        id: blue_slider
    BoxLayout:
        orientation: 'horizontal'
        size_hint_y: None
        height: 50
        Label:
            text: 'output colour:'
        Widget:
            canvas:
                Color:
                    rgb: red_slider.value, green_slider.value, blue_slider.value
                Rectangle:
                    size: self.size
                    pos: self.pos
Note that the only new line here sets the value of target_colour_rgb based on the values of the sliders. We’re once again taking advantage of automatic kv event binding: whenever any of red_slider.value, green_slider.value or blue_slider.value changes then this line will be re-evaluated to update target_colour_rgb. We can add some code to prove that it’s working, via a new method in the DrawingWidget class:
注意只有这儿的新的line线基于sliders的值设置了target_corlour_rgb的值。 我们使用kv事件自动绑定的优点:当red_slider.value, green_slider.value, blue_slider.value 的值改变时这线将被再设置给更新 target_colour_rgb. 我们可以增加一些代码来证明 改变成功, 通过再DrawingWidget 类中一个新的方法:
def on_target_colour_rgb(self, instance, value):
    print(f"target_colour_rgb changed to {self.target_colour_rgb}")
A method with this name will be called automatically whenever the target_colour_rgb property changes - this is another handy feature of Kivy event dispatching, instead of binding explicitly this default event method is always available. You can consider that code something like self.bind(target_colour_rgb=self.on_target_colour_rgb) has been automatically run to create the event binding.
当target_colour_rgb 属性改变时,有这名字的一个方法将被自动地使唤 - 这是kivy事件执行的另一种有用的特征, 替代了binding清楚地绑定,这个默认方法总是合适的。你可以考虑一些像self.bind(target_colour_rgb=self.on_target_colour_rgb)代码, 这些代码已经被自动地运行来创建事件绑定。
Now, run the application and move the values of the sliders. You should see code printed in your terminal every time a slider moves, because every movement updates the value of target_colour_rgb:
现在,运行程序并且移动sliders的值。你应该看见在你的terminal中断打印的代码,这代码每当slider移动就打印, 因为每个活动更新了target_colour_rgb的值:
target_colour_rgb changed to [0.20853658536585365, 0.6012195121951219, 0.4573170731707317]
target_colour_rgb changed to [0.20853658536585365, 0.6012195121951219, 0.4585365853658537]
target_colour_rgb changed to [0.20853658536585365, 0.6012195121951219, 0.45975609756097563]
Note: The colour changes in this example are very small because you’re getting an update every time the slider moves even a single pixel!
注意: 在这案例中的颜色改变是非常小的,因为你让一个update随着slider每次的1个pixel为单位的移动而更新!
The final step is to make the DrawingWidget use this target colour for the next line it draws. For this we just have to update the on_touch_down method:
最后一步是让DrawingWidget 使用这个目标颜色给要画的下个线。为了这目的,我们只是不得不更新on_touch_down方法了:
def on_touch_down(self, touch):
    super(DrawingWidget, self).on_touch_down(touch)

    if not self.collide_point(*touch.pos):
        return

    with self.canvas:
        Color(*self.target_colour_rgb)  # <- this line changed
        self.line = Line(points=[touch.pos[0], touch.pos[1]], width=2)
That’s all there is to it! When we make the new Color instruction for the new line, we pass in the current value of our property instead of selecting random values.
这就是这里要干的全部! 当我们给了新线新的颜色结构,我们传递当前我们属性的当前值替代了随机选择值。
Run the app now and every line should match your currently selected colour:
现在运行app,并且每个线应该和你当前选择的颜色相匹配:
For a further example, let’s add a similar method to set the Line width. Again, we add a Kivy property to DrawingWidget:
进一步的案例,让我们增加一个相同的方法来设置线的宽度。 再次,我们增加一个Kivy属性给DrawingWidget:
from kivy.properties import ListProperty, NumericProperty

class DrawingWidget(Widget):
    target_colour_rgb = ListProperty([0, 0, 0])
    target_width_px = NumericProperty(0)
Then in the kv <Interface> rule we add a Slider to select the width, and connect it to the property:
然后再kv的<Interface>规则中,我们增加一个Slider来选择宽度,并且将它和属性相连接:
<Interface>:
    orientation: 'vertical'
    DrawingWidget:
        target_colour_rgb: red_slider.value, green_slider.value, blue_slider.value
        target_width_px: width_slider.value
    ColourSlider:
        id: red_slider
    ColourSlider:
        id: green_slider
    ColourSlider:
        id: blue_slider
    BoxLayout:
        orientation: 'horizontal'
        size_hint_y: None
        height: 50
        Label:
            text: 'output colour:'
        Widget:
            canvas:
                Color:
                    rgb: red_slider.value, green_slider.value, blue_slider.value
                Rectangle:
                    size: self.size
                    pos: self.pos
    BoxLayout:
        orientation: 'horizontal'
        size_hint_y: None
        height: 50
        Label:
            text: "width: {}".format(width_slider.value)
        Slider:
            id: width_slider
            min: 2
            max: 10
            value: 2
And finally, update the DrawingWidget.on_touch_down to use the currently-selected width for the new Line instruction:
最终,更新DrawingWidget.on_touch_down 来使用当前选择的宽度给新的线结构:
def on_touch_down(self, touch):
    super(DrawingWidget, self).on_touch_down(touch)

    if not self.collide_point(*touch.pos):
        return

    with self.canvas:
        Color(*self.target_colour_rgb)
        self.line = Line(points=[touch.pos[0], touch.pos[1]],
                         width=self.target_width_px)
Note: I’ve added not just a single Slider, but a new BoxLayout to the kv rule, in order to display a Label indicating what the slider is for. Notice how, consistent with everything so far, the Label automatically updates to always show the current value of the Slider.
注意: 我已经添加了不仅仅是一个slider,还有一个新的BoxLayout 盒子布局给 kv规则,为了展示一个标签说明 slider滑块是干什么用的。 注意如何弄, 与目前的情况一致,标签总是自动地更新来展示当前slider的值。
Run the app and try the drawing. You should now be able to control both the colour and width of every line:
运行app,试着画画。 现在你应该可以控制每条线的颜色 和宽度。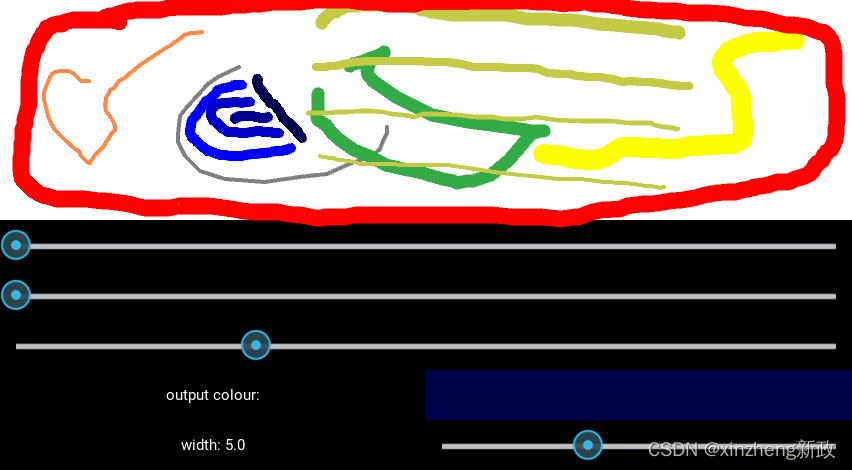
With that, the application is fully connected together. We have a UI element for drawing, alongside extra elements for controlling the details of the lines, with data passed around using Kivy properties. These basic ideas are at the heart of all Kivy applications.
这之后,应用程序是完整地联结在一起了。 我们有一个用于绘图的UI元素,以及用于控制线条细节的额外元素,并使用Kivy属性传递数据。这些基本思想是所有Kivy应用程序的核心。
This would be a good time to experiment. Try adding or removing widgets, and maybe adding more customisation to the lines.
这是一个好时候来体验。 试着增加或者再次移动widget组件,并且可能增加更多的自定义给线。
Full code
main.py:

from kivy.app import App
from kivy.uix.boxlayout import BoxLayout
from kivy.uix.slider import Slider

from kivy.uix.boxlayout import BoxLayout
from kivy.uix.label import Label
from kivy.uix.slider import Slider

from kivy.uix.widget import Widget
from kivy.graphics import Rectangle, Color, Line

from kivy.properties import ListProperty, NumericProperty

from random import random

class DrawingWidget(Widget):
    target_colour_rgb = ListProperty([0, 0, 0])
    target_width_px = NumericProperty(0)

    def on_touch_down(self, touch):
        super(DrawingWidget, self).on_touch_down(touch)

        if not self.collide_point(*touch.pos):
            return

        with self.canvas:
            Color(*self.target_colour_rgb)
            self.line = Line(points=[touch.pos[0], touch.pos[1]],
                            width=self.target_width_px)

    def on_touch_move(self, touch):
        if not self.collide_point(*touch.pos):
            return

        self.line.points = self.line.points + [touch.pos[0], touch.pos[1]]

    def on_target_colour_rgb(self, instance, value):
        print(f"target_colour_rgb changed to {self.target_colour_rgb}")


class Interface(BoxLayout):
    pass

class DrawingApp(App):

    def build(self):
        root_widget = Interface()
        return root_widget

DrawingApp().run()
drawing.kv:
<DrawingWidget>:
    canvas:
        Color:
            rgba: 1, 1, 1, 1
        Rectangle:
            pos: self.pos
            size: self.size

<ColourSlider@Slider>:
    min: 0
    max: 1
    value: 0.5
    size_hint_y: None
    height: 50


<Interface>:
    orientation: 'vertical'
    DrawingWidget:
        target_colour_rgb: red_slider.value, green_slider.value, blue_slider.value
        target_width_px: width_slider.value
    ColourSlider:
        id: red_slider
    ColourSlider:
        id: green_slider
    ColourSlider:
        id: blue_slider
    BoxLayout:
        orientation: 'horizontal'
        size_hint_y: None
        height: 50
        Label:
            text: 'output colour:'
        Widget:
            canvas:
                Color:
                    rgb: red_slider.value, green_slider.value, blue_slider.value
                Rectangle:
                    size: self.size
                    pos: self.pos
    BoxLayout:
        orientation: 'horizontal'
        size_hint_y: None
        height: 50
        Label:
            text: "width: {:.1f}".format(width_slider.value)
        Slider:
            id: width_slider
            min: 2
            max: 10
            value: 2
text: "width: {:.1f}".format(width_slider.value)
这段代码是Python中使用字符串格式化的一种方法,具体是使用了str.format()方法来插入变量width_slider.value的值到字符串中。
这里详细解释一下:
-
字符串模板:
"width: {:.1f}"是一个字符串模板。其中{}是一个占位符,它会被后面的.format()方法中的参数所替换。{:.1f}指定了如何格式化这个占位符。具体来说,:之后的内容是格式说明符。.1f表示浮点数(f)并保留一位小数(.1)。
-
.format(width_slider.value):这是str.format()方法,用于将width_slider.value的值插入到字符串模板中的占位符中。width_slider.value很可能是一个表示宽度的浮点数,可能来自于某个滑动条(slider)的当前值。
所以,如果width_slider.value的值是123.456,那么这段代码会返回"width: 123.5"。如果width_slider.value的值是78.9,则会返回"width: 78.9"。
def on_touch_down(self, touch): super(DrawingWidget, self).on_touch_down(touch) 中super()的作用
在Python中,super()函数用于调用父类(或称为基类、超类)的一个方法。在面向对象编程和类继承的上下文中,这非常有用,因为它允许子类重写或扩展父类的方法,同时仍然能够调用父类的原始实现。
在你给出的代码片段中:
def on_touch_down(self, touch):
super(DrawingWidget, self).on_touch_down(touch)这里有几个关键点:
-
DrawingWidget: 这似乎是一个类的名称,它可能继承自另一个类(可能是用于处理触摸事件的基类)。
-
on_touch_down: 这是
DrawingWidget类的一个方法,可能用于处理某种触摸按下事件。 -
super(DrawingWidget, self).on_touch_down(touch): 这行代码做了以下事情:
super(DrawingWidget, self):这调用了super()函数,并传递了当前类的名称(DrawingWidget)和类的实例(self)作为参数。这返回了一个临时对象,该对象绑定到DrawingWidget的父类,并允许你调用父类的方法。.on_touch_down(touch):通过上面创建的临时对象,这调用了父类的on_touch_down方法,并将touch参数传递给它。
这种模式在事件驱动的编程和GUI框架(如Kivy,它是你可能在使用的框架,因为on_touch_down是Kivy中常见的事件处理函数)中特别常见。子类可能会重写父类的事件处理方法以添加自己的功能,但仍然需要调用父类的原始实现以确保正常的事件处理流程。
简而言之,super()在这里的作用是确保DrawingWidget类在处理on_touch_down事件时,不仅执行了自己的代码,还执行了其父类的相关代码。


 被折叠的 条评论
为什么被折叠?
被折叠的 条评论
为什么被折叠?
 到【灌水乐园】发言


