


一)线程基本概念简介
1、操作系统中线程与概念概念
现在的操作系统是多任务操作系统,多线程是实现多任务的一种方式。
进程是指一个内存中运行的应用程序,每个进程都有自己独立的一块内存空间,一个进程中可以启动多个线程。比如在Windows系统中,一个运行的exe就是一个进程。
线程是指进程中的一个执行流程,一个进程中可以运行多个线程。比如java.exe进程中可以运行很多线程。线程总是属于某个进程,进程中的多个线程共享进程的内存。
多进程是指操作系统能同时运行多个任务(程序),“同时”执行是人的感觉,在线程之间实际上轮换执行。多线程是指在同一程序中有多个顺序流在执行。
2、线程的创建与启动
使用java.lang.Thread类或者java.lang.Runnable接口编写代码来定义、实例化和启动新线程。
一个Thread类实例只是一个对象,像Java中的任何其他对象一样,具有变量和方法,生死于堆上。
Java中,每个线程都有一个调用栈,即使不在程序中创建任何新的线程,线程也在后台运行着。
一个Java应用总是从main()方法开始运行,mian()方法运行在一个线程内,它被称为主线程。
一旦创建一个新的线程,就产生一个新的调用栈。
线程总体分两类:用户线程和守候线程。
当所有用户线程执行完毕的时候,JVM自动关闭。但是守候线程却不独立于JVM,守候线程一般是由操作系统或者用户自己创建的
1】implements Runnabele
package com.xiu.thread.test;

/**
 *eg1:两个线程交替打印
 *
 * @author xiu
 * @version 2017年8月7日 上午10:21:30
 */
public class ThreadTest1 {

	public static void main(String[] args) {
		// TODO 实例1
		Runner1 run = new Runner1();//定义实现了Runnable接口的类的对象
		Thread thread = new Thread(run);//创建线程对象
		thread.start();//启动线程,相当于启动一个分支调用Runner中的run方法
		for (int i = 0; i < 15; i++) {
			System.out.println("main——> "+ i);
		}
		System.out.println("结果是交替打印的是不是?因为是一起执行的");
	}
}

//实现了Runnable接口。
class Runner1 implements Runnable{
	/** 重写这个run()方法,也就是当用这个类的对象放到Thread的对象中后,
	用Thread的对象调用start()方法起动线程时,会执行这个方法;
	*/
	@Override
	public void run() {
		// TODO Auto-generated method stub
		for (int i = 0; i < 5; i++) {
			System.out.println("the test number is :" + i);
		}
	}
}
package com.xiu.thread.test;

/**
 *eg2:两个线程有序打印
 *
 * @author xiu
 * @version 2017年8月7日 上午10:21:30
 */
public class ThreadTest1 {

	public static void main(String[] args) {
		Runner1 run = new Runner1();//定义实现了Runnable接口的类的对象
		run.run();//先执行完run()后main方法才继续执行
		for (int i = 0; i < 5; i++) {
			System.out.println("main——> "+ i);
		}
		System.out.println("结果不是交替打印的是不是?因为先调用了run()后才执行main()方法");

	}
}
//实现了Runnable接口。
class Runner1 implements Runnable{
	@Override
	public void run() {
		// TODO Auto-generated method stub
		for (int i = 0; i < 5; i++) {
			System.out.println("the test number is :" + i);
		}
	}
}package com.xiu.thread.test;
/**
*eg3.继承Thread
*
* @author xiu
* @version 2017年8月7日 上午10:34:42
*/
public class ThreadTest2 {
public static void main(String[] args) {
// TODO
// Runner2 run = new Runner2();//创建一个继承了Thread的类对象
// run.start();//启动线程,相当于启动一个分支调用Runner2中的run方法
// run.run();
// for (int i = 0; i < 15; i++) {
// System.out.println("this is the main: " +i);
// }
// System.out.println("交叉着打印是不是? 因为他们是同时执行的");
Runner2 run = new Runner2();//创建一个继承了Thread的类对象
run.run();
for (int i = 0; i < 15; i++) {
System.out.println("this is the main: " +i);
}
System.out.println("现在不是交叉着打印是不是? 因为他们是有先后顺序的");
System.out.println("注意线程中的start方法只是准备好了一个分支,相当于一个厕所,进来了一个不一定马上就可以上,还要排队");
System.out.println("线程基本方法有:");
System.out.println("isAlive(),getPriority(),setProprity(),sleep(),join(),yield(),wait(),notify(),notifyAll()");
}
}
class Runner2 extends Thread{
public void run() {
for (int i = 0; i < 10; i++) {
System.out.println("this is the test thread: "+i);
}
}
}二)线程的创建与启动
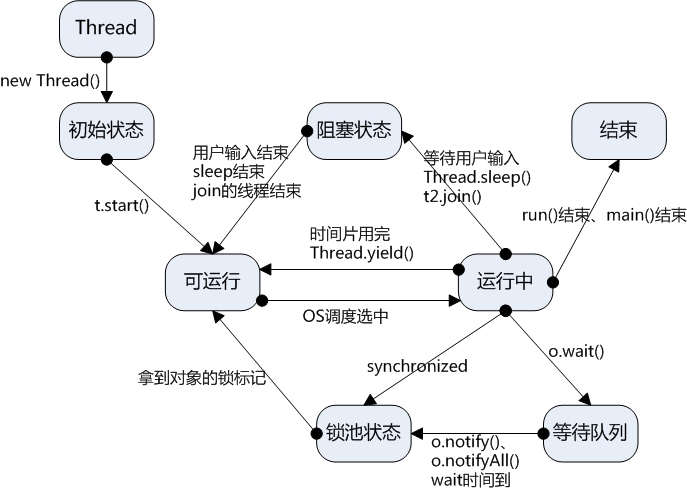
三)线程状态的转换
四)线程的同步与锁
五)线程的交互wait()、notify()
六)线程的调度与休眠、优先级、让步、合并、存活
1】sleep()
package com.xiu.thread.test;

/**
 *sleep()——这个方法的对象是哪里,就是哪个方法休息。
 * @author xiu
 * @version 2017年8月7日 上午10:45:39
 */
public class ThreadTestSleep {

	public static void main(String[] args) {
		// TODO Auto-generated method stub
//			Runner3 runner3  = new Runner3();//创建一个继承了Thread的类对象
//			runner3.start();//启动线程
//			try {
//				runner3.sleep(1000);
//			} catch (Exception e) {
//			}
//			runner3.interrupt();//这是唤醒睡眠,也就是停止分支的sleep,使其跑到异常,尽量少用
//			for (int i = 0; i < 15; i++) {
//				System.out.println("main test is :" + i);
//			}
//			System.out.println("the main is over!");

			Runner3 runner3  = new Runner3();//创建一个继承了Thread的类对象
			runner3.start();//启动线程
			for (int i = 0; i < 3; i++) {
				System.out.println("main test is :" + i);
			}
			System.out.println("the main is over!");
			runner3.shotDown();//使用这种方式关闭线程比interrupt好很多,减少异常,正如以while()条件判断
	}
}

class Runner3 extends Thread{
	boolean stop = true;
	public void run() {
		int i = 0;
		while(stop){
			System.out.println("the test num is :" + i);
			i++;
		}
	}

	public void shotDown() {
		// TODO Auto-generated method stub
		stop = false;
	}
}
main test is :0
the test num is :0
the test num is :1
the test num is :2
main test is :1
main test is :2
the test num is :3
the test num is :4
the test num is :5
the test num is :6
the test num is :7
the main is over!
the test num is :8
2】setPriority()
package com.xiu.thread.test;

/**
 *priority线程优先级的提升不能提高确保一定先执行,只能说相对执行时间、机会多一点
 *
 * @author xiu
 * @version 2017年8月7日 上午11:16:33
 */
public class ThreadTestPriority {

	public static void main(String[] args) {
		Thread run1 = new Thread(new Priority1());//创建一个线程对象,线程中执行priority
		Thread run2 = new Thread(new Priority2());
		run1.setPriority(Thread.MAX_PRIORITY);//将run1线程优先级提高3级
		run1.start();//启动线程,相当于启动一个分支的调用Priority1中run方法
		run2.run();
	}
}

class Priority1 implements Runnable{

	@Override
	public void run() {
		// TODO Auto-generated method stub
		for (int i = 0; i < 3; i++) {
			System.out.println("priority1  is:  " + this.getClass()+ " .  the num is  "  + i);
		}
	}
}
class Priority2 implements Runnable{

	@Override
	public void run() {
		// TODO Auto-generated method stub
		for (int i = 0; i < 3; i++) {
			System.out.println("priority1  is:  " + this.getClass()+ " .  the num is  " + i);
		}
	}
}
priority is: class com.xiu.thread.test.Priority2 . the num is 1
priority is: class com.xiu.thread.test.Priority1 . the num is 0
priority is: class com.xiu.thread.test.Priority1 . the num is 1
priority is: class com.xiu.thread.test.Priority2 . the num is 2
priority is: class com.xiu.thread.test.Priority1 . the num is 2
3】yield()
package com.xiu.thread.test;

/**
 *yield()——这是让出一下。也就是执行了这个方法后,这次执行后下次肯定是别的线程。
 *不过注意一点,每执行一次只让一次。
 *
 * @author xiu
 * @version 2017年8月7日 上午11:09:56
 */
public class ThreadTestYield {

	public static void main(String[] args) {
		// TODO Auto-generated method stub
		Runner5 runner1 = new Runner5();
		Runner5 runner2 = new Runner5();
		runner1.start();
		runner2.start();
		for (int i = 0; i < 3; i++) {
			System.out.println("main thread is :" +i);

		}
	}

}

class Runner5 extends Thread{
	public void run() {
		for (int i = 0; i < 3; i++) {
			System.out.println("the yield thread num is :" + i);
			if (i%2 == 0) {
				System.out.println("能够被2整除的整数,那就让一让它吧 "+i);
				yield();
			}
		}
	}
}
the yield thread num is :0
the yield thread num is :0
main thread is :0
main thread is :1
main thread is :2
能够被2整除的整数,那就让一让它吧 0
能够被2整除的整数,那就让一让它吧 0
the yield thread num is :1
the yield thread num is :2
能够被2整除的整数,那就让一让它吧 2
the yield thread num is :1
the yield thread num is :2
能够被2整除的整数,那就让一让它吧 2
4】join()
package com.xiu.thread.test;

/**
 *
 *
 * @author xiu
 * @version 2017年8月7日 上午11:02:41
 */
public class ThreadTestJoin {

	public static void main(String[] args) {
		// TODO Auto-generated method stub
		Runner4 runner4 = new Runner4();
		runner4.start();
		try {
			runner4.join();//合并线程,使主线程与分支合并成为一个单线程
		} catch (Exception e) {
			// TODO: handle exception
		}
		for (int i = 0; i < 15; i++) {
			System.out.println("main is :" + i);
		}
		System.out.println("是不是很奇怪,居然先执行完了join线程然后才轮到main线程!");
		System.out.println("因为他们合在了一条线程");
	}

}

class Runner4 extends Thread{
	public void run() {
		for (int i = 0; i < 10; i++) {
			System.err.println("the join thread num is :" + i);
			try {
				sleep(1000);
			} catch (Exception e) {
				return;
			}
		}
	}
}
the join thread num is :1
the join thread num is :2
main is :0
main is :1
main is :2
是不是很奇怪,居然先执行完了join线程然后才轮到main线程!
因为他们合在了一条线程
5)isAlive()
package com.xiu.thread.test;

/**
 *isAlive(),判断线程是否没有结束,没有则返回true
 *
 * @author xiu
 * @version 2017年8月7日 上午11:29:39
 */
public class ThreadTestIsAlive {

	public static void main(String[] args) {
		// TODO Auto-generated method stub
		IsAlive run = new IsAlive();
		run.run();
		System.out.println("the test thread is alive?  " + Thread.currentThread().isAlive()+"目前存活线程数为:"+ Thread.activeCount());
	}
}

class IsAlive extends Thread{
	public void run() {
		System.out.println("the test thread is alive?  " + Thread.currentThread().isAlive());
		for (int i = 0; i < 5; i++) {
			System.out.println("the test thread num is :" + i);
		}
	}
}
the test thread is alive? true
the test thread num is :0
the test thread num is :1
the test thread num is :2
the test thread num is :3
the test thread num is :4
the test thread is alive? true目前存活线程数为:1
七)线程的调度——守护线程
八)线程的同步——同步方法、同步块
1)不用synchronized
package com.xiu.thread.test;

/**
 *本来应该是第1个,第2个,但是因为同时进行,第一个在中间被打断。所以都成了第2个。
 *
 * @author xiu
 * @version 2017年8月7日 上午11:42:33
 */
public class TestSynchronized1  implements Runnable{

	Syn syn = new Syn();
	public static void main(String[] args){
		TestSynchronized1 run = new TestSynchronized1();
		Thread thread1 = new Thread(run);
		Thread thread2 = new Thread(run);
		thread1.setName("thread-1");
		thread2.setName("thread-2");
		thread1.start();
		thread2.start();
	}
	@Override
	public void run() {
		// TODO Auto-generated method stub
		syn.add(Thread.currentThread().getName());
	}
}

class Syn {
	private static int num = 0;
	public void add(String name) {
		num ++;
		try {
			Thread.sleep(10);
		} catch (Exception e) {
			// TODO: handle exception
		}
		System.out.println(name + "你是第几个线程: " + num);
		for (int i = 0; i < 3; i++) {
			System.out.println("the num is : " + i + Thread.currentThread().getName());
		}
	}
}
the num is : 0thread-1
the num is : 1thread-1
thread-2你是第几个线程: 2
the num is : 0thread-2
the num is : 2thread-1
the num is : 1thread-2
the num is : 2thread-2
2)使用synchronized
package com.xiu.thread.test;

/**
 *有顺序的执行
 *
 * @author xiu
 * @version 2017年8月7日 上午11:42:33
 */
public class TestSynchronized2  implements Runnable{

	Syn1 syn = new Syn1();
	public static void main(String[] args){
		TestSynchronized2 run = new TestSynchronized2();
		Thread thread1 = new Thread(run);
		Thread thread2 = new Thread(run);
		thread1.setName("thread-1");//线程名字
		thread2.setName("thread-2");
		thread1.start();
		thread2.start();
	}

	@Override
	public void run() {
		// TODO Auto-generated method stub
		syn.add(Thread.currentThread().getName());//执行某个线程
	}
}
class Syn1 {
	private static int num = 0;
	public void add(String name) {
		synchronized (this) {//把当前对象锁起来,使这里得操作不会被打断,知道某个线程执行完毕才操作下一个线程
			num ++;
			try {
				Thread.sleep(10);
			} catch (Exception e) {
				// TODO: handle exception
			}
			System.out.println(name + "你是第几个线程: " + num);
			for (int i = 0; i < 3; i++) {
				System.out.println("the num is : " + i + Thread.currentThread().getName());
			}
		}
	}
}
thread-1你是第几个线程: 1
the num is : 0thread-1
the num is : 1thread-1
the num is : 2thread-1
thread-2你是第几个线程: 2
the num is : 0thread-2
the num is : 1thread-2
the num is : 2thread-2
3)线程死锁
package com.xiu.thread.test;

/**
 *都卡在那了,无法进行下一步,所以打不出“t2-->0”和“t2-->1”。
 *
 * @author xiu
 * @version 2017年8月7日 下午1:56:22
 */
public class ThreadLock1 implements Runnable{

	static Thread t1 = null;
	static Thread t2 = null;

	public static void main(String[] args) {
		ThreadLock1 threadLock1 = new ThreadLock1();
		t1 = new Thread(threadLock1);
		t2 = new Thread(threadLock1);

		t1.setName("thread - 1");
		t2.setName("thread - 2");

		t1.start();
		t2.start();

		System.out.println("当前线程数量为:" +Thread.activeCount()+"当前线程为:"+Thread.currentThread().getName());
	}

	@Override
public void run() {
	// TODO Auto-generated method stub
	if (Thread.currentThread().getName().equals("thread - 1")) {
		synchronized (t1) {
			System.out.println("thread -1 ——>0");
			try {
				Thread.sleep(1000);
			} catch (Exception e) {
				// TODO: handle exception
			}
			synchronized (t2) {
			System.out.println("thread - 2 ——>0");
			}
		}
	}

	if (Thread.currentThread().getName().equals("thread - 2")) {
		synchronized (t2) {//锁住线程2
			System.out.println("thread -1 ——>1");
			try {
				Thread.sleep(1000);//线程2睡眠1秒
			} catch (Exception e) {
				// TODO: handle exception
			}
			synchronized (t1) {
			System.out.println("thread - 2 ——>1");
			}
		}
	}
}

}
thread -1 ——>0
thread -1 ——>1
当前线程数量为:3当前线程为:main
4)总结:
当一个方法再对一个值进行修改时, 如果只是读取的话,则不用加synchronized,加了效率反而降低了。
如果两个方法都对一个值进行修改的话,则这两个方法都要加上synchronized这样才不冲突,因为会先执行完一个后才会执行下一个。
九)线程并发协作——消费者与生产者模型
package com.xiu.thread.test;

/**
 *生产者消费者线程模型简单实例
 *
 * @author xiu
 * @version 2017年8月7日 下午2:08:33
 */
public class ThreadFactory {

	public static void main(String[] args) {
		// TODO Auto-generated method stub
		LanZi lZi = new LanZi();//创建一个篮子对象,该篮子可以放10个mant
		Users users = new Users(lZi);//一个吃货
		ShengChan sc = new ShengChan(lZi);//一个生产者
		new Thread(users).start();//吃货开吃
		new Thread(sc).start();//生产者生产
	}
}

/**
 *生产一个有序号的馒头
 *
 * @author xiu
 * @version 2017年8月7日 下午2:28:45
 */
class ManTuo{
	int id;
	public ManTuo(int id) {
		this.id = id;
	}
	public String toString() {
		return "馒头id ——>" + id;
	}
}

/**
 *篮子
 *
 * @author xiu
 * @version 2017年8月7日 下午2:40:07
 */
class LanZi{
	int index = 0;
	ManTuo[] allManTuos = new ManTuo[6];//初始化可以放20个馒头的篮子

	public synchronized void eat(ManTuo mTuo) throws Exception {
		while(index == 0){//当篮子中馒头数量为0就停止吃
			this.wait();

		}
		this.notify();
		allManTuos[index] = mTuo;
		index --;//馒头减少1
	}

	public synchronized void add(ManTuo wt) throws Exception{
		while (index == 6) {//当生产的馒头数量达到篮子最大容量20个就停止生产
			this.wait();
		}
		this.notify();
		index ++;//馒头增加1
		allManTuos[index] = wt;

	}
}

/**
 *吃货
 *
 * @author xiu
 * @version 2017年8月7日 下午2:36:29
 */
class Users implements Runnable{
	LanZi lz = null;
	public Users(LanZi lz) {//拉一个吃货进来,每个吃货有一只篮子
		this.lz = lz;
	}
	@Override
	public void run() {
		// TODO Auto-generated method stub
		for (int i = 0; i < 20; i++) {//一个吃货打算吃30个馒头
			ManTuo mTuo = new ManTuo(i);//吃货从篮子中拿出一个馒头开吃
			System.out.println("users ——>" + mTuo.toString());
			try {
				lz.eat(mTuo);
			} catch (Exception e) {
				// TODO: handle exception
			}
		}
	}
}

/**
 *生产者
 *
 * @author xiu
 * @version 2017年8月7日 下午2:36:41
 */
class ShengChan implements Runnable{
	LanZi lZi = null;
	public ShengChan(LanZi lZi) {
		this.lZi = lZi;
	}
	@Override
	public void run() {
		// TODO Auto-generated method stub
		for(int i=0; i<20;i++){
			ManTuo wt=new ManTuo(i);
			System.out.println("ShenChang-->"+ wt.toString());//生产者生产一个馒头
			try {
				lZi.add(wt);//把馒头放进篮子中
			} catch (Exception e) {
				e.printStackTrace();
			}
		}
	}
}
users ——>馒头id ——>0
ShenChang-->馒头id ——>0
users ——>馒头id ——>1
ShenChang-->馒头id ——>1
ShenChang-->馒头id ——>2
users ——>馒头id ——>2
users ——>馒头id ——>3
ShenChang-->馒头id ——>3
ShenChang-->馒头id ——>4
users ——>馒头id ——>4
users ——>馒头id ——>5
ShenChang-->馒头id ——>5
ShenChang-->馒头id ——>6
ShenChang-->馒头id ——>7
ShenChang-->馒头id ——>8
ShenChang-->馒头id ——>9
users ——>馒头id ——>6
users ——>馒头id ——>7
users ——>馒头id ——>8
users ——>馒头id ——>9


 15万+
15万+

 被折叠的 条评论
为什么被折叠?
被折叠的 条评论
为什么被折叠?
 到【灌水乐园】发言


