


css3新增选择器
元素关系选择器
元素关系选择器一共有三种,分别是子选择器、相邻兄弟选择器和通用兄弟选择器。
| 名称 | 举例 | 意义 |
|---|---|---|
| 子选择器 | div>p | div的子标签p |
| 相邻兄弟选择器 | img+p | 图片后面紧跟着的段落将被选中 |
| 通用兄弟选择器 | p~span | p元素之后的所有同层级span元素 |
子选择器
当使用 > 符号分隔两个元素时,它只会匹配那些作为第一个元素的直接后代元素,即两个标签为父子关系。他跟后代选择器的区别是后代选择器不一定限制是子元素。示例代码如下:
<!DOCTYPE html>
<html lang="en">
<head>
<meta charset="UTF-8">
<meta http-equiv="X-UA-Compatible" content="IE=edge">
<meta name="viewport" content="width=device-width, initial-scale=1.0">
<title>相邻兄弟选择器</title>
<style>
div>p {
color: gold;
}
</style>
</head>
<body>
<div>
<p>aaaaaaa</p>
<p>bbbbbbb</p>
<p>ccccccc</p>
</div>
<p>ddddddd</p>
<p>eeeeeee</p>
<p>fffffff</p>
</body>
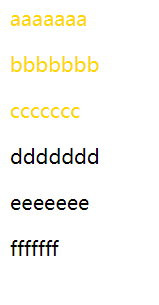
</html>div>p即div元素的所有子元素为p元素的元素将会被选中,代码效果如下:
相邻兄弟选择器
相邻兄弟选择器 (+) 介于两个选择器之间,当第二个元素紧跟在第一个元素之后,并且两个元素都是属于同一个父元素
的子元素,则第二个元素将被选中。示例代码如下:
<!DOCTYPE html>
<html lang="en">
<head>
    <meta charset="UTF-8">
    <meta http-equiv="X-UA-Compatible" content="IE=edge">
    <meta name="viewport" content="width=device-width, initial-scale=1.0">
    <title>css新增选择器</title>
    <style>
        div+p {
            color: red;
        }
    </style>
</head>
<body>
    <div>
        我是第一个div
    </div>
    <p>我是第一个p,我要变红色</p>
    <p>我是第二个p</p>
    <div>
        我是第二个div
    </div>
    <p>我是第三个p,我要变红色</p>
        <p>我是第四个p</p>
        <p>我是第五个p</p>
</body>
</html>
div+p即div元素后面的第一个同属于一个父元素的p元素将会被选中,代码效果如下:

通用兄弟选择器
通用兄弟选择器(),ab 选择a元素之后所有同层级b元素,示例代码如下:
<!DOCTYPE html>
<html lang="en">
<head>
    <meta charset="UTF-8">
    <meta http-equiv="X-UA-Compatible" content="IE=edge">
    <meta name="viewport" content="width=device-width, initial-scale=1.0">
    <title>相邻兄弟选择器</title>
    <style>
        div~p {
            color: green;
        }
    </style>
</head>
<body>
    <div>
        <p>aaaaaaa</p>
        <p>bbbbbbb</p>
        <p>ccccccc</p>
    </div>
    <p>ddddddd</p>
    <p>eeeeeee</p>
    <p>fffffff</p>
</body>
</html>
div~p即div元素后面的所有同级p元素将会被选中,代码效果如下:

序号选择器
| 举例 | 意义 |
|---|---|
| :first-child | 第1个子元素 |
| :last-child | 最后一个子元素 |
| :nth-child(3) | 第3个子元素 |
| :nth-of-type(3) | 第3个某类型子元素 |
| :nth-last-child(3) | 倒数第3个子元素 |
| :nth-last-of-type(3) | 倒数第3个某类型子元素 |
:first-child表示“选择第一个子元素”,比如下面的例子就表示选择.box1盒子中第一个p:
<style>
    .box1 p:first-child {
        color: red;
    }
</style>
:last-child表示“选择最后一个子元素”,比如下面的例子就表示选择.box1盒子中最后一个p:
<style>
    .box1 p:last-child {
        color: gold;
    }
</style>
:nth-child()可以选择任意序号的子元素,:nth-child()可以写成an + b的形式,表示从b开始每a个选 一个,注意不能写为b + an。
特殊得:2n+1等价于odd,表示奇数;2n等价于even,表示偶数。示例代码如下:
<style>
    .box1 p:nth-child(3) {
        color: red;
         }
    .box2 p:nth-child(3n + 2) {
        color: yellow;
         }
    .box3 p:nth-child(2n + 1) {
        color: green;
         }
    .box4 p:nth-child(2n) {
        color: gold;
    }
</style>
上述代码分别表示选择.box1盒子中第三个p为红色;
选择.box2盒子中从第2个p开始每3个选一个p包括第2个p为黄色;
选择.box3盒子中奇数p为绿色;
选择.box4盒子中偶数p为金黄色。
属性选择器
| 举例 | 意义 |
|---|---|
| img[alt] | 选择有alt属性的img标签 |
| img[alt=“故宫”] | 选择alt属性是故宫的img标签 |
| img[alt^=“北京”] | 选择alt属性以北京开头的img标签 |
| img[alt$=“夜景”] | 选择alt属性以夜景结尾的img标签 |
| img[alt*=“美”] | 选择有alt属性中含有美字的img标签 |
| img[alt~=“手机拍摄”] | 选择有alt属性中有空格隔开的手机拍摄字样的img标签 |
| img[alt|=“参赛作品”] | 选择有alt属性以“参赛作用-”开头的img标签 |
属性选择器比较简单,主要需要区分^、$、*、~、|这几个符号分别匹配什么。
CSS3新增伪类
在css3中又新增了几个伪类:
| 伪类 | 意义 |
|---|---|
| :empty | 选择空标签 |
| :focus | 选择当前获得焦点的表单元素 |
| :enabled | 选择当前有效的表单元素 |
| :disabled | 选择当前无效的表单元素 |
| :checked | 选择当前已经勾选的单选按钮或者复选框 |
| :root | 选择根元素,即<html>标签 |
示例代码如下:
<!DOCTYPE html>
<html lang="en">
<head>
    <meta charset="UTF-8">
    <meta http-equiv="X-UA-Compatible" content="IE=edge">
    <meta name="viewport" content="width=device-width, initial-scale=1.0">
    <title>Document</title>
    <style>
        .para {
            /* 设置高度、宽度 */
            width: 100px;
            height: 100px;
            /* 边框 */
            border: 1px solid #000;
        }
        .para:empty {
            background-color: red;
        }
        input:disabled {
            background-color: yellow;
        }
        input:enabled {
            background-color: rgb(0, 255, 136);
        }
    </style>
</head>
<body>
    <p class="para"></p>
    <p class="para">aaaa</p>
    <form action="" method="post">
        <p>
            <input type="text" disabled>
            <input type="text" value="bbbb">
            <input type="text" value="cccc">
            <input type="text" value="dddd">
            <input type="text" disabled>
        </p>
    </form>
</body>
</html>
代码效果如下:


 1515
1515


 被折叠的 条评论
为什么被折叠?
被折叠的 条评论
为什么被折叠?
 到【灌水乐园】发言


