


context 简介
-
go version go1.16beta1 darwin/arm64
-
参考链接:深度解密Go语言之context
Context 是什么
context 中文译作“上下文”,在Go 1.7标准库引入。基于对操作系统的认知,我们知道线程或进程切换时切的就是CPU各种寄存器中的值,而这些数据就是线程或进程的上下文,准确的说,上下文就是该进程或线程放弃CPU时保存到内存的PCB中的处理机(CPU)状态,包括指令计数器、通用寄存器、用户栈指针等;
context在go中指代的就是goroutine的上下文,包含goroutine的运行状态信息。go源码中对context的定义如下
Package context defines the Context type, which carries deadlines, cancellation signals, and other request-scoped values across API boundaries and between processes.
为什么用 Context
go源码是这样解释的:对服务器的incoming请求应创建一个context,而对服务器的outcoming调用应接收一个context。不管是incoming请求的函数调用链必须传播Context,可以选择将其替换为使用WithCancel,WithDeadline,WithTimeout或WithValue方法创建的派生Context。 取消上下文后,从该上下文派生的所有上下文也会被取消。
Context 使用原则
在context.context.go中提了几点使用context应该遵循的规则:
-
不要将
Context放入结构体,并且Context应该作为第一个参数传入,命名为ctx。 -
即使函数允许,也不要传入nil的
Context。如果不知道用哪种Context,可以使用context.TODO() -
使用
Context的Value相关方法,只应该用于在程序和接口中传递和请求相关的数据,不能用它来传递一些可选的参数 -
context是协程安全的,可以传递不同的goroutine
源码分析
Context 包是Go 1.7版本中引入标准库的,定义了两种接口和四种类型的 context 实现,UML 类图如下。可以看到,emptyCtx 和 cancelCtx 分别实现了 Context 接口和 canceler 接口,valueCtx 和 cancelCtx 通过组合形式嵌入 Context 作为成员对象从而实现了 Context 接口,timerCtx 则通过组合 cancelCtx 的方式拥有了 cancelCtx 的能力,同时提供了超时取消的能力。
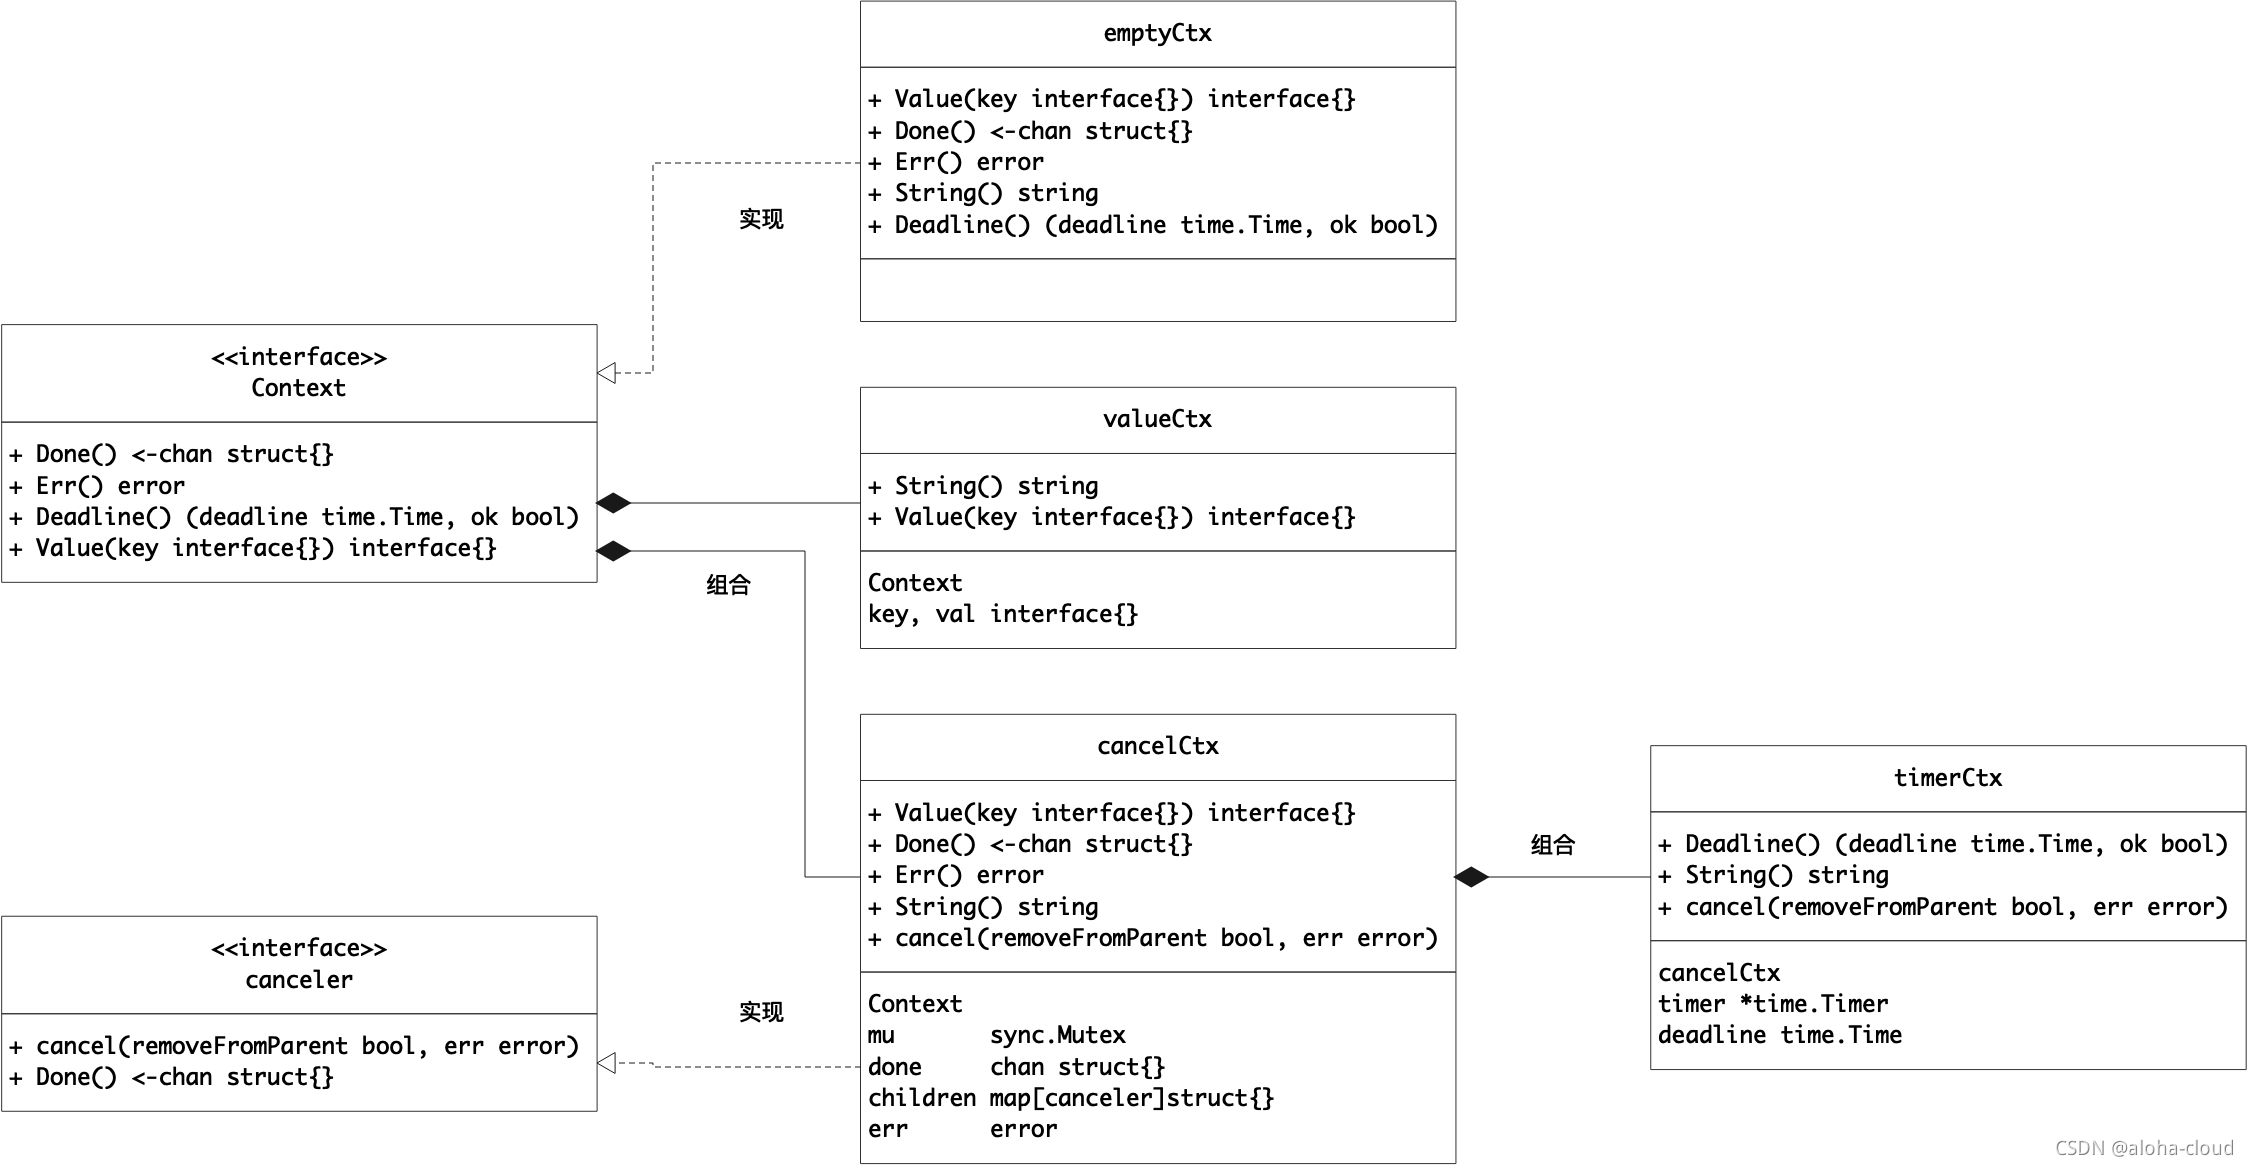
下面我们详细分析 go context 中的两个接口和四种 Context 类型
Context
Context接口定义了4个方法
 type Context interface {
     Done() <-chan struct{}
     Err() error
     Deadline() (deadline time.Time, ok bool)
     Value(key interface{}) interface{}
 }
-
Done()返回一个channel,表示context的取消信号:源码里不会向这个channel里面塞入值,相当于是个read_only的channel。真正对该channel是在CancelFunc中执行close(chan)操作。而读取一个关闭的channel返回的是该channel对应类型的零值,因此在子context里读这个channel,除非被关闭,否则读不出来任何东西。也正是利用了这一点,子协程从channel里读出了值(零值)后,就可以做一些收尾工作,尽快退出。 -
Err()返回一个error,表示channel被关闭的原因。只会在Done方法对应的 Channel 关闭时返回非空的值,比如-
如果
context.Context被取消,会返回Canceled错误;(var Canceled = errors.New("context canceled")) -
如果
context.Context超时,会返回DeadlineExceeded错误;
-
-
Deadline()返回context的截止时间,通过此时间,函数就可以决定是否进行接下来的操作,如果时间太短,就可以不往下做了,否则浪费系统资源。当然,也可以用这个deadline来设置一个I/O操作的超时时间。 -
Value()用于从Context中获取键对应的值,对于同一个Context来说,多次调用Value并传入相同的Key会返回相同的结果,该方法可以用来传递请求特定的数据。
canceler
canceler是一个非导出接口,定义了下面两个方法。实现了下面两个方法的Context表明该Context是可取消的。源码中cancelCtx和timerCtx实现了 canceler接口。注意,是这两个结构体的指针实现了canceler接口。
 type canceler interface {
   cancel(removeFromParent bool, err error)
   Done() <-chan struct{}
 }
Context和canceler的设计理念?直接将cancel方法添加进Context是否可以?为什么?
context 的 字面意思是‘上下文’,没有‘cancel’语义,
cancel操作应该是建议性,而非强制性。Context作为caller,不应该去关心或者干涉callee的情况,决定如何以及何时return是callee的责任。caller只需发送cancel信息,callee根据收到的信息来做进一步的决策,因此接口并没有定义cancel方法。
emptyCtx
emptyCtx 介绍
emptyCtx是一个空的 context,实现了Context接口。这些方法要么返回nil, 要么直接返回。因此, emptyCtx永远不会被cancel ,没有 value,也没有deadline。
type emptyCtx int
func (*emptyCtx) Deadline() (deadline time.Time, ok bool) {
return
}
func (*emptyCtx) Done() <-chan struct{} {
return nil
}
func (*emptyCtx) Err() error {
return nil
}
func (*emptyCtx) Value(key interface{}) interface{} {
return nil
}
实际上, emptyCtx被包装成background和todo ,我们一般不会直接使用emptyCtx,而是使用由emptyCtx实例化的两个变量。这是context包内的两个私有变量,都是通过new(emptyCtx)语句初始化的。
var (
background = new(emptyCtx)
todo = new(emptyCtx)
)
func Background() Context {
return background
}
func TODO() Context {
return todo
}
看到这我们会有个疑问,Background和TODO方法得到的context有什么区别呢?
源码中对此已有解释,简单总结就是
-
background通常用在main函数中,作为所有context的根节点。 -
todo通常用在并不知道传递什么context的情形。(例如,调用一个需要传递context参数的函数,但手头并没有其他context可以传递,这时就可以传递todo。相当于调用某个函数时,有个参数为指针,但手头并没有该参数的对象实例,所以只好传入nil)
emptyCtx 使用示例
package main
import (
"context"
"fmt"
"time"
)
func main(t *testing.T) {
// background 作为根节点
ctx, cancel := context.WithTimeout(context.Background(), 50*time.Millisecond)
defer cancel()
select {
case <-time.After(1 * time.Second):
fmt.Println("overslept")
case <-ctx.Done():
fmt.Println(ctx.Err()) // 输出 "context deadline exceeded"
}
}
cancleCtx
cancelCtx实现了interface canceler,另外,通过将Context作为一个匿名字段,它可以被看成一个Context。注意,cancelCtx有没有实现interface Context取决于创建该cancelCtx时传入的Context是否实现了
 type cancelCtx struct {
   Context            // 创建时需传入一个实现了context接口的context
   mu       sync.Mutex            // protects following fields
   done     chan struct{}         // created lazily, closed by first cancel call
   children map[canceler]struct{} // set to nil by the first cancel call
   err      error                 // set to non-nil by the first cancel call
 }
cancleCtx 的创建
cancelCtx是非导出的,只能通过context.WithCancel创建一个cancelCtx,代码如下:
 var Canceled = errors.New("context canceled")
 type CancelFunc func()
 func WithCancel(parent Context) (ctx Context, cancel CancelFunc) {
   c := newCancelCtx(parent)
   propagateCancel(parent, &c) // 建立子context和父context的关联
   return &c, func() { c.cancel(true, Canceled) }  // 这里返回的 CancelFunc,
 }
WithCancel传入一个父Context(这通常是一个background,作为根节点)通过三步来创建一个cancelCtx:
-
newCancelCtx: 使用父
context初始化一个cancelCtx -
propagateCancel:建立子context和父context的关联
-
返回新建的
context和CancelFunc
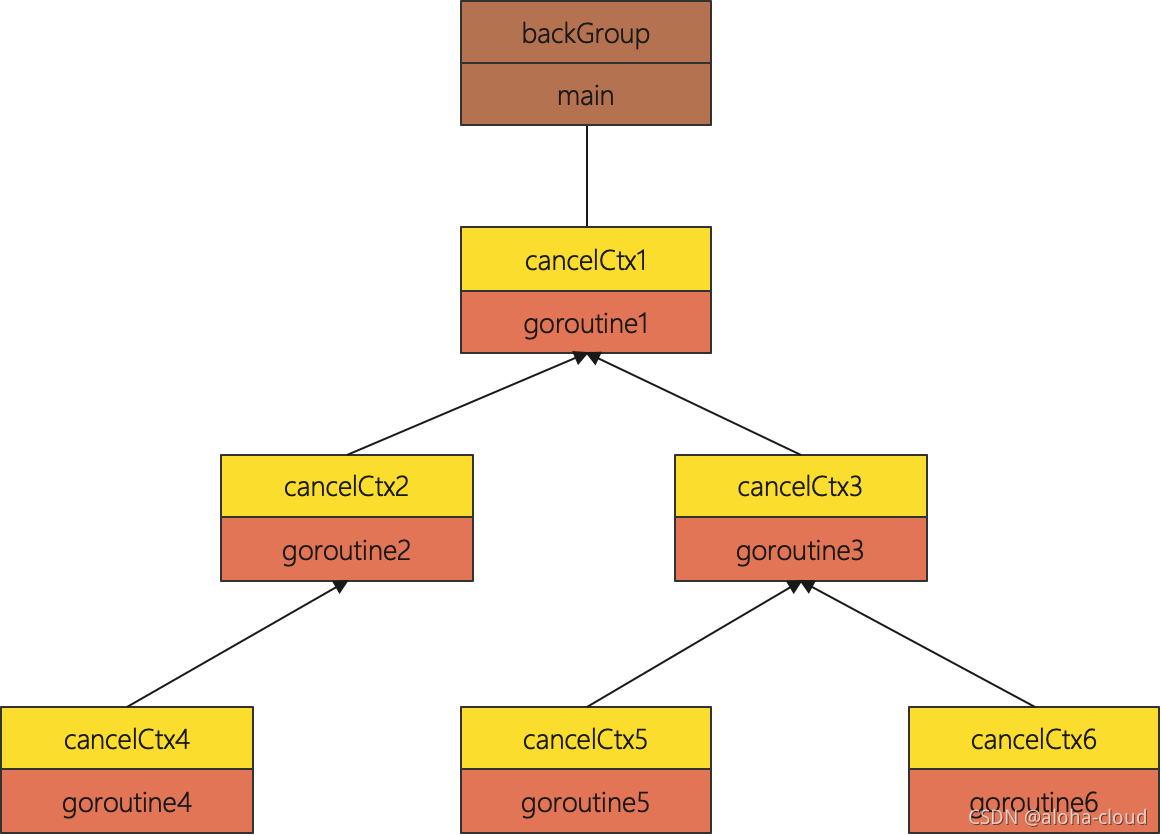
因为cancelCtx嵌入了一个Context,因此cancelCtx形成了一颗Context树。这与我们常说的进程树结构是相符的,如下图所示, 需要注意的是,这颗树的方向是向上的,因为子context和父context是一种复合关系,而非链表中的指向关系。实际上,cancelCtx常用于这一场景:当某个事件发生时,尽快终止该事件所在goroutine及其所有子goroutine。
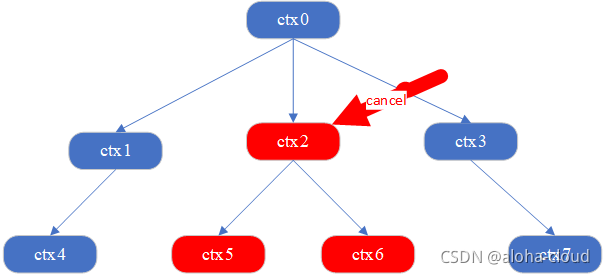
重点看propagateCancel(parent, &c), 该函数用于建立子context和父context的关联,这里所谓的关联其实就是建立cancel信号的传递机制,例如,对于cancelCtx5和cancelCtx6而言,它们怎么知道cancelCtx3被cancel掉了呢?看代码实现:
 func propagateCancel(parent Context, child canceler) {
   if parent.Done() == nil {
     return // 说明 parent 是一个 emptyCtx
   }

   if p, ok := parentCancelCtx(parent); ok {
     // parent 是一个 cancelCtx
     p.mu.Lock()
     if p.err != nil {
       // parent 已经被 cancel
       child.cancel(false, p.err)
     } else {
       // 将 child "挂到" parent 上
       if p.children == nil {
         p.children = make(map[canceler]struct{})
       }
       p.children[child] = struct{}{}
     }
     p.mu.Unlock()
   } else {
     // 进入该分支说明 parent 既不是 emptyCtx 也不是 cancelCtx
     go func() {
     // 启动一个协程监控父节点或者子节点的 cancel 动作
       select {
       case <-parent.Done():
         child.cancel(false, parent.Err())
       case <-child.Done():
       }
     }()
   }
 }
为什么会有 else 描述的情况发生?
进入 else 分支说明 parent 既不是 emptyCtx 也不是 cancelCtx。那么
case <-parent.Done()这个 case 就永远不会发生;而case <-child.Done()这个 case 又啥事不干。那这个else有什么用处呢?这个else 就是为了处理用户自定义实现了
interface Context接口和interface canceler的情况
要回答上述问题,我们先看parentCancelCtx
 func parentCancelCtx(parent Context) (*cancelCtx, bool) {
     for {
         switch c := parent.(type) {
         case *cancelCtx:
             return c, true
         case *timerCtx:
             return &c.cancelCtx, true
         case *valueCtx:
             parent = c.Context
         default:
             return nil, false
         }
     }
 }
parentCancelCtx识别三种parent的Context类型:cancelCtx,timerCtx,valueCtx。
但如果我们将一个Context嵌入到我们自定义的一个类型呢?比如
 type myContext struct {
     Context
 }
这时parent.(type) 为 myContext类型, parentCancelCtx就返回了nil, false。propagateCancel则进入else分支。
再返回cancel方法的代码实现中,上面说过cancel中会递归了cancel掉所有子context,但由于propagateCancel进入了else分支,没有执行将child挂到parent上。因此,对于类似将Context嵌入myContext的情况,myContext的子节点没有递归cancel,所以需要select机制来同步
 select {
     case <-parent.Done():
       child.cancel(false, parent.Err())
     case <-child.Done():
     }
需要补充的是,两个case都不能删除
-
第一个
case如上面所说,用于实现递归cancel掉所有子context。 -
第二个
case是说如果子节点自己取消了,那就退出这个 select,父节点的取消信号就不用管了。如果去掉这个 case,那么很可能父节点一直不取消,这个 goroutine 就泄漏了。当然,如果父节点取消了,就会重复让子节点取消,不过,这也没什么影响嘛。
所以使用原则中不建议将 Context 嵌入结构体内。
cancleCtx 的实现
cancelCtx实现了四个方法:
 func (c *cancelCtx) Done() <-chan struct{}
 func (c *cancelCtx) Err() error
 func (c *cancelCtx) String()
 func (c *cancelCtx) cancel(removeFromParent bool, err error)
先看看Done方法的实现:
 func (c *cancelCtx) Done() <-chan struct{} {
     c.mu.Lock()
     if c.done == nil {
         c.done = make(chan struct{})
     }
     d := c.done
     c.mu.Unlock()
     return d
 }
c.done是“懒汉式”创建,只有调用了Done()方法的时候才会被创建。再次说明,函数返回的是一个只读的channel,而且没有地方向这个channel里面写数据。所以,直接调用读这个channel,协程会被 block 住。一般通过搭配select来使用。一旦关闭,就会立即读出零值。
懒汉式就是创建对象时比较懒,先不急着创建对象,在需要使用时再去创建;需要注意的是,这种方式是非线程安全,多线程下可能会创建多次对象,因此
Done通过Sync.Mutex进行加锁保证线程安全。
再看看cancel方法的实现:
 func (c *cancelCtx) cancel(removeFromParent bool, err error) {
         if err == nil {
                 panic("context: internal error: missing cancel error")
         }
         c.mu.Lock()
         // err 不为nil说明该 context 已经执行过 cancel (c.err只有在本函数才会被赋值)
         if c.err != nil {
                 c.mu.Unlock()
                 return // already canceled
         }
         c.err = err
         // 关闭 channel,通知其他协程
         if c.done == nil {
                 c.done = closedchan
         } else {
                 close(c.done)
         }
         // 递归地 cancel 所有子 context
         for child := range c.children {
                 child.cancel(false, err)
         }
         c.children = nil
         c.mu.Unlock()
         // 从父context中移除
         if removeFromParent {
                 removeChild(c.Context, c)
         }
 }
如代码注释所示,cancel主要做了几件事:
-
判断当前
context是否已cancel,若已cancel则直接返回; -
关闭
c.done;(关闭后,正在监听该channel的goroutine会读到零值) -
递归地
cancel所有子context -
置 child 为空,因此执行
child.cancel(false, err)时传入的removeFromParent为false -
若
removeFromParent为true, 则将自己从父context中移除
注意到:调用子节点
cancel方法的时候,传入的第一个参数removeFromParent是false。两个问题需要回答:1. 什么时候会传 true?2. 为什么有时传 true,有时传 false?
removeFromParent 什么时候传true、什么时候传false呢?
-
答案是调用
WithCancel()新创建一个可取消的context节点时,返回的cancelFunc函数会传入true。这样做的结果是:当执行返回的cancelFunc时,会将这个context从它的父节点里移除,因为父节点可能有很多子节点。现在子节点自己执行了自己的cancel函数,父节点是不知道的,要主动从父节点移除。 -
而在
cancel函数内部,通过父context主动调用child.cancel时传false。因为所有子节点都因为c.children = nil而彻底删除了关联,在调用child.cancel的时候,child已经没有父节点了,自然就没有必要再多做这一步。另外,如果遍历子节点的时候,调用child.cancel函数传了true,还会造成同时遍历和删除一个map的情况,这是会出问题的。
至此我们就知道了 cancelCtx 的机制,简单来说就是创建时通过propagateCancel建立子context和父context的关联,通过cancel来递归取消当前 context 及其所有子 context
cancelCtx 的使用
构建如下cancelCtx树,3s 后执行ctx2的cancel
package main
import (
"context"
"log"
"testing"
"time"
)
func task(ctx context.Context, workerId int) {
log.Printf("worker %d start doing task", workerId)
for {
select {
case <-ctx.Done():
log.Printf("worker %d finished a task", workerId)
return
default:
time.Sleep(time.Second)
}
}
}
func worker(ctx context.Context, workerId, taskSum int) {
log.Printf("worker %d start working", workerId)
for i := 0; i < taskSum; i++ {
childCtx, _ := context.WithCancel(ctx)
go task(childCtx, workerId)
}
for {
select {
case <-ctx.Done():
log.Printf("worker %d finished work", workerId)
return
default:
time.Sleep(time.Second)
}
}
}
func TestCancelCtx_test(t *testing.T) {
ctx0 := context.Background()
ctx1, cancel1 := context.WithCancel(ctx0)
ctx2, cancel2 := context.WithCancel(ctx0)
ctx3, cancel3 := context.WithCancel(ctx0)
go worker(ctx1, 1,1)
go worker(ctx2, 2,2)
go worker(ctx3, 3,1)
t2 := time.NewTimer(time.Second * 3)
t1 := time.NewTimer(time.Second * 10)
for {
select {
case <- t2.C:
log.Println("ctx2 cancel")
cancel2()
case <- t1.C:
log.Println("ctx1 and ctx3 cancel")
cancel1()
cancel3()
return
}
}
}
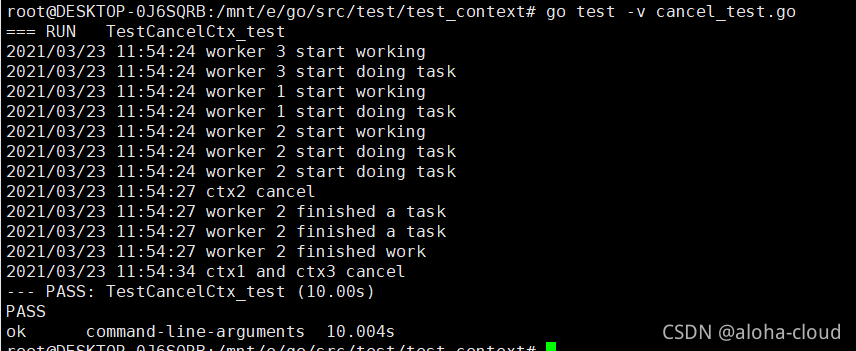
执行结果:
timerCtx
timerCtx带有一个timer和deadline,并嵌入一个cancelCtx实例实现了cancel和Done。 timer在 deadline 到来时触发cancel从而实现context的取消。
 type timerCtx struct {
   cancelCtx
   timer *time.Timer // Under cancelCtx.mu.
   deadline time.Time // 绝对时间
 }
timerCtx 的创建
同cancelCtx一样,timerCtx也是非导出的,context包提供了context.WithTimeout来创建一个timerCtx,代码如下:
 func WithTimeout(parent Context, timeout time.Duration) (Context, CancelFunc) {
   return WithDeadline(parent, time.Now().Add(timeout))
 }
WithTimeout将传入的deadline加上timeout的时间,然后调用了WithDeadline,从这可以看出,超时时间用的是绝对时间,当作一个时间戳来看即可。接下来看一下WithDeadline的实现:
func WithDeadline(parent Context, d time.Time) (Context, CancelFunc) {
if cur, ok := parent.Deadline(); ok && cur.Before(d)
// 如果父节点 context 的 deadline 早于传入的 d。那么父节点一定会早于子节点超时,而一旦父节点超时,
// 根据 cancelCtx 的特性,子节点也随之取消。因此,这种情况下新建 timerCtx 也就失去了 timer 的
// 意义,返回新的 cancelCtx 即可
return WithCancel(parent)
}
// 建立子节点和父节点的关联
c := &timerCtx{
cancelCtx: newCancelCtx(parent),
deadline: d,
}
propagateCancel(parent, c)
// 建立超时机制
dur := time.Until(d) // dur 为当前时间到 d 时刻的时长
if dur <= 0 {
// 新建的 timerCtx 的 deadline 已经超时了
c.cancel(true, DeadlineExceeded)
return c, func() { c.cancel(false, Canceled) }
}
c.mu.Lock()
defer c.mu.Unlock()
if c.err == nil {
c.timer = time.AfterFunc(dur, func() {
c.cancel(true, DeadlineExceeded)
})
}
return c, func() { c.cancel(true, Canceled) }
}
这里超时取消机制的核心在于:
 c.timer = time.AfterFunc(d, func() {
     c.cancel(true, DeadlineExceeded)
 })
也就是到达时刻 d 后,timer 会自动调用 cancel 函数,取消该 timerCtx 及其子节点。
从timerCtx的创建可以看出,其cancel机制沿用了cancelCtx,只是在其之上加多了一个超时取消的机制。
timerCtx 的实现
timerCtx实现了三个方法:
 func (c *timerCtx) Deadline() (deadline time.Time, ok bool)
 func (c *timerCtx) String() string
 func (c *timerCtx) cancel(removeFromParent bool, err error)
重点看cancel的实现:
 func (c *timerCtx) cancel(removeFromParent bool, err error) {
   c.cancelCtx.cancel(false, err)
   if removeFromParent {
      // 从父节点的 children 中把自己删掉, 即执行 delete(c.cancelCtx.Context.children, c)
     removeChild(c.cancelCtx.Context, c)
   }
   c.mu.Lock()
   if c.timer != nil {
     c.timer.Stop() // 关掉定时器,这样,在 deadline 到来时,不会再次取消
     c.timer = nil
   }
   c.mu.Unlock()
 }
timerCtx 的使用
package main
import (
"context"
"fmt"
"log"
"net/http"
"time"
)
const HttpTimeOut = 5
func main() {
mux := http.NewServeMux()
mux.HandleFunc("/api/login/", handler)
if err := http.ListenAndServe("127.0.0.1:8080", mux); err != nil {
log.Panic("ListenAndServe err:", err)
}
}
func handler(w http.ResponseWriter, r *http.Request) {
log.Printf("Request is coming\n")
var user string
var passwd string
if queryParams, ok := r.URL.Query()["user"]; ok && len(queryParams) > 0 {
user = queryParams[0]
}
if queryParams, ok := r.URL.Query()["passwd"]; ok && len(queryParams) > 0 {
passwd = queryParams[0]
}
// 设置 timerCtx
ctx, cancel := context.WithTimeout(r.Context(), HttpTimeOut * time.Second)
defer cancel()
// 处理请求
_, err := Login(ctx, userId, passwd)
if err != nil {
log.Printf("Request is return with error: %v\n", err)
w.WriteHeader(http.StatusExpectationFailed)
return
}
log.Printf("Request is return with success\n")
w.WriteHeader(http.StatusOK)
}
func Login(ctx context.Context, user, passwd string) (bool, error) {
c := make(chan bool, 1)
go func() {
time.Sleep(1 * time.Second)
c <- true
} ()
select {
case <-ctx.Done():
log.Printf("Context interrupt or timeout: %v\n", ctx.Err())
return false, fmt.Errorf(" Context interrupt or timeout: %v", ctx.Err())
case result := <-c:
log.Printf("login success: userId = %s; passwd = %s \n", user, passwd)
return result, nil
}
}
-
设置超时时间为1s:

-
设置超时时间为10s

valueCtx
valueCtx携带一个key-value,并为该key实现了Value。同cancelCtx一样,valueCtx也嵌入一个Context作为成员,从而使自己成为一个Context。
 type valueCtx struct {
   Context
   key, val interface{}
 }
valueCtx 的创建
valueCtx是非导出的,只能通过context.WithValue创建一个valueCtx,代码如下:
 func WithValue(parent Context, key, val interface{}) Context {
   if parent == nil {
     panic("cannot create context from nil parent")
   }
   if key == nil {
     panic("nil key")
   }
   if !reflectlite.TypeOf(key).Comparable() {
     panic("key is not comparable")
   }
   return &valueCtx{parent, key, val}
 }
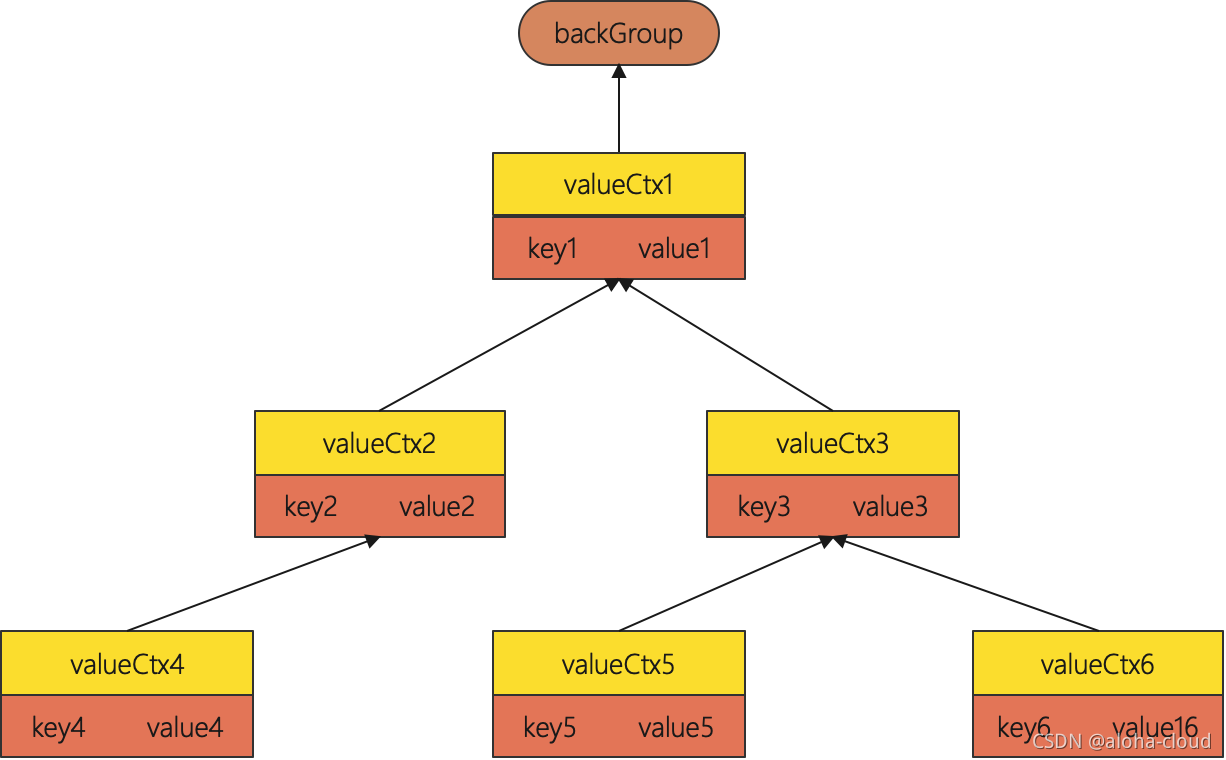
valueCtx对key的要求是可比较,因为之后需要通过key取出Context中的值,可比较是必须的。通过层层传递context,最终形成这样一棵树:
timerCtx 的实现
valueCtx实现了两个方法
func (c *valueCtx) String() string {
return contextName(c.Context) + ".WithValue(type " +
reflectlite.TypeOf(c.key).String() +
", val " + stringify(c.val) + ")"
}
func (c *valueCtx) Value(key interface{}) interface{} {
if c.key == key {
return c.val
}
return c.Context.Value(key)
}
取值的过程,实际上是一个递归查找的过程:
一直顺着 context 往前,比较当前节点的 key 是否是要找的 key,如果是,则直接返回 value,最终找到根节点(一般是 emptyCtx),直接返回一个 nil。所以用 Value 方法的时候要判断结果是否为 nil。注意,查找方向是自下向上的,因为,父节点没法获取子节点存储的值,子节点却可以获取父节点的值。
两个节点的key值是可以相等的,但它们是两个不同的 context 节点。根据key查找时,查找的是最近的那个context节点。所以,整体上而言,用 WithValue构造的其实是一个低效率的链表。
如果你接手过项目,肯定经历过这样的窘境:在一个处理过程中,有若干子函数、子协程。各种不同的地方会向context里塞入各种不同的 k-v 对,最后在某个地方使用。你根本就不知道什么时候什么地方传了什么值?这些值会不会被“覆盖”(底层是两个不同的context节点,查找的时候,只会返回一个结果)?目前当我们的程序允许不同的地方会向context里塞入各种不同的 k-v 对,每次塞入时对该key做下重复判断和处理。但这又会增加开销,因此只能说,慎用valueCtx。
而这也是 context.Value 最受争议的地方。很多人建议尽量不要通过 context 传值。
总结
context 使用场景
-
传递共享的数据
-
超时控制
-
防止
goroutine泄露
context 争议
-
context滥用:Go官方建议把Context作为函数的第一个参数,甚至连名字都准备好了。这造成一个后果:因为我们想控制所有的协程的取消动作,所以需要在几乎所有的函数里加上一个Context参数。很快,我们的代码里,context 将像病毒一样扩散。 -
O(n)复杂度:像WithCancel、WithDeadline、WithTimeout、WithValue这些创建函数,实际上是创建了一个个的链表结点而已。这些操作都是O(n)复杂度的,效率不高。
context 好处
-
并发控制和超时控制的标准做法:
context包是Go 1.7引入的标准库,主要用于在goroutine之间传递取消信号、超时时间、截止时间以及一些共享的值等。它并不是太完美,但几乎成了并发控制和超时控制的标准做法。 -
并发安全:使用上,先创建一个根节点的 context,之后根据库提供的四个函数创建相应功能的子节点 context。由于它是并发安全的,所以可以放心地传递。
综上,context可能并不完美,但它确实简洁高效地解决了问题。


 2070
2070

 被折叠的 条评论
为什么被折叠?
被折叠的 条评论
为什么被折叠?
 到【灌水乐园】发言


