


如何将我们自己的库也能这样来使用呢?下面我们将详细的讲解每一步的过程:
一、通过 sonatype 把你的开源库提交到Maven的中心库
1>首先,在 sonatype 官网中注册账号。进入官网的时候比较慢,需要耐心等待。注意要记住账号密码,会用于我们后续的发布及相关操作。
在 https://issues.sonatype.org 注册账号,需要注意的是密码必须超过 12 位,且包含至少一个大写字符,一个小写字符,一个特殊字符,以及不少于三种的不同字符(字符,数字,符号)。描述的有些拗口,简单说就是包含大写字母、小写字符、符号和数字,并且超过 12 位即可。,这里举列一个:%Wxp987654321。
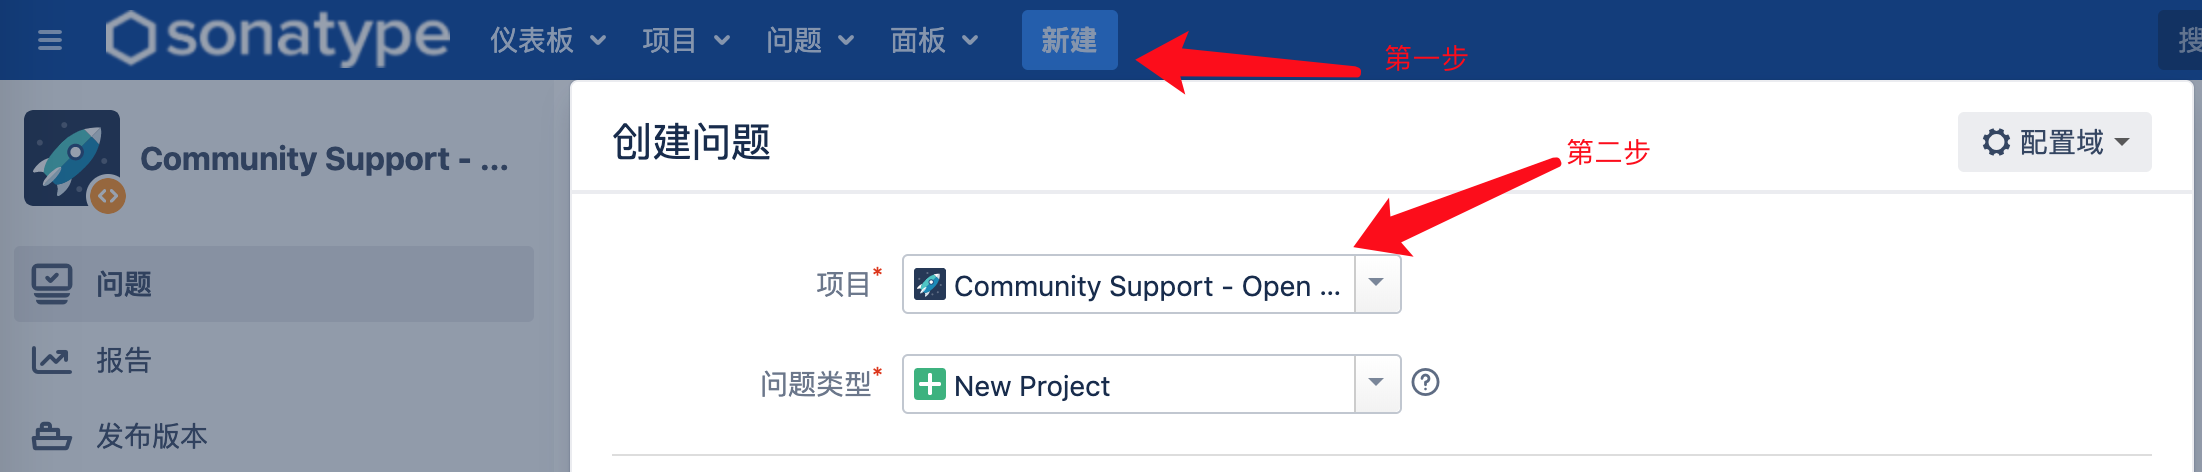
2.>如图新建一个issue,项目需要选择 Community Support - Open Source Project Repository Hosting、点击新创一个项目 NewProject。
3>参考下图填写概要、Group Id、项目地址、代码管理地址,填写后点击确认提交。
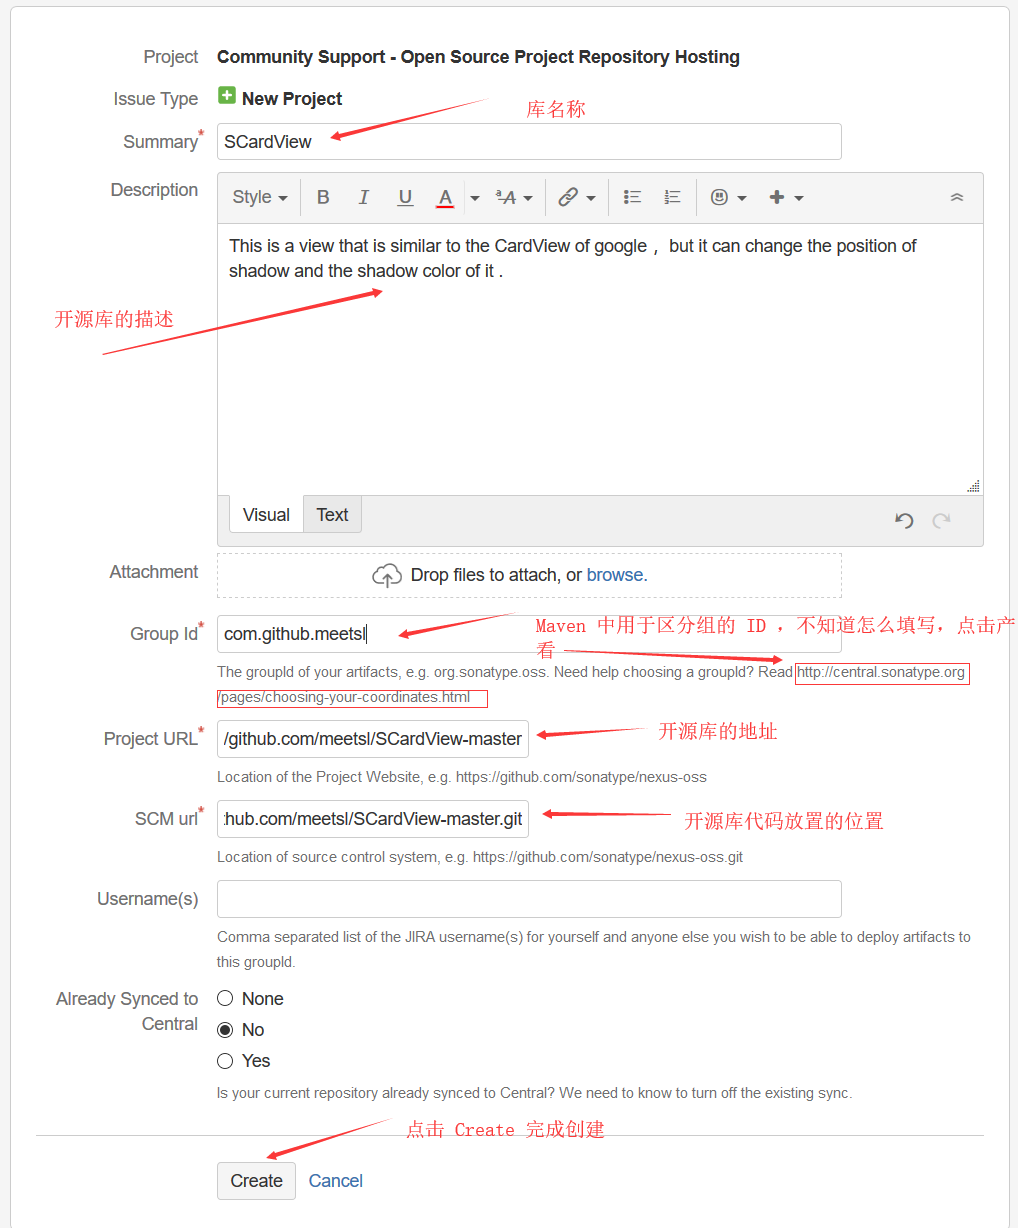
Project URL:项目地址。
SCM URL :项目clone的git地址。
Summary:你的jar包自己起个名字(无要求)。
Group Id:项目标识。
【提醒】确group id对应的是域名,推荐使用个人域名。
首先Central OSSRH 会问你,这个域名是你的么,怎么证明这个域名是你的呢?
方法有三个:
- 在域名解析中加上一个Txt记录,指向你发布的这个Issues(他称作JIRA ticket:)。(最快)
- 设置一个指向你的github主页的跳转(有点懵逼)
- 用pomit.cn的邮箱发送邮件到central@sonatype.com(这个真麻烦,为此我得搭个邮件服务器)
所以,我选择了第一种方式,在dns里加条记录。

我的域名是在腾讯云买的,所以需要到腾讯云去配置,如图所示,加一条TXT记录即可,然后回去评论告诉他:
他看完之后会告诉你,“可以上传jar包了,上传完成后告诉我下”,然后你就上传jar包吧。
注:这里的标识不是和你项目中一致的,而是你的项目所在的域名,如果你随便填的话,就会收到邮件确认是否拥有域名,如果是个人的可以挂在开源网站下,我是挂在码云下的,就可以填写如下:com.gitee.你的码云id。如果在GitHub上就用com.gttee。
点击 Create 之后,你就会进入一个 jira 页面(sonatype 使用jira 来追踪每一个项目进度),与此同时你注册时使用的邮箱中也会收到一封邮件提示你,任务创建成功,正在等待处理。
4>创建完毕后就等待一段时间,在通过确认和校验后,sonatype会回复你到时候maven发布会用到的snapshot地址和release地址,并提醒你首次发布后需要回复该issue,。当状态变为“已解决”,就可以上传maven项目了。
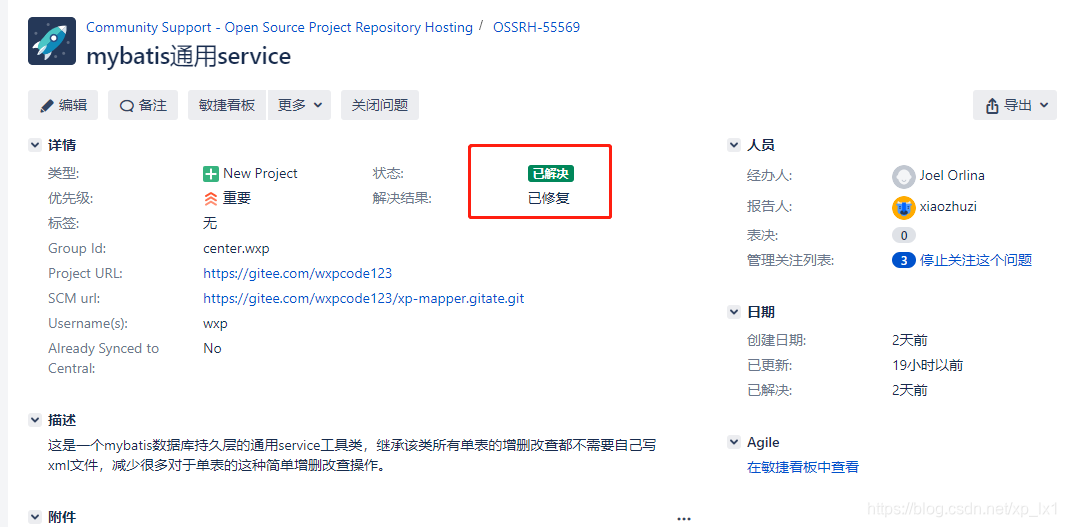
审核通过后会收到这样一封邮件,说明你的问题通过了 。

二、gpg 环境安装
gpg的主要作用是生成密钥对,会用于后续我们组件发布的校验。
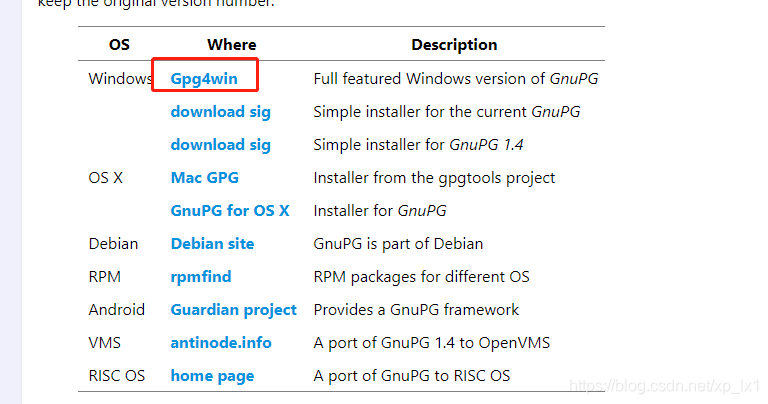
1> 下载地址:https://www.gnupg.org/download/
2> 如图红色框所示下载并安装、选择对应自己的操作系统。
3> 在安装完成后,执行以下命令生成密钥对,按照提示输入账号、邮箱、密码 (PS: 此处的密码在后面发布会用到,请务必记住)
gpg --gen-key 4> 执行命令查看密钥, 此时控制台会输出类似下面的内容
gpg --list-keys

C:/Users/Administrator/AppData/Roaming/gnupg/pubring.kbx
--------------------------------------------------------
pub   rsa2048 2020-03-05 [SC] [expires: 2022-03-05]
      AA7FFADE8B91C3AC08D8A840DD923EEA2BAAED19
uid           [ultimate] xiaozhuzi <1099272020@qq.com>
sub   rsa2048 2020-03-05 [E] [expires: 2022-03-05]
其中DD923EEA2BAAED19就是秘钥id。
5> 执行以下命令将公钥发布到服务器中、这里我发布了多个服务器。这里在上传时可以带端口也可以不带,好像都可以都可以上传成功。
gpg --keyserver hkp://keys.gnupg.net --send-keys DD923EEA2BAAED19
gpg –-keyserver hkp://keyserver.ubuntu.com:11371 –-send-keys DD923EEA2BAAED19
gpg –-keyserver hkp://pgp.mit.edu:11371 –-send-keys DD923EEA2BAAED19
gpg --keyserver hkp://pool.sks-keyservers.net --send-keys dd923eea2baaed19
gpg –-keyserver hkp://pool.sks-keyservers.net:11371 –-send-keys DD923EEA2BAAED19
验证是否发送成功:返回如下数据说明成功。
gpg --keyserver hkp://pgp.mit.edu:11371 --recv-keys dd923eea2baaed19
gpg: key DD923EEA2BAAED19: "xiaozhuzi <1099272020@qq.com>" not changed
gpg: Total number processed: 1
gpg:              unchanged: 1
如果公钥没有上传成功,在打包到远程仓库会报如下错误。
failureMessage  No public key: Key with id: (1fcda02dd63733fe) was not able to be located on http://pgp.mit.edu:11371/. Upload your public key and try the operation again.
failureMessage  No public key: Key with id: (1fcda02dd63733fe) was not able to be located on http://keyserver.ubuntu.com:11371/. Upload your public key and try the operation again.
failureMessage No public key: Key with id: (1fcda02dd63733fe) was not able to be located on http://pool.sks-keyservers.net:11371/. Upload your public key and try the operation again.三、进行maven项目的打包POM文件配置
1>说明:
<name>mybatis.mapper</name>
<url>http://www.wxp.centrt</url>
<description>Demo project for Mybatis mapper</description>
2>证书
 <licenses>
        <license>
            <name>The Apache Software License, Version 2.0</name>
            <url>http://www.apache.org/licenses/LICENSE-2.0.txt</url>
            <distribution>repo</distribution>
        </license>
    </licenses>
3>scm软件配置管理
 <scm>
        <tag>master</tag>
        <url>git@https://gitee.com/wxpcode123/xp-mapper.git</url>
        <connection>scm:git:git@https://gitee.com/wxpcode123/xp-mapper.git</connection>
        <developerConnection>scm:git:git@https://gitee.com/wxpcode123/xp-mapper.git</developerConnection>
    </scm>
4>开发者信息
<developers>
        <developer>
            <name>wxp</name>
            <email>1099272020@qq.com</email>
            <organization>http://www.wxp.center</organization>
        </developer>
    </developers>
5>打包配置,由于发布到maven中央仓库会要求我们在上传jar到同时,必须同步发布对应到Javadoc、source、asc(利用gpg生成到校验),所以需要在maven中添加以下构建插件
<profiles>
        <profile>
            <id>release</id>
            <build>
                <plugins>
                    <plugin>
                        <groupId>org.sonatype.plugins</groupId>
                        <artifactId>nexus-staging-maven-plugin</artifactId>
                        <version>1.6.8</version>
                        <extensions>true</extensions>
                        <configuration>
                            <!-- 这里的id必须要和全局配置中的release id 一致 -->
                            <serverId>oss</serverId>
                            <nexusUrl>https://oss.sonatype.org/</nexusUrl>
                            <!-- 如果希望发布后自动执行close和release操作,此处可以调整为true -->
                            <autoReleaseAfterClose>true</autoReleaseAfterClose>
                        </configuration>
                    </plugin>
                    <plugin>
                        <groupId>org.apache.maven.plugins</groupId>
                        <artifactId>maven-source-plugin</artifactId>
                        <version>2.2.1</version>
                        <executions>
                            <execution>
                                <phase>package</phase>
                                <goals>
                                    <goal>jar-no-fork</goal>
                                </goals>
                            </execution>
                        </executions>
                    </plugin>
                    <plugin>
                        <groupId>org.apache.maven.plugins</groupId>
                        <artifactId>maven-javadoc-plugin</artifactId>
                        <version>2.9.1</version>
                        <executions>
                            <execution>
                                <phase>package</phase>
                                <goals>
                                    <goal>jar</goal>
                                </goals>
                            </execution>
                        </executions>
                    </plugin>
                    <plugin>
                        <groupId>org.apache.maven.plugins</groupId>
                        <artifactId>maven-gpg-plugin</artifactId>
                        <version>1.5</version>
                        <executions>
                            <execution>
                                <phase>verify</phase>
                                <goals>
                                    <goal>sign</goal>
                                </goals>
                            </execution>
                        </executions>
                    </plugin>
                </plugins>
            </build>
        </profile>
    </profiles>
6>上传打包文件配置
<!-- 发布管理信息 -->
    <distributionManagement>
        <repository>
            <!-- 这里的id必须要和全局配置中的release id 一致 -->
            <id>sonatype_releases</id>
            <name>Nexus Release Repository</name>
            <!-- 这里就是在创建issue成功后,对方回复的release发布地址-->
            <url>https://oss.sonatype.org/service/local/staging/deploy/maven2</url>
        </repository>
        <snapshotRepository>
            <!-- 这里的id必须要和全局配置中的snapshot id 一致 -->
            <id>sonatype_snapshots</id>
            <name>Nexus Snapshot Repository</name>
            <!-- 这里就是在创建issue成功后,对方回复的snapshot发布地址-->
            <url>https://oss.sonatype.org/content/repositories/snapshots</url>
        </snapshotRepository>
</distributionManagement>7>添加服务器验证信息,这里的配置的id名称,要在maven的setting.xml文件中配置
<server>
            <id>oss</id>
            <username>admin</username>
            <password>admin123</password>
     </server>
注:这里的username是你一开始注册sonatype账号的username,而不是注册时填写的邮箱。
四、发布操作
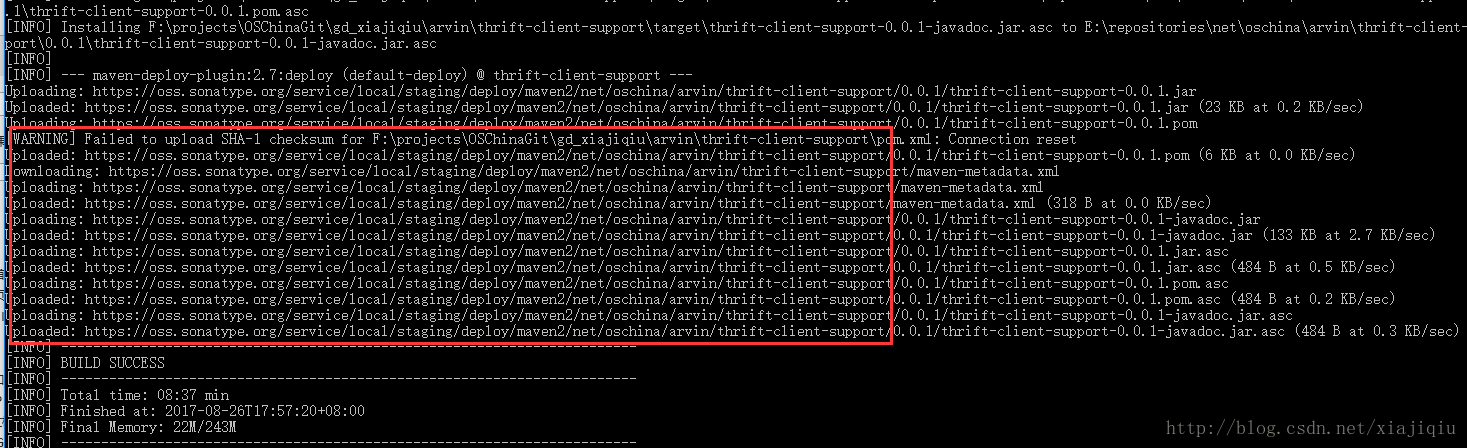
1> 执行以下命令进行发布(如果 pom.xml 中 autoReleaseAfterClose 的值为true,则脚本会自动完成在平台上close、release的操作,至此你将成功发布了,否则我们继续查看第2步)
mvn clean deploy -P release这个地方的release就是上面打包配置中的id。所以直接复制就好,打包会运行一会然后出现upload信息,最后提示BuildSuccess说明打包并上传成功了。
打包过程遇到问题:
- 1.javadoc格式错误,需要将错误问题解决。
- 2.failureMessage No public key,这个是gpg秘钥没有上传成功导致,我在实际操作时,明明上传成功,但是还是这样提示,只能多打包几次就可以了,不知道什么原因。解决方法: 如果你知道哪个密钥服务器会被查询,你可以直接在那里上传你的密钥。
- 3.实验过程中我的实际执行结果是(注意可能会超时,多试几次就好)
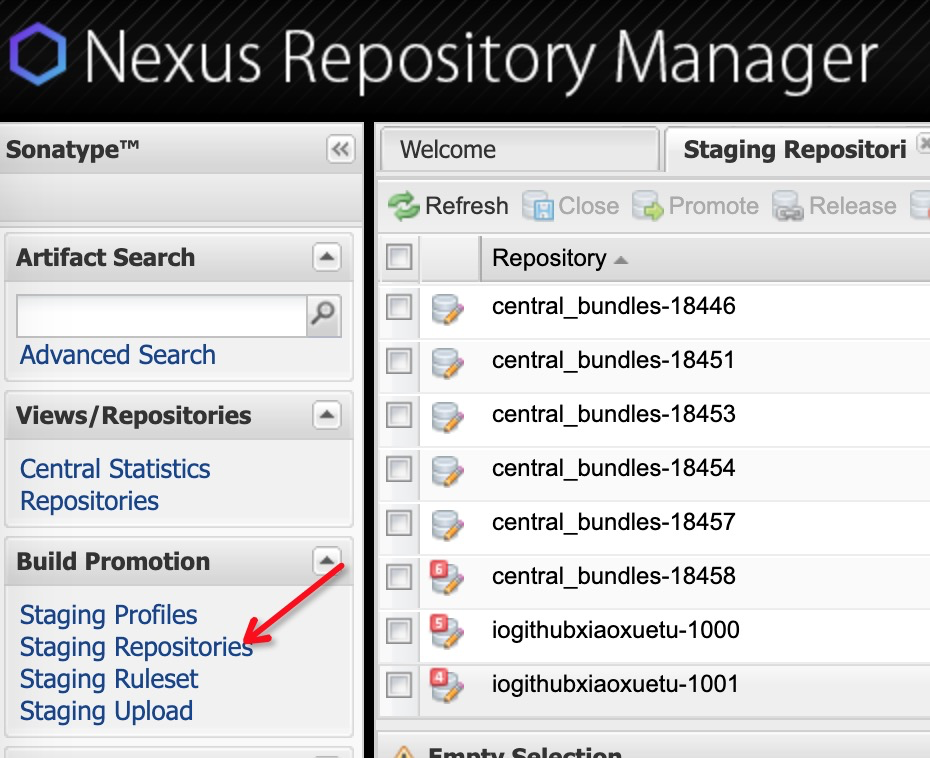
2> 登录https://oss.sonatype.org,然后选择staging Repositories
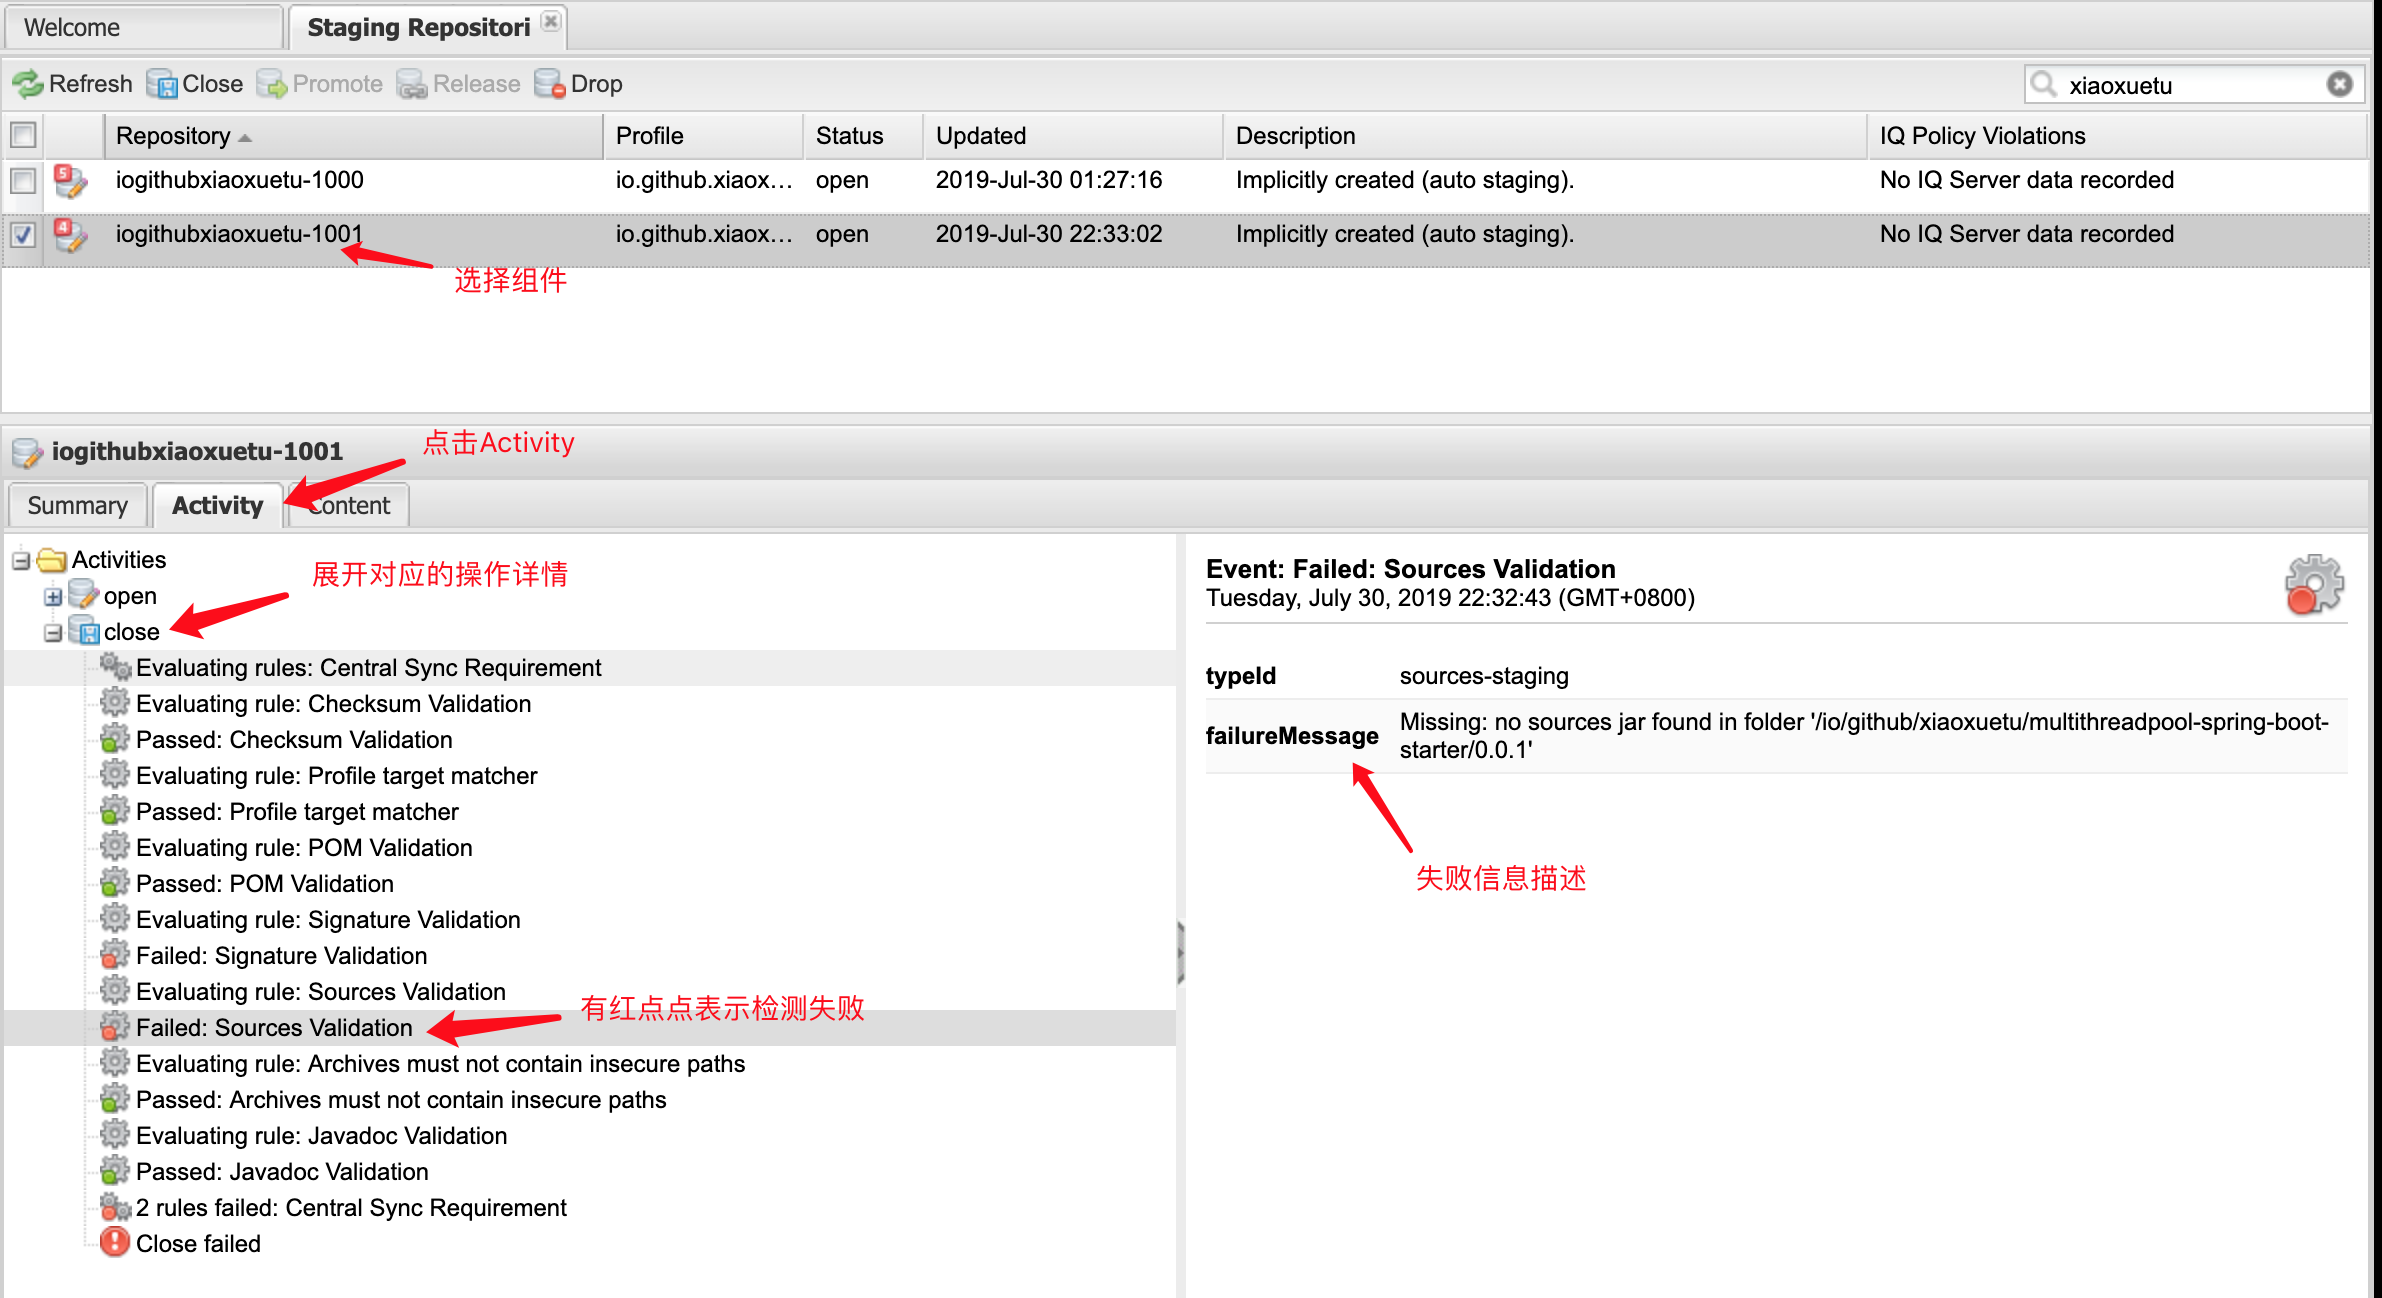
3> 如下图搜索并选择需要发布的组件,依次执行Close、Release操作

4> 如果Release成功,并且你是首次发布组件,则需要到你创建到issue中回复 “我已经成功发布该组件”,经历大概2小时后,该组件将会同步到对应的maven仓库 。
5> 如果Close或者Release不成功,你可以如下图操作查看原因并谷歌定位,或者回复咨询
6、>查找开源库
注意开源库发布出去之后,还是需要等待一段时间,才能在这里 https://search.maven.org/ 查找我们的开源库,以及查看如何依赖自己的开源库。
查看仓库文件:https://search.maven.org/artifact/center.wxp/mybatis.mapper
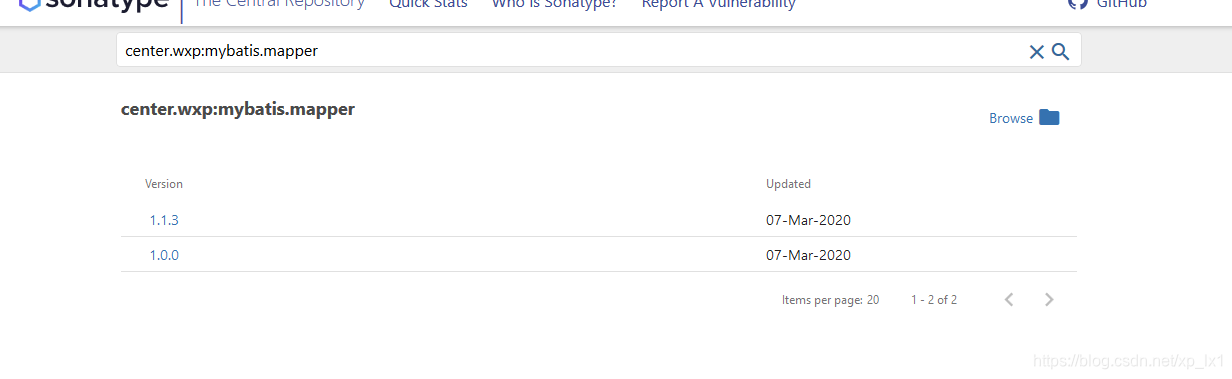
这里能够看到文件说明打包成功。 然后在项目中使用看下能不能从中央仓库下载,如果可以那就大功告成。
四、遇到问题总结:
1>Maven javaDoc plugin 乱码解决方案,
参考解决博文:https://blog.csdn.net/crazymakercircle/article/details/80259251
2>maven nexus-stagin 发布超时,多发布几次,或者在页面手动上传。
参考解决博文:https://www.cnblogs.com/alterhu/p/5790266.html
3>在 IntelliJ IDEA 中,pom.xml 里的插件找不到并报红,解决办法
- 1、手动下载:
mvn dependency:get -DrepoUrl=http://repo.maven.apache.org/maven2/ -Dartifact=org.apache.maven.plugins:maven-gpg-plugin:1.6- 2、在 IntelliJ IDEA 中更新
Indexed Maven Repositories
步骤: IntelliJ IDEA -> Preferences -> Build,Execution,Deployment -> Build Tools -> Mavne -> Repositories -> Remote URL -> Update。
参考解决博文:https://segmentfault.com/a/1190000009450347
4>Unable to execute gpg command: Error while executing process. Cannot run program "gpg": CreateProcess error=2, 系统找不到指定的文件
解决办法:使用dos进入项目目录 cd /d D:\StudyPlace\log-spring-boot-starter。
在target文件下有如下三个文件:

将pom.xml复制到target文件下并修改成log-spring-boot-starter-1.0.0.pom 。

使用如下命令在进行手动打包生成.asc签名文件。
mvn gpg:sign-and-deploy-file -DpomFile=target/log-spring-boot-starter-1.0.0.pom -Dfile=target/log-spring-boot-starter-1.0.0.jar -Durl=http://oss.sonatype.org/service/local/staging/deploy/maven2/ -DrepositoryId=oss
mvn gpg:sign-and-deploy-file -DpomFile=target/log-spring-boot-starter-1.0.0.pom -Dfile=target/log-spring-boot-starter-1.0.0-sources.jar -Durl=http://oss.sonatype.org/service/local/staging/deploy/maven2/ -DrepositoryId=oss
mvn gpg:sign-and-deploy-file -DpomFile=target/log-spring-boot-starter-1.0.0.pom -Dfile=target/log-spring-boot-starter-1.0.0-javadoc.jar -Durl=http://oss.sonatype.org/service/local/staging/deploy/maven2/ -DrepositoryId=oss
最后生成如下总共8文件:
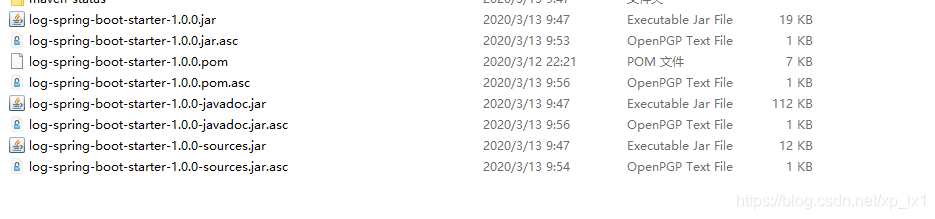 这样通过gpg生成签名文件成功,然后通过手动上传发布到中央仓库即可。
五、参考文档
发布构件到Maven中央仓库:https://blog.csdn.net/xiajiqiu/article/details/77610765
Maven中央仓库发布历程:https://www.cnblogs.com/exmyth/p/11567579.html
发布maven项目至中央仓库终极教程与疑难问题汇总解决帖:https://blog.csdn.net/u013407099/article/details/85851113
发布jar包到maven中央仓库(个人域名):https://blog.csdn.net/feiyangtianyao/article/details/87878253
使用Nexus和mvn deploy:deploy-file上传文件到中央库(Maven仓库):https://blog.csdn.net/shi2huang/article/details/80054713
中央仓库官方文档:https://help.sonatype.com/repomanager2/staging-releases/configuring-your-project-for-deployment


 1339
1339

 被折叠的 条评论
为什么被折叠?
被折叠的 条评论
为什么被折叠?
 到【灌水乐园】发言


