


总图
JDBC获取连接
DriverManager.getConnection(url, username, password);

//getConnection 方法
 private static Connection getConnection(
        String url, java.util.Properties info, Class<?> caller) throws SQLException {
        /*
         * When callerCl is null, we should check the application's
         * (which is invoking this class indirectly)
         * classloader, so that the JDBC driver class outside rt.jar
         * can be loaded from here.
         */
        ClassLoader callerCL = caller != null ? caller.getClassLoader() : null;
        synchronized(DriverManager.class) {
            // synchronize loading of the correct classloader.
            if (callerCL == null) {
                callerCL = Thread.currentThread().getContextClassLoader();
            }
        }

        if(url == null) {
            throw new SQLException("The url cannot be null", "08001");
        }

        println("DriverManager.getConnection(\"" + url + "\")");

        // Walk through the loaded registeredDrivers attempting to make a connection.
        // Remember the first exception that gets raised so we can reraise it.
        SQLException reason = null;

        for(DriverInfo aDriver : registeredDrivers) {
            // If the caller does not have permission to load the driver then
            // skip it.
            if(isDriverAllowed(aDriver.driver, callerCL)) {
                try {
                    println("    trying " + aDriver.driver.getClass().getName());
                    Connection con = aDriver.driver.connect(url, info);
                    if (con != null) {
                        // Success!
                        println("getConnection returning " + aDriver.driver.getClass().getName());
                        return (con);
                    }
                } catch (SQLException ex) {
                    if (reason == null) {
                        reason = ex;
                    }
                }

            } else {
                println("    skipping: " + aDriver.getClass().getName());
            }

        }

        // if we got here nobody could connect.
        if (reason != null)    {
            println("getConnection failed: " + reason);
            throw reason;
        }

        println("getConnection: no suitable driver found for "+ url);
        throw new SQLException("No suitable driver found for "+ url, "08001");
    }
逻辑大致就是获取所有的Driver,然后调用Driver的connect方法获取连接。mysql驱动的Driver代码如下:
public class Driver extends NonRegisteringDriver implements java.sql.Driver {
    public Driver() throws SQLException {
    }

    static {
        try {
            DriverManager.registerDriver(new Driver());
        } catch (SQLException var1) {
            throw new RuntimeException("Can't register driver!");
        }
    }
}
也就是说在MySQL中connect方法在父类中,查看父类NonRegisteringDriver的connect方法,方法代码如下:
    public Connection connect(String url, Properties info) throws SQLException {
        try {
            try {
                if (!ConnectionUrl.acceptsUrl(url)) {
                    return null;
                } else {
                    ConnectionUrl conStr = ConnectionUrl.getConnectionUrlInstance(url, info);
                    switch(conStr.getType()) {
                    case SINGLE_CONNECTION:
                        return ConnectionImpl.getInstance(conStr.getMainHost());
                    case FAILOVER_CONNECTION:
                    case FAILOVER_DNS_SRV_CONNECTION:
                        return FailoverConnectionProxy.createProxyInstance(conStr);
                    case LOADBALANCE_CONNECTION:
                    case LOADBALANCE_DNS_SRV_CONNECTION:
                        return LoadBalancedConnectionProxy.createProxyInstance(conStr);
                    case REPLICATION_CONNECTION:
                    case REPLICATION_DNS_SRV_CONNECTION:
                        return ReplicationConnectionProxy.createProxyInstance(conStr);
                    default:
                        return null;
                    }
                }
            } catch (UnsupportedConnectionStringException var5) {
                return null;
            } catch (CJException var6) {
                throw (UnableToConnectException)ExceptionFactory.createException(UnableToConnectException.class, Messages.getString("NonRegisteringDriver.17", new Object[]{var6.toString()}), var6);
            }
        } catch (CJException var7) {
            throw SQLExceptionsMapping.translateException(var7);
        }
    }
其逻辑就是根据url字符串判断创建什么样的连接。这里面包括了单连接、负载均衡模式下的连接代理、主从模式下的连接代理。至此连接就创建好了。
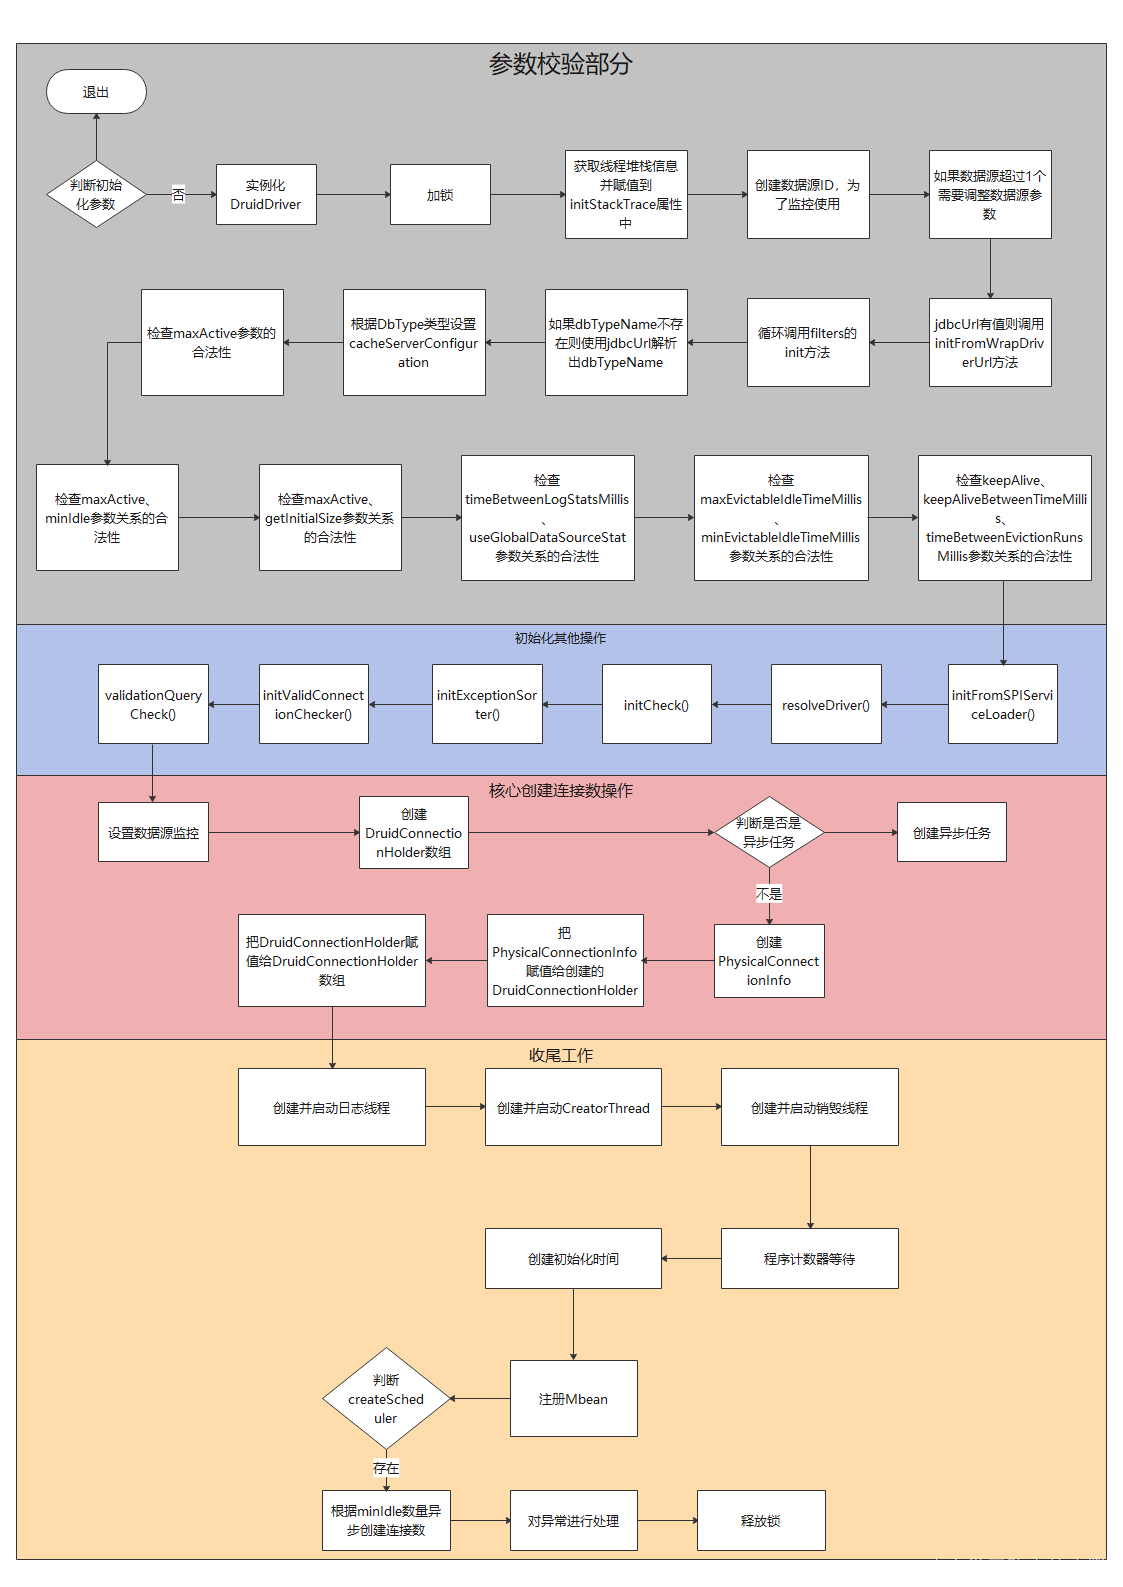
Druid中init方法创建连接
直接创建
init方法,如果是非异步init则会直接创建连接。代码如下:
             while (poolingCount < initialSize) {
                    try {
                        PhysicalConnectionInfo pyConnectInfo = createPhysicalConnection();
                        DruidConnectionHolder holder = new DruidConnectionHolder(this, pyConnectInfo);
                        connections[poolingCount++] = holder;
                    } catch (SQLException ex) {
                        LOG.error("init datasource error, url: " + this.getUrl(), ex);
                        if (initExceptionThrow) {
                            connectError = ex;
                            break;
                        } else {
                            Thread.sleep(3000);
                        }
                    }
                }

                if (poolingCount > 0) {
                    poolingPeak = poolingCount;
                    poolingPeakTime = System.currentTimeMillis();
                }
关键方法就是createPhysicalConnection方法。根据名字可以判断是创建物理连接信息。关键代码如下:
 public Connection createPhysicalConnection(String url, Properties info) throws SQLException {
        Connection conn;
        if (getProxyFilters().size() == 0) {
            conn = getDriver().connect(url, info);
        } else {
            conn = new FilterChainImpl(this).connection_connect(info);
        }

        createCountUpdater.incrementAndGet(this);

        return conn;
    }
是调用的驱动的connect方法。这里就和jdbc方式对应上了。
而PhysicalConnectionInfo类是Druid定义的,除了数据库连接意外还包括了其他一些辅助功能的参数对象。从上面init逻辑中也能看出,创建的PhysicalConnectionInfo对象被封装放到了holder对象中。同时把holder对象赋值给了数组。由此可以看出DruidConnectionHolder 对象是Durid中的一个关键对象。
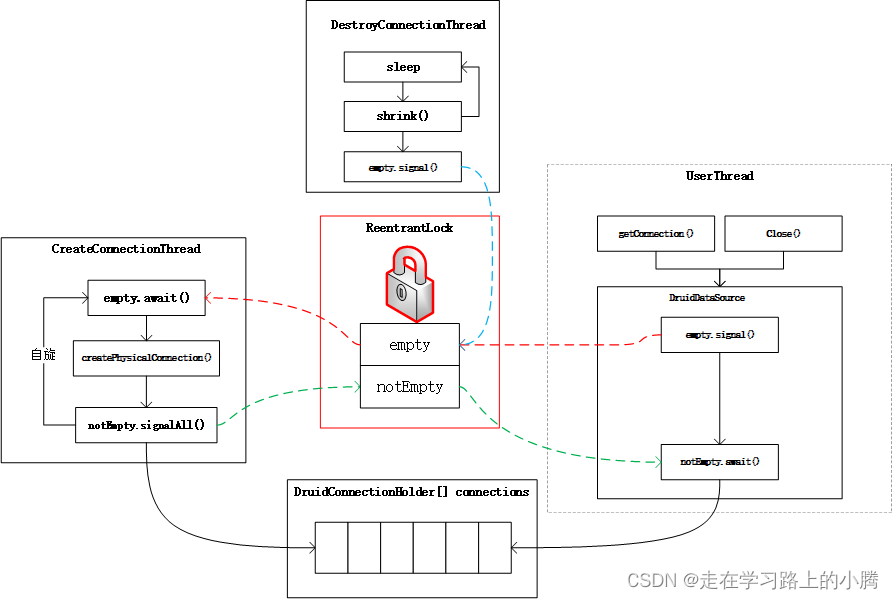
异步创建
异步方法这里就要分析如下的代码:
       createAndLogThread();
       createAndStartCreatorThread();
       createAndStartDestroyThread();
这里使用到了线程,虽然核心逻辑还是创建连接、销毁连接。就是上面的逻辑。但是这里面使用了多线程的计数器、锁、以及条件控制来实现了DruidConnectionHolder数组的生产与消费。关键类如下:
    protected ReentrantLock                            lock;
    protected Condition                                notEmpty;
    protected Condition                                empty;
    private final CountDownLatch             initedLatch               = new CountDownLatch(2);
核心逻辑可以参考下图:
总结:
1.获取连接最终还是使用了数据驱动中类来创建物理连接,Druid把这个物理连接封装到了自己的对象中。
2.在使用多线程时,ReentrantLock 与 Condition 配合可以实现一个生产者/消费者模式。


 768
768


 被折叠的 条评论
为什么被折叠?
被折叠的 条评论
为什么被折叠?
 到【灌水乐园】发言


