


使用 Spring Boot 的多模块项目
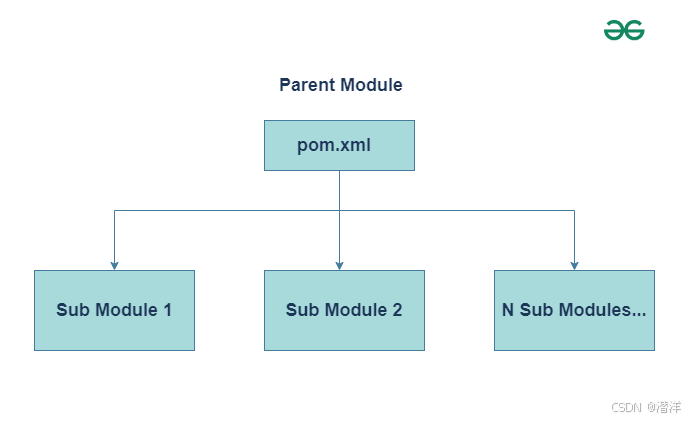
Spring Boot 的多模块项目是指将多个模块或子项目组织在一个父项目下的项目结构。每个模块可以代表应用程序的不同组件、功能或层,从而实现更好的组织、可维护性和代码重用。简而言之,我们可以说,包含嵌套 Maven 项目的Spring Boot 项目通常称为多模块项目。
在Spring Boot多模块项目中,应用程序被分为多个模块,每个模块在应用程序的某些功能中都发挥着重要作用。模块可以被视为独立项目或子项目。在本文中,我们将讨论如何使用 Spring Boot 创建多模块项目。
注意:多模块项目只是一组多个项目,每个项目都有各自的功能。
Spring Boot 多模块项目的工作原理
- 创建父模块
- 首先,您必须创建一个父模块。
- 父模块充当子模块的容器。
- 另外,您可以使用父模块来引导应用程序(main()方法)。
- 或者,您也可以通过实现 main() 方法来引导应用程序并从父模块中删除 main() 方法来使用任何子模块。
- 配置父模块
- 你的父模块应该有pom包装而不是jar和war。
- 当您创建子模块时,所有子模块都会在父模块的 pom.xml 中的<modules>标签中列出。
- Inheritance
- 您在父模块的 pom.xml 中列出的所有依赖项将自动被子模块直接继承。
- 因此,您不需要向子模块的 pom.xml 中添加依赖项来使用它们。
在 Spring Boot 中创建多模块项目的步骤
- 步骤 1:创建一个简单的 Spring Starter 项目(File -> New -> Spring Starter Project -> Next -> ( Select Dependencies ) -> Next -> Finish)
- 步骤 2:更改或添加<packaging>pom</packaging>
- 步骤 3:添加子模块(Right click on Parent Module -> New -> other -> Maven -> Maven Module -> Next ( Select both checkboxes ) -> Next -> jar or war -> Finish)。
- 步骤4:创建子模块后,父模块将包含子模块的文件夹,并且还将创建已创建的各个子模块的独立项目。
步骤 1:创建父模块
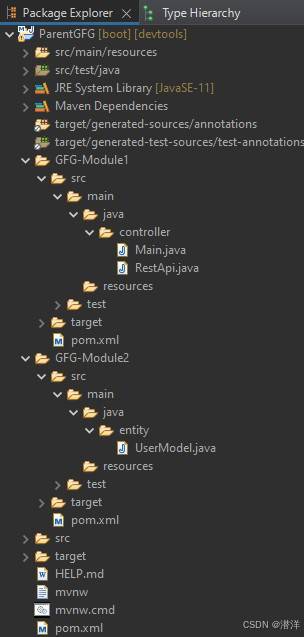
ParentGFG – 父模块
现在,我们将使用 Maven 依赖项创建一个简单的父模块,并将 pom 打包到聚合库和应用程序模块。
pom包装:
  <groupId>sia</groupId>
     <artifactId>ParentGFG</artifactId>
     <version>0.0.1-SNAPSHOT</version>
  <packaging>pom</packaging>
pom.xml(配置):
XML
<?xml version="1.0" encoding="UTF-8"?>
<project xmlns="http://maven.apache.org/POM/4.0.0"
         xmlns:xsi="http://www.w3.org/2001/XMLSchema-instance"
         xsi:schemaLocation="http://maven.apache.org/POM/4.0.0
                             https://maven.apache.org/xsd/maven-4.0.0.xsd">
    <modelVersion>4.0.0</modelVersion>
    <parent>
        <groupId>org.springframework.boot</groupId>
        <artifactId>spring-boot-starter-parent</artifactId>
        <version>2.6.3</version>
        <relativePath/> <!-- lookup parent from repository -->
    </parent>
    <groupId>sia</groupId>
    <artifactId>ParentGFG</artifactId>
    <version>0.0.1-SNAPSHOT</version>
    <packaging>pom</packaging>
    <name>ParentGFG</name>
    <description>Multi Module Project</description>
    <properties>
        <java.version>11</java.version>
    </properties>
    <dependencies>
        <dependency>
            <groupId>org.springframework.boot</groupId>
            <artifactId>spring-boot-starter-thymeleaf</artifactId>
        </dependency>
        <dependency>
            <groupId>org.springframework.boot</groupId>
            <artifactId>spring-boot-starter-web</artifactId>
        </dependency>

        <dependency>
            <groupId>org.springframework.boot</groupId>
            <artifactId>spring-boot-devtools</artifactId>
            <scope>runtime</scope>
            <optional>true</optional>
        </dependency>
        <dependency>
            <groupId>org.projectlombok</groupId>
            <artifactId>lombok</artifactId>
            <optional>true</optional>
        </dependency>
        <dependency>
            <groupId>org.springframework.boot</groupId>
            <artifactId>spring-boot-starter-test</artifactId>
            <scope>test</scope>
        </dependency>
    </dependencies>

    <build>
        <plugins>
            <plugin>
                <groupId>org.springframework.boot</groupId>
                <artifactId>spring-boot-maven-plugin</artifactId>
                <configuration>
                    <excludes>
                        <exclude>
                            <groupId>org.projectlombok</groupId>
                            <artifactId>lombok</artifactId>
                        </exclude>
                    </excludes>
                </configuration>
            </plugin>
        </plugins>
    </build>

    <modules>
        <module>GFG-Module1</module>
        <module>GFG-Module2</module>
    </modules>
</project>
笔记:
- 在使用 jar 或 war 打包创建 Spring Starter Project 后,请确保使用“pom”->“<packaging>pom</packaging>”添加或更改“packaging”标签。
- 当您创建子模块时,“模块”标签将自动生成并添加相应的模块。
- 您还可以在任何子模块中实现 main() 方法后从父模块中删除“src”文件夹,因为父模块也可以充当容器。
第 2 步:创建子模块
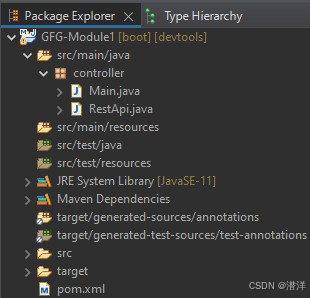
GFG-Module1::
现在,我们将创建一个名为GFG-Module1的子模块。
pom.xml(配置):
- 声明该子模块将成为其一部分的父模块。
- 该子模块的信息标签也同样被初始化。
XML
<project xmlns="http://maven.apache.org/POM/4.0.0"
         xmlns:xsi="http://www.w3.org/2001/XMLSchema-instance"
         xsi:schemaLocation="http://maven.apache.org/POM/4.0.0
                             https://maven.apache.org/xsd/maven-4.0.0.xsd">
  <modelVersion>4.0.0</modelVersion>
  <parent>
    <groupId>sia</groupId>
    <artifactId>ParentGFG</artifactId>
    <version>0.0.1-SNAPSHOT</version>
  </parent>
  <artifactId>GFG-Module1</artifactId>
  <name>GFG-Module1</name>
  <description>GeeksforGeeks</description>
</project>
步骤 3:创建主应用程序类
Main.java(应用程序的引导)
Java
package controller;
import org.springframework.boot.SpringApplication;
import org.springframework.boot.autoconfigure.SpringBootApplication;
@SpringBootApplication
public class Main {
public static void main(String[] args)
{
SpringApplication.run(Main.class, args);
}
}
步骤 4:创建 REST 控制器
RestApi.java(应用程序的端点)
- 此类使用从父模块的 pom.xml 自动继承的“Starter Web”依赖项。
- 该控制器类接受HTTP请求。
- 这里,HTTP GET 请求由 get() 方法接受。
- 此方法使用在子模块 (GFG-Module2) 中创建并声明的实体类。
- 要从不同的模块导入类等,您必须将鼠标悬停在红色错误下线上。
- 单击->“修复项目设置”并选择您在其中创建类的相应子模块。
Java
package controller;
import entity.UserModel;
import org.springframework.web.bind.annotation.GetMapping;
import org.springframework.web.bind.annotation.RequestMapping;
import org.springframework.web.bind.annotation.RestController;
@RestController
@RequestMapping("/get")
public class RestApi {
@GetMapping public UserModel get()
{
UserModel entity = new UserModel();
entity.setId("1");
entity.setName("Darshan.G.Pawar");
entity.setEmail("geek@geek");
entity.setPincode("422 009");
return entity;
}
}
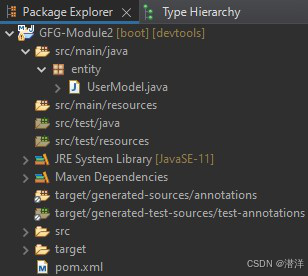
GFG-Module2:
pom.xml(配置)
XML
<project xmlns="http://maven.apache.org/POM/4.0.0"
         xmlns:xsi="http://www.w3.org/2001/XMLSchema-instance"
         xsi:schemaLocation="http://maven.apache.org/POM/4.0.0
                             https://maven.apache.org/xsd/maven-4.0.0.xsd">
  <modelVersion>4.0.0</modelVersion>
  <parent>
    <groupId>sia</groupId>
    <artifactId>ParentGFG</artifactId>
    <version>0.0.1-SNAPSHOT</version>
  </parent>
  <artifactId>GFG-Module2</artifactId>
  <name>GFG-Module2</name>
  <description>GeeksforGeeks</description>
</project>
步骤 5:在另一个模块中创建实体类
UserModel.java(用户数据实体类)
- 该类表示用户实体类,已经被RestApi.java类的get()方法使用。
- 该类需要所有实例变量字段的一组重要的 Getter 和 Setter 方法。
- 此类使用“Lombok”依赖项,它是从父模块的 pom.xml 自动继承的。
- 因此使用Lombok库的' @Data '注解在运行时自动生成Getter和Setter方法。
- 注释' @RequiredArgsConstructor '用于为类的必需(其中约束为' @NonNull')或最终字段自动生成构造函数。
- 如果类不包含字段,则' @RequiredArgsConstructor '注释将充当' @NoArgsConstructor '注释,创建零参数构造函数。
Java
package entity;
import lombok.Data;
import lombok.RequiredArgsConstructor;
@Data
@RequiredArgsConstructor
public class UserModel {
String id;
String name;
String email;
String pincode;
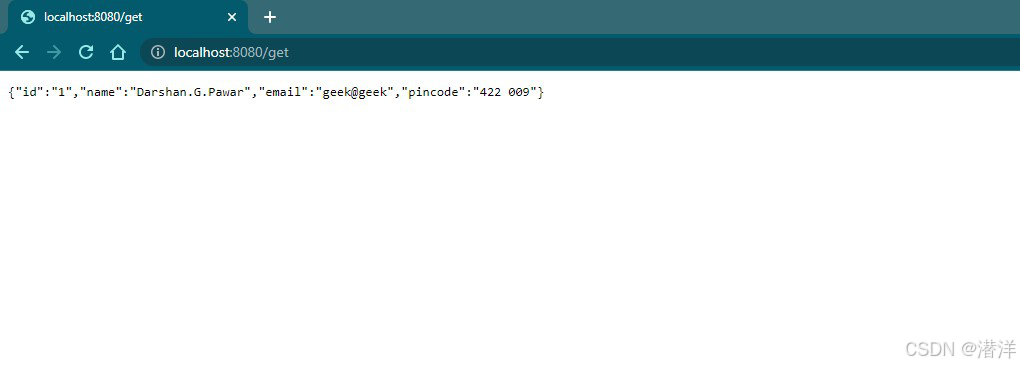
输出:
GFG-Module1的RestApi.java
- GFG-Module2(子模块)声明一个实体(数据)对象。
- 该数据用于 GFG-Module1(子模块)的 RESTful API 返回的响应主体中。
注意:您必须运行 GFG-Module1 作为 main() 方法,并且控制器类位于此子模块中。
多模块项目的优势
- 它提供了仅使用单个命令即可构建所有子模块的强大功能。
- 我们可以从父模块运行构建命令。
- 在构建应用程序时,构建系统会负责构建顺序。
- 应用程序的部署变得非常方便和灵活。
- 此外,不同项目的各个模块的代码可以重复使用。
- 最后但并非最不重要的一点是,借助多模块项目架构,我们可以从微服务架构中获益。


 被折叠的 条评论
为什么被折叠?
被折叠的 条评论
为什么被折叠?
 到【灌水乐园】发言


