


前言
本章要讲解的Maven在项目中划分模块上的应用,用到上文中提到的继承和聚合,来减少重复,通过各个模块的划分,提高灵活性,以求达到高内聚,低耦合的效果。以下将会以一个Web项目为例来进行说明。
模块的划分
我们在开发web项目时,会将项目分成3层架构:
- Dao层负责数据库交互,封装了与数据库交互的类。
- Service层处理业务逻辑,放一些Service接口。
- Web层负责与客户端交互,主要有一些Structs的Action类。
- Utils类负责一些工具类,供其它层次调用。
我们使用包来分割,包之间单项调用,各个模块对应的包名
edu.fudan.app.dao
edu.fudan.app.Service
edu.fudan.app.Web
edu.fudan.qpp.Utils
通过这3个层次的划分,实现了3个模块的高内聚,以及模块间的低耦合,但是对于构建层次来说,所有东西还是耦合在一起的。(需要同时,一起构建)
这样在开发的过程中就会出现一些问题:
1 随着项目的增大,编译整个项目的时间会很长,即使你只需要负责Web这个模块的开发,也必须每次都编译整个项目。
2 项目的某个模块可能需要专门的人员进行处理,并不是任何程序员都可以 进行修改,比如Utils工具集合,可能需要专门的维护,最终成为公司中独立的一个框架,供其它所有项目调用。
具体实现
实现的思路
- app-parent(pom.xml,pom 打包方式)
- app-dao ( pom.xml , jar 打包方式 )
- app-service ( pom.xml ,jar 打包方式 )
- app-utils ( pom.xml , jar 打包方式 )
- app-web (pom.xml ,war打包方式)
依赖关系:(->表示依赖于)
app-dao->app-utils
app-service->app-dao
app-web->app-service
parent中pom中利用<modules>聚合了其他的子模块来实现一键编译
各个子模块中使用<parent> 来继承父类来消除重复
这样也可以使项目的各个解决上述构建中的问题。
实现步骤
1 按照上面给出的项目划分,建立起各个项目,其中app-web是web类型的项目。
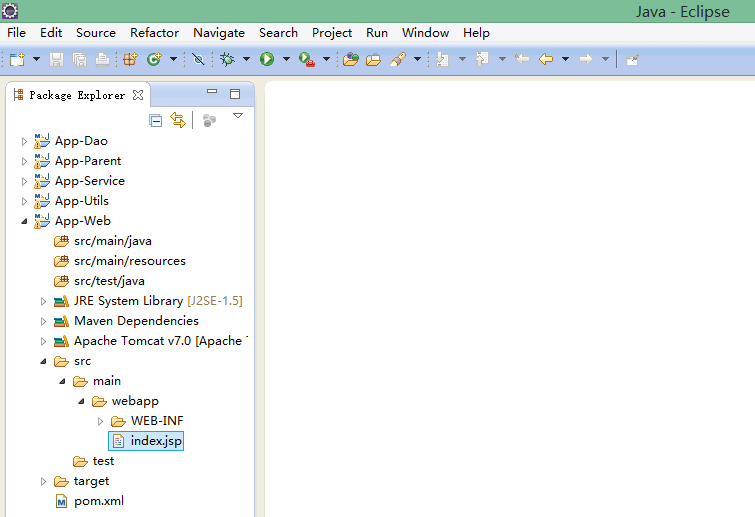
如上所示,即为建好的项目目录
2 按照继承和聚合,来修改各个项目的pom文件
1 修改Parent的pom.xml
```
<project xmlns="http://maven.apache.org/POM/4.0.0" xmlns:xsi="http://www.w3.org/2001/XMLSchema-instance"
xsi:schemaLocation="http://maven.apache.org/POM/4.0.0 http://maven.apache.org/xsd/maven-4.0.0.xsd">
<modelVersion>4.0.0</modelVersion>
<groupId>edu.fudan</groupId>
<artifactId>App-Parent</artifactId>
<version>0.0.1-SNAPSHOT</version>

<!-- 此处打包方式必须为pom -->
<packaging>pom</packaging>

<!-- 此处可以项目的信息,会显示在生成的文档中 -->
<name>App-Parent</name>

<!-- 聚合整个项目的所有模块 -->
<modules>
    <module>../App-Utils</module>
    <module>../App-Dao</module>
    <module>../App-Service</module>
    <module>../App-Web</module>
</modules>

<!-- 定义一些公共,容易修改的变量 -->
<properties>
    <project.build.sourceEncoding>UTF-8</project.build.sourceEncoding>
    <junit.version>4.9</junit.version>
    <pro.version>0.0.1-SNAPSHOT</pro.version>
</properties>

<!-- 此处定义依赖,dependencyManagement 中的 dependencies 元素只表明依赖项版本的优先选择,并不影响项目的依赖项 -->
<dependencyManagement>
    <dependencies>
        <dependency>
            <groupId>junit</groupId>
            <artifactId>junit</artifactId>
            <version>${junit.version}</version>
            <scope>test</scope>
        </dependency>
        <dependency>
            <groupId>edu.fudan</groupId>
            <artifactId>App-Utils</artifactId>
            <version>${pro.version}</version>
        </dependency>
        <dependency>
            <groupId>edu.fudan</groupId>
            <artifactId>App-Dao</artifactId>
            <version>${pro.version}</version>
        </dependency>
        <dependency>
            <groupId>edu.fudan</groupId>
            <artifactId>App-Service</artifactId>
            <version>${pro.version}</version>
        </dependency>
    </dependencies>
</dependencyManagement>
</project>`

2 修改Utils的pom.xml
<project xmlns="http://maven.apache.org/POM/4.0.0" xmlns:xsi="http://www.w3.org/2001/XMLSchema-instance"
xsi:schemaLocation="http://maven.apache.org/POM/4.0.0 http://maven.apache.org/xsd/maven-4.0.0.xsd">
<modelVersion>4.0.0</modelVersion>
<artifactId>App-Utils</artifactId>
<packaging>jar</packaging>
<name>App-Utils</name>

<!-- 此处为继承 -->
<parent>
    <groupId>edu.fudan</groupId>
    <artifactId>App-Parent</artifactId>
    <version>0.0.1-SNAPSHOT</version>
    <relativePath>../App-Parent/pom.xml</relativePath>
</parent>

<dependencies>
    <dependency>
        <groupId>junit</groupId>
        <artifactId>junit</artifactId>
        <!-- 此处无需写版本号,Parent中已经定义 -->
        <scope>test</scope>
    </dependency>
</dependencies>
</project>

3 修改Dao的pom.xml
<project xmlns="http://maven.apache.org/POM/4.0.0" xmlns:xsi="http://www.w3.org/2001/XMLSchema-instance"
xsi:schemaLocation="http://maven.apache.org/POM/4.0.0 http://maven.apache.org/xsd/maven-4.0.0.xsd">
<modelVersion>4.0.0</modelVersion>
<artifactId>App-Dao</artifactId>
<packaging>jar</packaging>
<name>App-Dao</name>

<!-- 此处为继承 -->
<parent>
    <groupId>edu.fudan</groupId>
    <artifactId>App-Parent</artifactId>
    <version>0.0.1-SNAPSHOT</version>
    <relativePath>../App-Parent/pom.xml</relativePath>
</parent>

<dependencies>
    <dependency>
        <groupId>junit</groupId>
        <artifactId>junit</artifactId>
        <scope>test</scope>
    </dependency>

    <dependency>
        <groupId>edu.fudan</groupId>
        <artifactId>App-Utils</artifactId>
    </dependency>
</dependencies>
</project>

4 修改Service的pom.xml
<project xmlns="http://maven.apache.org/POM/4.0.0" xmlns:xsi="http://www.w3.org/2001/XMLSchema-instance"
xsi:schemaLocation="http://maven.apache.org/POM/4.0.0 http://maven.apache.org/xsd/maven-4.0.0.xsd">
<modelVersion>4.0.0</modelVersion>
<artifactId>App-Service</artifactId>
<packaging>jar</packaging>
<name>App-Service</name>

<!-- 继承 -->
<parent>
    <groupId>edu.fudan</groupId>
    <artifactId>App-Parent</artifactId>
    <version>0.0.1-SNAPSHOT</version>
    <relativePath>../App-Parent/pom.xml</relativePath>
</parent>

<dependencies>
    <dependency>
        <groupId>junit</groupId>
        <artifactId>junit</artifactId>
        <scope>test</scope>
    </dependency>

    <dependency>
        <groupId>edu.fudan</groupId>
        <artifactId>App-Dao</artifactId>
    </dependency>
</dependencies>
</project>

5 修改web的pom.xml
<project xmlns="http://maven.apache.org/POM/4.0.0" xmlns:xsi="http://www.w3.org/2001/XMLSchema-instance"
xsi:schemaLocation="http://maven.apache.org/POM/4.0.0 http://maven.apache.org/maven-v4_0_0.xsd">
<modelVersion>4.0.0</modelVersion>
<artifactId>App-Web</artifactId>
<packaging>war</packaging>
<name>App-Web Maven Webapp</name>

<!--这里是继承Parent的pom文件 -->
<parent>
    <groupId>edu.fudan</groupId>
    <artifactId>App-Parent</artifactId>
    <version>0.0.1-SNAPSHOT</version>
    <relativePath>../App-Parent/pom.xml</relativePath>
</parent>
<dependencies>
    <dependency>
        <groupId>junit</groupId>
        <artifactId>junit</artifactId>
        <scope>test</scope>
    </dependency>

    <dependency>
        <groupId>edu.fudan</groupId>
        <artifactId>App-Service</artifactId>
    </dependency>
</dependencies>
<!-- 配置cargo自动部署到tomcat下面 -->
<build>
    <finalName>app</finalName>
    <plugins>
        <plugin>
            <groupId>org.codehaus.cargo</groupId>
            <artifactId>cargo-maven2-plugin</artifactId>
            <version>1.2.3</version>
            <configuration>
                <container>
                    <containerId>tomcat7x</containerId>
                    <home>D:/Tomcat7.0</home>
                </container>
                <configuration>
                    <type>existing</type>
                    <home>D:/Tomcat7.0</home>
                </configuration>
            </configuration>
            <executions>
                <execution>
                    <id>cargo-run</id>
                    <phase>install</phase>
                    <goals>
                        <goal>run</goal>
                    </goals>
                </execution>
            </executions>
        </plugin>
    </plugins>
</build>
</project>
这样的好处是:既可以在Parent中进行所有模块和依赖的版本的统一控 制,而且利用<dependencyManagement>子模块可以有选择行的继承,而不需要全部继承。
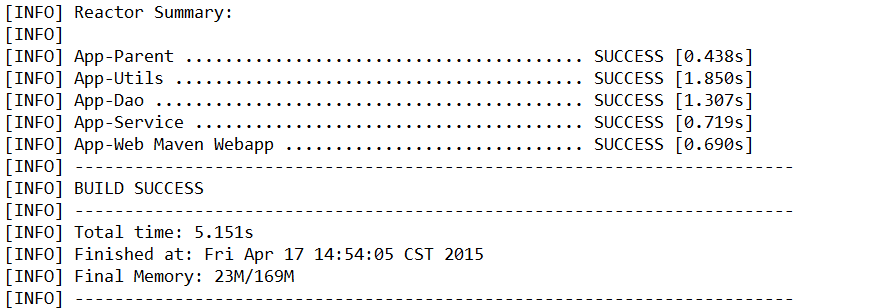
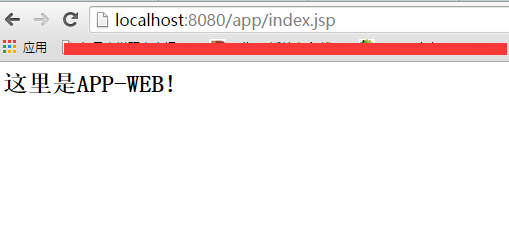
3 接下来就可以install,通过cargo自动部署到tomcat上
运行结果如下


 201
201

 被折叠的 条评论
为什么被折叠?
被折叠的 条评论
为什么被折叠?
 到【灌水乐园】发言


