


一、前言
Mysql的授权登录分为很多种,当设置权限允许远程登录后,会使得服务器中的mysql会在本地的第三方MySQL连接工具【如Navicat、SQLyog】进行可视化连接,在第三方软件下管理数据库。
二、MySQL的权限分类
1、全局——可以管理整个MySQL
2、库——可以管理指定的数据库
3、表——可以管理指定数据库的指定表
4、字段——可以管理指定数据库的指定表的指定字段
注:
权限相关的数据存储在mysql库的user,db,tables_priv, columns_priv, procs_priv这几个系统表中。待MySQL实例启动后就加载到内存中。
三、查看用户权限并授权用户权限
#1、进入mysql
#2、执行use mysql; 切换到mysql数据库中
use mysql;
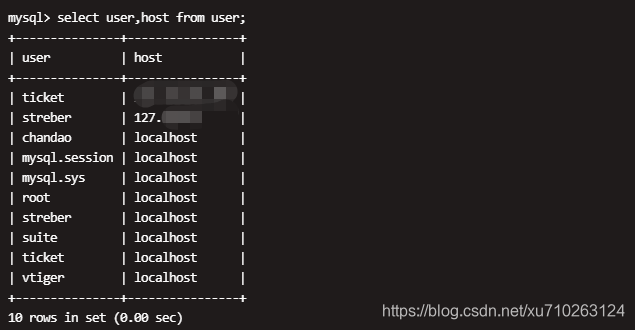
#3.查看所有用户【用户名、授权等】
select user,host from mysql.user;
#4、设置用户访问数据库权限
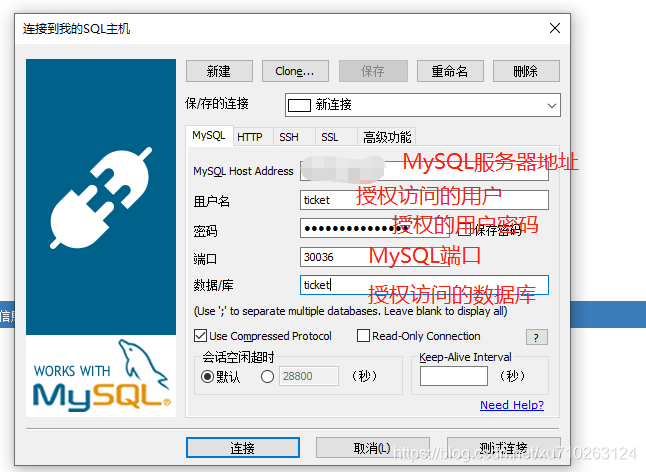
# 这里需要注意: 如果是局域网内访问mysql数据库中的表的话,该IP地址可设为该服务器内网IP,如果需要外部机器访问,则该IP地址为服务器的对外的外网IP。
grant all privileges on ticket.* to ticket@IP地址 identified by "123456" ; // 设置用户ticket,只能访问数据库ticket,其他数据库均不能访问 ;
#5、刷新授权:
flush privileges;
5、测试工具连接
可采用SQLyog测试
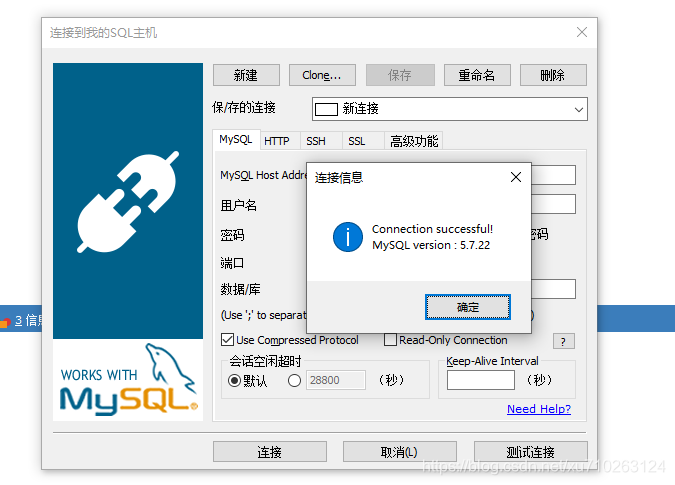
连接成功~~
四、MySQL的相关权限整理
1、创建新用户
通过root用户登录之后创建
grant all privileges on *.* to testuser@localhost identified by "123456" ;  //创建新用户,用户名为testuser,密码为123456;
grant all privileges on *.* to testuser@localhost identified by "123456" ;  // 设置用户testuser,可以在本地访问mysql
grant all privileges on *.* to testuser@"%" identified by "123456" ;   //  设置用户testuser,可以在远程访问mysql
flush privileges ;  //  mysql 新设置用户或更改密码后需用flush privileges刷新MySQL的系统权限相关表,否则会出现拒绝访问,还有一种方法,就是重新启动mysql服务器,来使新设置生效
2、设置用户访问数据库权限
grant all privileges on test_db.* to testuser@localhost identified by "123456" ;  // 设置用户testuser,只能访问数据库test_db,其他数据库均不能访问 ;
grant all privileges on *.* to testuser@localhost identified by "123456" ;  //  设置用户testuser,可以访问mysql上的所有数据库 ;
grant all privileges on test_db.user_infor to testuser@localhost identified by "123456" ;  //  设置用户testuser,只能访问数据库test_db的表user_infor,数据库中的其他表均不能访问 ;
3、设置用户操作权限
grant all privileges on *.* to testuser@localhost identified by "123456" WITH GRANT OPTION;  //设置用户testuser,拥有所有的操作权限,也就是管理员 ;
grant select on *.* to testuser@localhost identified by "123456" WITH GRANT OPTION;  //设置用户testuser,只拥有【查询】操作权限 ;
grant select,insert on *.* to testuser@localhost identified by "123456";  //设置用户testuser,只拥有【查询\插入】操作权限 ;
grant select,insert,update,delete on *.* to testuser@localhost identified by "123456"; //设置用户testuser,只拥有【查询\插入】操作权限 ;
REVOKE select,insert ON what FROM testuser  //取消用户testuser的【查询\插入】操作权限 ;
4、设置用户远程访问权限
grant all privileges on *.* to testuser@“192.168.1.100” identified by "123456" ; //设置用户testuser,只能在客户端IP为192.168.1.100上才能远程访问mysql ;
5、关于root用户的访问设置
设置所有用户可以远程访问mysql,修改my.cnf配置文件,将bind-address = 127.0.0.1前面加“#”注释掉,这样就可以允许其他机器远程访问本机mysql了;
grant all privileges on *.* to root@"%" identified by "123456" ;   //  设置用户root,可以在远程访问mysql
select host,user from user;   //查询mysql中所有用户权限
6、关闭root用户远程访问权限
delete from user where user="root" and host="%" ;  //禁止root用户在远程机器上访问mysql
flush privileges ;  //修改权限之后,刷新MySQL的系统权限相关表方可生效


 2687
2687

 被折叠的 条评论
为什么被折叠?
被折叠的 条评论
为什么被折叠?
 到【灌水乐园】发言


