


文章目录
linux@自动化换源等优化美化自动化操作脚本@oh my zsh安装@卸载与删除@vim@vi卸载与更新异常
references
信息检查和预备工作👌
查看发行版和内核版本号相关主题命令
自动化脚本部署/美化🎈
自动化脚本的使用提要👌
- 主要针对完整的Linux系统和WSL
- 某些免费的学习用的主机不提供
sudo等命令,只允许用户执行特定的命令 - 比如
AWS SageMaker Lab提供的资源主要用来运行notebook,执行一些深度学习的任务,但是缺失一些常用命令,比如man,sudo
- 某些免费的学习用的主机不提供
- 将脚本复制,并粘贴到新建文本文件中(可以用 vim/gedit/任意编辑器)
然后再该文件目录下执行- 直接复制粘贴可能导致各种异常
source yourFileName.sh
具体而言,比如您创建文件名为replaceAptSource.sh
那么运行:
source replaceAptSource.sh
- 直接复制粘贴可能导致各种异常
更换国内镜像源(Part1:optional)🎈
-
使用前提:
-
适配于debian系发行版
-
确保当前用户
sudo命令可用
-
换源脚本模板
- 不要直接使用
- 以kali-linux 更换国内镜像源(阿里源为例)
- 只提供流程参考
- 如果要使用,请打开编辑器,将[国内源部分]替换为自己的发行版的国内源
# 备份:backup the origin source.list(or just rename(use move command))
# 注意sources.list 不要拼错(带s)
cd /etc/apt
sudo mv sources.list sources.list.bak_bySh
# 切换到家目录,写入国内镜像源到一个文件中(文件名为sources.list),采用多行输入的方式写入
#这里以阿里源为例
cd ~
# 多行输入[国内源]
cat >sources.list <<EOF

deb https://mirrors.aliyun.com/kali kali-rolling main non-free contrib
deb-src https://mirrors.aliyun.com/kali kali-rolling main non-free contrib

EOF

#上面的EOF间的内容不要写入其他与源无关的内容(除了注释和源,其他命令不要写在里头)
# 检查写入的内容:
echo "check the conetent of the file 'source.list'"
## 将家目录下的sources.list 转移到/etc/apt目录下(sodu可以作用与mv/cp等命令,
## 但好像不可以直接作用与cat,所以没有直接在/etc/apt目录下创建新文件)
sudo mv sources.list /etc/apt
cat /etc/apt/sources.list
# 更新并使得apt配置文件生效
echo "updating the apt..."
sudo apt update


# 其他写法:探索中

# sourceCN="
# deb https://mirrors.aliyun.com/kali kali-rolling main non-free contrib
# deb-src https://mirrors.aliyun.com/kali kali-rolling main non-free contrib
# "
# echo $sourceCN
# sudo cat>>source.list<<EOF
# echo $sourceCN
# EOF
ubuntu 换源
- ubuntu | 镜像站使用帮助 | 清华大学开源软件镜像站 | Tsinghua Open Source Mirror
- ubuntu源by阿里
- 版本较多,操作类似,可以按阿里源那样一步步做,也可以将上述脚本中的源地址更换位对应版本的ubuntu源即可
- 这里以清华源的
21.10版本为例 - 其他版本将源地址群换为对应版本
通用版脚本
#  ubuntu 21.10更换国内镜像源(清华源为例)
# 备份:backup the origin source.list(or just rename(use move command))
# 注意sources.list 不要拼错(带s)
cd /etc/apt
sudo mv sources.list sources.list.bak_bySh
# 切换到家目录,写入国内镜像源到一个文件中(文件名为sources.list),采用多行输入的方式写入
#这里以阿里源为例
cd ~
# 多行输入
sudo tee >sources.list <<EOF
# 默认注释了源码镜像以提高 apt update 速度,如有需要可自行取消注释
deb https://mirrors.tuna.tsinghua.edu.cn/ubuntu/ impish main restricted universe multiverse
# deb-src https://mirrors.tuna.tsinghua.edu.cn/ubuntu/ impish main restricted universe multiverse
deb https://mirrors.tuna.tsinghua.edu.cn/ubuntu/ impish-updates main restricted universe multiverse
# deb-src https://mirrors.tuna.tsinghua.edu.cn/ubuntu/ impish-updates main restricted universe multiverse
deb https://mirrors.tuna.tsinghua.edu.cn/ubuntu/ impish-backports main restricted universe multiverse
# deb-src https://mirrors.tuna.tsinghua.edu.cn/ubuntu/ impish-backports main restricted universe multiverse
deb https://mirrors.tuna.tsinghua.edu.cn/ubuntu/ impish-security main restricted universe multiverse
# deb-src https://mirrors.tuna.tsinghua.edu.cn/ubuntu/ impish-security main restricted universe multiverse

# 预发布软件源,不建议启用
# deb https://mirrors.tuna.tsinghua.edu.cn/ubuntu/ impish-proposed main restricted universe multiverse
# deb-src https://mirrors.tuna.tsinghua.edu.cn/ubuntu/ impish-proposed main restricted universe multiverse

#结束文档
EOF

#上面的EOF间的内容不要写入其他与源无关的内容(除了注释和源,其他命令不要写在里头)
# 检查写入的内容:
echo "check the conetent of the file 'source.list'"
## 将家目录下的sources.list 转移到/etc/apt目录下(sodu可以作用与mv/cp等命令,
## 但好像不可以直接作用于cat,所以没有直接在/etc/apt目录下创建新文件)
sudo mv sources.list /etc/apt
cat /etc/apt/sources.list
# 更新并使得apt配置文件生效
echo "updating the apt..."
sudo apt update
简化版(从默认源替换为国内源)
将source.list 文件修改为清华源ubutun22
- (清华源为例,使用sed处理
/etc/apt/sources.list文件) - 仍然建议事先备份
sudo cp /etc/apt/sources.list /etc/apt/sources.list.bak文件
sudo sed -i "s@http://.*archive.ubuntu.com@https://mirrors.tuna.tsinghua.edu.cn@g" /etc/apt/sources.list
sudo sed -i "s@http://.*security.ubuntu.com@https://mirrors.tuna.tsinghua.edu.cn@g" /etc/apt/sources.list
- 执行刷新操作
sudo apt update
kali
- kali源by阿里
- 清华源kali
deb http://mirrors.tuna.tsinghua.edu.cn/kali kali-rolling main contrib non-free

deb-src https://mirrors.tuna.tsinghua.edu.cn/kali kali-rolling main contrib non-free
云服务器的源
- 阿里云服务器自己的源是配置的阿里自己的源
- 可以不做换源操作
- 但仍然应该做一次
sudo apt update,否则很多工具将无法install.
- 但仍然应该做一次
- ESC ubuntu实例创建的普通用户可能无法直接使用
sudo,这会导致脚本出错- 幸运的是,解决这个问题不负责,只需要切换到root用户补增执行
sudo adduser <userName> sudo(大致流程如下)
- 幸运的是,解决这个问题不负责,只需要切换到root用户补增执行
cxxu@iZ2zef3tpqffm5sdfaydsjqi4zsdsZ:/etc/apt$ su -
Password:
root@iZ2zef3tpqffsdfm5ysdfgdjdfsfqi4zsZ:~# sudo addusr cxxu sudo
sudo: addusr: command not found
root@iZ2zef3tpsdfqffasdm5ydjqi4zsZ:~# sudo adduser cxxu sudo
Adding user `cxxu' to group `sudo' ...
Adding user cxxu to group sudo
Done.
zsh:oh my zsh安装(part2)🎈
- Oh My Zsh - a delightful & open source framework for Zsh
- 以下两种安装方式,如果网络环境不好,容易失败
sh -c "$(curl -fsSL https://raw.githubusercontent.com/ohmyzsh/ohmyzsh/master/tools/install.sh)"sh -c "$(wget https://raw.githubusercontent.com/ohmyzsh/ohmyzsh/master/tools/install.sh -O -)"
国内推荐安装方式
# 工作目录设定为用户家目录
cd ~
sudo apt update
sudo apt install zsh curl git  man wget -y
wget https://gitee.com/mirrors/oh-my-zsh/raw/master/tools/install.sh
# 由于国内网络问题,可能需要多尝试几次一下source 命令才可以安装成功.(我将其注释掉,采用换源后再执行clone
#source install.sh
#本段代码将修改install.sh中的拉取源,以便您能够冲gitee上成功将需要的文件clone下来.


# 本段代码会再修改前做备份(备份文件名为install.shE)
sed '/(^remote)|(^repo)/I s/^#*/#/ ;
/^#*remote/I a\
REPO=${REPO:-mirrors/oh-my-zsh}\
REMOTE=${REMOTE:-https://gitee.com/${REPO}.git} ' -r ~/install.sh > gitee_install.sh
# 执行安装
source gitee_install.sh


#返回到脚本所在目录(以便执行新的脚本)
cd -
zsh安装失败问题
- 一般来说,重试一两次即可clone(install)成功
- 若始终无法clone下来,可以修改
install.sh中的特定几行,使其去拉取gitee上的文件
修改方案一(sed 自动修改)
- 鉴于sed对于bash的兼容性较好,最好将其拷贝到bash运行(而不建议用其他shell)
#本段代码将修改install.sh中的拉取源,以便您能够冲gitee上成功将需要的文件clone下来.
# 本段代码会再修改前做备份(备份文件名为install.shE)
sed '/(^remote)|(^repo)/I s/^#*/#/ ;
/^#*remote/I a\
REPO=${REPO:-mirrors/oh-my-zsh}\
REMOTE=${REMOTE:-https://gitee.com/${REPO}.git} ' -r  -iE ~/install.sh
# 执行安装
source install.sh
修改方案二(手工修改)
-
打开
install.sh文件修改如下部分:-
大概在40多行
-
推荐做法是,注释掉原来的两行
-
将下面的两行粘贴进去
-
REPO=${REPO:-mirrors/oh-my-zsh}
REMOTE=${REMOTE:-https://gitee.com/${REPO}.git}
-
拉取报错
-
对于某些环境(譬如我在ubuntu12 老版本上操作的时候,遇到安全设置问题)
-
错误如下:
-
Cloning Oh My Zsh...
fatal: unable to access 'https://gitee.com/mirrors/oh-my-zsh.git/': server certificate verification failed. CAfile: /etc/ssl/certs/ca-certificates.crt CRLfile: none
/home/cxxu
Error: git clone of oh-my-zsh repo failed
-
-
git config --global http.sslverify false -
尝试执行上述语句解决
uninstall oh-my-zsh🎈
-
如果你的
oh-my-zsh出现异常想要重装,可以尝试:
直接卸载
- 执行命令
uninstall_oh_my_zsh
手动卸载ohmyzsh
-
某些情况下(例如安装失败/错误/不完整安装),容易导致上述命令无法顺利运行
-
下方指令可以帮助您卸载
-
cd ~/.oh-my-zsh/tools
source uninstall.sh -y
# rm /home/.oh-my-zsh
oh-my-zsh 插件篇🎈
安装/修复vim(optional)
-
某些自带(vi/vim)会和vim 冲突,可以先卸载vi再安装vim
-
sudo apt remove vi;sudo apt install vim
vim/vi卸载与更新异常
-
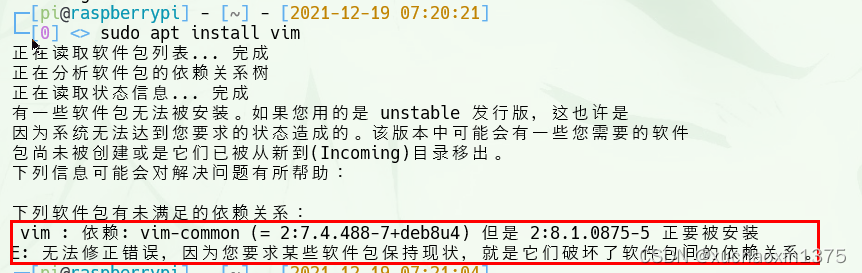
-
执行
sudo apt remove vim-common再次移除造成问题的原组件 -
重新执行安装
sudo apt install vim
for centOS install oh-my-zsh
# 工作目录设定为用户家目录
cd ~
sudo yum update
sudo yum install zsh curl git vim man wget -y
wget https://gitee.com/mirrors/oh-my-zsh/raw/master/tools/install.sh
# 由于国内网络问题,可能需要多尝试几次一下source 命令才可以安装成功.
source install.sh
#返回到脚本所在目录(以便执行新的脚本)
cd -
去除绿色背景(wsl)🎈
# dirColorSetting.sh
# remove the background color to improve the reading experience.
cat>> ~/.bashrc<<EOF
# remove the background color to improve the reading experience.
eval "$(dircolors -p | \
    sed 's/ 4[0-9];/ 01;/; s/;4[0-9];/;01;/g; s/;4[0-9] /;01 /' | \
    dircolors /dev/stdin)"

EOF
# 使得修改生效:
source ~/.bashrc
# 如果您使用zsh的话,请解开这一段注释,反之,则将其注释掉,防止错误

cat>> ~/.zshrc<<EOF
# remove the background color to improve the reading experience.
eval "$(dircolors -p | \
    sed 's/ 4[0-9];/ 01;/; s/;4[0-9];/;01;/g; s/;4[0-9] /;01 /' | \
    dircolors /dev/stdin)"

EOF
#使得修改生效
source ~/.zshrc


 1万+
1万+


 被折叠的 条评论
为什么被折叠?
被折叠的 条评论
为什么被折叠?
 到【灌水乐园】发言


