


背景:
网上各路资料都是浅层次的使用说明,即使是作为供他人使用的接口说明也是不合格的,所以还是得看看源码看官方文档。
Guice产生的源头
通常我们的一个Service 依赖多个其他的模块A,B,C, D,在Service里初始化这些A,B,C,D呢?大家都知道,搞UT的时候最麻烦最恶心的地方就是要考虑如何去Mock掉这些依赖,所以这样当然不是很好的方式。
那么通过setter来将它们设置进来呢?你会看到在实例化Service前有一大坨的对依赖的初始化代码。而且这些过程可能比较容易出错,比如你写的库给别人使用,其中的某个服务有较多的依赖,那么即使你写的很好的doc,而别人在使用的时候,会痛苦,最严重的是会出错。
那么Guice的作用就是 将依赖的处理也给默默的做了,那么在实例化服务的时候将会非常的清爽。
下面是SomeServices服务,其有两个依赖Depends2,Depends1
public class SomeServices {
    Depends2 depends2;
    @Inject
    Depends1 depends1;

    @Inject
    public SomeServices( Depends2 depends2) {
        this.depends2 = depends2;

    }

    public void start() {
        depends2.start();
        depends1.start();
    }
}
实例化SomeServices时候,只有简单的一行。
SomeServices someServices = Guice.createInjector(new SomeServicesModule()).getInstance(SomeServices.class);
Bindings
借助注解@Inject就能够将依赖给解决掉?这背后是如何实现的呢?
通过注解@Inject我们只知道依赖模块的类类型,也许他还是抽象类,离真正的解决依赖还有一段距离,那么就是通过Binding把这个差距给“连接”起来。
它在哪里实现
创建一个继承自AbstractModule的子类,然后实现configure方法。
Guice使用EDSL语言来使得创建bindings更简单可读性更好,
比如 bind ….to..
见:https://github.com/google/guice/wiki/Bindings
那么可以理解Bindings (实质就是对configure方法的实现过程)就是生成相应Injecter的一个配置。
那么RoboGuice又是?
RoboGuice 是Guice的扩展,增加了Android的支持。
从头说起,Guice跟Android平台无关,如果我们想使用一个fragment,他里面也是有很多依赖,依赖外界资源,依赖其他服务,依赖,依赖View组件,这堆依赖初始化也挺费事,直接用guice可以!但是你需要自己写Bindings, 比如@Inject Button btn;
那么RoboGuice就是帮你将Android平台下的Bindings给写好了。这就是他存在的意义。
继承RoboFragment?
那为什么没有见Guice.createInjector.getInstance之流?而是继承个RoboFragment?那么进入到RoboFragment中看看就明白了,在onCreate中
final RoboInjector injector = RoboGuice.getInjector(this);
injector.injectMembersWithoutViews(this);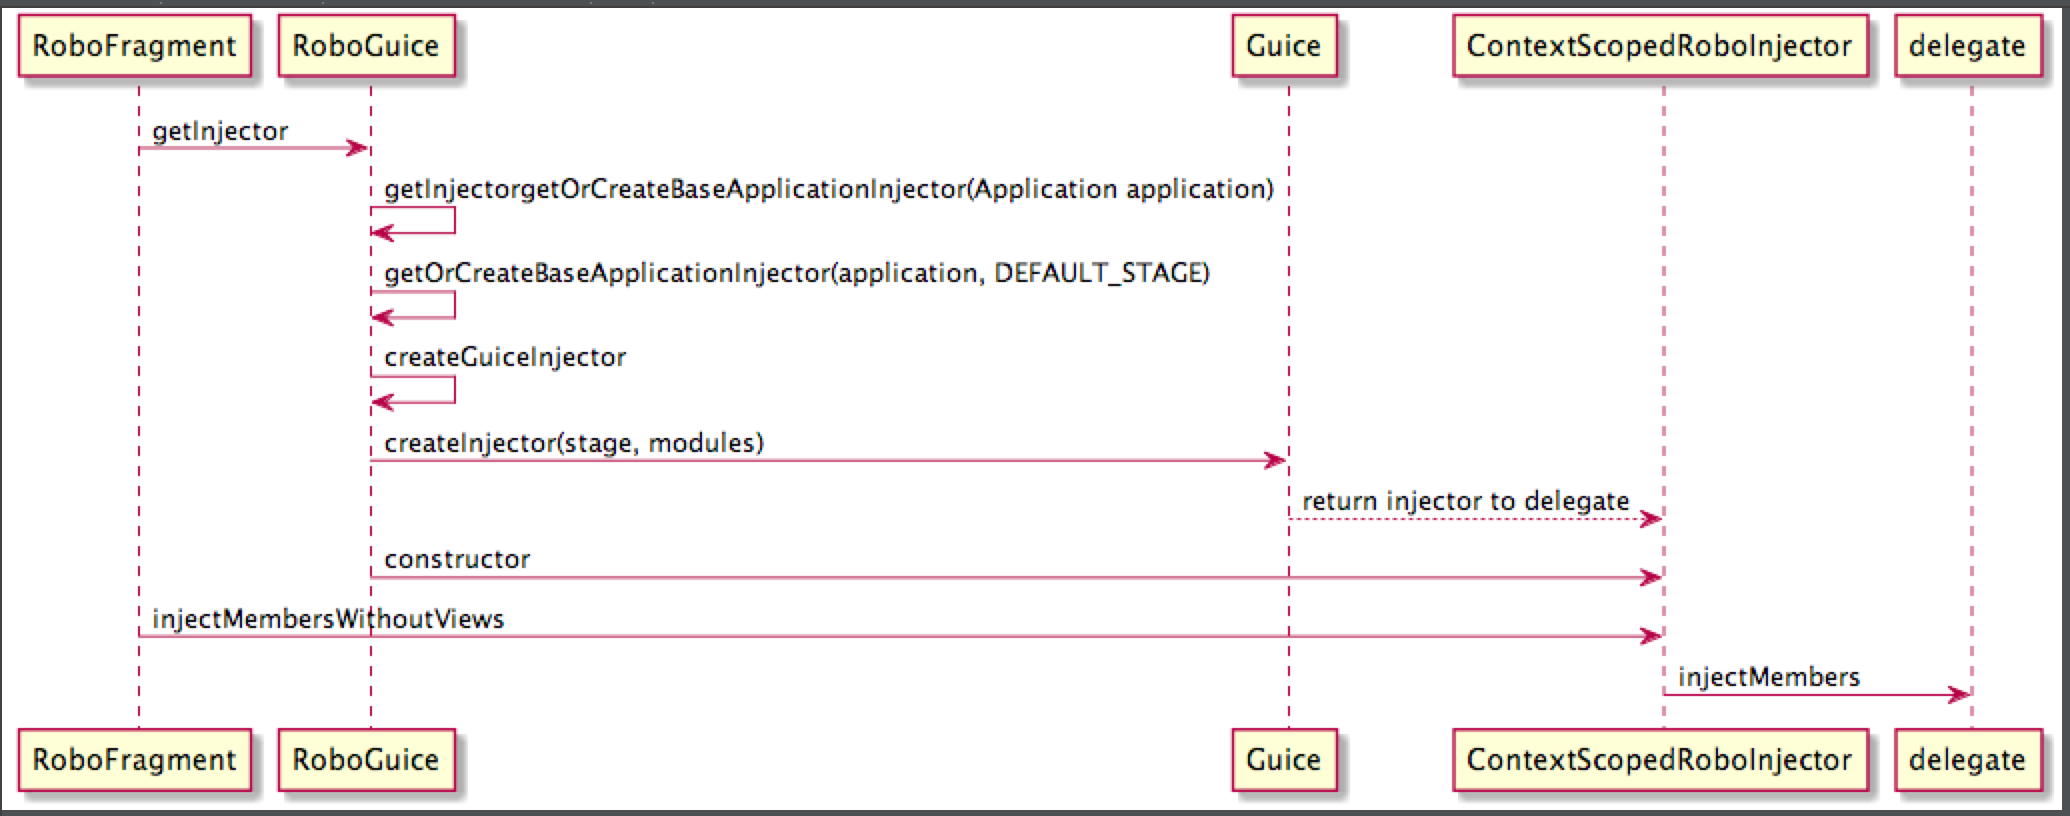
getInjector 根据上下文环境获取适合的Injector
Injector是如何获取到的。
似乎Guice 直接getInjector(this) 就拿到了injector,那么Module是在哪里声明的呢?没有看到Module,我们就无法知晓注入的具体实现。
    public static RoboInjector getInjector(Context context) {
        final Application application = (Application)context.getApplicationContext();
        return new ContextScopedRoboInjector(context, getBaseApplicationInjector(application), getViewListener(application));
    }
再看getBaseApplicationInjector
    protected static WeakHashMap<Application,Injector> injectors = new WeakHashMap<Application,Injector>();
 public static Injector getBaseApplicationInjector(Application application) {
        Injector rtrn = injectors.get(application);
        if( rtrn!=null )
            return rtrn;

        synchronized (RoboGuice.class) {
            rtrn = injectors.get(application);
            if( rtrn!=null )
                return rtrn;

            return setBaseApplicationInjector(application, DEFAULT_STAGE);
        }
    }
injectors类似一个Injector的缓存,初始的时候当然是为空的。所以再看setBaseApplicationInjector
 public static Injector setBaseApplicationInjector(Application application, Stage stage) {

        synchronized (RoboGuice.class) {
            int id = modulesResourceId;
            if (id == 0)
                id = application.getResources().getIdentifier("roboguice_modules", "array", application.getPackageName());

            final String[] moduleNames = id>0 ? application.getResources().getStringArray(id) : new String[]{};
            final ArrayList<Module> modules = new ArrayList<Module>();
            final DefaultRoboModule defaultRoboModule = newDefaultRoboModule(application);

            modules.add(defaultRoboModule);

            try {
                for (String name : moduleNames) {
                    final Class<? extends Module> clazz = Class.forName(name).asSubclass(Module.class);

                    try {
                        modules.add(clazz.getDeclaredConstructor(Context.class).newInstance(application));
                    } catch( NoSuchMethodException ignored ) {
                        modules.add( clazz.newInstance() );
                    }

                }
            } catch (Exception e) {
                throw new RuntimeException(e);
            }

            final Injector rtrn = setBaseApplicationInjector(application, stage, modules.toArray(new Module[modules.size()]));
            injectors.put(application,rtrn);
            return rtrn;
        }

    }
解析上面的代码可以了解到:
1.Guice会默认去读取代码中名为roboguice_modules的string array里面的值,该值存什么呢?存储的是自定义AbstractModule的类全名,胡根据反射机制来实例化该AbstractModule。
2.Guice自己默认的AbstractModule为DefaultRoboModule,如果想了解一下其注入的实现可看看。
然后调用injector的injectMembersWithoutViews方法,该方法主要就是注入非View的Java对象。
在onViewCreated中
RoboGuice.getInjector(getActionBarActivity()).injectViewMembers(this);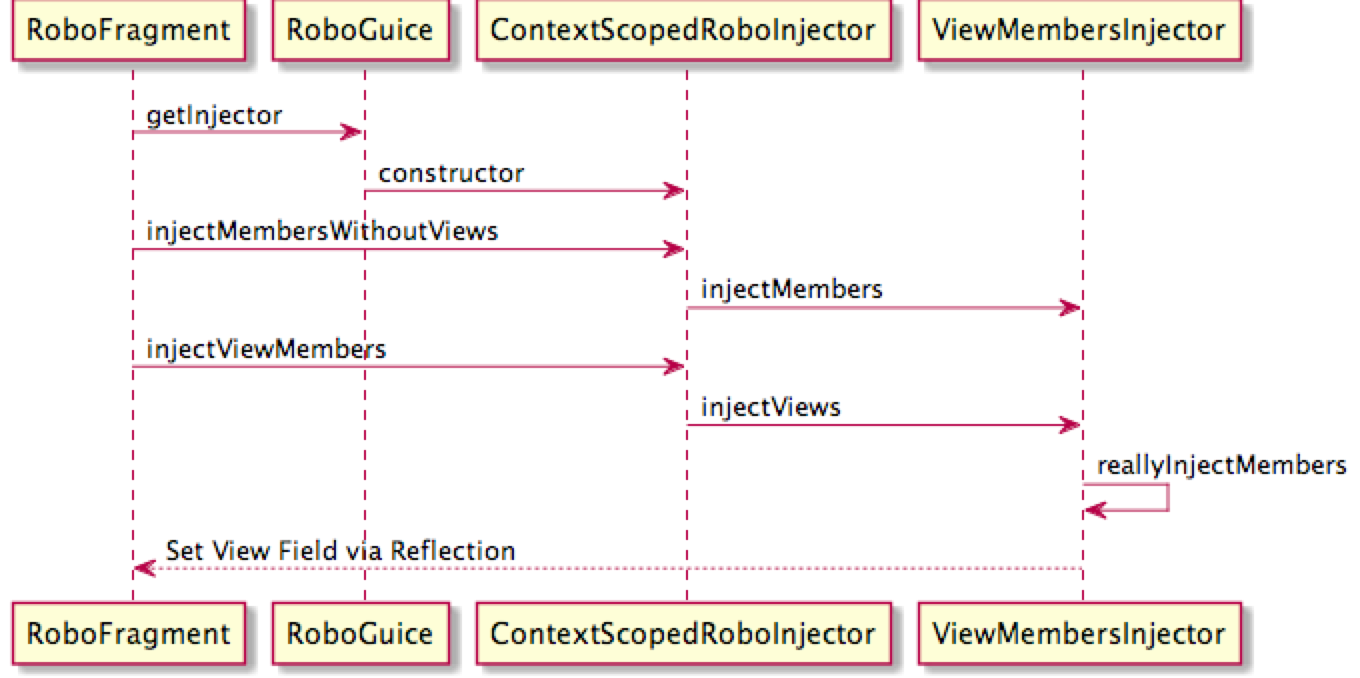
注:
所有对View的插入实现都在ViewMembersInjector中。
几个常用注解
| 注解名 | 意义 |
|---|---|
| @InjectView(R.id.name) | |
| @InjectResource(R.drawable.icon) | |
| @Inject | |
| @Singleton | 我们想要使用单例模式(Singleton Pattern)来获取对象,即 One Instance in the application,你可以在实现类上使用 Singleton 注释去标记。 |
| @ProvidedBy(AddProvider.class) | 可以直接在接口声明处使用 ProvidedBy 注释来指定该接口的 Provider 类型 |
| @ImplementedBy(SimpleAdd.class) | 如果 Add 接口有多个实现类,但是我们希望 SimpleAdd 是 Add 的默认实现类 |
| @InjectExtra (“Extra1” ) String extra1 | ?? |
几个常用Bindings写法
| 类型 | 意义 |
|---|---|
| binder.bind(Add.class).to(SimpleAdd.class) | |
| bind(CityController.class).in(Singleton.class) | 没有指明目标实现类,那么要求类CityController应该由@ImplementedBy或@ProvidedBy标注过(也就是间接的定义了目标实现类类型) |
| toProvider(new CategoryProvider()) | 指出目标实现类的Provider |
| annotatedWith(Names.named(“deal”)) | 在该接口声明的地方是否有注解Names(“deal”),一般当接口有多个实现类的时候,通过注解Names来标明最终是用哪个实现类实例化 |
指明目标实现类的方法
一.在configure方法中通过bind().to(Target.class);
二.创建实现Provider接口的类,并在configure方法中通过bind().toProvider(new TargetProvider());
三.在AbstractModule的子类中,编写方法,返回相应类型,并用注解@Provides标注该方法,和方法二类似。
四.在接口定义上以@ImplementedBy(SimpleAdd.class)或 @ProvidedBy(AddProvider.class)标注
其他
install
在一个Module中
protected void configure {
        install(new NetModule(application));
}
在官方文档上很简单的说明:
void install(Module module)
Uses the given module to configure more bindings.
在宿主Module中引入NetModule中定义的bindings,类似允许一种封装及扩展吧。


 2589
2589

 被折叠的 条评论
为什么被折叠?
被折叠的 条评论
为什么被折叠?
 到【灌水乐园】发言


