


微服务阶段
- JavaSE:面向对象
- MySql + JDBC:持久化存储
- html + css +JavaScript + Jquery + 框架:视图,框架
- JavaWeb:开始独立开发MVC三层架构的网站(原始)
- SSM:框架(简化了我们的开发流程,配置也开始较为复杂)
- war:Tomcat运行
- Spring再简化:SpringBoot - Jar(内嵌Tomcat)- 微服务架构

SpringCloud:

Spring
Spring是一个开源框架,2003年兴起的一个轻量级的Java开发框架。Spring是为了解决企业级应用开发的复杂性而创建的,简化开发
为了降低Java开发的复杂性,Spring采用了以下4种关键策略:
- 1、基于POJO的轻量级和最小侵入性编程
- 2、通过IOC,依赖注入(DI)和面向接口实现松耦合;
- 3、基于切面(AOP)和惯例进行声明式编程
- 4、通过切面和模板减少样式代码
核心思想:约定大于配置!!!
(程序猿)程序 = 数据结构 + 算法(集合框架)
(码农)程序 = 面向对象 + 框架
微服务架构
微服务是一种架构风格,它要求我们在开发一个应用的时候,这个应用必须构建一系列小服务的组合;可以通过http方式进行互通。要说微服务架构,先得说说过去我们的单体应用架构
单体应用架构:
- 所谓单体应用架构(all in one)是指,我们将一个应用的中的所有应用服务都封装在一个应用中。
- 无论是ERP、CRM或是其他什么系统,你都把数据库访问,web访问,等等各个功能放到一个war包内
- 这样做的好处是:易于开发和测试;也十分方便部署;当需要扩展时,只需要将war复制多份,然后放到多个服务器上,再做个负载均衡就可以了。
- 单体应用框架的缺点是:哪怕我要修改一个非常小的地方,我都需要停掉整个服务、重新打包、部署这个应用war包。特别是对于一个大型应用,我们不可能把所有内容放在一个应用里面,我们如何维护、如何分工合作都是问题
微服务架构:
- all in one的架构方式,我们把所有的功能单元放在一个应用里面。然后我们把整个应用部署到服务器上。如果负载能力不行,我们将整个应用进行水平复制,进行扩展,然后在负载均衡。
- 所谓微服务架构,就是打破之前all in one的架构方式,把每个功能元素独立出来。把独立出来的功能元素的动态组合,需要的功能元素才去拿来组合,需要多一些时可以整合多个功能元素。所以微服务架构是对功能元素进行复制,而没有对整个应用复制
- 这样做的好处:
- 1、节省了调用资源
- 2、每个功能元素的服务都是一个可替换的、可独立升级的软件代码
高内聚,低耦合!!!
如何构建微服务
一个大型系统的微服务架构,就像一个复杂交织的神经网络,每一个神经元就是一个功能元素,它们各自完成自己的功能,然后通过http相互请求调用。比如一个电商系统,查缓存、连数据库、浏览页面、结账、支付等服务都是一个个独立的功能服务,都被微化了,它们作为一个个微服务共同构建一个庞大的系统。如果修改其中的一个功能,只需要更新升级其中一个功能服务单元即可。
但是这种庞大的系统架构给部署和运维带来很大的难度。于是,Spring为我们带来了构建大型分布式微服务的全套、全程产品:
- 构建一个个功能独立的微服务应用单元,可以使用SpringBoot,可以帮我们快速构建一个应用;
- 大型分布式网络服务的调用,这部分由Spring Cloud来实现,实现分布式;
- 在分布式中间,进行流式数据计算、批处理,我们有Spring Cloud Data Flow。
- Spring为我们想清楚了整个从开始构建应用到大型分布式应用全流程方案。
第一个SpringBoot程序
官方:提供一个快速生成的网站,IDEA集成了这个网站
- 可以在官网直接下载后,导入idea开发(官网在哪)
- 可以直接使用idea创建一个SpringBoot项目(一般开发直接在IDEA中创建)
官网网址:https://spring.io/projects/spring-boot
进入官网后,点击Spring Initializr


在官网配置好项目后,就可以点击下面的 GENERATE CTRL + 回车
。然后会得到一个项目压缩包,解压后,就可以导入到 idea 中。
如果是在idea工具里面进行配置的话,一定要注意,下载来源不要默认,而要加上阿里云镜像!!!!

后面的过程就和官网配置页面设置一样,选好后,就可以进入到项目中编写了。

package com.blb.demo.controller;

import org.springframework.stereotype.Controller;
import org.springframework.web.bind.annotation.GetMapping;
import org.springframework.web.bind.annotation.RequestMapping;
import org.springframework.web.bind.annotation.ResponseBody;

@Controller
@RequestMapping("/hello")
public class HelloController {

    @GetMapping("/hello")
    @ResponseBody
    public String hello(){
        return "hello,world";
    }
}
当我们写好第一个接口后,就可以在本地上跑一下了

成功!!!
细节讲解:
- @RequestMapping():注解映射请求路径
- @GetMapping和@PostMapping
-
从命名约定我们可以看到每个注释都是为了处理各自的传入请求方法类型,即
@GetMapping用于处理请求方法的GET类型,@PostMapping用于处理请求方法的POST类型等。 -
如果我们想使用传统的@RequestMapping注释实现URL处理程序,那么它应该是这样的:
@RequestMapping(value = "/get/{id}", method = RequestMethod.GET) -
新方法可以简化为:
@GetMapping("/get/{id}")
-
@responseBody注解的作用是:
- 将controller的方法返回的对象通过适当的转换器转换为指定的格式之后,写入到response对象的body区,通常用来返回JSON数据或者是XML数据。
- 注意:在使用此注解之后不会再走视图处理器,而是直接将数据写入到输入流中,他的效果等同于通过response对象输出指定格式的数据
原理初探
自动配置:
- pom.xml
- spring-boot-dependencies:核心依赖在父工程中
- 我们在写或者引入一些SpringBoot依赖的时候,不需要指定版本,就因为有这些版本仓库
启动器:
<dependency>
	<groupId>org.springframework.boot</groupId>
    <artifactId>spring-boot-starter</artifactId>
</dependency>
- 启动器就是SpringBoot的启动场景
- 比如spring-boot-starter-web,他就会帮我们自动导入web环境所有的依赖!
- SpringBoot会将所有的功能场景,都变成一个个的启动器
- 我们要使用什么功能,就只需要找到对应的启动器就可以了 starter
主程序:
package com.blb.demo;

import org.springframework.boot.SpringApplication;
import org.springframework.boot.autoconfigure.SpringBootApplication;

// @SpringBootApplication : 标注这个类是一个SpringBoot的应用(启动类下的所有资源被导入)
@SpringBootApplication
public class DemoApplication {

    public static void main(String[] args) {
    	// 将SpringBoot应用启动
        SpringApplication.run(DemoApplication.class, args);
    }

}
- 注解
- @SpringBootConfiguration:SpringBoot的配置
- @Configuration:Spring配置类
- @Component:说明这也是一个Spring的组件
- @EnableAutoConfiguration:自动配置
- @AutoConfigurationPackage:自动配置包
- @Import({AutoConfigurationPackages.Registrar.class}):自动配置 包注册
- @Import(AutoConfigurationImportSelector.class):自动导入选择
- 获取所有的配置:
List<String> configurations = getCandidateConfigurations(annotationMetadata, attributes);
- @AutoConfigurationPackage:自动配置包
- @SpringBootConfiguration:SpringBoot的配置
获取候选的配置:
- 方法getCandidateConfigurations()返回了自动配置类的信息列表,而它通过调用SpringFactoriesLoader.loadFactoryNames()来扫描加载含有META-INF/spring.factories文件的jar包,该文件记录了具有哪些自动配置类
protected List<String> getCandidateConfigurations(AnnotationMetadata metadata, AnnotationAttributes attributes) {
		List<String> configurations = SpringFactoriesLoader.loadFactoryNames(getSpringFactoriesLoaderFactoryClass(),
				getBeanClassLoader());
		Assert.notEmpty(configurations, "No auto configuration classes found in META-INF/spring.factories. If you "
				+ "are using a custom packaging, make sure that file is correct.");
		return configurations;
	}
META-INF/spring.factories:自动配置的核心文件

所有资源加载到配置类中!
Properties properties = PropertiesLoaderUtils.loadProperties(resource);
结论:SpringBoot所有自动配置都是在启动的时候扫描并加载(spring.factories所有的自动配置类都在这里面,但是不一定生效,要判断条件是否成立,只要导入了对应的start,就有对应的启动器了,有了启动器,我们自动装配就会生效,然后就配置成功!)
- 1、SpringBoot在启动的时候,从类路径下
/META-INF/spring.factories获取指定的值; - 2、将这些自动配置的类导入容器,自动配置就会生效,帮我进行自动配置
- 3、以前我们需要自动配置的东西,现在SpringBoot帮我们做了!
- 4、整个JavaEE,解决方案和自动配置的东西都在
spring-boot-autoconfigure-2.2.0.RELEASE.jar这个包下 - 5、它会把所有需要导入的组件,以类名的方式返回,这些组件就会被添加到容器;
- 6、容器中也会存在非常多的
xxxAutoConfiguration@Bean的文件,就是这些类给容器中导入了这个场景需要的所有组件;并自动配置。@Configuration,JavaConfig! - 7、有了自动配置类,免去了我们手动编写配置文件的工作了!
SpringApplication.run(主程序类)分析:分析该方法主要分为两部分
- 1、SpringApplication的实例化
- new SpringApplication(主程序类)
- 判断是否web应用
- 加载并保存所有ApplicationContextInitializer(META-INF/spring.factories)
- 加载并保存所有ApplicationListener
- 获取到主程序类
- new SpringApplication(主程序类)
- 2、run方法的执行
- run()
- 回调所有的SpringApplicationRunListener(META-INF/spring.factories)的starting
- 获取ApplicationArguments
- 准备环境和所有监听器(SpringApplicationRunListener)的environmentPrepared
- 打印banner信息
- 创建ioc容器对象
- AnnotationConfigEmbeddedWebApplicationContext(Web环境容器)
- AnnotationConfigApplicationContext(普通环境容器)
- run()
SpringApplication:这个类主要做了以下四件事情
- 1、推断应用的类型是普通的项目还是Web项目
- 2、查找并加载所有可用初始化器,设置到initializers属性中
- 3、找出所有的应用程序监听器,设置到listeners属性中
- 4、推断并设置main方法的定义类,找到运行的主类
查看构造器:
public SpringApplication(ResourceLoader resourceLoader, Class<?>... primarySources) {
		// 设置一些默认参数
        this.sources = new LinkedHashSet();
        this.bannerMode = Mode.CONSOLE;
        this.logStartupInfo = true;
        this.addCommandLineProperties = true;
        this.addConversionService = true;
        this.headless = true;
        this.registerShutdownHook = true;
        this.additionalProfiles = new HashSet();
        this.isCustomEnvironment = false;
        this.lazyInitialization = false;
        this.resourceLoader = resourceLoader;
        Assert.notNull(primarySources, "PrimarySources must not be null");

		// 保存主配置类到一个Set集合primarySources中
        this.primarySources = new LinkedHashSet(Arrays.asList(primarySources));

        // 获取当前的应用类型,判断是不是Web应用
        this.webApplicationType = WebApplicationType.deduceFromClasspath();

		// 从类路径下找到META-INF/spring.factories配置的所有ApplicationContextInitializer;然后保存起来
        this.setInitializers(this.getSpringFactoriesInstances(ApplicationContextInitializer.class));

		// 从类路径下找到META‐INF/spring.ApplicationListener;然后保存起来,原理同上
        this.setListeners(this.getSpringFactoriesInstances(ApplicationListener.class));
        // 从多个配置类中找到有main方法的主配置类。在调run方法的时候是可以传递多个配置类的
        this.mainApplicationClass = this.deduceMainApplicationClass();
        // 执行完毕,SpringApplication对象就创建出来了,返回到1处,调用SpringApplication对象的run方法,到3
    }
SpringBoot:配置文件及自动配置原理
配置文件:SpringBoot使用一个全局的配置文件,配置文件名称是固定的
- application.properties
- 语法结构:key = value
- application.yaml
- 语法结构:key: 空格 value
配置文件的作用:修改SpringBoot自动配置的默认值,因为SpringBoot在底层都给我们自动配置好了;
YAML
YAML是"YAML Ain’t a Markup Language"(YAML不是一种标记语言)的递归缩写。在开发的这种语言时,YAML 的意思其实是:“Yet Another Markup Language”(仍是一种标记语言),但为了强调这种语言以数据做为中心,而不是以标记语言为重点,而用反向缩略语重命名。(取自百度百科)
标记语言:以前的配置文件,大多数都是使用xml来配置;比如一个简单的端口配置,我们来对比下yaml和xml
-
yaml配置:
server: port: 8080 // 普通的key-value name: huake // 对象 student: name: huake age: 3 // 行内写法 studednt: {name: huake, age: 3} // 数组 pets: - cat - dog - pig pets: [cat, dog, pig] -
xml配置:
<server> <port>8080</port> </server> -
properties只能写键值对
name=huake

student.name = huake
student.age = 3
YAML语法
基本语法:
k:(空格) v
以此来表示一对键值对(空格不能省略);以空格的缩进来控制层级关系,只要是左边对齐的一列数据都是同一个层级的。
注意:属性和值的大小写都是十分敏感的。例如:
server:
	port: 8080
	path: /hello
值的写法:字面量: 普通的值 [数字, 布尔值, 字符串]
k: v
字面量直接写在后面就可以,字符串默认不用加上双引号或者单引号;"" 双引号,不会转义字符串里面的特殊字符,特殊字符会作为本身想表示的意思;
比如:name: "kuang \n shen"
输出:
kuang
shen
yaml可以直接给实体类赋值:
- 首先介绍一下原生的赋值方式:
- 先创建一个类

- @component是spring中的一个注解,它的作用就是实现bean的注入(注册bean)
- @Value是一个赋值注解
- @Autowired是用在JavaBean中的注解,通过byType形式,用来给指定的字段或方法注入所需的外部资源

- 经过测试,我们拿到了实例化后的值;
- 先创建一个类
- 接下来就是通过yaml文件来进行赋值:
-
同样先创建好我们的类

-
在yaml文件进行对应类型赋值

-
最后进行测试,发现数据都得到了

-
打印结果
Person{name='huake',
age=3,
happy=true,
birth=Fri Jan 07 00:00:00 CST 2022,
maps={k1=v1, k2=v2},
lists=[code, music, girl],
dog=Dog{name='旺财', age=3}}
-
@ConfigurationProperties作用:
- 将配置文件中配置的每一个属性值,映射到这个组件中;
- 告诉SpringBoot将本类中的所有属性和配置文件中国相关的配置进行绑定
- 参数 prefix = “person” (将配置文件中的person下面的所有属性一一对应)
- 只有这个组件是容器中的组件,才能使用容器提供的@ConfigurationProperties功能
上面采用的方法都是最简单的方式,开发中最常用的;那我们来唠叨一下其他的实现方式,道理都是相通的,写还是那样写;配置文件除了yaml还有我们之前常用的properties,但properties配置文件在写中文的时候,会有乱码,我们需要去IDEA中设置编码格式为UTF-8;
| @ConfigurationProperties | @Value | |
|---|---|---|
| 功能 | 批量注入配置文件中的属性 | 一个个指定 |
| 松散绑定(松散语法) | 支持 | 不支持 |
| SpEL | 不支持 | 支持 |
| JSR303数据校验 | 支持 | 不支持 |
| 复杂类型封装 | 支持 | 不支持 |
- cp只需要写一次即可,value则需要每个字段都添加
- 松散绑定:比如我的yaml中写的last-name,这个和lastName是一样的,- 后面跟着的字母默认是大写的。这就是松散绑定
- JSR303数据校验:这个就是我们可以在字段是增加一层过滤器验证,可以保证数据的合法性
- 复杂类型封装,yaml中可以封装对象,使用@Value就不支持
结论:
- 配置yaml和配置properties都可以获取到值,强烈推荐yaml
- 如果我们在某个业务中,只需要获取配置文件中的某个值,可以使用 @Value
- 如果说,我们专门编写了一个JavaBean来和配置文件进行映射,就直接使用 @ConfigurationProperties,不要犹豫!!!
JSR303数据校验(了解即可):
SpringBoot中可以用@validated来校验数据,如果数据异常则会统一抛出异常,方便异常中心统一处理。
-
我们这里来写个注解让我们的name只能支持Email格式


-
空检查
- @Null 验证对象是否为null
- @NotNull 验证对象是否不为null, 无法查检长度为0的字符串
- @NotBlank 检查约束字符串是不是Null还有被Trim的长度是否大于0,只对字符串,且会去掉前后空格.
- @NotEmpty 检查约束元素是否为NULL或者是EMPTY.
-
Booelan检查
- @AssertTrue 验证 Boolean 对象是否为 true
- @AssertFalse 验证 Boolean 对象是否为 false
-
长度检查
- @Size(min=, max=) 验证对象(Array,Collection,Map,String)长度是否在给定的范围之内
- @Length(min=, max=) Validates that the annotated string is between
min and max included.
-
日期检查
- @Past 验证 Date 和 Calendar 对象是否在当前时间之前
- @Future 验证 Date 和 Calendar 对象是否在当前时间之后
- @Pattern 验证 String 对象是否符合正则表达式的规则(正则表达式)
-
数值检查,建议使用在Stirng,Integer类型,不建议使用在int类型上,因为表单值为“”时无法转换为int,但可以转换为Stirng为"",Integer为null
- @Min 验证 Number 和 String 对象是否大等于指定的值
- @Max 验证 Number 和 String 对象是否小等于指定的值
- @DecimalMax 被标注的值必须不大于约束中指定的最大值.
这个约束的参数是一个通过BigDecimal定义的最大值的字符串表示.小数存在精度 - @DecimalMin 被标注的值必须不小于约束中指定的最小值.
这个约束的参数是一个通过BigDecimal定义的最小值的字符串表示.小数存在精度 - @Digits 验证 Number 和 String 的构成是否合法
- @Digits(integer=,fraction=)
验证字符串是否是符合指定格式的数字,interger指定整数精度,fraction指定小数精度。 - @Range(min=, max=) Checks whether the annotated value lies between
(inclusive) the specified minimum and maximum. - @Range(min=10000,max=50000,message=“range.bean.wage”) private
BigDecimal wage; - @Valid 递归的对关联对象进行校验,
如果关联对象是个集合或者数组,那么对其中的元素进行递归校验,如果是一个map,则对其中的值部分进行校验.(是否进行递归验证) - @CreditCardNumber信用卡验证
- @Email 验证是否是邮件地址,如果为null,不进行验证,算通过验证。
- @ScriptAssert(lang= ,script=, alias=)
- @URL(protocol=,host=, port=,regexp=, flags=)

多环境切换
profile是Spring对不同环境提供不同配置功能的支持,可以通过激活不同的环境版本,实现快速切换环境
- 方式一:多配置文件
- 我们在主配置文件编写的时候,文件名可以是 application-{profile}.properties/yml,用来指定多个环境版本;
- 例如:
- application-test.properties 代表测试环境配置
- application-dev.properties代表开发环境配置
- 但是SpringBoot并不会直接启动这些配置文件,它默认使用application.properties主配置文件
- 我们需要通过一个配置来选择需要激活的环境:
// 比如在配置文件中指定dev环境,我们可以通过设置不同的端口号进行测试;
// 我们启动SpringBoot,就可以看到已经切换到dev下的配置了
spring.profiles.active=dev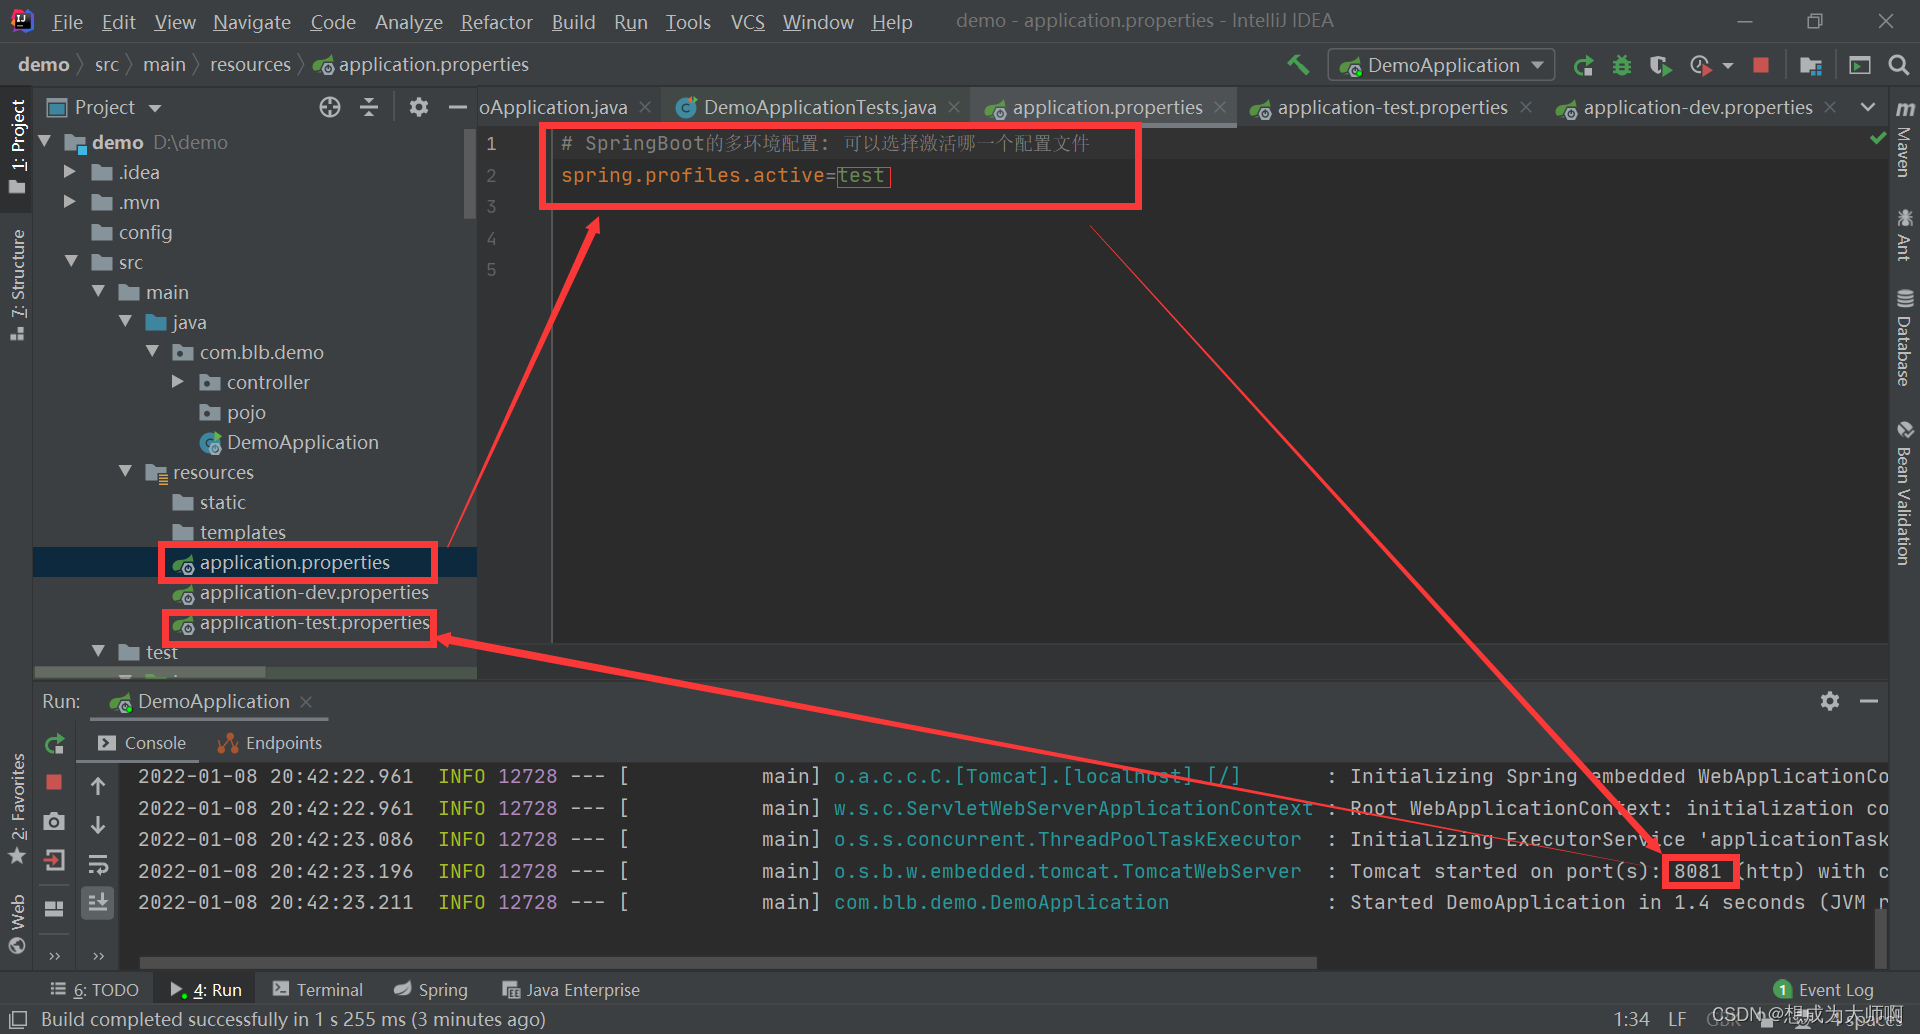

我们可以配置多个端口(测试端口,开发端口等等),在我们主配置文件中指定哪一个配置文件作为项目启动的端口即可spring.profiles.active=配置文件名
- 方式二:yaml的多文档块(默认为8081端口)
-
和properties配置文件一样,但是使用yml去实现不需要创建多个配置文件,更加方便了

也是通过spring.profiles.active进行配置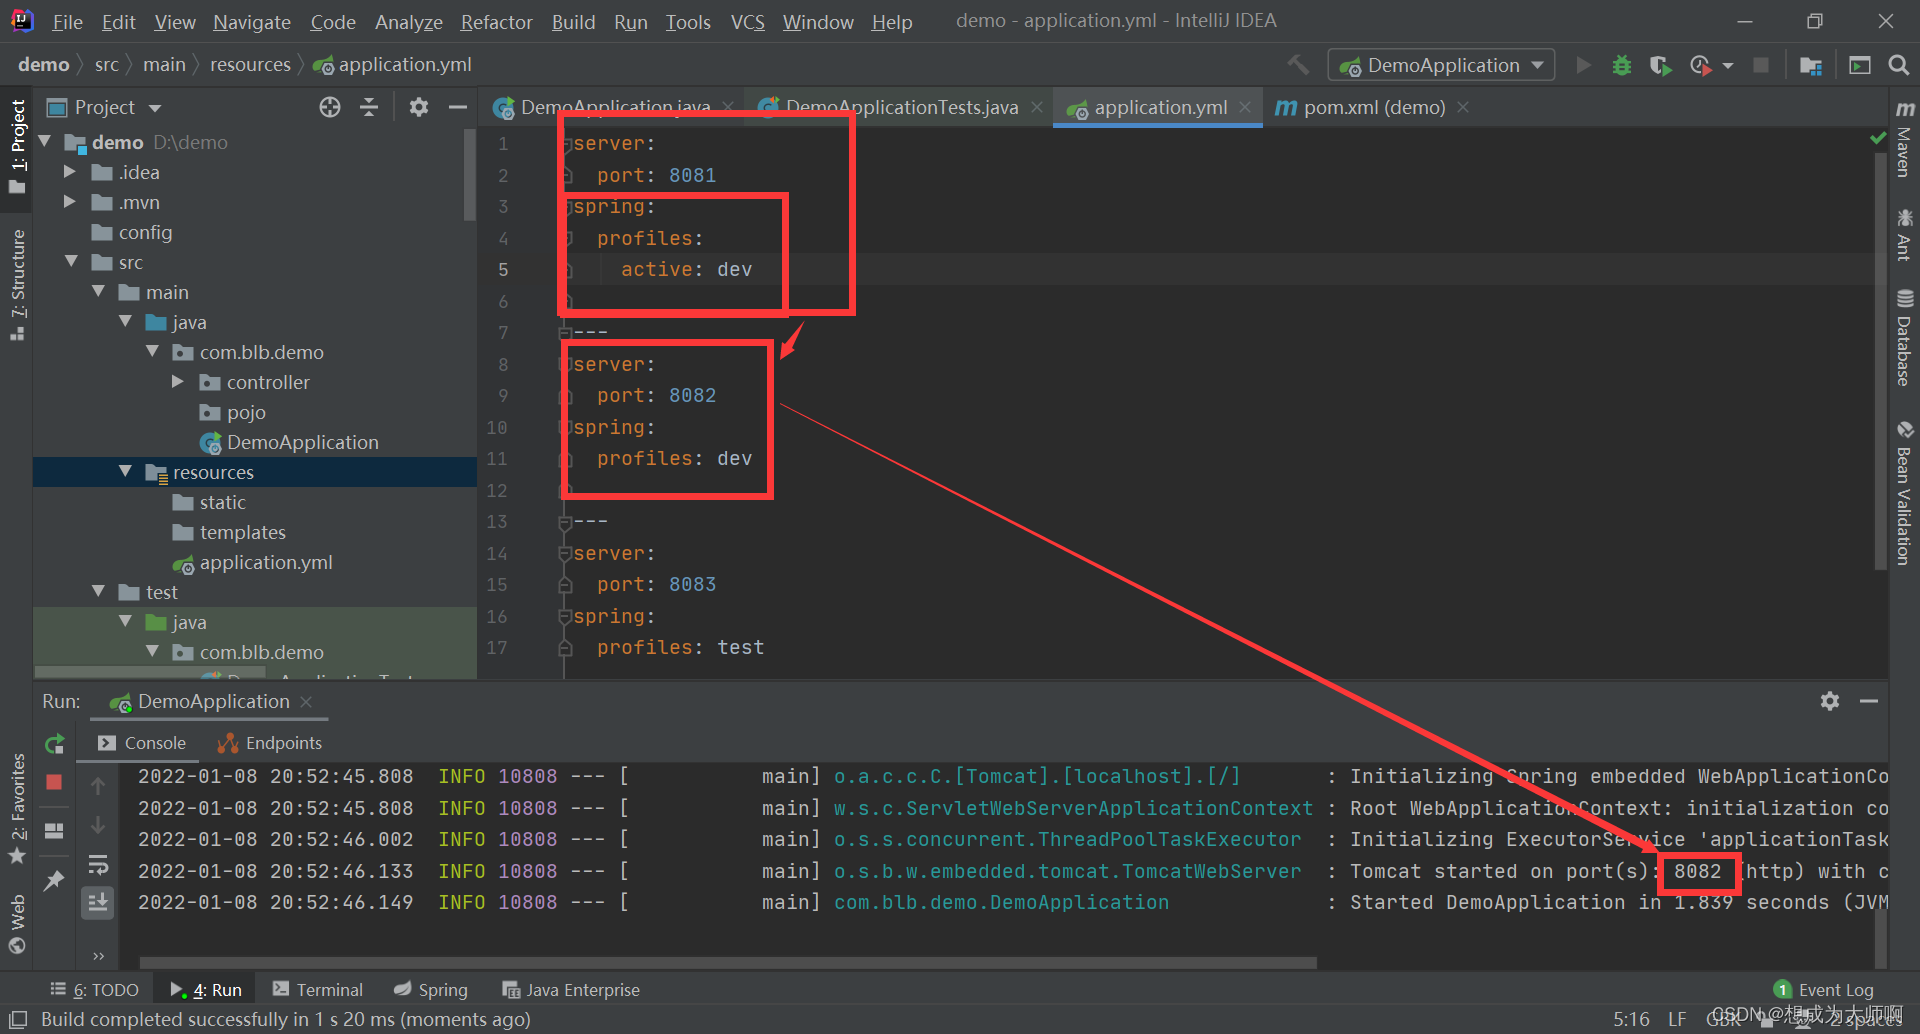
-
注意:如果yml和properties同时都配置了端口,并且没有激活其他环境,默认会使用properties配置文件的!
-
配置文件加载位置
SpringBoot启动会扫描以下位置的application.properties或者application.yml文件作为SpringBoot的默认配置文件
- 优先级1:项目路径下的config文件夹配置文件
- 优先级2:项目路径下配置文件
- 优先级3:资源路径下的config文件夹配置文件
- 优先级4:资源路径下配置文件
优先级由高到低,高优先级的配置会覆盖低优先级的配置;
SpringBoot会从这四个位置全部加载主配置文件,互补配置;我们在最低级的配置文件中设置一个项目访问路径的配置来测试互补问题
// 配置项目的访问路径
server.servlet.context-path=/huake
扩展:指定位置加载配置文件
- 我们还可以通过spring.config.location来改变默认的配置文件位置
- 项目打包好以后,我们可以使用命令行参数的形式,启动项目的时候来指定配置文件的新位置
- 这种情况,一般是后期运维做的多,相同配置,外部指定的配置文件优先级最高
java -jar spring-boot-config.jar --spring.config.location=F://application.properties
外部加载配置文件的方式十分多,我们选择最常用的即可,在开发的资源文件中进行配置
自动配置原理再理解
-
表示这是一个配置类
@Configuration(proxyBeanMethods = false) -
自动配置属性:HttpProperties
@EnableConfigurationProperties(HttpProperties.class) -
Spring的底层注解:根据不同的条件,来判断当前配置或者类是否生效
@ConditionalOnWebApplication(type = ConditionalOnWebApplication.Type.SERVLET) -
在配置文件中能配置的东西,都存在一个固有的规律:
xxxProperties、xxxAutoConfiguration -
xxxAutoConfiguration有默认值(而这些默认值的改变是通过xxxProperties和配置文件的绑定),所以我们可以使用自定义的配置了
# Initializers
org.springframework.context.ApplicationContextInitializer=\
org.springframework.boot.autoconfigure.SharedMetadataReaderFactoryContextInitializer,\
org.springframework.boot.autoconfigure.logging.ConditionEvaluationReportLoggingListener

# Application Listeners
org.springframework.context.ApplicationListener=\
org.springframework.boot.autoconfigure.BackgroundPreinitializer

# Auto Configuration Import Listeners
org.springframework.boot.autoconfigure.AutoConfigurationImportListener=\
org.springframework.boot.autoconfigure.condition.ConditionEvaluationReportAutoConfigurationImportListener

# Auto Configuration Import Filters
org.springframework.boot.autoconfigure.AutoConfigurationImportFilter=\
org.springframework.boot.autoconfigure.condition.OnBeanCondition,\
org.springframework.boot.autoconfigure.condition.OnClassCondition,\
org.springframework.boot.autoconfigure.condition.OnWebApplicationCondition

# Auto Configure
org.springframework.boot.autoconfigure.EnableAutoConfiguration=\
org.springframework.boot.autoconfigure.admin.SpringApplicationAdminJmxAutoConfiguration,\
org.springframework.boot.autoconfigure.aop.AopAutoConfiguration,\
org.springframework.boot.autoconfigure.amqp.RabbitAutoConfiguration,\
org.springframework.boot.autoconfigure.batch.BatchAutoConfiguration,\
org.springframework.boot.autoconfigure.cache.CacheAutoConfiguration,\
org.springframework.boot.autoconfigure.cassandra.CassandraAutoConfiguration,\
org.springframework.boot.autoconfigure.context.ConfigurationPropertiesAutoConfiguration,\
org.springframework.boot.autoconfigure.context.LifecycleAutoConfiguration,\
org.springframework.boot.autoconfigure.context.MessageSourceAutoConfiguration,\
org.springframework.boot.autoconfigure.context.PropertyPlaceholderAutoConfiguration,\
org.springframework.boot.autoconfigure.couchbase.CouchbaseAutoConfiguration,\
org.springframework.boot.autoconfigure.dao.PersistenceExceptionTranslationAutoConfiguration,\
org.springframework.boot.autoconfigure.data.cassandra.CassandraDataAutoConfiguration,\
org.springframework.boot.autoconfigure.data.cassandra.CassandraReactiveDataAutoConfiguration,\
org.springframework.boot.autoconfigure.data.cassandra.CassandraReactiveRepositoriesAutoConfiguration,\
org.springframework.boot.autoconfigure.data.cassandra.CassandraRepositoriesAutoConfiguration,\
org.springframework.boot.autoconfigure.data.couchbase.CouchbaseDataAutoConfiguration,\
org.springframework.boot.autoconfigure.data.couchbase.CouchbaseReactiveDataAutoConfiguration,\
org.springframework.boot.autoconfigure.data.couchbase.CouchbaseReactiveRepositoriesAutoConfiguration,\
org.springframework.boot.autoconfigure.data.couchbase.CouchbaseRepositoriesAutoConfiguration,\
org.springframework.boot.autoconfigure.data.elasticsearch.ElasticsearchDataAutoConfiguration,\
org.springframework.boot.autoconfigure.data.elasticsearch.ElasticsearchRepositoriesAutoConfiguration,\
org.springframework.boot.autoconfigure.data.elasticsearch.ReactiveElasticsearchRepositoriesAutoConfiguration,\
org.springframework.boot.autoconfigure.data.elasticsearch.ReactiveElasticsearchRestClientAutoConfiguration,\
org.springframework.boot.autoconfigure.data.jdbc.JdbcRepositoriesAutoConfiguration,\
org.springframework.boot.autoconfigure.data.jpa.JpaRepositoriesAutoConfiguration,\
org.springframework.boot.autoconfigure.data.ldap.LdapRepositoriesAutoConfiguration,\
org.springframework.boot.autoconfigure.data.mongo.MongoDataAutoConfiguration,\
org.springframework.boot.autoconfigure.data.mongo.MongoReactiveDataAutoConfiguration,\
org.springframework.boot.autoconfigure.data.mongo.MongoReactiveRepositoriesAutoConfiguration,\
org.springframework.boot.autoconfigure.data.mongo.MongoRepositoriesAutoConfiguration,\
org.springframework.boot.autoconfigure.data.neo4j.Neo4jDataAutoConfiguration,\
org.springframework.boot.autoconfigure.data.neo4j.Neo4jRepositoriesAutoConfiguration,\
org.springframework.boot.autoconfigure.data.solr.SolrRepositoriesAutoConfiguration,\
org.springframework.boot.autoconfigure.data.r2dbc.R2dbcDataAutoConfiguration,\
org.springframework.boot.autoconfigure.data.r2dbc.R2dbcRepositoriesAutoConfiguration,\
org.springframework.boot.autoconfigure.data.r2dbc.R2dbcTransactionManagerAutoConfiguration,\
org.springframework.boot.autoconfigure.data.redis.RedisAutoConfiguration,\
org.springframework.boot.autoconfigure.data.redis.RedisReactiveAutoConfiguration,\
org.springframework.boot.autoconfigure.data.redis.RedisRepositoriesAutoConfiguration,\
org.springframework.boot.autoconfigure.data.rest.RepositoryRestMvcAutoConfiguration,\
org.springframework.boot.autoconfigure.data.web.SpringDataWebAutoConfiguration,\
org.springframework.boot.autoconfigure.elasticsearch.ElasticsearchRestClientAutoConfiguration,\
org.springframework.boot.autoconfigure.flyway.FlywayAutoConfiguration,\
org.springframework.boot.autoconfigure.freemarker.FreeMarkerAutoConfiguration,\
org.springframework.boot.autoconfigure.groovy.template.GroovyTemplateAutoConfiguration,\
org.springframework.boot.autoconfigure.gson.GsonAutoConfiguration,\
org.springframework.boot.autoconfigure.h2.H2ConsoleAutoConfiguration,\
org.springframework.boot.autoconfigure.hateoas.HypermediaAutoConfiguration,\
org.springframework.boot.autoconfigure.hazelcast.HazelcastAutoConfiguration,\
org.springframework.boot.autoconfigure.hazelcast.HazelcastJpaDependencyAutoConfiguration,\
org.springframework.boot.autoconfigure.http.HttpMessageConvertersAutoConfiguration,\
org.springframework.boot.autoconfigure.http.codec.CodecsAutoConfiguration,\
org.springframework.boot.autoconfigure.influx.InfluxDbAutoConfiguration,\
org.springframework.boot.autoconfigure.info.ProjectInfoAutoConfiguration,\
org.springframework.boot.autoconfigure.integration.IntegrationAutoConfiguration,\
org.springframework.boot.autoconfigure.jackson.JacksonAutoConfiguration,\
org.springframework.boot.autoconfigure.jdbc.DataSourceAutoConfiguration,\
org.springframework.boot.autoconfigure.jdbc.JdbcTemplateAutoConfiguration,\
org.springframework.boot.autoconfigure.jdbc.JndiDataSourceAutoConfiguration,\
org.springframework.boot.autoconfigure.jdbc.XADataSourceAutoConfiguration,\
org.springframework.boot.autoconfigure.jdbc.DataSourceTransactionManagerAutoConfiguration,\
org.springframework.boot.autoconfigure.jms.JmsAutoConfiguration,\
org.springframework.boot.autoconfigure.jmx.JmxAutoConfiguration,\
org.springframework.boot.autoconfigure.jms.JndiConnectionFactoryAutoConfiguration,\
org.springframework.boot.autoconfigure.jms.activemq.ActiveMQAutoConfiguration,\
org.springframework.boot.autoconfigure.jms.artemis.ArtemisAutoConfiguration,\
org.springframework.boot.autoconfigure.jersey.JerseyAutoConfiguration,\
org.springframework.boot.autoconfigure.jooq.JooqAutoConfiguration,\
org.springframework.boot.autoconfigure.jsonb.JsonbAutoConfiguration,\
org.springframework.boot.autoconfigure.kafka.KafkaAutoConfiguration,\
org.springframework.boot.autoconfigure.availability.ApplicationAvailabilityAutoConfiguration,\
org.springframework.boot.autoconfigure.ldap.embedded.EmbeddedLdapAutoConfiguration,\
org.springframework.boot.autoconfigure.ldap.LdapAutoConfiguration,\
org.springframework.boot.autoconfigure.liquibase.LiquibaseAutoConfiguration,\
org.springframework.boot.autoconfigure.mail.MailSenderAutoConfiguration,\
org.springframework.boot.autoconfigure.mail.MailSenderValidatorAutoConfiguration,\
org.springframework.boot.autoconfigure.mongo.embedded.EmbeddedMongoAutoConfiguration,\
org.springframework.boot.autoconfigure.mongo.MongoAutoConfiguration,\
org.springframework.boot.autoconfigure.mongo.MongoReactiveAutoConfiguration,\
org.springframework.boot.autoconfigure.mustache.MustacheAutoConfiguration,\
org.springframework.boot.autoconfigure.orm.jpa.HibernateJpaAutoConfiguration,\
org.springframework.boot.autoconfigure.quartz.QuartzAutoConfiguration,\
org.springframework.boot.autoconfigure.r2dbc.R2dbcAutoConfiguration,\
org.springframework.boot.autoconfigure.rsocket.RSocketMessagingAutoConfiguration,\
org.springframework.boot.autoconfigure.rsocket.RSocketRequesterAutoConfiguration,\
org.springframework.boot.autoconfigure.rsocket.RSocketServerAutoConfiguration,\
org.springframework.boot.autoconfigure.rsocket.RSocketStrategiesAutoConfiguration,\
org.springframework.boot.autoconfigure.security.servlet.SecurityAutoConfiguration,\
org.springframework.boot.autoconfigure.security.servlet.UserDetailsServiceAutoConfiguration,\
org.springframework.boot.autoconfigure.security.servlet.SecurityFilterAutoConfiguration,\
org.springframework.boot.autoconfigure.security.reactive.ReactiveSecurityAutoConfiguration,\
org.springframework.boot.autoconfigure.security.reactive.ReactiveUserDetailsServiceAutoConfiguration,\
org.springframework.boot.autoconfigure.security.rsocket.RSocketSecurityAutoConfiguration,\
org.springframework.boot.autoconfigure.security.saml2.Saml2RelyingPartyAutoConfiguration,\
org.springframework.boot.autoconfigure.sendgrid.SendGridAutoConfiguration,\
org.springframework.boot.autoconfigure.session.SessionAutoConfiguration,\
org.springframework.boot.autoconfigure.security.oauth2.client.servlet.OAuth2ClientAutoConfiguration,\
org.springframework.boot.autoconfigure.security.oauth2.client.reactive.ReactiveOAuth2ClientAutoConfiguration,\
org.springframework.boot.autoconfigure.security.oauth2.resource.servlet.OAuth2ResourceServerAutoConfiguration,\
org.springframework.boot.autoconfigure.security.oauth2.resource.reactive.ReactiveOAuth2ResourceServerAutoConfiguration,\
org.springframework.boot.autoconfigure.solr.SolrAutoConfiguration,\
org.springframework.boot.autoconfigure.task.TaskExecutionAutoConfiguration,\
org.springframework.boot.autoconfigure.task.TaskSchedulingAutoConfiguration,\
org.springframework.boot.autoconfigure.thymeleaf.ThymeleafAutoConfiguration,\
org.springframework.boot.autoconfigure.transaction.TransactionAutoConfiguration,\
org.springframework.boot.autoconfigure.transaction.jta.JtaAutoConfiguration,\
org.springframework.boot.autoconfigure.validation.ValidationAutoConfiguration,\
org.springframework.boot.autoconfigure.web.client.RestTemplateAutoConfiguration,\
org.springframework.boot.autoconfigure.web.embedded.EmbeddedWebServerFactoryCustomizerAutoConfiguration,\
org.springframework.boot.autoconfigure.web.reactive.HttpHandlerAutoConfiguration,\
org.springframework.boot.autoconfigure.web.reactive.ReactiveWebServerFactoryAutoConfiguration,\
org.springframework.boot.autoconfigure.web.reactive.WebFluxAutoConfiguration,\
org.springframework.boot.autoconfigure.web.reactive.error.ErrorWebFluxAutoConfiguration,\
org.springframework.boot.autoconfigure.web.reactive.function.client.ClientHttpConnectorAutoConfiguration,\
org.springframework.boot.autoconfigure.web.reactive.function.client.WebClientAutoConfiguration,\
org.springframework.boot.autoconfigure.web.servlet.DispatcherServletAutoConfiguration,\
org.springframework.boot.autoconfigure.web.servlet.ServletWebServerFactoryAutoConfiguration,\
org.springframework.boot.autoconfigure.web.servlet.error.ErrorMvcAutoConfiguration,\
org.springframework.boot.autoconfigure.web.servlet.HttpEncodingAutoConfiguration,\
org.springframework.boot.autoconfigure.web.servlet.MultipartAutoConfiguration,\
org.springframework.boot.autoconfigure.web.servlet.WebMvcAutoConfiguration,\
org.springframework.boot.autoconfigure.websocket.reactive.WebSocketReactiveAutoConfiguration,\
org.springframework.boot.autoconfigure.websocket.servlet.WebSocketServletAutoConfiguration,\
org.springframework.boot.autoconfigure.websocket.servlet.WebSocketMessagingAutoConfiguration,\
org.springframework.boot.autoconfigure.webservices.WebServicesAutoConfiguration,\
org.springframework.boot.autoconfigure.webservices.client.WebServiceTemplateAutoConfiguration

# Failure analyzers
org.springframework.boot.diagnostics.FailureAnalyzer=\
org.springframework.boot.autoconfigure.data.redis.RedisUrlSyntaxFailureAnalyzer,\
org.springframework.boot.autoconfigure.diagnostics.analyzer.NoSuchBeanDefinitionFailureAnalyzer,\
org.springframework.boot.autoconfigure.flyway.FlywayMigrationScriptMissingFailureAnalyzer,\
org.springframework.boot.autoconfigure.jdbc.DataSourceBeanCreationFailureAnalyzer,\
org.springframework.boot.autoconfigure.jdbc.HikariDriverConfigurationFailureAnalyzer,\
org.springframework.boot.autoconfigure.r2dbc.ConnectionFactoryBeanCreationFailureAnalyzer,\
org.springframework.boot.autoconfigure.session.NonUniqueSessionRepositoryFailureAnalyzer

# Template availability providers
org.springframework.boot.autoconfigure.template.TemplateAvailabilityProvider=\
org.springframework.boot.autoconfigure.freemarker.FreeMarkerTemplateAvailabilityProvider,\
org.springframework.boot.autoconfigure.mustache.MustacheTemplateAvailabilityProvider,\
org.springframework.boot.autoconfigure.groovy.template.GroovyTemplateAvailabilityProvider,\
org.springframework.boot.autoconfigure.thymeleaf.ThymeleafTemplateAvailabilityProvider,\
org.springframework.boot.autoconfigure.web.servlet.JspTemplateAvailabilityProvider
每一个这样的xxxAutoConfiguration类都是容器中的一个组件,最后都加入到容器中;用他们来做自动配置
每一个自动配置类可以进行自动配置功能;
一句话总结:根据当前不同的条件判断,决定这个配置类是否生效!
一但这个配置类生效;这个配置类就会给容器中添加各种组件;这些组件的属性是从对应的properties类中获取的,这些类里面的每一个属性又是和配置文件绑定的;
所有在配置文件中能配置的属性都是在xxxProperties类中封装着;配置文件能配置什么就可以参照某个功能对应的这个属性类
自动装配的原理:
- SpringBoot启动会加载大量的自动配置类
- 我们看我们需要的功能有没有在SpringBoot默认写好的自动配置类当中
- 我们再来看这个自动配置类中到底配置了哪些组件;(只要我们要用的组件存在在其中,我们就不需要再手动配置了)
- 给容器中自动配置类添加组件的时候,会从properties类中获取某些属性。我们只需要在配置文件中指定这些属性的值即可
- xxxxAutoConfiguration:自动配置类(给容器中添加组件)
- xxxxProperties:封装配置文件中相关属性
@Conditional
- 了解完自动装配的原理后,我们来关注一个细节问题,自动配置类必须在一定的条件下才能生效;@Conditional派生注解(Spring注解版原生的@Conditional作用)
- 作用:必须是@Conditional指定的条件成立,才给容器中添加组件,配置里面的所有内容才生效;

那么多的自动配置类,必须在一定的条件下才能生效;也就是说,我们加载了这么多的配置类,但不是所有的都生效了
我们可以通过启用 debug=true属性(默认为false);来让控制台打印自动配置报告,这样我们就可以很方便的知道哪些自动配置类生效
// 开启SpringBoot的调试类
debug=true
- Postive matches:(自动配置类启用的:正匹配)
- Negative matches:(没有启动,没有匹配成功的自动配置类:负匹配)
- Unconditional classes:(没有条件的类)
输出的日志我们可以在这里看下:

SpringBoot Web开发
jar:webapp!
SpringBoot到底帮我们配置了什么?我们能不能进行修改?能修改哪些东西?能不能扩展?
- xxxxAutoConfiguration:向容器中自动配置组件
- xxxxProperties:自动配置类,装配配置文件中自定义的一些内容!
要解决的问题:
- 导入静态资源
- 首页
- jsp,模板引擎 Thymeleaf
- 装配扩展SpringMVC
- 增删改查
- 拦截器
- 国际化
静态资源
webjars

我们任意添加一个jsquery包


依此类推,优先级:resources > static(默认)> public
@Override
public void addResourceHandlers(ResourceHandlerRegistry registry) {
	if (!this.resourceProperties.isAddMappings()) {
		logger.debug("Default resource handling disabled");
		return;
	}
	Duration cachePeriod = this.resourceProperties.getCache().getPeriod();
	CacheControl cacheControl = this.resourceProperties.getCache().getCachecontrol().toHttpCacheControl();
	if (!registry.hasMappingForPattern("/webjars/**")) {
		customizeResourceHandlerRegistration(registry.addResourceHandler("/webjars/**")
				.addResourceLocations("classpath:/META-INF/resources/webjars/")
				.setCachePeriod(getSeconds(cachePeriod)).setCacheControl(cacheControl));
	}
	String staticPathPattern = this.mvcProperties.getStaticPathPattern();
	if (!registry.hasMappingForPattern(staticPathPattern)) {
		customizeResourceHandlerRegistration(registry.addResourceHandler(staticPathPattern)
				.addResourceLocations(getResourceLocations(this.resourceProperties.getStaticLocations()))
				.setCachePeriod(getSeconds(cachePeriod)).setCacheControl(cacheControl));
	}
}
private static final String[] CLASSPATH_RESOURCE_LOCATIONS = { "classpath:/META-INF/resources/",
			"classpath:/resources/", "classpath:/static/", "classpath:/public/" };
总结:
- 1、在SpringBoot,我们可以使用以下方式处理静态资源
- webjars(
localhost:8080/webjars) - public、static、/**、resources
- webjars(
- 2、优先级:resources > static(默认)> public
模板引擎
前端交给我们的页面,是HTML页面,如果是我们以前开发,我们需要把他们转成JSP页面,JSP好处就是当我们查出一些数据转发到JSP页面以后,我们可以用jsp轻松实现数据的显示,及交互等。jsp支持非常强大的功能,包括能写Java代码,但是呢,
- 第一:我们现在的这种情况,SpringBoot这个项目首先是以jar的方式,不是war
- 第二:我们用的还是嵌入式的Tomcat,所以呢,他现在默认是不支持jsp的
那不支持jsp,如果我们直接用纯静态页面的方式,那给我们开发会带来非常大的麻烦,那怎么办呢,SpringBoot推荐你可以来使用模板引擎——Thymeleaf。类似的模板引擎有jsp、freemarker等等,那如何去使用?
第一步:引入Thymeleaf,对于SpringBoot来说,什么事情不都是一个start的事情嘛,我们在去项目中引入一下。
- 1、Thymeleaf官网:
https://www.thymeleaf.org/ - 2、Thymeleaf在Github的主页:
https://github.com/thymeleaf/thymeleaf - 3、Spring官方文档:
https://docs.spring.io/spring-boot/docs/2.1.6.RELEASE/reference/htmlsingle/#using-boot-starter,找到我们对应的版本
<!-- Thymeleaf 我们都是基于3.x开发的-->

<dependency>
    <groupId>org.thymeleaf</groupId>
    <artifactId>thymeleaf-spring5</artifactId>
</dependency>
<dependency>
    <groupId>org.thymeleaf.extras</groupId>
    <artifactId>thymeleaf-extras-java8time</artifactId>
</dependency>


结论:只要需要使用thymeleaf,只需要导入对应的依赖就可以了!我们将html放在我们的templates即可
Thymeleaf语法
| order | Feature | Attributes |
|---|---|---|
| 1 | Fragment inclusion | th:insert & th:replace |
| 2 | Fragment iteration | th:each |
| 3 | Conditional evaluation | th:if & th:unless & th:switch & th:case |
| 4 | Local variable definition | th:object & th:with |
| 5 | General attribute modification | th:attr & th:attrprepend & th:attrappend |
| 6 | Specific attribute modification | th:value & th:href & th:src & … |
| 7 | Text(tag body modification) | th:text & th:utext |
| 8 | Fragment specificaiton | th:fragment |
| 9 | Fragment removal | th:remove |
演示一个小案例:(大致和JSP相似)
package com.blb.controller;

import org.springframework.stereotype.Controller;
import org.springframework.ui.Model;
import org.springframework.web.bind.annotation.RequestMapping;

import java.util.Arrays;

@Controller
public class IndexController {

    @RequestMapping("/test")
    public String test(Model model){
        model.addAttribute("msg", "<h1>hello SpringBoot</h1>");
        model.addAttribute("users", Arrays.asList("huake", "wuli"));
        return "test";
    }
}
<!DOCTYPE html>
<html lang="en" xmlns:th="http://www.thymeleaf.org">
<head>
    <meta charset="UTF-8">
    <title>This is Thymeleaf</title>
</head>
<body>
    <!--所有的html元素都可以被thymeleaf替换接管  th:元素名-->
    <div th:text="${msg}"></div>
    <div th:utext="${msg}"></div>

<hr>
<!--两种方式遍历, 但一般使用第一种-->
<h3 th:each="user:${users}" th:text="${user}"></h3>
<h3 th:each="user:${users}">[[ ${user} ]]</h3>
</body>
</html>

SpringMVC自动配置
在进行测试前,我们还需要知道一个东西,就是SpringBoot对我们的SpringMVC还做了哪些配置,包括如何扩展,如何定制。
- 途径一:源码分析
- 途径二:官方文档
地址:https://docs.spring.io/spring-boot/docs/2.1.6.RELEASE/reference/html/boot-features-developing-web-applications.html
修改SpringBoot的默认配置
- 方式一:
- 这么多的配置,原理都是一样的,SpringBoot在自动配置很多组件的时候,先看容器中有没有用户自己配置的(如果用户自己配置@bean),如果有就用用户配置的,如果没有就用自动配置的;如果有些组件可以存在多个,比如我们的视图解析器,就将用户配置的和自己默认的组合起来!
SpringBoot的JDBC
对于数据访问层,无论是 SQL(关系型数据库)还是NOSQL(非关系数据库),SpringBoot底层都是采用SpringData的方式进行统一处理
SpringBoot底层都是采用SpringData的方式进行统一处理各种数据库,SpringData也是Spring中与SpringBoot、SpringCloud等齐名的知名项目
在pom.xml配置中
// JDBC
<dependency>
    <groupId>org.springframework.boot</groupId>
    <artifactId>spring-boot-starter-jdbc</artifactId>
</dependency>

// Web
<dependency>
    <groupId>org.springframework.boot</groupId>
    <artifactId>spring-boot-starter-web</artifactId>
</dependency>

// MySQL
<dependency>
    <groupId>mysql</groupId>
    <artifactId>mysql-connector-java</artifactId>
    <scope>runtime</scope>
</dependency>
在创建项目后,我们可以选择application.properties里面配置JDBC属性,但我们之前认识到了yaml语言,所以通过yaml来配置

如果你采用的是阿里云的途径来创建项目,则会报如下错;原因是因为通过阿里云创建的项目,在application.properties里面就默认配置好了JDBC的属性,所以只需要注释掉所有application.properties的配置信息即可
java.sql.SQLException: Access denied for user '***'@'localhost' (using password: YES)
在我们的测试代码中
package com.zya;

import org.junit.jupiter.api.Test;
import org.springframework.beans.factory.annotation.Autowired;
import org.springframework.boot.test.context.SpringBootTest;

import javax.sql.DataSource;
import java.sql.Connection;
import java.sql.SQLException;

@SpringBootTest
class DemoApplicationTests {

    @Autowired
    DataSource dataSource;

    @Test
    void contextLoads() {
        // 查看一下默认的数据源   : dbcp
        System.out.println(dataSource.getClass());  // class com.zaxxer.hikari.HikariDataSource

        // 获取数据库连接
        try {
            Connection connection = dataSource.getConnection();
            System.out.println(connection);

            // xxxx Template : SpringBoot已经配置好模板Bean, 拿来即用 CRUD

            // 关闭
            connection.close();
        } catch (SQLException throwables) {
            throwables.printStackTrace();
        }
    }

}
DataSource dataSource的作用:
- 通过DataSource可以获取数据库连接Connection
- 通过DataSource创建JdbcTemplate操作数据库
@Autowired
DataSource dataSource;
接着简单写一下我们JDBC的增删改查(但SpringBoot框架真的很好,基本内容都应经帮忙配置好了)
package com.zya.controller;

import org.springframework.beans.factory.annotation.Autowired;
import org.springframework.jdbc.core.JdbcTemplate;
import org.springframework.stereotype.Controller;
import org.springframework.web.bind.annotation.GetMapping;
import org.springframework.web.bind.annotation.PathVariable;
import org.springframework.web.bind.annotation.RestController;

import java.util.List;
import java.util.Map;

@RestController
public class JDBCController {

    @Autowired
    JdbcTemplate jdbcTemplate;

    // 查询数据库的所有信息
    // 没有实体类 数据库中的东西通过 Map 获取
    @GetMapping("/userList")
    public List<Map<String, Object>> userList(){
        String sql = "select * from Springuser";
        List<Map<String, Object>> list_maps = jdbcTemplate.queryForList(sql);
        return list_maps;
    }

	// 增加用户
    @GetMapping("/addUser")
    public String addUser(){
        String sql = "insert into Springboot01.springuser(id, name, pwd, perms) values (2, 'huake', '123', 'world')";
        jdbcTemplate.update(sql);
        return "add-ok";
    }

	// 更新用户
    @GetMapping("/updateUser/{id}")
    public String updateUser(@PathVariable("id") int id){
        String sql = "update Springboot01.springuser set name=?, pwd=? where id="+id;

        // 封装
        Object[] objects = new Object[2];
        objects[0] = "小明";
        objects[1] = "zzzzz";
        jdbcTemplate.update(sql, objects);
        return "update-ok";
    }

	// 删除用户
    @GetMapping("/deleteUser/{id}")
    public String deleteUser(@PathVariable("id") int id){
        String sql = "delete from Springboot01.springuser where id=?";
        jdbcTemplate.update(sql, id);
        return "update-ok";
    }

}
@PathVariable()
- 当使用@RequestMapping URI template 样式映射时, 即 someUrl/{paramId},
这时的paramId可通过 @Pathvariable注解绑定它传过来的值到方法的参数上。
自定义数据源 DruidDataSource
Druid简介:
- Druid是阿里巴巴开源平台上一个数据库连接池实现,结合了C3P0、DBCP、PROXOOL等DB池的优点,同时加入了日志监控
- Druid可以很好的监控DB池连接和SQL的执行情况,天生就是针对监控而生的DB连接池
- SpringBoot2.0以上默认使用Hikari数据源,可以说Hikari与Driud都是当前JavaWeb上最优秀的数据源,接下来重点介绍SpringBoot如何集成Druid数据源,如何实现数据库监控
com.alibaba.druid.pool.DruidDataSource基本配置参数如下:
<bean id="dataSource" class="com.alibaba.druid.pool.DruidDataSource" init-method="init" destroy-method="close">
<!-- 数据库驱动 -->
<property name="driverClassName" value="${jdbc.driverClassName}" />
      <!-- 基本属性 url、user、password -->
      <property name="url" value="${jdbc_url}" />
      <property name="username" value="${jdbc_user}" />
      <property name="password" value="${jdbc_password}" />
      <!-- 配置初始化大小、最小、最大 -->
      <property name="initialSize" value="1" />
      <property name="minIdle" value="1" />
      <property name="maxActive" value="20" />
      <!-- 配置获取连接等待超时的时间 -->
      <property name="maxWait" value="60000" />
      <!-- 配置间隔多久才进行一次检测,检测需要关闭的空闲连接,单位是毫秒 -->
      <property name="timeBetweenEvictionRunsMillis" value="60000" />
      <!-- 配置一个连接在池中最小生存的时间,单位是毫秒 -->
      <property name="minEvictableIdleTimeMillis" value="300000" />
      <property name="validationQuery" value="SELECT 'x'" />
      <property name="testWhileIdle" value="true" />
      <property name="testOnBorrow" value="false" />
      <property name="testOnReturn" value="false" />
      <!-- 打开PSCache,并且指定每个连接上PSCache的大小 -->
      <property name="poolPreparedStatements" value="true" />
      <property name="maxPoolPreparedStatementPerConnectionSize" value="20" />
      <!-- 配置监控统计拦截的filters -->
      <property name="filters" value="stat" />
  </bean>
application.yml配置
spring:
  datasource:
    username: root
    password: zya11230318
    url: jdbc:mysql://localhost:3306/springboot01?characterEncoding=utf-8&serverTimezone=GMT%2B8
    driver-class-name: com.mysql.cj.jdbc.Driver
    type: com.alibaba.druid.pool.DruidDataSource

    # SpringBoot 默认是不注入这些属性值的,需要自己绑定
    # druid 数据源专有配置
    initialSize: 5
    minIdle: 5
    maxActive: 20
    maxWait: 60000
    timeBetweenEvictionRunsMillis: 60000
    minEvictableIdleTimeMillis: 300000
    validationQuery :SELECT 1 FROM DUAL
    testWhileIdle: true
    testOnBorrow: false
    testOnReturn: false
    poolPreparedStatements: true

    # 配置监控统计拦截的filters, stat:监控统计、Log4j(日志记录)、wall(防御sql注入)
    # 如果允许时报错 java.lang.ClassNotFoundException: org.apache.log4j.Priority
    # 则导入 log4j 依赖即可, Maven 地址: https://mvnrepository.com/artifact/log4j/log4j
    filters: stat,wall,log4j
    maxPoolPreparedStatementPerConnectionSize: 20
    useGlobalDataSourceStat: true
    connectionProperties: druid.stat.mergeSql=true;druid.stat.slowSqlMillis=500
后台监控(阿里巴巴)
package com.zya.config;

import com.alibaba.druid.pool.DruidDataSource;
import com.alibaba.druid.support.http.StatViewServlet;
import com.alibaba.druid.support.http.WebStatFilter;
import org.springframework.boot.context.properties.ConfigurationProperties;
import org.springframework.boot.web.servlet.FilterRegistrationBean;
import org.springframework.boot.web.servlet.ServletRegistrationBean;
import org.springframework.context.annotation.Bean;
import org.springframework.context.annotation.Configuration;

import javax.servlet.Filter;
import javax.sql.DataSource;
import java.util.HashMap;

@Configuration
public class DruidConfig {

    @ConfigurationProperties(prefix = "spring.datasource")
    @Bean
    public DataSource druidDataSource(){
        return new DruidDataSource();
    }

    // 后台监控 : web.xml, ServletRegistrationBean
    // 因为SpringBoot内置了servlet容器,所以没有web.xml, 代替方法: ServletRegistrationBean
    @Bean
    public ServletRegistrationBean a(){
        ServletRegistrationBean<StatViewServlet> bean = new ServletRegistrationBean<>(new StatViewServlet(), "/druid/*");

        // 后台需要有人登录, 账号密码配置
        HashMap<String, String> initParameters = new HashMap<>();
        // 增加配置
        initParameters.put("loginUsername", "admin");   // 登录key 是固定的 loginUsername和loginPassword
        initParameters.put("loginPassword", "123456");

        // 允许谁能访问
        initParameters.put("allow", "");    // 为空则谁都能访问

        // 禁止谁不能访问 initParameters.put("huake", "192.168.11.123");    // 为空则谁都能访问

        bean.setInitParameters(initParameters);   // 设置初始化参数
        return bean;
    }

    // filter
    @Bean
    public FilterRegistrationBean webStatFilter(){
        FilterRegistrationBean<Filter> bean = new FilterRegistrationBean();
        bean.setFilter(new WebStatFilter());

        // 可以过滤哪些请求呢?
        HashMap<String, String> initParameters = new HashMap<>();

        // 这些东西不进行统计
        initParameters.put("exclusions", "*.js, *.css, /druid/*");

        bean.setInitParameters(initParameters);

        return bean;
    }

}
启动我们的项目后,在路径上输入druid,就可以进入登录页面;输入账号密码

进入到后台页面


当我们执行之前写的sql语句时,这个后台就会记录下来,还有好多功能,就不在这一一演示了。
整合Mybatis框架
整体建包样式:

mybatis-spring-boot-starter: 整合
<dependency>
    <groupId>org.mybatis.spring.boot</groupId>
    <artifactId>mybatis-spring-boot-starter</artifactId>
    <version>2.1.1</version>
</dependency>
application.properties
- mybatis.mapper-locations=classpath:mybatis/*.xml(一定要注意路径不要找错了!!!)
# 应用名称
spring.application.name=demo
# 应用服务 WEB 访问端口
server.port=8080
# 数据库驱动:
spring.datasource.driver-class-name=com.mysql.cj.jdbc.Driver
# 数据源名称
spring.datasource.name=defaultDataSource
# 数据库连接地址
spring.datasource.url=jdbc:mysql://localhost:3306/mybatis?serverTimezone=UTC&useUnicode=true&characterEncoding=utf-8
# 数据库用户名&密码:
spring.datasource.username=root
spring.datasource.password=zya11230318

# 整合mybatis
mybatis.type-aliases-package=com.zya.pojo
mybatis.mapper-locations=classpath:mybatis/*.xml
创建一个User类
- @Data 注解:主要作用是提高代码的简洁,使用这个注解可以省去代码中大量的get()、 set()、 toString()等方法;
- @NoArgsConstructor : 生成一个无参数的构造方法
- @AllArgsContructor: 会生成一个包含所有变量的构造方法,默认生成的方法是 public 的
package com.zya.pojo;

import lombok.AllArgsConstructor;
import lombok.Data;
import lombok.NoArgsConstructor;

@Data
@NoArgsConstructor
@AllArgsConstructor
public class User {

    private int id;
    private String name;
    private String pwd;
}
UserMapper接口
- @Mapper注解是由Mybatis框架中定义的一个描述数据层接口的注解,注解往往起到的都是一个描述性作用,用于告诉spring框架此接口的实现类由Mybatis负责创建,并将其实现类对象存储到spring容器中。
首先我们需要引入jar包(依赖),分别是JDBC、MYSQL、MYBATI
@Mapper和@Repository的区别:
- 使用@mapper后,不需要在spring配置中设置扫描地址,通过mapper.xml里面的namespace属性对应相关的mapper类,spring将动态的生成Bean后注入到ServiceImpl中。
- @repository则需要在Spring中配置扫描包地址,然后生成dao层的bean,之后被注入到ServiceImpl中
package com.zya.mapper;

import com.zya.pojo.User;
import org.apache.ibatis.annotations.Mapper;
import org.springframework.stereotype.Repository;

import java.util.List;

// 这个注解表示了这是一个 mybatis的mapper类
@Mapper
@Repository
public interface UserMapper {

    List<User> queryUserList();

    User queryUserById(int id);

    int addUser(User user);

    int updateUser(User user);

    int deleteUser(int id);
}
UserController类
@RestController:
- 相当于@Controller+@ResponseBody两个注解的结合,返回json数据不需要在方法前面加@ResponseBody注解了,但使用@RestController这个注解,就不能返回jsp,html页面,视图解析器无法解析jsp,html页面
package com.zya.controller;

import com.zya.mapper.UserMapper;
import com.zya.pojo.User;
import org.springframework.beans.factory.annotation.Autowired;
import org.springframework.web.bind.annotation.GetMapping;
import org.springframework.web.bind.annotation.RestController;

import java.util.List;

@RestController
public class UserController {

    @Autowired
    private UserMapper userMapper;

    // 查询所有人信息
    @GetMapping("/queryUserList")
    public List<User> queryUserList(){
        List<User> userList = userMapper.queryUserList();
        for (User user:userList) {
            System.out.println(user);
        }
        return userList;
    }

    // 添加一个用户
    @GetMapping("/addUser")
    public String addUser(){
        userMapper.addUser(new User(4, "hello", "123"));
        return "ok";
    }

    // 修改一个用户信息
    @GetMapping("/updateUser")
    public String updateUser(){
        userMapper.updateUser(new User(4, "world", "1233"));
        return "ok";
    }

    // 删除一个用户
    @GetMapping("/deleteUser")
    public String deleteUser(){
        userMapper.deleteUser(4);
        return "ok";
    }
}
mybatis下的UserMapper.xml配置
<?xml version="1.0" encoding="UTF-8" ?>
<!DOCTYPE mapper
        PUBLIC "-//mybatis.org//DTD Mapper 3.0//EN"
        "http://mybatis.org/dtd/mybatis-3-mapper.dtd">
<mapper namespace="com.zya.mapper.UserMapper">

    <select id="queryUserList" resultType="User">
        select * from userone
    </select>

    <select id="queryUserById" resultType="User">
        select * from userone where id=#{id}
    </select>

    <insert id="addUser" parameterType="User">
        insert into userone (id, name, pwd) values (#{id}, #{name}, #{pwd})
    </insert>

    <update id="updateUser" parameterType="User">
        update userone set name=#{name}, pwd=#{pwd} where id=#{id}
    </update>

    <delete id="deleteUser" parameterType="int">
        delete from userone where id=#{id}
    </delete>

</mapper>
SpringSecurity(安全)
简介:
Spring Security是针对Spring项目的安全框架,也是SpringBoot底层安全模块默认的技术选型,他可以实现强大的Web安全控制,我们仅需要引入spring-boot-starter-security模块,进行少量的配置,即可实现强大的安全管理
记住几个类:
- WebSecurityConfigurerAdapter:自定义Security策略
- AuthenticationManagerBuilder:自定义认证策略
- @EnableWebSecurity:开启WebSecurity模式(@Enablexxxx 开启某个功能)
Spring Security的两个主要目标是 “认证” 和 “授权”(访问控制)
在web开发中,安全第一位!类似:过滤器、拦截器等等
功能性需求:否
做网站时,安全应该在设计之初考虑
- 漏洞,隐私泄露
- 架构一旦确定
shiro、SpringSecurity:很像,除了类不一样,名字不一样;
认证,授权(vip1、vip2、vip3)
- 功能权限
- 访问权限
- 菜单权限
- … 拦截器、过滤器:大量的原生代码~冗余
MVC - Spring - SpringBoot - 框架思想
认证和授权:
package com.zya.config;

import org.springframework.security.config.annotation.authentication.builders.AuthenticationManagerBuilder;
import org.springframework.security.config.annotation.web.builders.HttpSecurity;
import org.springframework.security.config.annotation.web.configuration.EnableWebSecurity;
import org.springframework.security.config.annotation.web.configuration.WebSecurityConfigurerAdapter;
import org.springframework.security.crypto.bcrypt.BCryptPasswordEncoder;

// AOP: 拦截器
@EnableWebSecurity
public class SecurityConfig extends WebSecurityConfigurerAdapter {

    // 授权
    // 链式编程
    @Override
    protected void configure(HttpSecurity http) throws Exception {
        // 首页所有人可以访问, 但是功能页只有对应有权限的人才能访问

        // 请求授权的规则~
        http.authorizeRequests()
                .antMatchers("/").permitAll()   // 所有人都可以访问
                .antMatchers("/level1/**").hasRole("vip1")      // 只允许vip1的人访问
                .antMatchers("/level2/**").hasRole("vip2")      // 只允许vip2的人访问
                .antMatchers("/level3/**").hasRole("vip3");     // 只允许vip3的人访问


        // 没有权限默认会到登录页面
        // login
        // 定制登录页
        http.formLogin().loginPage("/toLogin");

        // 注销(开启了注销功能, 跳到首页)
        http.logout().logoutSuccessUrl("/");
        // 防止网站工具 get post
        http.csrf().disable();  // 关闭csrf功能(登录失败可能存在的原因)

        // 开启记住我功能(cookie, 默认保存两周)
        http.rememberMe();
    }

    // 认证, SpringBoot 2.1.X 可以直接使用~
    // 密码编码: PasswordEncoder
    // 在Spring Security 5.0+ 新增了很多的加密方法
    @Override
    protected void configure(AuthenticationManagerBuilder auth) throws Exception {

        // 这些数据正常应该从数据库中读取
        auth.inMemoryAuthentication().passwordEncoder(new BCryptPasswordEncoder())
                .withUser("huake").password(new BCryptPasswordEncoder().encode("123456")).roles("vip1", "vip2", "vip3")
                .and()
                .withUser("wuda").password(new BCryptPasswordEncoder().encode("123")).roles("vip1")
                .and()
                .withUser("root").password(new BCryptPasswordEncoder().encode("123456")).roles("vip1", "vip2", "vip3");
    }
}
Shiro
什么是Shiro:
- Apache Shiro是一个Java的安全(权限)框架
- Shiro可以非常容易的开发出足够好的应用,其不仅可以用在JavaSE环境,也可以用在JavaEE环境
- Shiro可以完成:认证、授权、加密、会话管理、Web集成、缓存等
- 下载地址:
http://shiro.apache.org/
Shiro有哪些功能:
- Authentication:身份验证、登录、验证用户是不是拥有相应的身份;
- Authorization:授权(即权限验证,验证某个已认证的用户是否拥有某个权限,即判断用户能否进行什么操作,如:验证某个用户是否拥有某个角色,或者细密度的验证某个用户对某个资源是否具有某个权限)
- Session Manager:会话管理,即用户登录后就是第一次会话,在没有退出之前,它的所有信息都在会话中;会话可以是普通的JavaSE环境,也可以是Web环境;
- Cryptography:加密,保护数据的安全性,如密码加密存储到数据库中,而不是明文存储
- Web Support:Web支持,可以非常容易的集成到Web环境
- Caching:缓存,比如用户登录后,其用户信息,拥有的角色、权限不必每次去查,这样可以提高效率
- Concurrency:Shiro支持多线程应用的并发验证,即,如果在一个线程中开启另一个线程,能把权限自动的传播过去
- Testing:提供测试支持
- Run As:允许一个用户假装为另一个用户(如果他们允许)的身份进行访问
- Remember Me:记住我,这个是非常常见的功能,即一次登录后,下次再来的话就不用登录了
Shiro架构(外部)

- Subject:任何可以与应用交互的“用户”
- Security Manager:相当于SpringMVC中的DispatcherServlet;是Shiro的心脏,所有具体的交互都通过Security Manager进行控制,它管理者所有的Subject,且负责进行认证、授权、会话、及缓存的管理
- Authenticator:负责Subject认证,是一个扩展点,可以自定义实现;可以使用认证策略(Authentication Strategy),即什么情况下算用户认证通过了;
- Authorizer:授权器,即访问控制器,用来决定主体是否有权限进行相应的操作;即控制着用户能访问应用中的那些功能
- Realm:可以有一个或者多个的realm,可以认为是安全实体数据源,即用于获取安全实体的,可以用JDBC实现,也可以是内存实现等等,由用户提供;所以一般在应用中都需要实现自己的realm
- SessionManager:管理Session生命周期的组件,而Shiro并不仅仅可以用在Web环境,也可以用在普通的JavaSE环境中
- CacheManager:缓存控制器,来管理如用户,角色,权限等缓存的;因为这些数据基本上很少改变,放到缓存中可以提高访问的性能
- Cryptography:密码模块,Shiro提高了一些常见的加密组件用于密码加密,解密等
Swagger
学习目标:
- 了解Swagger的作用和概念
- 了解前后端分离
- 在SpringBoot中集成Swagger
Swagger简介:
前后端分离:
- Vue + SpringBoot
- 后端时代:前端只用管理静态页面;html==>后端。模板引擎JSP==>后端是主力
- 前后端分离时代:
- 后端:控制层,服务层,数据访问层【后端团队】
- 前端:前端控制层,视图层【前端团队】
- 伪造后端数据,JSON。已经存在了,不需要后端,前端工程依旧能够跑起来
- 前后端通过API交互
- 前后端相对独立,松耦合;
- 前后端甚至可以部署到不同的服务器上
产生一个问题:
- 前后端集成联调,前端人员和后端人员无法做到,“即使协商,尽早解决”,最终导致问题集中爆发
- 首先指定schema[计划的提纲],实时更新最新的API,降低集成的风险;
- 早些年:制定word计划文档;
- 前后端分离:前端测试后端接口:postman
- 后端提供接口,需要实时更新最新的消息及改动!
Swagger:
- 号称世界上最流行的Api框架
- RestFul Api文档在线自动生成工具 =>
Api文档与API定义同步更新 - 直接运行,可以在线测试API接口;
- 支持多种语言:Java、PHP…
- 官网:
https://swagger.io/
在项目中使用Swagger需要SpringBox:
- Swagger2
- UI
SpringBoot集成Swagger
新建一个SpringBoot = Web项目
导入相关依赖:
<!-- https://mvnrepository.com/artifact/io.springfox/springfox-swagger2 -->
<dependency>
    <groupId>io.springfox</groupId>
    <artifactId>springfox-swagger2</artifactId>
    <version>3.0.0</version>
</dependency>

<!-- https://mvnrepository.com/artifact/io.springfox/springfox-swagger-ui -->
<dependency>
    <groupId>io.springfox</groupId>
    <artifactId>springfox-swagger-ui</artifactId>
    <version>3.0.0</version>
</dependency>
配置Swagger
Swagger的bean实例Docket:
package com.zya.config;

import org.springframework.context.annotation.Bean;
import org.springframework.context.annotation.Configuration;
import springfox.documentation.service.ApiInfo;
import springfox.documentation.service.Contact;
import springfox.documentation.spi.DocumentationType;
import springfox.documentation.spring.web.plugins.Docket;
import springfox.documentation.swagger2.annotations.EnableSwagger2;

import java.util.ArrayList;

@Configuration
@EnableSwagger2     // 开启Swagger2
public class SwaggerConfig {

    // 配置了Swagger的Bean实例
    @Bean
    public Docket docket(){
        return new Docket(DocumentationType.SWAGGER_2)
                .apiInfo(apiInfo());
    }

    // 配置Swagger信息=apiInfo
    private ApiInfo apiInfo(){

        // 作者信息
        Contact contact = new Contact("huake", "http://www.apache.org/licenses/LICENSE-2.0", "111");

        return new ApiInfo(
                "Api Documentation",
                "Api Documentation",
                "1.0",
                "urn:tos",
                contact,
                "Apache 2.0",
                "http://www.apache.org/licenses/LICENSE-2.0",
                new ArrayList<>());
    }

}
Swagger配置扫描接口
Docket.select():
// 配置了Swagger的Bean实例
@Bean
public Docket docket(){
    return new Docket(DocumentationType.SWAGGER_2)
            .apiInfo(apiInfo())
            .select()
            // RequestHandlerSelectors: 配置要扫描接口的方式
            // basePackage: 指定要扫描的包
            // any(): 扫描全部
            // none(): 都不扫描
            // withClassAnnotation: 扫描类上的注解, 参数是以一个注解的反射对象
            // withMethodAnnotation: 扫描方法上的注解
            .apis(RequestHandlerSelectors.basePackage("com.zya.controller"))
            // 过滤路径
            .paths(PathSelectors.ant("/kuang/**"))
            .build();
}
配置是否启动Swagger
// 配置了Swagger的Bean实例
    @Bean
    public Docket docket(){
        return new Docket(DocumentationType.SWAGGER_2)
                .apiInfo(apiInfo())
                .enable(false)  // enable是否启动, 如果为False, 则Swagger不能在浏览器中访问
                .select()
.apis(RequestHandlerSelectors.basePackage("com.zya.controller"))
                // 过滤路径
                //.paths(PathSelectors.ant("/kuang/**"))
                .build();
    }
问:我只希望我的Swagger在生产环境中使用,在发布的时候不使用?
- 判断是不是生产环境 flag=false
- 注入enable(flag)
配置API文档的分组:
.groupName("hello")
多个Docket实例即可配置多个分组:
@Bean
public Docket docket1(){
    return new Docket(DocumentationType.SWAGGER_2).groupName("A");
}

@Bean
public Docket docket2(){
    return new Docket(DocumentationType.SWAGGER_2).groupName("B");
}

@Bean
public Docket docket3(){
    return new Docket(DocumentationType.SWAGGER_2).groupName("C");
}
实体类配置:
package com.zya.pojo;

import io.swagger.annotations.ApiModel;
import io.swagger.annotations.ApiModelProperty;

// @Api(注释)
@ApiModel("用户实体类")
public class User {

    @ApiModelProperty("用户名")
    public String username;
    @ApiModelProperty("密码")
    public String password;
}
package com.zya.controller;

import com.zya.pojo.User;
import io.swagger.annotations.ApiOperation;
import io.swagger.annotations.ApiParam;
import org.springframework.web.bind.annotation.GetMapping;
import org.springframework.web.bind.annotation.PostMapping;
import org.springframework.web.bind.annotation.RequestMapping;
import org.springframework.web.bind.annotation.RestController;

// Operation接口
@ApiOperation("Hello控制类")
@RestController
public class HelloController {

    @RequestMapping(value = "/hello")
    public String hello(){
        return "hello";
    }

    // 只要我们的接口中, 返回值中存在实体类, 他就会被扫描到Swagger中
    @PostMapping(value = "/user")
    public User user(){
        return new User();
    }

    // Operation接口, 不是放在类上的, 是方法
    @ApiOperation("Hello控制类")
    @GetMapping(value = "/hello2")
    public String hello2(@ApiParam("用户名") String username){
        return "hello"+username;
    }
}
总结:
- 1、我们可以通过Swagger给一些比较难理解的属性或者接口,增加注释信息
- 2、接口文档实时更新
- 3、可以在线测试
Swagger是一个优秀的工具,几乎所有大公司都有使用它 【注意点:在正式发布的时候,关闭Swagger!!!出于安全考虑。而且节省内存】
任务
- 异步任务
- 定时任务
- 邮件发送
如果前端响应3秒中之后才能给出数据,那给用户的体验感就非常差。所以我可以通过告诉Spring,我这个任务是一个异步任务,则就会出现不一样的效果。
AsyncController.java
package com.zya.controller;

import com.zya.service.AsyncService;
import org.springframework.beans.factory.annotation.Autowired;
import org.springframework.web.bind.annotation.RequestMapping;
import org.springframework.web.bind.annotation.RestController;

@RestController
public class AsyncController {

    @Autowired
    AsyncService asyncService;

    @RequestMapping("/hello")
    public String hello(){
        asyncService.hello();   // 停止3秒
        return "ok";
    }

}
AsyncService.java
package com.zya.service;

import org.springframework.scheduling.annotation.Async;
import org.springframework.stereotype.Service;

@Service
public class AsyncService {

    // 告诉Spring这是一个异步的方法
    @Async
    public void hello(){
        try {
            Thread.sleep(3000);
        } catch (InterruptedException e) {
            e.printStackTrace();
        }
        System.out.println("数据正在处理...");
    }

}
DemoApplication .java
package com.zya;

import org.springframework.boot.SpringApplication;
import org.springframework.boot.autoconfigure.SpringBootApplication;
import org.springframework.scheduling.annotation.EnableAsync;

// 开启异步注解功能
@EnableAsync
@SpringBootApplication
public class DemoApplication {

    public static void main(String[] args) {
        SpringApplication.run(DemoApplication.class, args);
    }

}


 2159
2159


 被折叠的 条评论
为什么被折叠?
被折叠的 条评论
为什么被折叠?
 到【灌水乐园】发言


