


目录
在SwitchA配置5条静态路由,并在将这些静态路由引入到OSPF协议中
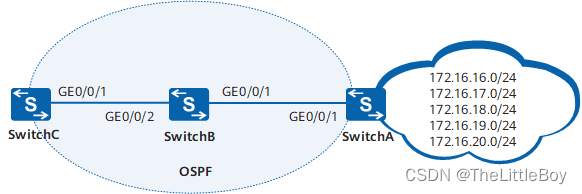
组网需求
如图所示,运行OSPF协议的网络中,SwitchA从Internet网络接收路由,并为OSPF网络提供了Internet路由。用户希望OSPF网络中只能访问172.16.17.0/24、172.16.18.0/24和172.16.19.0/24三个网段的网络,其中SwitchC连接的网络只能访问172.16.18.0/24网段的网络。
配置思路
采用如下的思路配置对路由进行过滤:
-
在SwitchA上配置路由策略,在路由发布时运用路由策略,使SwitchA仅提供路由172.16.17.0/24、172.16.18.0/24、172.16.19.0/24给SwitchB,实现OSPF网络中只能访问172.16.17.0/24、172.16.18.0/24和172.16.19.0/24三个网段的网络。
-
在SwitchC上配置路由策略,在路由引入时运用路由策略,使SwitchC仅接收路由172.16.18.0/24,实现SwitchC连接的网络只能访问172.16.18.0/24网段的网络。
操作步骤
-
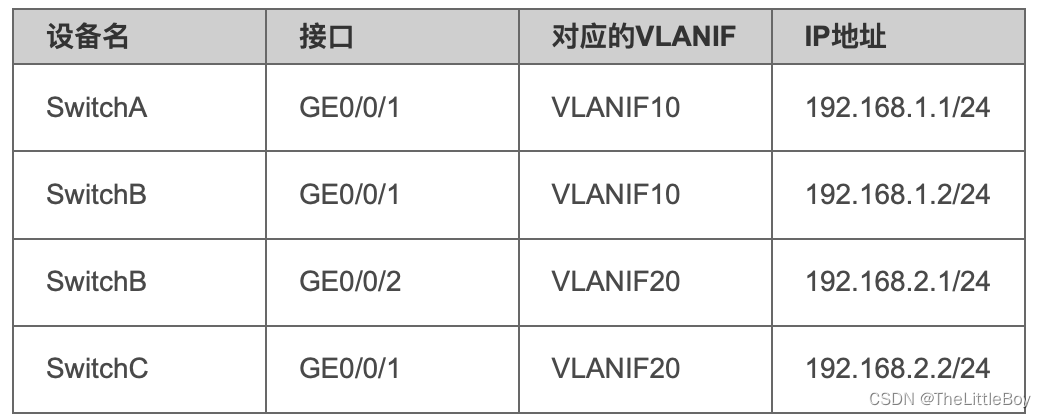
配置各接口所属的VLAN
# 配置SwitchA。SwitchB和SwitchC的配置与SwitchA类似。
<HUAWEI> system-view
[HUAWEI] sysname SwitchA
[SwitchA] vlan batch 10
[SwitchA] interface gigabitethernet 0/0/1
[SwitchA-GigabitEthernet0/0/1] port link-type trunk
[SwitchA-GigabitEthernet0/0/1] port trunk allow-pass vlan 10
[SwitchA-GigabitEthernet0/0/1] quit
-
配置各VLANIF接口的IP地址
# 配置SwitchA。SwitchB和SwitchC的配置与SwitchA类似。
[SwitchA] interface vlanif 10
[SwitchA-Vlanif10] ip address 192.168.1.1 24
[SwitchA-Vlanif10] quit
-
配置OSPF基本功能
# SwitchA的配置。
[SwitchA] ospf
[SwitchA-ospf-1] area 0
[SwitchA-ospf-1-area-0.0.0.0] network 192.168.1.0 0.0.0.255
[SwitchA-ospf-1-area-0.0.0.0] quit
[SwitchA-ospf-1] quit
# SwitchB的配置。
[SwitchB] ospf
[SwitchB-ospf-1] area 0
[SwitchB-ospf-1-area-0.0.0.0] network 192.168.1.0 0.0.0.255
[SwitchB-ospf-1-area-0.0.0.0] network 192.168.2.0 0.0.0.255
[SwitchB-ospf-1-area-0.0.0.0] quit
[SwitchB-ospf-1] quit
# SwitchC的配置。
[SwitchC] ospf
[SwitchC-ospf-1] area 0
[SwitchC-ospf-1-area-0.0.0.0] network 192.168.2.0 0.0.0.255
[SwitchC-ospf-1-area-0.0.0.0] quit
[SwitchC-ospf-1] quit
-
在SwitchA配置5条静态路由,并在将这些静态路由引入到OSPF协议中
[SwitchA] ip route-static 172.16.16.0 24 NULL 0
[SwitchA] ip route-static 172.16.17.0 24 NULL 0
[SwitchA] ip route-static 172.16.18.0 24 NULL 0
[SwitchA] ip route-static 172.16.19.0 24 NULL 0
[SwitchA] ip route-static 172.16.20.0 24 NULL 0
[SwitchA] ospf
[SwitchA-ospf-1] import-route static
[SwitchA-ospf-1] quit
# 在SwitchB查看IP路由表,可以看到OSPF引入的5条静态路由。
[SwitchB] display ip routing-table Route Flags: R - relay, D - download to fib, T - to vpn-instance ------------------------------------------------------------------------------ Routing Tables: Public Destinations : 11 Routes : 11 Destination/Mask Proto Pre Cost Flags NextHop Interface 127.0.0.0/8 Direct 0 0 D 127.0.0.1 InLoopBack0 127.0.0.1/32 Direct 0 0 D 127.0.0.1 InLoopBack0 172.16.16.0/24 O_ASE 150 1 D 192.168.1.1 Vlanif10 172.16.17.0/24 O_ASE 150 1 D 192.168.1.1 Vlanif10 172.16.18.0/24 O_ASE 150 1 D 192.168.1.1 Vlanif10 172.16.19.0/24 O_ASE 150 1 D 192.168.1.1 Vlanif10 172.16.20.0/24 O_ASE 150 1 D 192.168.1.1 Vlanif10 192.168.1.0/24 Direct 0 0 D 192.168.1.2 Vlanif10 192.168.1.2/32 Direct 0 0 D 127.0.0.1 Vlanif10 192.168.2.0/24 Direct 0 0 D 192.168.2.1 Vlanif20 192.168.2.1/32 Direct 0 0 D 127.0.0.1 Vlanif20 -
配置路由发布策略
# 在SwitchA配置地址前缀列表a2b。
[SwitchA] ip ip-prefix a2b index 10 permit 172.16.17.0 24
[SwitchA] ip ip-prefix a2b index 20 permit 172.16.18.0 24
[SwitchA] ip ip-prefix a2b index 30 permit 172.16.19.0 24
# 在SwitchA配置发布策略,引用地址前缀列表a2b进行过滤。
[SwitchA] ospf
[SwitchA-ospf-1] filter-policy ip-prefix a2b export static
# 在SwitchB查看IP路由表,可以看到SwitchB仅接收到列表a2b中定义的3条路由。
[SwitchB] display ip routing-table Route Flags: R - relay, D - download to fib, T - to vpn-instance ------------------------------------------------------------------------------ Routing Tables: Public Destinations : 9 Routes : 9 Destination/Mask Proto Pre Cost Flags NextHop Interface 127.0.0.0/8 Direct 0 0 D 127.0.0.1 InLoopBack0 127.0.0.1/32 Direct 0 0 D 127.0.0.1 InLoopBack0 172.16.17.0/24 O_ASE 150 1 D 192.168.1.1 Vlanif10 172.16.18.0/24 O_ASE 150 1 D 192.168.1.1 Vlanif10 172.16.19.0/24 O_ASE 150 1 D 192.168.1.1 Vlanif10 192.168.1.0/24 Direct 0 0 D 192.168.1.2 Vlanif10 192.168.1.2/32 Direct 0 0 D 127.0.0.1 Vlanif10 192.168.2.0/24 Direct 0 0 D 192.168.2.1 Vlanif20 192.168.2.1/32 Direct 0 0 D 127.0.0.1 Vlanif20 -
配置路由接收策略
# 在SwitchC配置地址前缀列表in。
[SwitchC] ip ip-prefix in index 10 permit 172.16.18.0 24# 在SwitchC配置接收策略,引用地址前缀列表in进行过滤。
[SwitchC] ospf
[SwitchC-ospf-1] filter-policy ip-prefix in import
[SwitchC-ospf-1] quit
# 查看SwitchC的IP路由表,可以看到SwitchC的IP路由表中,仅接收了列表in定义的1条路由。
[SwitchC] display ip routing-table
Route Flags: R - relay, D - download to fib, T - to vpn-instance
------------------------------------------------------------------------------
Routing Tables: Public
         Destinations : 5        Routes : 5

Destination/Mask    Proto  Pre  Cost     Flags NextHop         Interface

      127.0.0.0/8    Direct 0    0           D  127.0.0.1       InLoopBack0
      127.0.0.1/32   Direct 0    0           D  127.0.0.1       InLoopBack0
    172.16.18.0/24   O_ASE  150  1           D  192.168.2.1     Vlanif20
    192.168.2.0/24   Direct 0    0           D  192.168.2.2     Vlanif20
    192.168.2.2/32   Direct 0    0           D  127.0.0.1       Vlanif20


 94
94


 被折叠的 条评论
为什么被折叠?
被折叠的 条评论
为什么被折叠?
 到【灌水乐园】发言


