


android的动画一共分为三种,view动画,帧动画,属性动画。
View动画
什么是view动画,动画的对象只能是view的动画叫做view动画。view动画一共分为四种:TranslateAnimation(平移),ScaleAnimation(缩放),RotateAnimation(旋转),AlphaAnimation(透明度)四种动画。还有一个 AnimationSet(组合动画),他们都继承Animation 类。要记得view动画是通过通过Convas相关设置得以实现,而不是改变view的属性的,所以会出现一个问题就是view平移了,点击事件却没有改变。(当一个view开始一个view动画后,不是马上执行view的动画,而是请求重绘,等一个16.8ms后,重新遍历view树的时候,再绘制,而动画的执行是在这个view的父view中通过操作view的画布的坐标来实现的)
要切记一点所有动画的原点坐标都是相对于View的左上顶点
view动画的实现方式一共两种:动态代码和xml文件实现。建议使用xml使用,复用性强。

xml中使用,必须创建xml文件,文件路径:res/anim/filename.xml
TranslateAnimation动画
代码实现:

如果没有指定fromXType的话,就是默认的 ABSOLUTE
构造方法一共如上三种。
formXType:指定应如何解释fromXValue。一共有三种模式:
ABSOLUTE //绝对值,单位是px
RELATIVE_TO_SELF //相对于自身,意思是fromXValue*自身的宽度
RELATIVE_TO_PARENT //相对于父类的,意思是fromXvalue*父类的宽度
常用的属性:
duration :动画持续时间,默认是0,马上的意思
fillAfter: 动画执行完毕后,是否保持结束位置
fillBefore:动画结束后,是否保持开始位置
repeatCount:动画重复,默认是1次,-1代表无效循环
repeatMode:动画重复模式 Animation.REVERSE (动画结束后,反向重复) Animation.RESTART(每次都重新开始)
interpolator:动画的插值器,随时间改变,动画属性的改变百分比
reset:重置动画
setStartOffset:动画相对开始时间延迟多久开始,offset-偏移
setStartTime:设置动画执行的具体时间,单位为以毫秒为单位的开始时间。
cancel():动画停止,同时停止view动画,还可以使用it.clearAnimation(),区别在于,cancel是停止指定动画,clearAnimation()是停止于作用当前view的动画,他们都会回调onAnimationEnd方法。
xml实现:
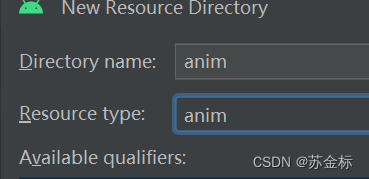
首先在res中创建 anim文件夹,

往上选择anim选项,名字只能是固定的anim
创建完成后,右键,创建xml动画
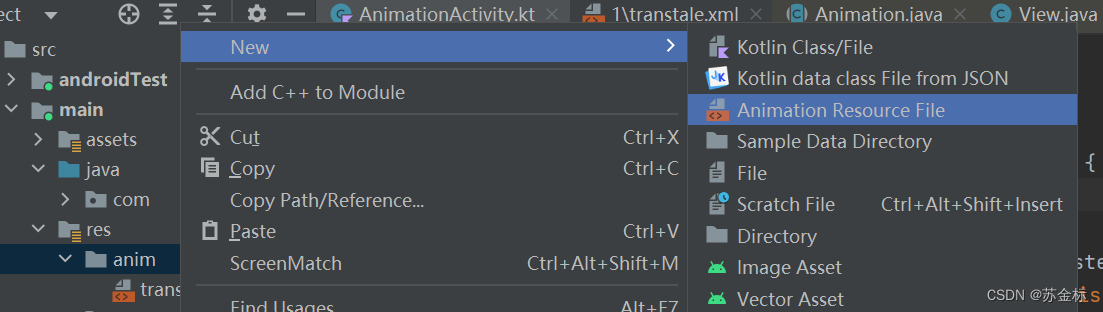
创建slide_1.xml
第一种写法:
<?xml version="1.0" encoding="utf-8"?>
<set xmlns:android="http://schemas.android.com/apk/res/android"
    >
<translate
    android:duration="500"
    android:fillAfter="true"
    android:fromXDelta="0"
    android:toXDelta="200"
    ></translate>
</set>

<set>是animationSet的xml写法,如果这样写的话,会发现一个问题,就是在<tramslate  标签里面,基本不会提示duration等,这个时候把xmlns:android="http://schemas.android.com/apk/res/android"引用写到<translate>标签中就可以了。

第二种写法:
<?xml version="1.0" encoding="utf-8"?>
<translate xmlns:android="http://schemas.android.com/apk/res/android"
    android:duration="500"
    android:fillAfter="true"
    android:fromXDelta="0"
    android:toXDelta="200"
    >
</translate>在xml中没有formXType或者formYType这两个属性,那如何表示呢?
android:toYDelta="50" 没有修饰符的,代表ABSOLUTE ,单位是px
android:toYDelta="50%" // %代表RELATIVE_TO_SELF
android:toYDelta="50%p" // %p代表 RELATIVE_TO_PARENT
使用:
      val loadAnimation = AnimationUtils.loadAnimation(this, R.anim.slide_1)
                it.startAnimation(loadAnimation)
设置监听:
     loadAnimation.setAnimationListener(object :AnimationListener{
                override fun onAnimationStart(animation: Animation?) {
                }

                override fun onAnimationEnd(animation: Animation?) {
                }

                override fun onAnimationRepeat(animation: Animation?) {
                }

            })
ScaleAnimation动画
代码实现:

参数的解释:
fromX:从自身x轴长度多少倍开始缩放,(特别注意不是指缩放的px值)如:fromX= 0.5表示从自身X轴长度0.5倍开始缩放
tox:缩放到自身x轴长度多少倍结束,如:toX = 2.0表示x轴缩放到自身x轴长度2倍结束
formY:从自身Y轴长度多少倍开始缩放,如:fromY=0.5表示从自身Y轴长度0.5倍开始缩放
toY:缩放到自身Y轴长度多少倍结束,如:toY=2.0,表示y轴缩放到自身的y轴长度2倍结束。
pivot(中心点)
pivotX:相对于控制轴X的位置开始缩放
pivotY:相对于控制轴y的位置开始缩放
pivotXType:解释pivotx值的意义,默认是ABSOLUTE
pivotYType:解释pivoty值的意义,默认是ABSOLUTE
需要注意的 是,缩放的时候,是以pivotx,pivoty为中心点两边同时缩放的。
xml实现:
<?xml version="1.0" encoding="utf-8"?>
<set
    xmlns:android="http://schemas.android.com/apk/res/android"
    >
<scale
    android:duration="500"
    android:fillAfter="true"
    android:fromXScale="1"
    android:toXScale="0.5"
    android:fromYScale="1"
    android:toYScale="0.5"
    android:pivotY="50%"
    android:pivotX="50%"
    ></scale>
</set>
切记,不要在xml中添加float的修饰符 f,不然编译不过
如:
<scale
    android:duration="500"
    android:fillAfter="true"
    android:fromXScale="1"
    android:toXScale="0.5f"   //这样编译不过
    android:fromYScale="1"
    android:toYScale="0.5"
    android:pivotY="50%"
    android:pivotX="50%"
    ></scale>
RotateAnimation旋转动画
代码实现:

formDegrees:从多少角度开始旋转
toDegrees:旋转到多少 度结束
pivotX:在X轴旋转中心位置
pivoty:在y轴旋转中心位置
pivotXtype:解释pivotx的意义,默认是ABSOLUTE
AlphaAnimation透明度动画
    /**
     * Constructor to use when building an AlphaAnimation from code
     *
     * @param fromAlpha Starting alpha value for the animation, where 1.0 means
     *        fully opaque and 0.0 means fully transparent.
     * @param toAlpha Ending alpha value for the animation.
     */
    源码的注解已经说明,透明度的值是0.0-1.0
    public AlphaAnimation(float fromAlpha, float toAlpha) {
        mFromAlpha = fromAlpha;
        mToAlpha = toAlpha;
    }
代码实现:
     val alphaAnimation = AlphaAnimation(1f, 0f).
               apply {
                   duration =500
               }
              it.startAnimation(alphaAnimation)
xml实现
anim->new->animaltion resource file ->

这个时候发现好多代码写不出来,比如duration,这个时候可以在外层包一个set标签,把那个值复制过来,再删了<set>标签。
<?xml version="1.0" encoding="utf-8"?>
<alpha xmlns:android="http://schemas.android.com/apk/res/android"
    android:fromAlpha="1"
   android:duration="500"
    android:toAlpha="0.5"
    />
AnimationSet组合动画
将多个动画组合使用
代码实现
通过AnimationSet的addAnimation方式执行。
val apply = AnimationSet(true).apply {
    addAnimation(RotateAnimation(
        0f, -90f, Animation.RELATIVE_TO_SELF, 0.5f,
        Animation.RELATIVE_TO_SELF, 0.5f
    ).apply {
        duration = 300
    })
    addAnimation(AlphaAnimation(1.0f, 0.3f).apply {
        duration = 300
        startOffset = 300
    })
}
it.startAnimation(apply)
xml中执行
<?xml version="1.0" encoding="utf-8"?>
<set xmlns:android="http://schemas.android.com/apk/res/android"
    android:duration="300"
    android:interpolator="@android:anim/linear_interpolator" //动画集合的插值器
    android:shareInterpolator="true"
   //表示动画集合是否共享一个插值器,如果不指定插值器,那么子动画就需要自己指定插值器,或者使用默认的
    android:fillAfter="true"
    >
<rotate
    android:fromDegrees="0"
    android:toDegrees="90"
    ></rotate>

    <alpha
        android:fromAlpha="1"
        android:duration="800"  //子类的设置的时间会替换动画集合的时间
        android:toAlpha="0.0"
        ></alpha>

</set>
如何实现一个view中一共有三个动画,一个动画结束完了,再执行另外一个动画呢?
属性动画有一个ordering属性,但是view动画是一起执行的,而且没有ordering属性。
那么我们可以通过
startOffset属性来执行。
<?xml version="1.0" encoding="utf-8"?>
<set xmlns:android="http://schemas.android.com/apk/res/android"
    >
    <translate
        android:fromXDelta="0"
        android:toXDelta="200"
        android:duration="500"
        ></translate>
    <rotate
        android:startOffset="500"
        android:fromDegrees="0"
        android:toDegrees="180"
        android:pivotX="100%"
        android:pivotY="50%"
        android:duration="500"
        ></rotate>

    <alpha
        android:startOffset="1000"
        android:fromAlpha="1"
        android:toAlpha="0.2"
        android:duration="500"
        ></alpha>


</set>
layoutAnimation
layoutAnimation是作用于所有的ViewGroup,当为这个ViewGroup指定这个一个动画后,他子元素出场都具有这种动画效果。layoutAnimation不是指单独一种动画,而是一种手段。也可以看成view动画。
xml写法
在anim文件夹下创建 layoutAnimation类型文件。
lyanimation.xml
<?xml version="1.0" encoding="utf-8"?>
<layoutAnimation xmlns:android="http://schemas.android.com/apk/res/android"
    android:animation="@anim/slide_1"
    android:animationOrder="normal"
    android:delay="0.5"
    >
</layoutAnimation>

animation //引用的view动画
animationOrder //子元素执行动画的顺序,有三种选项:normal、reverse和random,其中normal表示顺
序显示,即排在前面的子元素先开始播放入场动画;reverse表示逆向显示,即排在后面的
子元素先开始播放入场动画;random则是随机播放入场动画。
delay //表示子元素开始动画的时间延迟,比如子元素入场动画的时间周期为300ms,那么0.5
表示每个子元素都需要延迟150ms才能播放入场动画。总体来说,第一个子元素延迟
150ms开始播放入场动画,第2个子元素延迟300ms开始播放入场动画,依次类推。
slide_1.xml
<?xml version="1.0" encoding="utf-8"?>
<set
    android:duration="300"
    xmlns:android="http://schemas.android.com/apk/res/android"
    >
<translate
    android:fromXDelta="-100%"
    android:toXDelta="0"
    ></translate>
</set>
ViewGroup中 android:layoutAnimation="@anim/lyanimation"引用。
 <LinearLayout
        android:gravity="center_horizontal"
        android:layout_width="match_parent"
        android:orientation="vertical"
        android:id="@+id/tv_click_12"
        android:layout_marginBottom="@dimen/dp_300"
        android:layoutAnimation="@anim/lyanimation" //引用
        android:layout_height="wrap_content">

        <TextView
            android:background="@drawable/img"
            android:layout_width="400px"
            android:text="组合动画"
            android:gravity="center"
            android:layout_marginTop="@dimen/dp_30"
            android:layout_height="100px"></TextView>
        <TextView
            android:layout_marginTop="@dimen/dp_30"
            android:background="@drawable/img_1"
            android:layout_width="400px"
            android:text="组合动画"
            android:gravity="center"
            android:layout_height="100px"></TextView>
        <TextView
            android:layout_marginTop="@dimen/dp_30"
            android:background="@drawable/img_2"
            android:layout_width="400px"
            android:text="组合动画"
            android:gravity="center"
            android:layout_height="100px"></TextView>
        <TextView
            android:layout_marginTop="@dimen/dp_30"
            android:background="@drawable/img_3"
            android:layout_width="400px"
            android:text="组合动画"
            android:gravity="center"
            android:layout_height="100px"></TextView>
    </LinearLayout>
代码中设置
注意这个是出场动画,假如这个viewGroup已经是可见的,你通过点击事件设置这个动画,是没有效果的
        val tv_click_12 = findViewById<LinearLayout>(R.id.tv_click_12);//获得viewGroup


val loadAnimation = AnimationUtils.loadAnimation(this, R.anim.slide_1) //加载view动画
val LayoutAnimationController = LayoutAnimationController(loadAnimation).apply { //创建LayoutAnimationController
 delay = 0.5f
order = LayoutAnimationController.ORDER_NORMAL
            }
            tv_click_12.layoutAnimation = LayoutAnimationController  //设置
效果如图:

Activity的切换效果
activity的跳转有默认的一个动画效果,但是 这个动画我们也可以自定义。主要通过
public void overridePendingTransition(int enterAnim, int exitAnim) {
    ActivityClient.getInstance().overridePendingTransition(mToken, getPackageName(),
            enterAnim, exitAnim);
}
这个方法。这个方法必须在startActivity(intent)或者finish()之后调用才能生效。
帧动画
帧动画是按顺序播放一组预先定义好的图片,类似于 电影播放。不同于view动画,系统提供了一个AnimationDrawable类来使用帧动画,AnimationDrawable属于Drawable,所以直接在drawable文件夹中右键->new ->drawable resource file ->
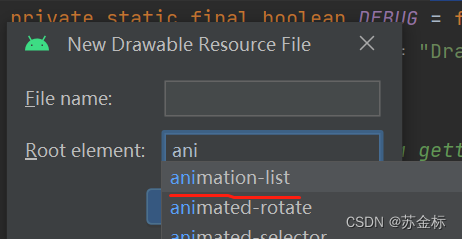
创建xml文件
<?xml version="1.0" encoding="utf-8"?>
<animation-list xmlns:android="http://schemas.android.com/apk/res/android"
    android:oneshot="true"  oneshot = tru表示执行一遍,false是一直重复执行
    >
<item android:duration="200" android:drawable="@drawable/img"></item>
    <item android:duration="200" android:drawable="@drawable/img_1"></item>
    <item android:duration="200" android:drawable="@drawable/img_2"></item>
    <item android:duration="200" android:drawable="@drawable/img_3"></item>
</animation-list>
设view设置 北京色
代码中使用:
      val mAnimationDrawable = findViewById<View>(R.id.tv_click_11).background as AnimationDrawable
            mAnimationDrawable.start()
就可以了。
属性动画
属性动画对View动画进行了扩展,他作用于任何对象,甚至可以没有对象。属性动画不仅仅限制于平移,缩放,旋转,和透明度这四种简单的变化。
属性动画有ValueAnimator,ObjectAnimator,AnimtorSet。这三种,通过他们可以实现复杂的动画。
了解属性动画之前需要了解俩个类:
interpolator 插值器,这个view 动画也有。TypeEvaluator 估值器
interpolator 的作用是指随着时间的流逝,计算当前属性值改变的百分比
android内置了几种插值器
LinearInterpolator(线性插值器:匀速动画)
AccelerateDecelerateInterpolator(加速减速插值器:动画两头慢中间快)
DecelerateInterpolator(减速插值器:动画越来越慢)
TypeEvaluator的作用是根据当前属性改变的百分比来计算改变后属性值,系统内置了
IntEvaluator(针对整形的属性)
public class IntEvaluator implements TypeEvaluator<Integer> {
public Integer evaluate(float fraction,Integer startValue,Integer
endValue) {
int startInt = startValue;
return (int)(startInt + fraction * (endValue -startInt));
}
}
ObjectAnimator
objectAnimator是针对于对象的。objectAnimator是ValueAnimator的子类,ObjectAnimator一共有如下几个重要的方法。
ObjectAnimator.ofInt()
ObjectAnimator.ofFloat()
ObjectAnimator.ofArgb()
ObjectAnimator.ofObject()

//android提供了int,float,argb等默认的估值器,如果使用ObjectAnimator.ofObject()则得自定义估值器。可以参考这篇文章Android动画学习(三):自定义属性动画 - 简书


public static ObjectAnimator ofInt(Object target, String propertyName, int... values) {
    ObjectAnimator anim = new ObjectAnimator(target, propertyName);
    anim.setIntValues(values);
    return anim;
}
target:动画作用的对象
propertyName:要改变的属性名称,在执行动画的时候,会不停的去调用这个属性的set方法
int... value:属性值变化,是一个数组,比如:透明度,从0->1->0
因为属性动画的原理是按一定的速度去动态改变这个属性值,从而达到动画的效果,所以要设置一个属性动画必须满足两个条件:
1:如果给一个AB属性设置属性动画,则必须满足,这个属性有setAB方法,而且假如不设置起始值的话,那个则必须有getAB方法,属性动画会通过这个方法去获取初始值。
2.执行属性动画的属性值的改变必须在UI上体现出来,不然会没效果。
eg:如何用属性实现如下效果.
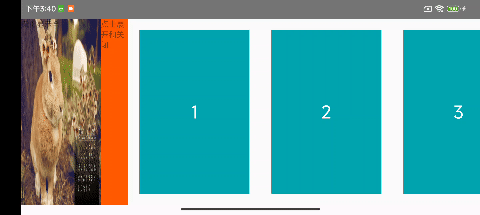
分析代码:左边的图片是展开收起的布局,我们可以让点击红色布局的时候,让左边图片的
marginLeft改变,从而达到这个效果。
根据属性动画必须满足的两个条件,我们知道左边ImageView是没有marginLeft这个属性的。那么针对这种不满足上面两个条件的属性执行动画怎么解决呢?官方给提供了如下解决方案:
- 给object提供一个包装类,用来包装原始对象,假如没有这个属性,就提供间接为其提供这个属性,并且提供get,set方法
-
使用ValueAnimator,监听动画的过程,自己实现属性的改变。
动态代码:
xml:
<?xml version="1.0" encoding="utf-8"?>
<LinearLayout
    xmlns:android="http://schemas.android.com/apk/res/android"
    xmlns:app="http://schemas.android.com/apk/res-auto"
    xmlns:tools="http://schemas.android.com/tools"
    android:layout_width="match_parent"
    android:layout_height="match_parent"
    android:orientation="horizontal"
    android:id="@+id/ln_content"
    tools:context=".AnimationActivity2">
    <TextView
        android:id="@+id/slide_s"
        android:layout_width="400px"
        android:text="点击显示全"
        android:background="@drawable/img_2"
        android:layout_height="match_parent"></TextView>
    <TextView
        android:text="点击展开和关闭"
        android:layout_width="50dp"
        android:id="@+id/click_button"
        android:background="@color/color_f74e00"
        android:layout_height="match_parent"></TextView>
    <HorizontalScrollView
        android:layout_width="0dp"
        android:layout_weight="1"
        android:layout_height="match_parent">
    <LinearLayout
        android:layout_width="match_parent"
        android:orientation="horizontal"
        android:layout_height="match_parent">
        <TextView
            android:layout_width="200dp"
            android:text="1"
            android:textSize="32sp"
            android:gravity="center"
            android:textColor="#ffffff"
            android:layout_margin="@dimen/dp_20"
            android:background="#00b5ad"
            android:layout_height="match_parent"/>
        <TextView
            android:layout_width="200dp"
            android:layout_margin="@dimen/dp_20"
            android:background="#00b5ad"
            android:text="2"
            android:textSize="32sp"
            android:gravity="center"
            android:textColor="#ffffff"
            android:layout_height="match_parent"/>
        <TextView
            android:layout_width="200dp"
            android:text="3"
            android:textSize="32sp"
            android:gravity="center"
            android:textColor="#ffffff"
            android:layout_margin="@dimen/dp_20"
            android:background="#00b5ad"
            android:layout_height="match_parent"/>
        <TextView
            android:layout_width="200dp"
            android:layout_margin="@dimen/dp_20"
            android:background="#00b5ad"
            android:text="4"
            android:textSize="32sp"
            android:gravity="center"
            android:textColor="#ffffff"
            android:layout_height="match_parent"/>
        <TextView
            android:layout_width="200dp"
            android:layout_margin="@dimen/dp_20"
            android:background="#00b5ad"
            android:text="5"
            android:textSize="32sp"
            android:gravity="center"
            android:textColor="#ffffff"
            android:layout_height="match_parent"/>
        <TextView
            android:layout_width="200dp"
            android:layout_margin="@dimen/dp_20"
            android:background="#00b5ad"
            android:text="6"
            android:textSize="32sp"
            android:gravity="center"
            android:textColor="#ffffff"
            android:layout_height="match_parent"/>
        <TextView
            android:layout_width="200dp"
            android:layout_margin="@dimen/dp_20"
            android:background="#00b5ad"
            android:text="7"
            android:textSize="32sp"
            android:gravity="center"
            android:textColor="#ffffff"
            android:layout_height="match_parent"/>
        <TextView
            android:layout_width="200dp"
            android:text="8"
            android:textSize="32sp"
            android:gravity="center"
            android:textColor="#ffffff"
            android:layout_margin="@dimen/dp_20"
            android:background="#00b5ad"
            android:layout_height="match_parent"/>
        <TextView
            android:layout_width="200dp"
            android:text="9"
            android:textSize="32sp"
            android:gravity="center"
            android:textColor="#ffffff"
            android:layout_margin="@dimen/dp_20"
            android:background="#00b5ad"
            android:layout_height="match_parent"/>
    </LinearLayout>


    </HorizontalScrollView>


</LinearLayout>
代码:
采用包装类的方式实现:
创建一个包装类:SlideWrapper
    class SlideWrapper(val mSlide: View) {
        private var marginLeft :Int  //提供这个属性
        get() {   //重新这个属性的get方法
            return (mSlide.layoutParams as LinearLayout.LayoutParams).leftMargin
        }
        set(value) {  //重写这个属性的set方法,满足属性值的改变会体验在ui效果上

            val apply = (mSlide.layoutParams as LinearLayout.LayoutParams).apply {
                leftMargin = value
            }
            mSlide.layoutParams = apply
        }

    }
var isExpand:Boolean = true //定义一个字段记录展开和收起的状态
val slideView = SlideWrapper(slide_s)
findViewById<View>(R.id.click_button).setOnClickListener {
it.isEnabled = false
if (isExpand){
//这是属性动画
ObjectAnimator.ofInt(slideView,"marginLeft",-400).apply {
duration = 500
addListener(object :AnimatorListener{
override fun onAnimationStart(animation: Animator?) {
}
override fun onAnimationEnd(animation: Animator?) {
it.isEnabled = true
isExpand = false
}
override fun onAnimationCancel(animation: Animator?) {
}
override fun onAnimationRepeat(animation: Animator?) {
}
})
start()
}
} else{
ObjectAnimator.ofInt(slideView,"marginLeft",-400,0).apply {
duration =500
addListener(object:AnimatorListener{
override fun onAnimationStart(animation: Animator?) {
}
override fun onAnimationEnd(animation: Animator?) {
it.isEnabled = true
isExpand = true
}
override fun onAnimationCancel(animation: Animator?) {
}
override fun onAnimationRepeat(animation: Animator?) {
}
})
start()
}
}
}
采用ValueAnimator监听动画的过程实现
ValueAnimator本身不作用于任何对象,也就是说直接使用他是没有任何效果的,他可以对一个值做动画,我们可以监听其动画过程,在动画过程中修改我们对象的属性值。这样也相当于给我们对象做了动画。
  slide_s = findViewById<ImageView>(R.id.slide_s)
        findViewById<View>(R.id.click_button).setOnClickListener {
            it.isEnabled = false //防止动画没有执行完,触发点击事件
            if (isOpen){
                //执行关闭动画,我们监听从0到 -400的int值的变化
                ValueAnimator.ofInt(0,-400).apply {
                    duration = 500 //动画执行时间
                    //监听动画的每一帧
                    addUpdateListener(object :AnimatorUpdateListener{
                        override fun onAnimationUpdate(animation: ValueAnimator) {
                            val animatedValue = animation.animatedValue as Int //获得动画当前的值
                            val apply = (slide_s.layoutParams as LinearLayout.LayoutParams).apply {
                                leftMargin = animatedValue
                            }

                        }

                    })
                    //监听动画的执行过程
                    addListener(object :AnimatorListener{
                        override fun onAnimationStart(animation: Animator?) {
                        }

                        override fun onAnimationEnd(animation: Animator?) {
                            it.isEnabled =true
                        }

                        override fun onAnimationCancel(animation: Animator?) {
                        }

                        override fun onAnimationRepeat(animation: Animator?) {
                        }

                    })
                    start()
                }


            }else{
                //执行打开动画
    ValueAnimator.ofInt(-400,0).apply {
        duration =500
        addUpdateListener(object :AnimatorUpdateListener{
            override fun onAnimationUpdate(animation: ValueAnimator) {
                val animatedValue = animation.animatedValue as Int //获得动画当前值
                val apply = (slide_s.layoutParams as LinearLayout.LayoutParams).apply {
                    leftMargin = animatedValue
                }

            }

        })

        addListener(object :AnimatorListener{
            override fun onAnimationStart(animation: Animator?) {
            }

            override fun onAnimationEnd(animation: Animator?) {
                it.isEnabled =true
            }

            override fun onAnimationCancel(animation: Animator?) {
            }

            override fun onAnimationRepeat(animation: Animator?) {
            }

        })
        start()
    }
            }
}这里用到了AnimatorUpdateListener,这个监听比较特殊它会监听整个动画过程,动画是由许多帧组成的,每播放一帧,onAnimationUpdate就会被调用一次。
效果是一样的。
属性动画除了通过代码实现以外,还可以通过XML来定义。属性动画需要定义在
<set
android:ordering=["together" | "sequentially"]>
<objectAnimator
android:propertyName="string"
android:duration="int"
android:valueFrom="float | int | color"
android:valueTo="float | int | color"
android:startOffset="int"
android:repeatCount="int"
android:repeatMode=["repeat" | "reverse"]
android:valueType=["intType" | "floatType"]/>
<animator
android:duration="int"
android:valueFrom="float | int | color"
android:valueTo="float | int | color"
android:startOffset="int"
android:repeatCount="int"
android:repeatMode=["repeat" | "reverse"]
android:valueType=["intType" | "floatType"]/>

</set>
属性动画的各种参数都比较好理解,在XML中可以定义ValueAnimator、ObjectAnimator以及AnimatorSet,其中<set>标签对应AnimatorSet,<Animator>标签对应
ValueAnimator,而<objectAnimator>则对应ObjectAnimator。<set>标签的android:ordering
属性有两个可选值:“together”和“sequentially”,其中“together”表示动画集合中的子动画
同时播放,“sequentially”则表示动画集合中的子动画按照前后顺序依次播放,
android:ordering属性的默认值是“together”。
对于<objectAnimator>标签的各个属性的含义,下面简单说明一下,对于<Animator>
标签这里就不再介绍了,因为它只是比<objectAnimator>少了一个android:propertyName属
性而已,其他都是一样的。
android:propertyName——表示属性动画的作用对象的属性的名称;
android:duration——表示动画的时长;
android:valueFrom——表示属性的起始值;
android:valueTo——表示属性的结束值;
android:startOffset——表示动画的延迟时间,当动画开始后,需要延迟多少毫秒才会
真正播放此动画;
android:repeatCount——表示动画的重复次数;
android:repeatMode——表示动画的重复模式;
android:valueType——表示android:propertyName所指定的属性的类型,
有“intType”和“floatType”两个可选项,分别表示属性的类型为整型和浮点型。另外,
如果android:propertyName所指定的属性表示的是颜色,那么不需要指定
android:valueType,系统会自动对颜色类型的属性做处理。
对于一个动画来说,有两个属性这里要特殊说明一下,一个是android:repeatCount,
它表示动画循环的次数,默认值为0,其中-1表示无限循环;另一个是
android:repeatMode,它表示动画循环的模式,有两个选项:“repeat”和“reverse”,分别表
示连续重复和逆向重复。连续重复比较好理解,就是动画每次都重新开始播放,而逆向重
复是指第一次播放完以后,第二次会倒着播放动画,第三次再重头开始播放动画,第四次
再倒着播放动画,如此反复Android 中有许多属性可以用来实现动画效果,以下是一些常用的属性:
translationX:视图在 X 轴上的平移距离。translationY:视图在 Y 轴上的平移距离。scaleX:视图在 X 轴上的缩放比例。scaleY:视图在 Y 轴上的缩放比例。rotation:视图的旋转角度。alpha:视图的透明度。
假如:scaleX和scaleY改变,view的宽度是不会改变的,这个值是指X轴和Y轴的缩放比例,但是因为改变是属性,所以点击事件都会改变的。
eg:
通过scaleY实现3D旋转动画。
fun show3DAnimation(view: View){
     ValueAnimator.ofInt(0,180).apply {
         duration =1000
         addUpdateListener {

             view.rotationY = (it.animatedValue as Int).toFloat()
         }
        start()
     }

}


 3万+
3万+


 被折叠的 条评论
为什么被折叠?
被折叠的 条评论
为什么被折叠?
 到【灌水乐园】发言


