


首先创建一个新的springboot项目
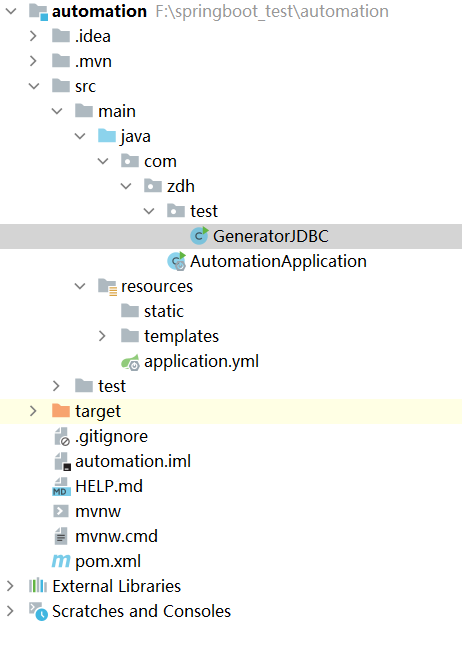
项目初始化结构如下:
运行自动生成结构代码后的效果如下:
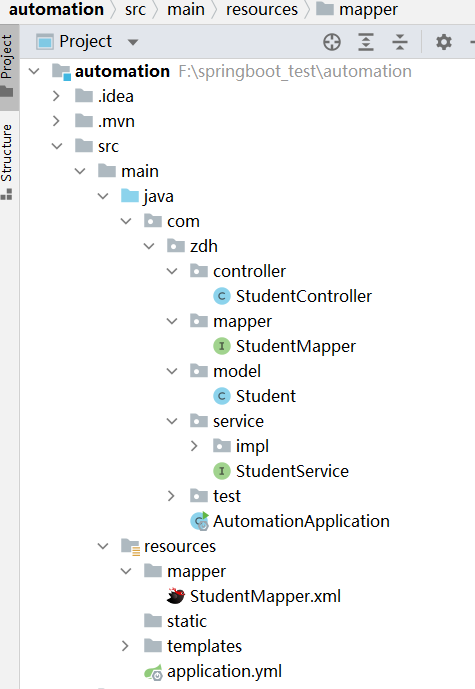
对比初始化项目结构可以发现结构中多了以下几个部分;
- controller文件夹存储接口类
- mapper文佳夹存储数据库映射
- model文件夹存储数据库模型类
- Service文件夹存储业务处理类
- resources配置文件中多了mapper文件夹存储数据库sql
运行自动化生成代码之前需要先创建一个测试的数据库,以及数据库一个测试表:
以本人为例:
- 创建名为automation的数据库
- 在该数据库下新建名为student的学生表
表字段如图:

运行自动化生成代码之前需要在项目的pom文件中导入依赖:
<!-- 使用自动生成策略需要导入依赖-->
<!-- mybatis-plus的springboot支持-->
<dependency>
<groupId>com.baomidou</groupId>
<artifactId>mybatis-plus-boot-starter</artifactId>
<version>3.3.0</version>
</dependency>
<!-- mysql驱动-->
<dependency>
<groupId>mysql</groupId>
<artifactId>mysql-connector-java</artifactId>
<version>8.0.11</version>
</dependency>
<!-- mybatis-plus代码生成器的依赖-->
<dependency>
<groupId>com.baomidou</groupId>
<artifactId>mybatis-plus-generator</artifactId>
<version>3.4.1</version>
</dependency>
<!-- 模板引擎依赖-->
<dependency>
<groupId>org.apache.velocity</groupId>
<artifactId>velocity-engine-core</artifactId>
<version>2.3</version>
</dependency>
<!--引入Knife4j的官方start包,Swagger2基于Springfox2.10.5项目-->
<dependency>
<groupId>com.github.xiaoymin</groupId>
<!--使用Swagger2-->
<artifactId>knife4j-spring-boot-starter</artifactId>
<version>2.0.9</version>
</dependency>
依赖导入后就可以运行自动化生成代码了
代码如下:
import com.baomidou.mybatisplus.core.exceptions.MybatisPlusException;
import com.baomidou.mybatisplus.core.toolkit.StringPool;
import com.baomidou.mybatisplus.core.toolkit.StringUtils;
import com.baomidou.mybatisplus.generator.AutoGenerator;
import com.baomidou.mybatisplus.generator.InjectionConfig;
import com.baomidou.mybatisplus.generator.config.*;
import com.baomidou.mybatisplus.generator.config.po.LikeTable;
import com.baomidou.mybatisplus.generator.config.po.TableInfo;
import com.baomidou.mybatisplus.generator.config.rules.DateType;
import com.baomidou.mybatisplus.generator.config.rules.NamingStrategy;
import java.util.ArrayList;
import java.util.List;
import java.util.Scanner;
public class GeneratorJDBC {
public static void main(String[] args) {
// String moduleName = scanner("模块名");
String tableName = scanner("表名,(目前每次只支持单张表生成)");
String tablePrefix = scanner("实体类名");
//代码生成器
AutoGenerator mpg = new AutoGenerator();
// 数据源配置
DataSourceConfig dsc = new DataSourceConfig();
dsc.setUrl("jdbc:mysql://localhost:3306/automation?useUnicode=true&characterEncoding=UTF-8&serverTimezone=Asia/Shanghai&useSSL=false");
// dsc.setSchemaName("public");
dsc.setDriverName("com.mysql.cj.jdbc.Driver");
dsc.setUsername("root");
dsc.setPassword("");
mpg.setDataSource(dsc);
// 全局配置
GlobalConfig gc = new GlobalConfig();
//获取到项目根路径
String projectPath = System.getProperty("user.dir");
//main目录
String mainPath = projectPath + "/src/main";
//根路径 + 项目名 + java目录
gc.setOutputDir(mainPath + "/java");
//设置作者
gc.setAuthor("yhw");
//代码生成是不是要打开文件夹
gc.setOpen(false);
//实体属性 Swagger2 注解
gc.setSwagger2(true);
//会在mapper.xml文件中生成一个基础的<resultmap>会映射所有的字段
gc.setBaseResultMap(true);
//覆盖掉原先生成的同文件
gc.setFileOverride(true);
//主键策略
//gc.setIdType(IdType.UUID);
//定义生成的实体类中日期类型
gc.setDateType(DateType.ONLY_DATE);
//实体类名:直接用表名, %s=表名
gc.setEntityName(tablePrefix);
//mapper接口名
gc.setMapperName(tablePrefix + "Mapper");
//mapper.xml文件名
gc.setXmlName(tablePrefix);
//业务逻辑接口名
gc.setServiceName(tablePrefix + "Service");
//业务逻辑实现类名
gc.setServiceImplName(tablePrefix + "ServiceImpl");
//业务接口类名
gc.setControllerName(tablePrefix + "Controller");
//将全局配置设置到AutoGenerator
mpg.setGlobalConfig(gc);
// 包配置
PackageConfig pc = new PackageConfig();
//模块名
/*pc.setModuleName(moduleName); //需要生成在指定目录夹下可设置 */
//包名
pc.setParent("com.zdh");
//接口层
pc.setController("controller");
//数据模型层
pc.setEntity("model");
//业务逻辑层
pc.setService("service");
//业务逻辑实现层
pc.setServiceImpl("service.impl");
//数据访问层
pc.setMapper("mapper");
//完整的包名:com.example.quickstart.pms
mpg.setPackageInfo(pc);
// 自定义配置
InjectionConfig cfg = new InjectionConfig() {
@Override
public void initMap() {
// to do nothing
}
};
// 如果模板引擎是 freemarker
// String templatePath = "/templates/mapper.xml.ftl";
// 如果模板引擎是 velocity
String templatePath = "/templates/mapper.xml.vm";
// 自定义输出配置
List<FileOutConfig> focList = new ArrayList<>();
// 自定义配置会被优先输出
focList.add(new FileOutConfig(templatePath) {
@Override
public String outputFile(TableInfo tableInfo) {
// 自定义输出文件名 , 如果你 Entity 设置了前后缀、此处注意 xml 的名称会跟着发生变化!!
return mainPath + "/resources/mapper/" + pc.getModuleName()
+ "/" + tableInfo.getEntityName() + "Mapper" + StringPool.DOT_XML;
}
});
cfg.setFileOutConfigList(focList);
mpg.setCfg(cfg);
// 配置模板
TemplateConfig templateConfig = new TemplateConfig();
// 配置自定义输出模板
//指定自定义模板路径,注意不要带上.ftl/.vm, 会根据使用的模板引擎自动识别
// templateConfig.setEntity("templates/entity2.java");
// templateConfig.setService();
// templateConfig.setController();
// 把已有的xml生成置空,失效
templateConfig.setXml(null);
mpg.setTemplate(templateConfig);
// 策略配置
StrategyConfig strategy = new StrategyConfig();
// 表名的生成策略:下划线转驼峰 pms_product -- PmsProduct
strategy.setNaming(NamingStrategy.underline_to_camel);
// 列名的生成策略: 下划线转驼峰 last_name -- lastName
strategy.setColumnNaming(NamingStrategy.underline_to_camel);
// strategy.setSuperEntityClass("你自己的父类实体,没有就不用设置!");
strategy.setEntityLombokModel(true);
// 在controller类上是否生成RestController
strategy.setRestControllerStyle(true);
// 公共父类
// strategy.setSuperControllerClass("你自己的父类控制器,没有就不用设置!");
// 写于父类中的公共字段
// strategy.setSuperEntityColumns("id");
if (tableName.indexOf('*') > 0) {
strategy.setLikeTable(new LikeTable(tableName.replace('*', '_')));
} else {
// 要生成的表名,
strategy.setInclude(tableName);
}
// 要生成的表名,多个用逗号分隔
strategy.setTablePrefix(tablePrefix);
// 使用模糊前缀
// strategy.setLikeTable(new LikeTable("pms_"));
// strategy.setControllerMappingHyphenStyle(true);
// 设置 表的过滤替换前缀
// strategy.setTablePrefix(pc.getModuleName() + "_");
mpg.setStrategy(strategy);
// mpg.setTemplateEngine(new FreemarkerTemplateEngine());
// 进行生成
mpg.execute();
}
/**
* <p>
* 读取控制台内容
* </p>
*/
public static String scanner(String tip) {
Scanner scanner = new Scanner(System.in);
StringBuilder help = new StringBuilder();
help.append("请输入" + tip + ":");
System.out.println(help.toString());
if (scanner.hasNext()) {
String ipt = scanner.next();
if (StringUtils.isNotBlank(ipt)) {
return ipt;
}
}
throw new MybatisPlusException("请输入正确的" + tip + "!");
}
}
代码在自己的项目中运行需要修改几个地方:
1、需要修改成自己的数据库名称,以及自己的数据库用户名和数据库密码。
// 数据源配置
DataSourceConfig dsc = new DataSourceConfig();
dsc.setUrl("jdbc:mysql://localhost:3306/automation?useUnicode=true&characterEncoding=UTF-8&serverTimezone=Asia/Shanghai&useSSL=false");
// dsc.setSchemaName("public");
dsc.setDriverName("com.mysql.cj.jdbc.Driver");
dsc.setUsername("root");
dsc.setPassword("");
2、作者改为自己:
//设置作者
gc.setAuthor("yhw");
3、项目如果引入了swagger配置填入true反之则为false
//实体属性 Swagger2 注解
gc.setSwagger2(true);
4、需要改成自己的包名
//包名
pc.setParent("com.zdh");
代码中加入了控制台输入操作:
输入绑定的数据库中表的表名和需要再项目中生成的模型类的名称来自动生成需要的项目结构
/**
* <p>
* 读取控制台内容
* </p>
*/
public static String scanner(String tip) {
Scanner scanner = new Scanner(System.in);
StringBuilder help = new StringBuilder();
help.append("请输入" + tip + ":");
System.out.println(help.toString());
if (scanner.hasNext()) {
String ipt = scanner.next();
if (StringUtils.isNotBlank(ipt)) {
return ipt;
}
}
throw new MybatisPlusException("请输入正确的" + tip + "!");
}
以本人为例:
我的表名称为student 则输入student

回车之后需要输入生成的模型类名称:Student
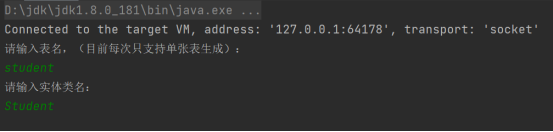
再次回车之后生成需要的项目文件夹及文件:

如果有需要生成增删改查接口的朋友接着往下看:
在resources配置文件中的templates文件夹下新建controller.java.vm文件:

接口模型可根据需要自行修改:
package ${package.Controller};
import org.springframework.web.bind.annotation.*;
import javax.annotation.Resource;
import java.util.List;
import ${package.Service}.${table.serviceName};
import ${package.Entity}.${entity};
#if(${restControllerStyle})
import org.springframework.web.bind.annotation.RestController;
#else
import org.springframework.stereotype.Controller;
#end
#if(${superControllerClassPackage})
import ${superControllerClassPackage};
#end
/**
* <p>
* $!{table.comment} 前端控制器
* </p>
*
* @author ${author}
* @since ${date}
*/
@RestController
@RequestMapping("#if(${package.ModuleName})/${package.ModuleName}#end/#if(${controllerMappingHyphenStyle})${controllerMappingHyphen}#else${table.entityPath}#end")
public class ${table.controllerName} {
@Resource
private ${table.serviceName} ${table.entityPath}Service;
/**
* 查询所有数据接口
*/
@GetMapping("/list")
public List<${entity}> findAll() {
return ${table.entityPath}Service.list();
}
/**
* 根据id查询数据接口
*/
@GetMapping("/getById")
public ${entity} findOne(@RequestParam(value = "id") Integer id) {
return ${table.entityPath}Service.getById(id);
}
/**
* 新增接口
*/
@PostMapping("/add")
public boolean save(@RequestBody ${entity} ${table.entityPath}) {
return ${table.entityPath}Service.save(${table.entityPath});
}
/**
* 更新接口
*/
@PostMapping("/update")
public boolean update(@RequestBody ${entity} ${table.entityPath}) {
return ${table.entityPath}Service.updateById(${table.entityPath});
}
/**
* 删除接口
*/
@DeleteMapping("/del")
public boolean delete(@RequestParam(value = "id") Integer id) {
return ${table.entityPath}Service.removeById(id);
}
/**
* 批量删除接口
*/
@PostMapping("/dels")
public boolean deleteBatch(@RequestBody List<Integer> ids) {
return ${table.entityPath}Service.removeByIds(ids);
}
}
在StudentController中会自动生成如下代码:
import org.springframework.web.bind.annotation.*;
import javax.annotation.Resource;
import java.util.List;
import com.zdh.service.StudentService;
import com.zdh.model.Student;
import org.springframework.web.bind.annotation.RestController;
/**
* <p>
* 前端控制器
* </p>
*
* @author xxx
* @since 2024-05-13
*/
@RestController
@RequestMapping("/student")
public class StudentController {
@Resource
private StudentService studentService;
/**
* 查询所有数据接口
*/
@GetMapping("/list")
public List<Student> findAll() {
return studentService.list();
}
/**
* 根据id查询数据接口
*/
@GetMapping("/getById")
public Student findOne(@RequestParam(value = "id") Integer id) {
return studentService.getById(id);
}
/**
* 新增接口
*/
@PostMapping("/add")
public boolean save(@RequestBody Student student) {
return studentService.save(student);
}
/**
* 更新接口
*/
@PostMapping("/update")
public boolean update(@RequestBody Student student) {
return studentService.updateById(student);
}
/**
* 删除接口
*/
@DeleteMapping("/del")
public boolean delete(@RequestParam(value = "id") Integer id) {
return studentService.removeById(id);
}
/**
* 批量删除接口
*/
@PostMapping("/dels")
public boolean deleteBatch(@RequestBody List<Integer> ids) {
return studentService.removeByIds(ids);
}
}
源代码以及sql文件已打包0积分下载
Spring Boot + mybatis-plus代码生成器 自动生成项目结构
本次分享到此结束,遇到问题的朋友可以留言讨论,觉得有所帮助的朋友点点关注点点赞。


 1971
1971


 被折叠的 条评论
为什么被折叠?
被折叠的 条评论
为什么被折叠?
 到【灌水乐园】发言


