


瑞吉外卖-第五天
课程内容
-
新增套餐
-
套餐分页查询
-
删除套餐
-
短信发送
-
手机验证码登录
1. 新增套餐
1.1 需求分析
套餐就是菜品的集合。
后台系统中可以管理套餐信息,通过新增套餐功能来添加一个新的套餐,在添加套餐时需要选择当前套餐所属的套餐分类和包含的菜品,并且需要上传套餐对应的图片,在移动端会按照套餐分类来展示对应的套餐。

1.2 数据模型
新增套餐,其实就是将新增页面录入的套餐信息插入到setmeal表,还需要向setmeal_dish表插入套餐和菜品关联数据。所以在新增套餐时,涉及到两个表:
| 表 | 说明 | 备注 |
|---|---|---|
| setmeal | 套餐表 | 存储套餐的基本信息 |
| setmeal_dish | 套餐菜品关系表 | 存储套餐关联的菜品的信息(一个套餐可以关联多个菜品) |
两张表具体的表结构如下:
1). 套餐表setmeal
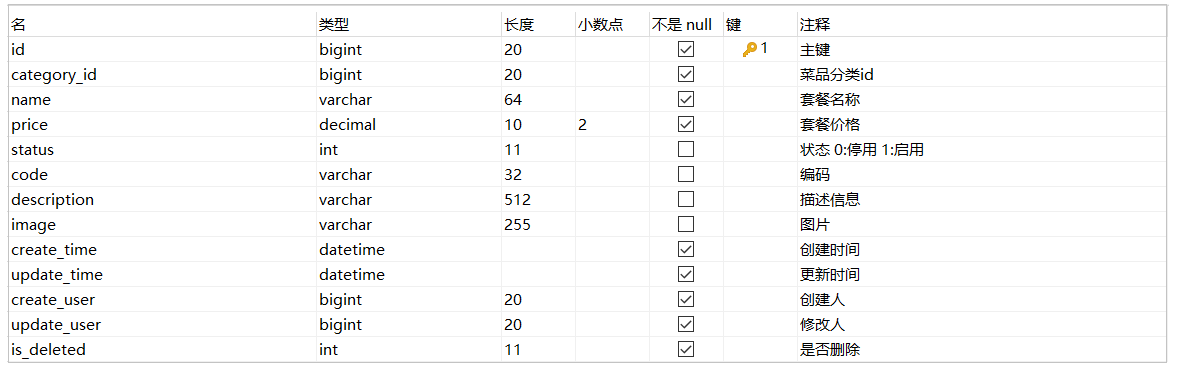
在该表中,套餐名称name字段是不允许重复的,在建表时,已经创建了唯一索引。

2). 套餐菜品关系表setmeal_dish
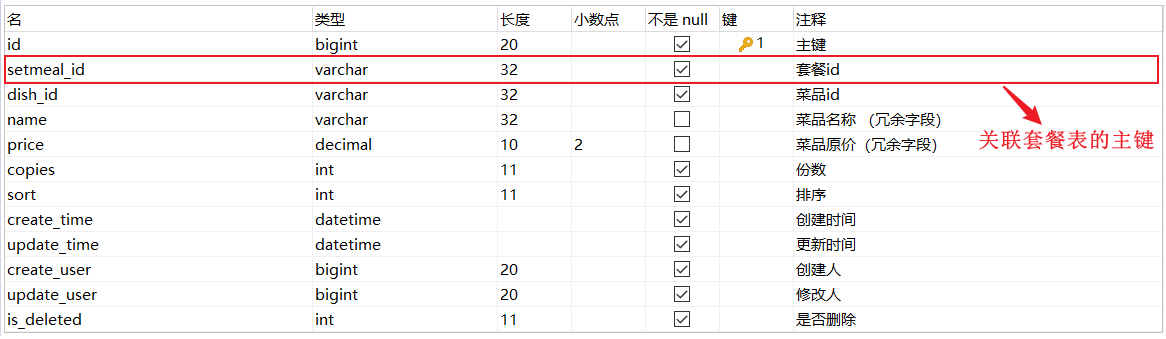
在该表中,菜品的名称name,菜品的原价price 实际上都是冗余字段,因为我们在这张表中存储了菜品的ID(dish_id),根据该ID我们就可以查询出name,price的数据信息,而这里我们又存储了name,price,这样的话,我们在后续的查询展示操作中,就不需要再去查询数据库获取菜品名称和原价了,这样可以简化我们的操作。
1.3 准备工作
在开发业务功能前,先将需要用到的类和接口基本结构创建好,在做这一块儿的准备工作时,我们无需准备Setmeal的相关实体类、Mapper接口、Service接口及实现,因为之前在做分类管理的时候,我们已经引入了Setmeal的相关基础代码。 接下来,我们就来完成以下的几步准备工作:
1). 实体类 SetmealDish
ps.直接从课程资料中导入即可,Setmeal实体前面课程中已经导入过了。
所属包: com.itheima.reggie.entity
package com.itheima.reggie.entity;

import lombok.Data;
import java.io.Serializable;
import java.math.BigDecimal;
import java.time.LocalDateTime;

/**
 * 套餐菜品关系
 */
@Data
public class SetmealDish implements Serializable {
    private static final long serialVersionUID = 1L;

    private Long id;

    //套餐id
    private Long setmealId;

    //菜品id
    private Long dishId;

    //菜品名称 (冗余字段)
    private String name;

    //菜品原价
    private BigDecimal price;

    //份数
    private Integer copies;

    //排序
    private Integer sort;


    private LocalDateTime createTime;


    private LocalDateTime updateTime;


    private Long createUser;

    private Long updateUser;

    //是否删除
    private Integer isDeleted;
}
2). DTO SetmealDto
该数据传输对象DTO,主要用于封装页面在新增套餐时传递过来的json格式的数据,其中包含套餐的基本信息,还包含套餐关联的菜品集合。直接从课程资料中导入即可。
所属包: com.itheima.reggie.dto
import com.itheima.reggie.entity.Setmeal;
import com.itheima.reggie.entity.SetmealDish;
import lombok.Data;
import java.util.List;

@Data
public class SetmealDto extends Setmeal {

    private List<SetmealDish> setmealDishes;//套餐关联的菜品集合

    private String categoryName;//分类名称
}
1.4 前端页面分析
服务端的基础准备工作我们准备完毕之后,在进行代码开发之前,需要梳理一下新增套餐时前端页面和服务端的交互过程:
1). 点击新建套餐按钮,访问页面(backend/page/combo/add.html),页面加载发送ajax请求,请求服务端获取套餐分类数据并展示到下拉框中(已实现)
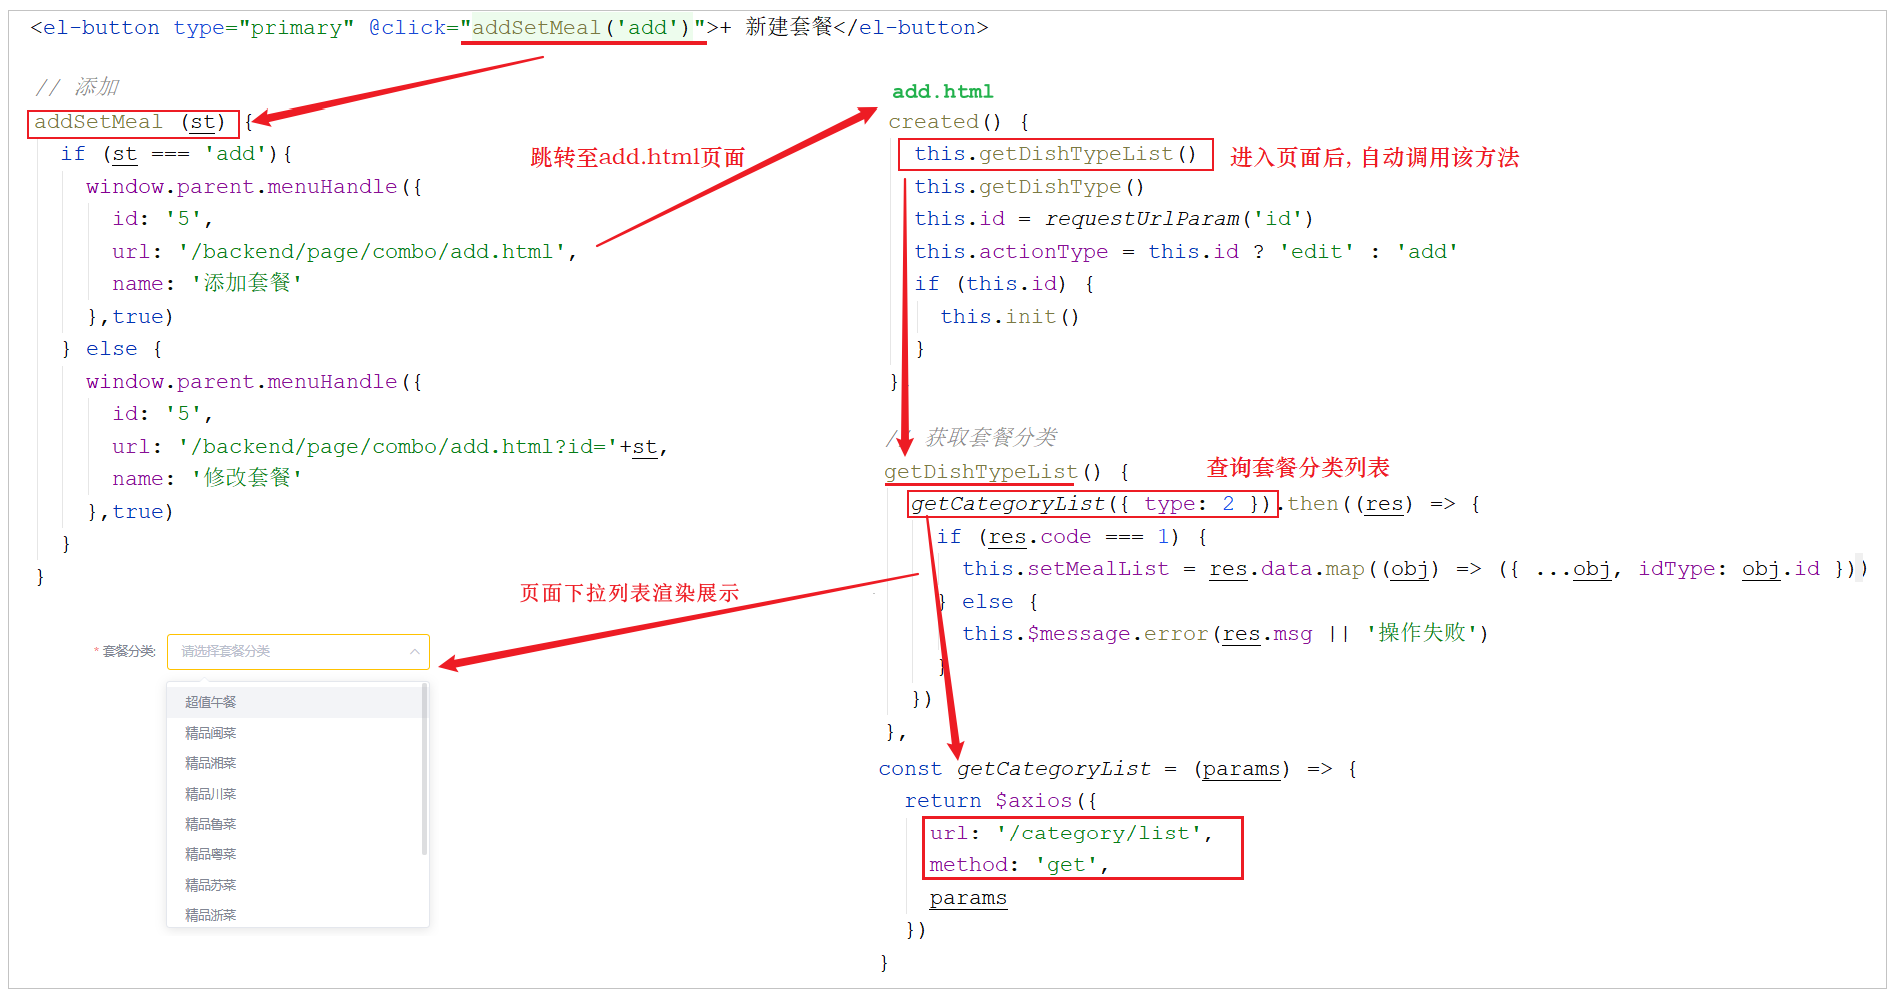
获取套餐分类列表的功能我们不用开发,之前已经开发完成了,之前查询时type传递的是1,查询菜品分类; 本次查询时,传递的type为2,查询套餐分类列表。
2). 访问页面(backend/page/combo/add.html),页面加载时发送ajax请求,请求服务端获取菜品分类数据并展示到添加菜品窗口中(已实现)

本次查询分类列表,传递的type为1,表示需要查询的是菜品的分类。查询菜品分类的目的,是添加套餐关联的菜品时,我们需要根据菜品分类,来过滤查询菜品信息。查询菜品分类列表的代码已经实现, 具体展示效果如下:

3). 当点击添加菜品窗口左侧菜单的某一个分类, 页面发送ajax请求,请求服务端,根据菜品分类查询对应的菜品数据并展示到添加菜品窗口中

4). 页面发送请求进行图片上传,请求服务端将图片保存到服务器(已实现)
5). 页面发送请求进行图片下载,将上传的图片进行回显(已实现)
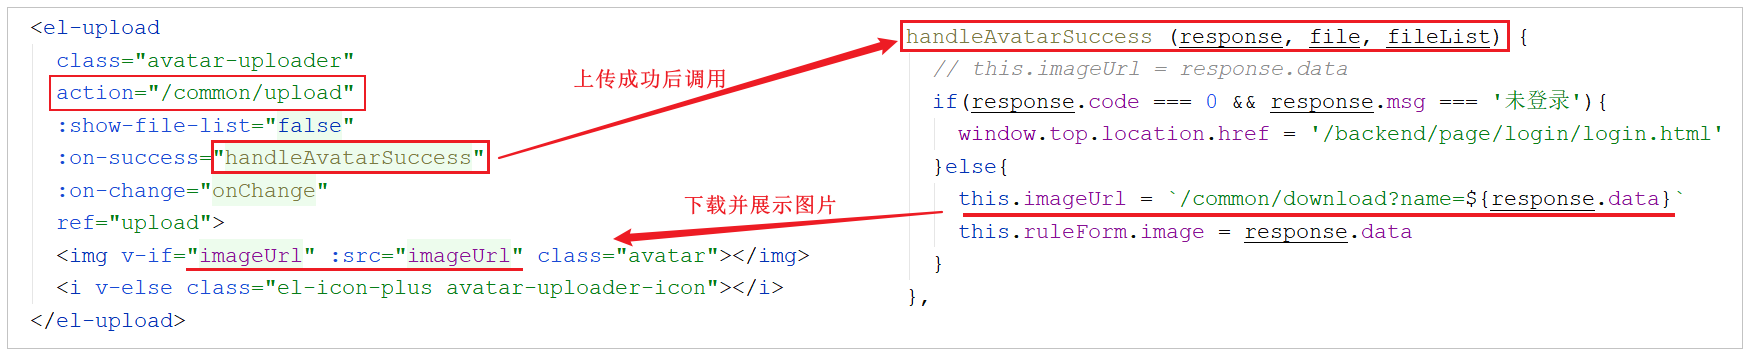
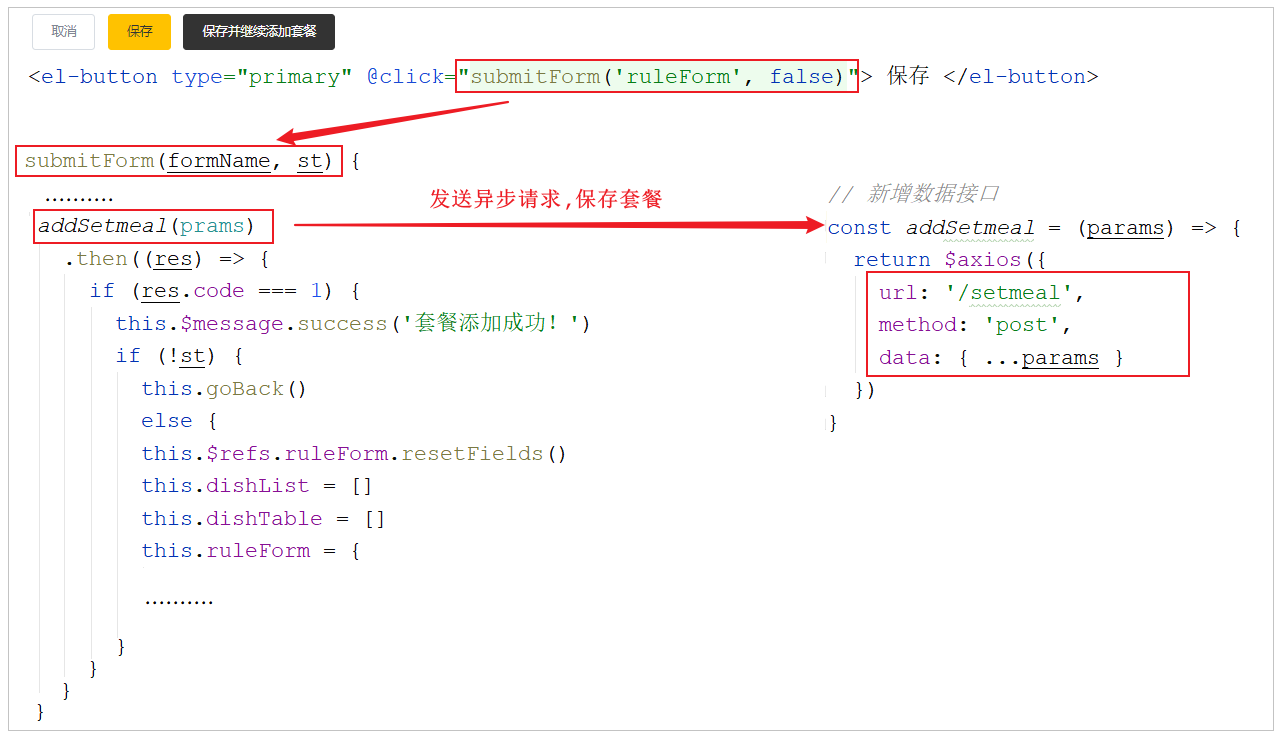
6). 点击保存按钮,发送ajax请求,将套餐相关数据以json形式提交到服务端
经过上述的页面解析及流程分析,我们发送这里需要发送的请求有5个,分别是 :
A. 根据传递的参数,查询套餐分类列表
B. 根据传递的参数,查询菜品分类列表
C. 图片上传
D. 图片下载展示
E. 根据菜品分类ID,查询菜品列表
F. 保存套餐信息
而对于以上的前4个功能我们都已经实现, 所以我们接下来需要开发的功能主要是最后两项, 具体的请求信息如下:
1). 根据分类ID查询菜品列表
| 请求 | 说明 |
|---|---|
| 请求方式 | GET |
| 请求路径 | /dish/list |
| 请求参数 | ?categoryId=1397844263642378242 |
2). 保存套餐信息
| 请求 | 说明 |
|---|---|
| 请求方式 | POST |
| 请求路径 | /setmeal |
| 请求参数 | json格式数据 |
传递的json格式数据如下:
{
    "name":"营养超值工作餐",
    "categoryId":"1399923597874081794",
    "price":3800,
    "code":"",
    "image":"9cd7a80a-da54-4f46-bf33-af3576514cec.jpg",
    "description":"营养超值工作餐",
    "dishList":[],
    "status":1,
    "idType":"1399923597874081794",
    "setmealDishes":[
    	{"copies":2,"dishId":"1423329009705463809","name":"米饭","price":200},
    	{"copies":1,"dishId":"1423328152549109762","name":"可乐","price":500},
    	{"copies":1,"dishId":"1397853890262118402","name":"鱼香肉丝","price":3800}
    ]
}
1.5 代码开发
上面我们已经分析了接下来我们需要实现的两个功能,接下来我们就需要根据上述的分析,来完成具体的功能实现。
1.5.1 根据分类查询菜品
1.5.1.1 功能实现
- DishController
package com.itheima.reggie.controller;

import com.itheima.reggie.common.R;
import com.itheima.reggie.dto.DishDto;
import com.itheima.reggie.entity.Dish;
import com.itheima.reggie.entity.Page;
import com.itheima.reggie.service.DishFlavorService;
import com.itheima.reggie.service.DishService;
import lombok.extern.slf4j.Slf4j;
import org.springframework.beans.factory.annotation.Autowired;
import org.springframework.web.bind.annotation.*;

import javax.servlet.http.HttpServletRequest;
import java.time.LocalDateTime;
import java.util.List;

/**
 * 菜品管理
 */
@RestController
@RequestMapping("/dish")
@Slf4j
public class DishController {
    @Autowired
    private DishService dishService;

    @Autowired
    private DishFlavorService dishFlavorService;


     /**
     * 根据类别查询菜品
     * @param categoryId
     * @return
     */
    @GetMapping("list")
    public R<List<Dish>> list(Long categoryId){
        R<List<Dish>> result=  dishService.findByCategoryId(categoryId);
        return result;
    }


}
- DishService
package com.itheima.reggie.service;

import com.itheima.reggie.common.R;
import com.itheima.reggie.dto.DishDto;
import com.itheima.reggie.entity.Dish;
import com.itheima.reggie.entity.Page;

import java.util.List;

public interface DishService {

     /**
     * 根据类别查询菜品
     * @param categoryId
     * @return
     */
    R<List<Dish>> findByCategoryId(Long categoryId);
}
- DishServiceImpl
package com.itheima.reggie.service.impl;

import com.github.pagehelper.PageHelper;
import com.github.pagehelper.PageInfo;
import com.itheima.reggie.common.R;
import com.itheima.reggie.dto.DishDto;
import com.itheima.reggie.entity.*;
import com.itheima.reggie.mapper.DishMapper;
import com.itheima.reggie.service.CategoryService;
import com.itheima.reggie.service.DishFlavorService;
import com.itheima.reggie.service.DishService;
import org.springframework.beans.BeanUtils;
import org.springframework.beans.factory.annotation.Autowired;
import org.springframework.stereotype.Service;
import org.springframework.transaction.annotation.Transactional;

import java.time.LocalDateTime;
import java.util.ArrayList;
import java.util.List;
import java.util.stream.Collectors;

@Service
public class DishServiceImpl implements DishService {

    @Autowired(required = false)
    private DishMapper dishMapper;

    @Autowired
    private DishFlavorService dishFlavorService;

    @Autowired
    private CategoryService categoryService;


    /**
     * 根据类别查询菜品
     * @param categoryId
     * @return
     */
    @Override
    public R<List<Dish>> findByCategoryId(Long categoryId) {
        List<Dish> dishList = dishMapper.findByCategoryId(categoryId);
        return R.success(dishList);
    }
}
- DishMapper
package com.itheima.reggie.mapper;

import com.itheima.reggie.entity.Dish;
import com.itheima.reggie.dto.DishDto;
import org.apache.ibatis.annotations.Insert;
import org.apache.ibatis.annotations.Options;
import org.apache.ibatis.annotations.Select;

import java.util.List;

public interface DishMapper {

  @Select("select * from dish where category_id=#{categoryId}")
    List<Dish> findByCategoryId(Long categoryId);
}
1.5.1.2 功能测试
代码编写完毕,我们重新启动服务器,进行测试,可以通过debug断点跟踪的形式查看页面传递的参数封装情况,及响应给页面的数据信息。

1.5.2 保存套餐
1.5.2.1 功能实现
在进行套餐信息保存时,前端提交的数据,不仅包含套餐的基本信息,还包含套餐关联的菜品列表数据 setmealDishes。所以这个时候我们使用Setmeal就不能完成参数的封装了,我们需要在Setmeal的基本属性的基础上,再扩充一个属性 setmealDishes 来接收页面传递的套餐关联的菜品列表,而我们在准备工作中,导入进来的SetmealDto能够满足这个需求。
1). SetmealController中定义方法save,新增套餐
在该Controller的方法中,我们不仅需要保存套餐的基本信息,还需要保存套餐关联的菜品数据,所以我们需要再该方法中调用业务层方法,完成两块数据的保存。
页面传递的数据是json格式,需要在方法形参前面加上@RequestBody注解, 完成参数封装。
package com.itheima.reggie.controller;


import com.itheima.reggie.common.R;
import com.itheima.reggie.dto.SetmealDto;
import com.itheima.reggie.service.SetmealService;
import lombok.extern.slf4j.Slf4j;
import org.springframework.beans.factory.annotation.Autowired;
import org.springframework.web.bind.annotation.PostMapping;
import org.springframework.web.bind.annotation.RequestBody;
import org.springframework.web.bind.annotation.RequestMapping;
import org.springframework.web.bind.annotation.RestController;

import javax.servlet.http.HttpServletRequest;
import java.time.LocalDateTime;

@RestController
@RequestMapping("/setmeal")
@Slf4j
public class SetmealController {

    @Autowired
    private SetmealService setmealService;

  /**
     * 作用:新增套餐
     * @param setmealDto
     * @return
     */
    @PostMapping
    public R<String> save(@RequestBody  SetmealDto setmealDto, HttpSession session){

        //1. 获取登陆者信息,补全信息
        Long empId = (Long) session.getAttribute("employee");
        setmealDto.setCreateUser(empId);
        setmealDto.setUpdateUser(empId);
        setmealService.save(setmealDto);
        return R.success("保存成功");

    }
}
2). SetmealService中定义方法saveWithDish
package com.itheima.reggie.service;

import com.itheima.reggie.dto.SetmealDto;

public interface SetmealService {

  /**
     * 作用:新增套餐
     * @param setmealDto
     * @return
     */
    void save(SetmealDto setmealDto);
}
3). SetmealServiceImpl实现方法saveWithDish
具体逻辑:
A. 保存套餐基本信息
B. 获取套餐关联的菜品集合,并为集合中的每一个元素赋值套餐ID(setmealId)
C. 批量保存套餐关联的菜品集合
代码实现:
package com.itheima.reggie.service.impl;

import com.itheima.reggie.common.R;
import com.itheima.reggie.dto.SetmealDto;
import com.itheima.reggie.entity.SetmealDish;
import com.itheima.reggie.mapper.SetmealDishMapper;
import com.itheima.reggie.mapper.SetmealMapper;
import com.itheima.reggie.service.SetmealService;
import org.springframework.beans.factory.annotation.Autowired;
import org.springframework.stereotype.Service;
import org.springframework.transaction.annotation.Transactional;

import java.time.LocalDateTime;
import java.util.List;
import java.util.stream.Collectors;

@Service
public class SetmealServiceImpl implements SetmealService {

    @Autowired(required = false)
    private SetmealMapper setmealMapper;

    @Autowired(required = false)
    private SetmealDishMapper setmealDishMapper;


   /**
     * 作用:新增套餐
     * @param setmealDto
     * @return
     */
    @Override
    @Transactional
    public void save(SetmealDto setmealDto) {
        //1. 补全setmeal的信息,比如:、修改、创建时间、
        setmealDto.setCreateTime(LocalDateTime.now());
        setmealDto.setUpdateTime(LocalDateTime.now());
        //2. 调用保存的方法
        setMealMapper.save(setmealDto); //把套餐的id设置给实体类


        //3.得到套餐的菜品,给所有的菜品补全信息(setmeal_id 、修改、创建时间、排序,)
        List<SetmealDish> setmealDishes = setmealDto.getSetmealDishes();
        setmealDishes = setmealDishes.stream().map(setmealDish -> {
            setmealDish.setSetmealId(setmealDto.getId());
            setmealDish.setCreateUser(setmealDto.getCreateUser());
            setmealDish.setUpdateUser(setmealDto.getUpdateUser());
            setmealDish.setCreateTime(LocalDateTime.now());
            setmealDish.setUpdateTime(LocalDateTime.now());
            setmealDish.setSort(0);
            return setmealDish;
        }).collect(Collectors.toList());

        //4. 批量插入套餐菜品表
        setmealDishMapper.saveBatch(setmealDishes);

    }
}
3). SetmealMapper 保存套餐
package com.itheima.reggie.mapper;

import com.itheima.reggie.dto.SetmealDto;
import org.apache.ibatis.annotations.Insert;
import org.apache.ibatis.annotations.Options;
import org.apache.ibatis.annotations.Select;

public interface SetmealMapper {


      @Insert("insert into setmeal values(null,#{categoryId},#{name},#{price},#{status},#{code},#{description},#{image},#{createTime},#{updateTime},#{createUser},#{updateUser},0)")
    @Options(useGeneratedKeys = true,keyProperty = "id",keyColumn = "id")
    void save(SetmealDto setmealDto);

}
4). SetmealDishMapper 保存套餐的菜品
package com.itheima.reggie.mapper;

import com.itheima.reggie.entity.SetmealDish;
import org.apache.ibatis.annotations.Param;

import java.util.List;

public interface SetmealDishMapper {

     void saveBatch(@Param("setmealDishes") List<SetmealDish> setmealDishes);
}
}
5). SetmealDishMapper.xml
  <insert id="saveBatch">
        insert into setmeal_dish values
        <foreach collection="setmealDishes" item="setmealDish" separator=",">
            (null,#{setmealDish.setmealId},#{setmealDish.dishId},#{setmealDish.name},#{setmealDish.price},#{setmealDish.copies}
            ,#{setmealDish.sort},#{setmealDish.createTime},#{setmealDish.updateTime},#{setmealDish.createUser},#{setmealDish.updateUser},0)
        </foreach>
    </insert>
1.5.2.2 功能测试
代码编写完毕,我们重新启动服务器,进行测试,可以通过debug断点跟踪的形式查看页面传递的参数封装情况,及套餐相关数据的保存情况。
录入表单数据:
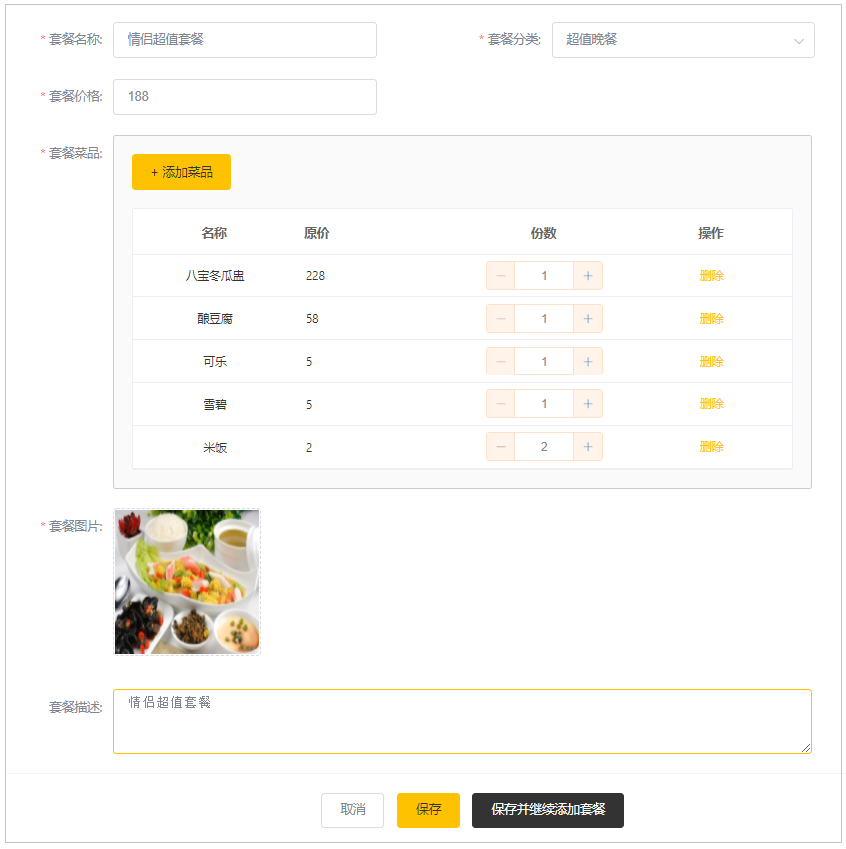
debug跟踪数据封装:

跟踪数据库保存的数据:
[外链图片转存失败,源站可能有防盗链机制,建议将图片保存下来直接上传(img-EFSL6III-1640771881953)(Q:/%E7%91%9E%E5%90%89%E5%A4%96%E5%8D%96%E7%AC%AC%E4%BA%94%E5%A4%A9/01.%E8%AE%B2%E4%B9%89/assets/image-20210806014807017.png)]
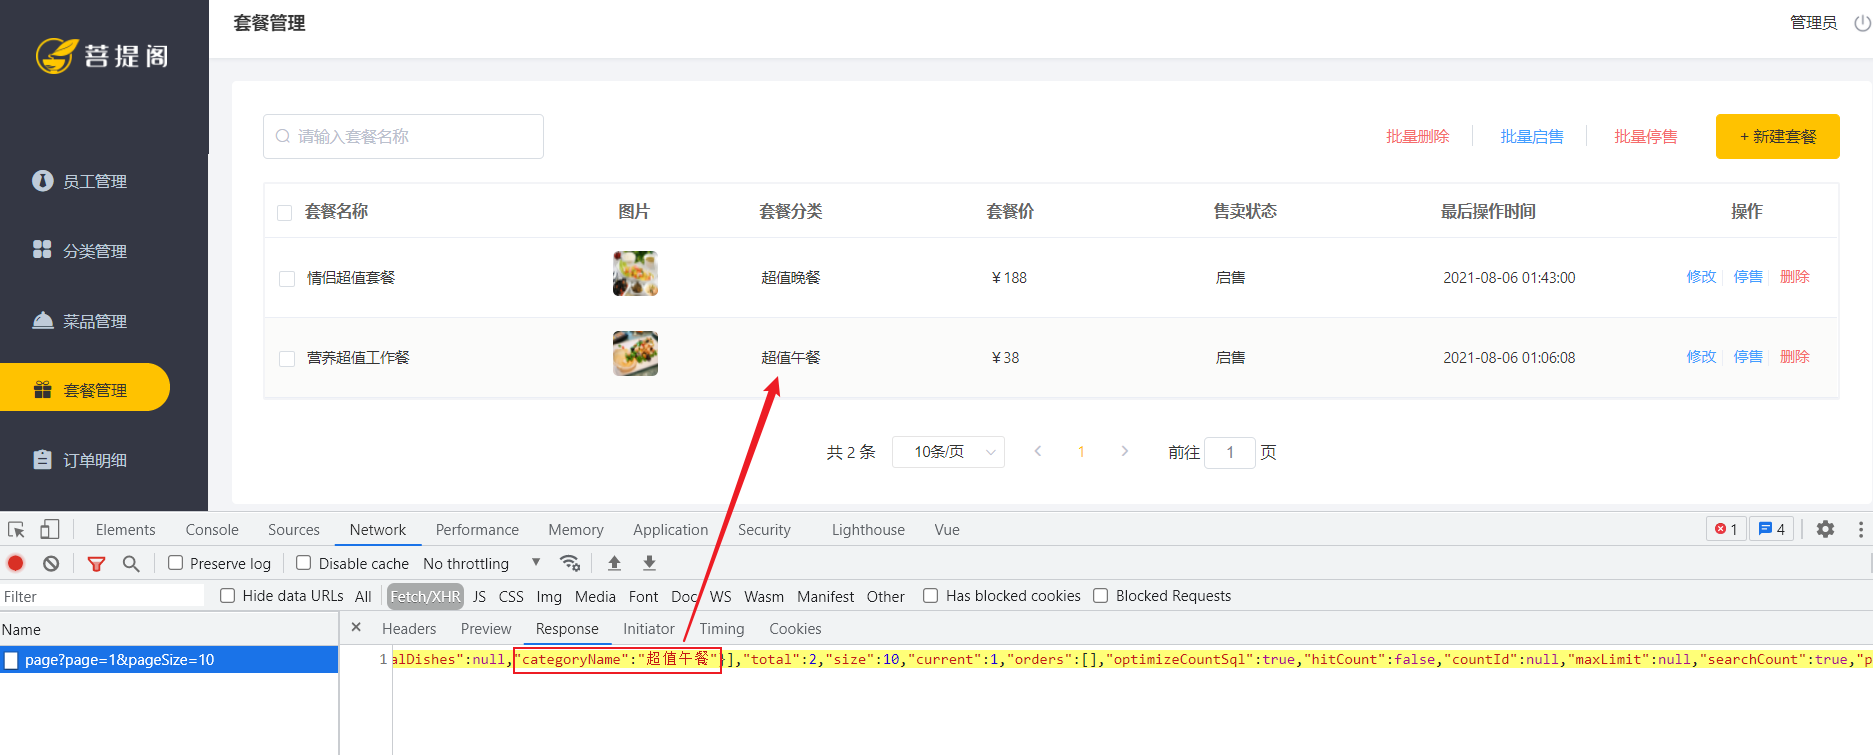
2. 套餐分页查询
2.1 需求分析
系统中的套餐数据很多的时候,如果在一个页面中全部展示出来会显得比较乱,不便于查看,所以一般的系统中都会以分页的方式来展示列表数据。
[外链图片转存失败,源站可能有防盗链机制,建议将图片保存下来直接上传(img-cigaKpPt-1640771881954)(Q:/%E7%91%9E%E5%90%89%E5%A4%96%E5%8D%96%E7%AC%AC%E4%BA%94%E5%A4%A9/01.%E8%AE%B2%E4%B9%89/assets/image-20210806073710653.png)]
在进行套餐数据的分页查询时,除了传递分页参数以外,还可以传递一个可选的条件(套餐名称)。查询返回的字段中,包含套餐的基本信息之外,还有一个套餐的分类名称,在查询时,需要关联查询这个字段。
2.2 前端页面分析
在开发代码之前,需要梳理一下套餐分页查询时前端页面和服务端的交互过程:
1). 访问页面(backend/page/combo/list.html),页面加载时,会自动发送ajax请求,将分页查询参数(page、pageSize、name)提交到服务端,获取分页数据

2). 在列表渲染展示时,页面发送请求,请求服务端进行图片下载,用于页面图片展示(已实现)

而对于以上的流程中涉及到2个功能,文件下载功能我们已经实现,本小节我们主要实现列表分页查询功能, 具体的请求信息如下:
| 请求 | 说明 |
|---|---|
| 请求方式 | GET |
| 请求路径 | /setmeal/page |
| 请求参数 | ?page=1&pageSize=10&name=xxx |
2.3 代码开发
2.3.1 基本信息查询
- SetmealController
package com.itheima.reggie.controller;


import com.itheima.reggie.common.R;
import com.itheima.reggie.dto.SetmealDto;
import com.itheima.reggie.entity.Page;
import com.itheima.reggie.entity.Setmeal;
import com.itheima.reggie.service.SetmealService;
import lombok.extern.slf4j.Slf4j;
import org.springframework.beans.factory.annotation.Autowired;
import org.springframework.web.bind.annotation.*;

import javax.servlet.http.HttpServletRequest;
import java.time.LocalDateTime;

@RestController
@RequestMapping("/setmeal")
@Slf4j
public class SetmealController {

    @Autowired
    private SetmealService setmealService;


   /**
     * 作用:查看套餐的分页
     * @param page  当前页
     * @param pageSize  页面大小
     * @param name  搜索套餐名字
     * @return
     */
    @GetMapping("/page")
    public R<Page<SetmealDto>> page(@RequestParam(defaultValue = "1") Integer page,
                                    @RequestParam(defaultValue = "10") Integer pageSize, String name){
        R<Page<SetmealDto>> result = setmealService.findByPage(page,pageSize,name);
        return result;
    }
}
- SetmealService
package com.itheima.reggie.service;

import com.itheima.reggie.dto.SetmealDto;
import com.itheima.reggie.entity.Page;
import com.itheima.reggie.entity.Setmeal;

public interface SetmealService {


/**
     * 作用:查看套餐的分页
     * @param page  当前页
     * @param pageSize  页面大小
     * @param name  搜索套餐名字
     * @return
     */
    R<Page<SetmealDto>> findByPage(Integer page, Integer pageSize, String name);
}
- SetmealServiceImpl
package com.itheima.reggie.service.impl;

import com.github.pagehelper.PageHelper;
import com.github.pagehelper.PageInfo;
import com.itheima.reggie.common.R;
import com.itheima.reggie.dto.SetmealDto;
import com.itheima.reggie.entity.Page;
import com.itheima.reggie.entity.Setmeal;
import com.itheima.reggie.entity.SetmealDish;
import com.itheima.reggie.mapper.SetmealDishMapper;
import com.itheima.reggie.mapper.SetmealMapper;
import com.itheima.reggie.service.SetmealService;
import org.springframework.beans.factory.annotation.Autowired;
import org.springframework.stereotype.Service;
import org.springframework.transaction.annotation.Transactional;

import java.time.LocalDateTime;
import java.util.List;
import java.util.stream.Collectors;

@Service
public class SetmealServiceImpl implements SetmealService {

    @Autowired(required = false)
    private SetmealMapper setmealMapper;


 @Override
    public R<Page<SetmealDto>> findByPage(Integer page, Integer pageSize, String name) {
        //1. 设置当前页与页面大小
        PageHelper.startPage(page,pageSize);
        //2. 根据套餐的名字去搜索套餐LIst集合
        List<Setmeal> setmealList = setmealMapper.findByName(name);

        //3. 得到PageInfo对象
        PageInfo<Setmeal> pageInfo = new PageInfo<>(setmealList);

        //4. 得到所有的Setmeal,把Setmeal转换为SetmealDto,并且设置套餐的名字
        List<SetmealDto> setmealDtoList = setmealList.stream().map(setmeal -> {
            SetmealDto setmealDto = new SetmealDto();
            //属性拷贝
            BeanUtils.copyProperties(setmeal, setmealDto);
            //设置类别的名字
            Category category = categoryMapper.findbyId(setmeal.getCategoryId());
            setmealDto.setCategoryName(category.getName());
            return setmealDto;
        }).collect(Collectors.toList());

        //5. 构建page对象
        Page<SetmealDto> pageResult = new Page<>(setmealDtoList,pageInfo.getTotal(),page,pageSize);


        return R.success(pageResult);
    }
}
- SetmealMapper
package com.itheima.reggie.mapper;

import com.itheima.reggie.dto.SetmealDto;
import com.itheima.reggie.entity.Setmeal;
import org.apache.ibatis.annotations.Insert;
import org.apache.ibatis.annotations.Options;
import org.apache.ibatis.annotations.Select;

import java.util.List;

public interface SetmealMapper {

    //根据名字查找套餐
      List<Setmeal> findByName(@Param("name") String name);
}
<?xml version="1.0" encoding="UTF-8" ?>
<!DOCTYPE mapper
        PUBLIC "-//mybatis.org//DTD Mapper 3.0//EN"
        "http://mybatis.org/dtd/mybatis-3-mapper.dtd" >
<mapper namespace="com.itheima.reggie.mapper.SetmealMapper">

    <select id="findByName" resultType="setmeal">
        select * from setmeal
        <where>
            <if test="name!=null and name!=''">
                  name like concat('%',#{name},'%')
            </if>
        </where>
    </select>

</mapper>
2.4 功能测试
代码完善后,重启服务,测试列表查询,我们发现, 抓取浏览器的请求响应数据,我们可以获取到套餐分类名称categoryName,也可以在列表页面展示出来 。
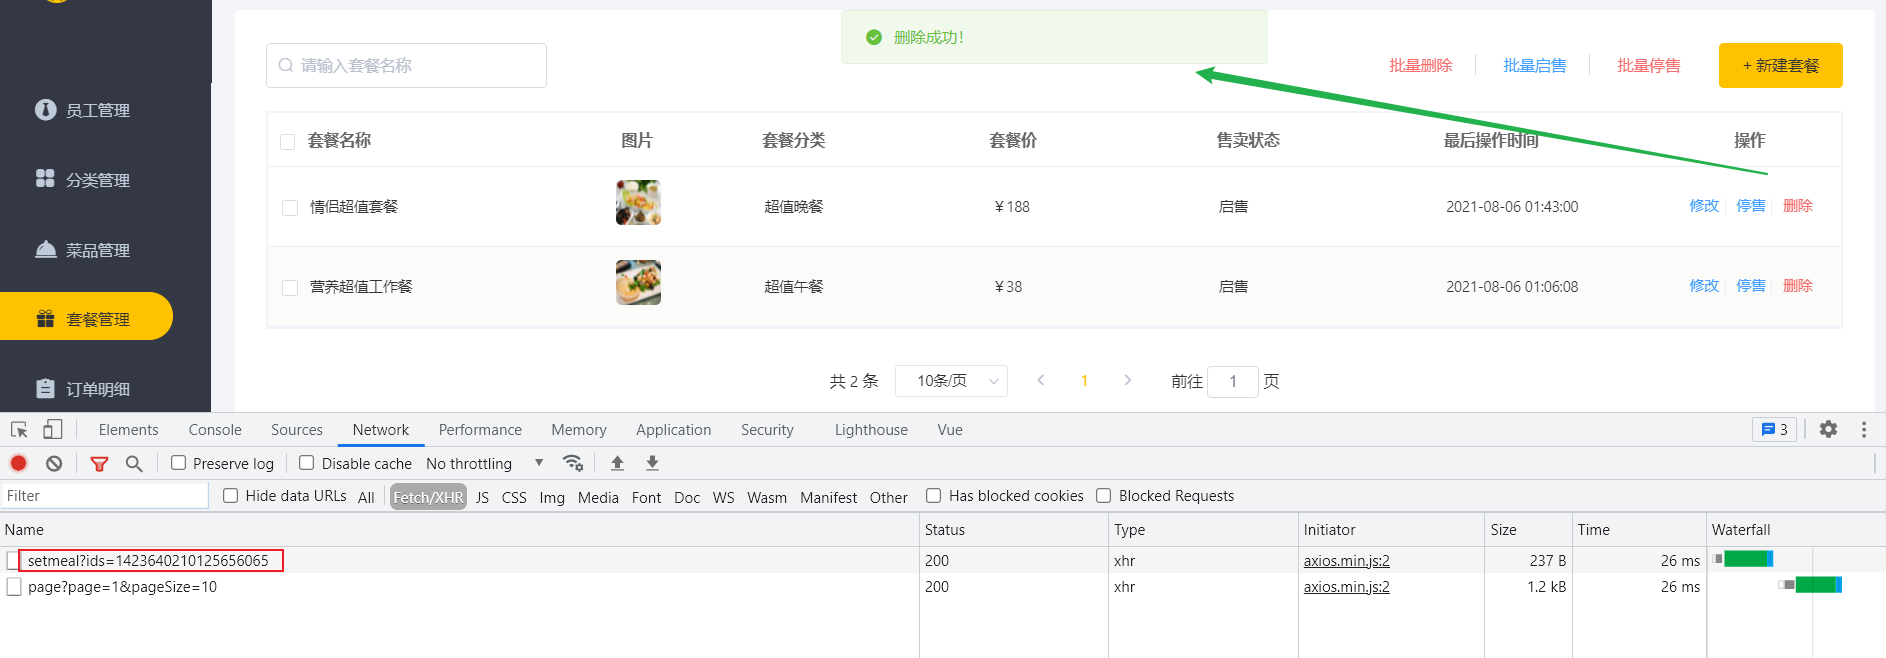
3. 删除套餐
3.1 需求分析
在套餐管理列表页面,点击删除按钮,可以删除对应的套餐信息。也可以通过复选框选择多个套餐,点击批量删除按钮一次删除多个套餐。注意,对于状态为售卖中的套餐不能删除,需要先停售,然后才能删除。
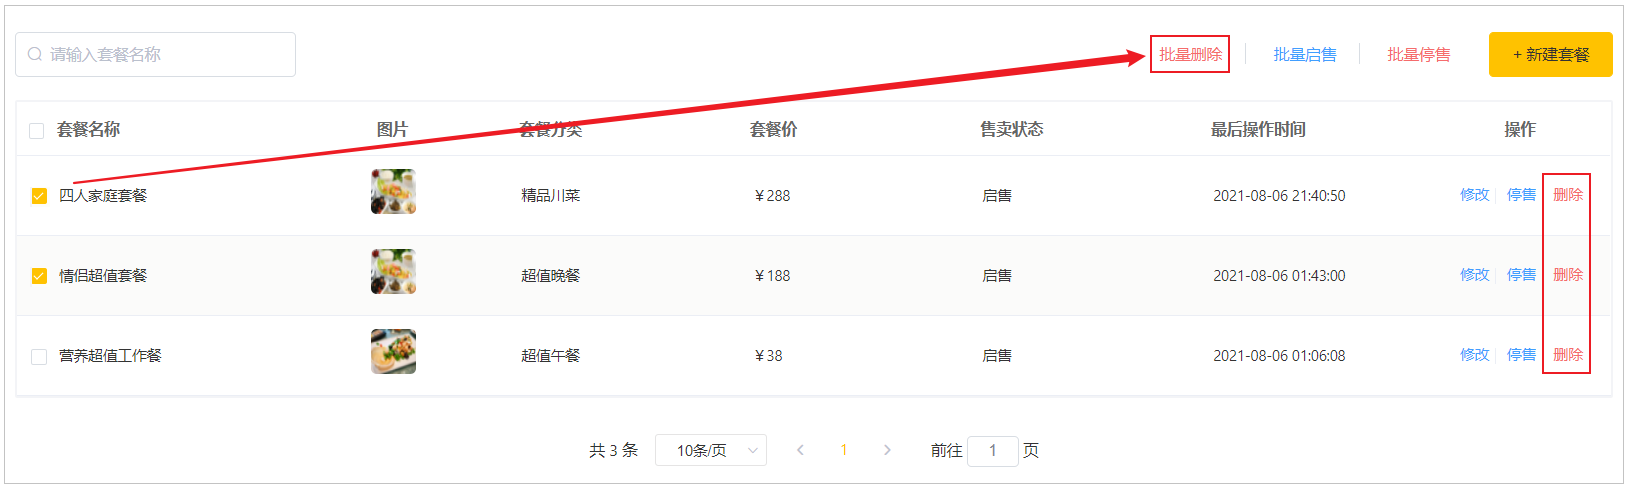
3.2 前端页面分析
在开发代码之前,需要梳理一下删除套餐时前端页面和服务端的交互过程:
1). 点击删除, 删除单个套餐时,页面发送ajax请求,根据套餐id删除对应套餐
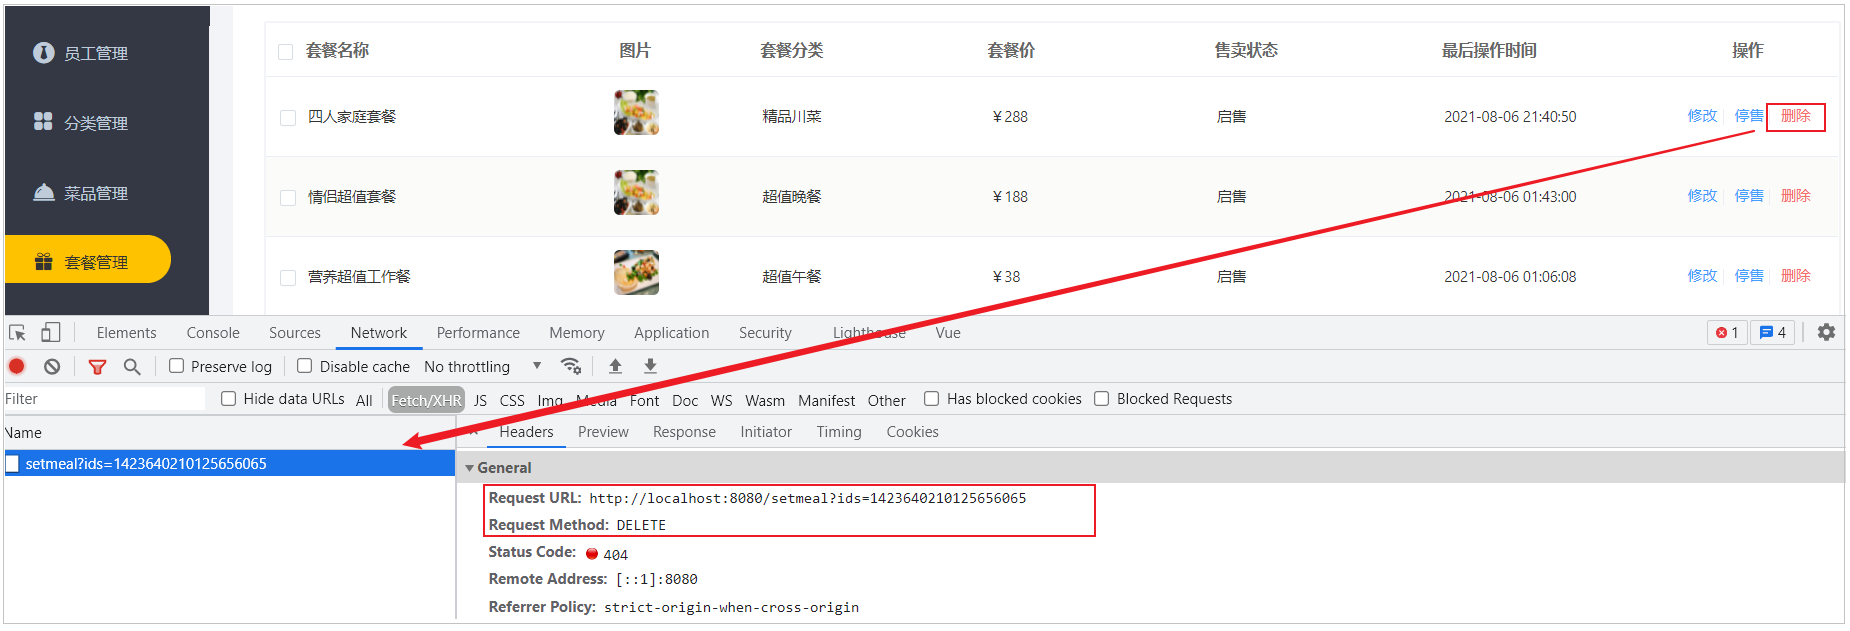
2). 删除多个套餐时,页面发送ajax请求,根据提交的多个套餐id删除对应套餐
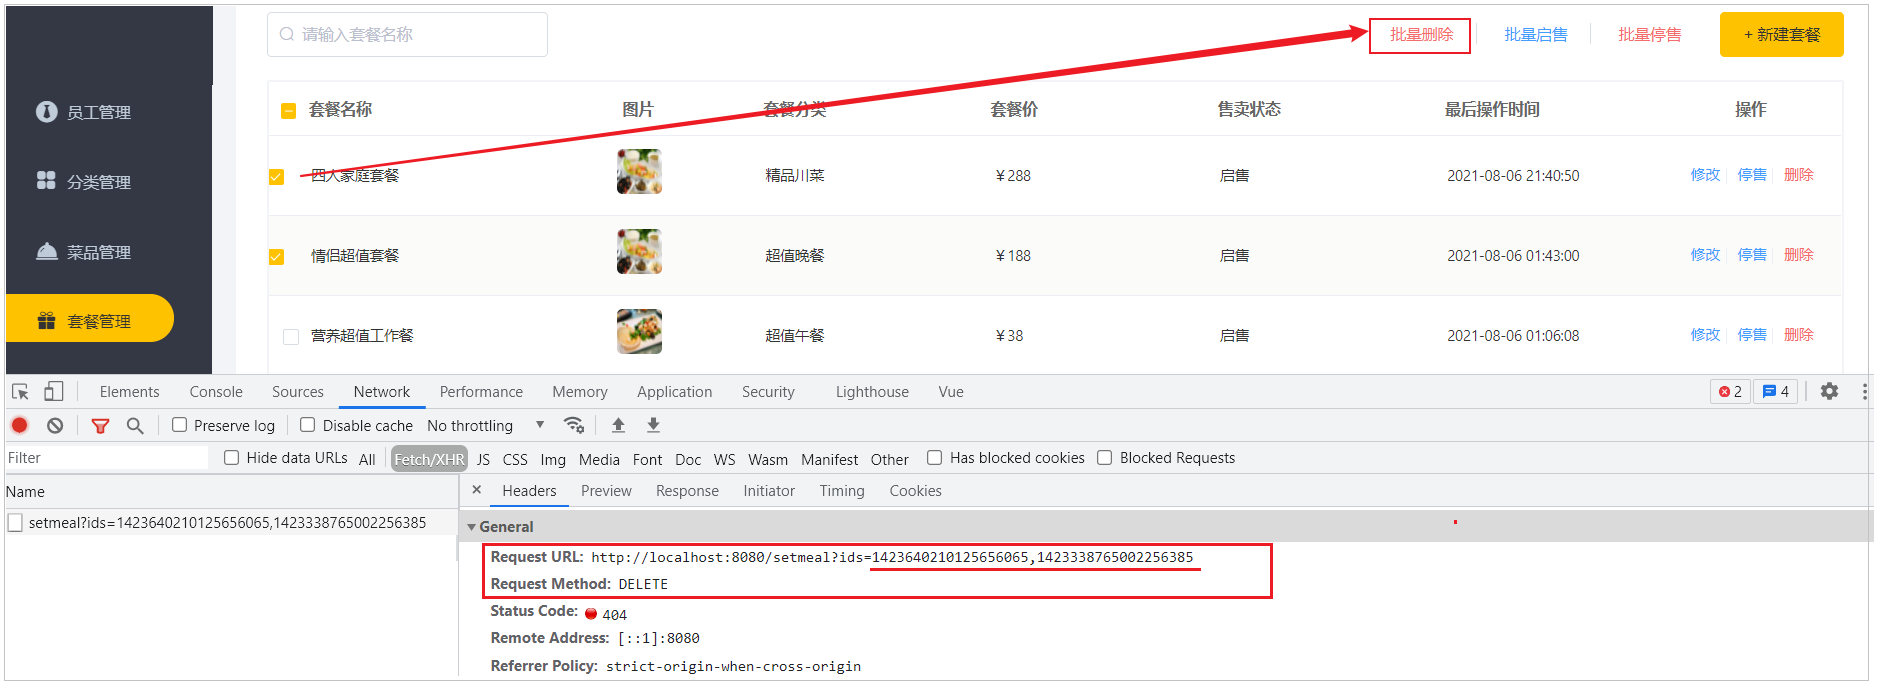
开发删除套餐功能,其实就是在服务端编写代码去处理前端页面发送的这2次请求即可,一次请求为根据ID删除,一次请求为根据ID批量删除。
观察删除单个套餐和批量删除套餐的请求信息可以发现,两种请求的地址和请求方式都是相同的,不同的则是传递的id个数,所以在服务端可以提供一个方法来统一处理。
具体的请求信息如下:
| 请求 | 说明 |
|---|---|
| 请求方式 | DELETE |
| 请求路径 | /setmeal |
| 请求参数 | ?ids=1423640210125656065,1423338765002256385 |
3.3 代码开发
删除套餐的流程及请求信息,我们分析完毕之后,就来完成服务端的逻辑开发。在服务端的逻辑中, 删除套餐时, 我们不仅要删除套餐, 还要删除套餐与菜品的关联关系。
1). 在SetmealController中创建delete方法
我们可以先测试在delete方法中接收页面提交的参数,具体逻辑后续再完善:
package com.itheima.reggie.controller;


import com.itheima.reggie.common.R;
import com.itheima.reggie.dto.SetmealDto;
import com.itheima.reggie.entity.Page;
import com.itheima.reggie.entity.Setmeal;
import com.itheima.reggie.service.SetmealService;
import lombok.extern.slf4j.Slf4j;
import org.springframework.beans.factory.annotation.Autowired;
import org.springframework.web.bind.annotation.*;

import javax.servlet.http.HttpServletRequest;
import java.time.LocalDateTime;
import java.util.List;

@RestController
@RequestMapping("/setmeal")
@Slf4j
public class SetmealController {

    @Autowired
    private SetmealService setmealService;


    /**
     * 批量删除套餐
     * ids : 要被删除的套餐的id,传递的id是有多个的。
     * 接收多个参数的方式:
     *      1. 数组接收  Long[]
     *      2. list集合接收 List<Long> ,如果使用List集合接收需要使用@Requestparam注解
     * @return
     */
    @DeleteMapping
    public R<String> delete(@RequestParam  List<Long> ids){
        setmealService.deleteByIds(ids);
        return R.success("删除成功");
    }
}
编写完代码,我们重启服务之后,访问套餐列表页面,勾选复选框,然后点击"批量删除",我们可以看到服务端可以接收到集合参数ids,并且在控制台也可以输出对应的数据 。

2). SetmealService接口定义方法removeWithDish
package com.itheima.reggie.service;

import com.itheima.reggie.dto.SetmealDto;
import com.itheima.reggie.entity.Page;
import com.itheima.reggie.entity.Setmeal;

import java.util.List;

public interface SetmealService {


  /**
     * 根据id删除套餐
     * @param ids
     */
    @Transactional
    void deleteByIds(List<Long> ids);
}
3). SetmealServiceImpl中实现方法removeWithDish
该业务层方法具体的逻辑为:
A. 查询该批次套餐中是否存在售卖中的套餐, 如果存在, 不允许删除
B. 删除套餐数据
C. 删除套餐关联的菜品数据
代码实现为:
package com.itheima.reggie.service.impl;

import com.github.pagehelper.PageHelper;
import com.github.pagehelper.PageInfo;
import com.itheima.reggie.common.CustomException;
import com.itheima.reggie.common.R;
import com.itheima.reggie.dto.SetmealDto;
import com.itheima.reggie.entity.Category;
import com.itheima.reggie.entity.Page;
import com.itheima.reggie.entity.Setmeal;
import com.itheima.reggie.entity.SetmealDish;
import com.itheima.reggie.mapper.CategoryMapper;
import com.itheima.reggie.mapper.SetmealDishMapper;
import com.itheima.reggie.mapper.SetmealMapper;
import com.itheima.reggie.service.SetmealService;
import org.springframework.beans.BeanUtils;
import org.springframework.beans.factory.annotation.Autowired;
import org.springframework.stereotype.Service;
import org.springframework.transaction.annotation.Transactional;

import java.time.LocalDateTime;
import java.util.List;
import java.util.stream.Collectors;

@Service
public class SetmealServiceImpl implements SetmealService {

    @Autowired(required = false)
    private SetmealMapper setmealMapper;

    @Autowired(required = false)
    private SetmealDishMapper setmealDishMapper;


   /**
     * 根据id删除套餐
     * @param ids
     */
    @Override
    public void deleteByIds(List<Long> ids) {
        //1. 删除之前先检查套餐是否在售,如果在售不允许删除
        long count = setmealMapper.findSetmealByStatus(ids);
        if(count>0){
            throw  new CustomerException("不允许删除在售的套餐");
        }
        //2. 如果套餐不是在售状态则删除套餐(setmeal)
        setmealMapper.deleteByIds(ids);

        //3. 删除套餐关联菜品(setmeal_dish)
        setmealDishMapper.deleteBysetmealIds(ids);
    }
}
由于当前的业务方法中存在多次数据库操作,为了保证事务的完整性,需要在方法上加注解 @Transactional 来控制事务。
**4).SetmealMapper接口与Mapper文件 **
package com.itheima.reggie.mapper;

import com.itheima.reggie.dto.SetmealDto;
import com.itheima.reggie.entity.Setmeal;
import org.apache.ibatis.annotations.Insert;
import org.apache.ibatis.annotations.Options;
import org.apache.ibatis.annotations.Param;
import org.apache.ibatis.annotations.Select;

import java.util.List;

public interface SetMealMapper {


    //根据删除的id查询状态为1的套餐的总数量
    long findSetmealByStatus(@Param("ids") List<Long> ids);

    //根据ID删除套餐
    void deleteByIds(@Param("ids") List<Long> ids);
}
<?xml version="1.0" encoding="UTF-8" ?>
<!DOCTYPE mapper
        PUBLIC "-//mybatis.org//DTD Mapper 3.0//EN"
        "http://mybatis.org/dtd/mybatis-3-mapper.dtd">
<!-- namespace名称空间,名称空间代表该xml文件映射是哪个接口-->
<mapper namespace="com.itheima.reggie.mapper.SetmealMapper">


   <select id="findSetmealByStatus" resultType="long">
        SELECT COUNT(*) FROM setmeal WHERE  STATUS=1 and id in
        <foreach collection="ids" item="id" open="(" close=")" separator=",">
            #{id}
        </foreach>
    </select>

    <delete id="deleteByIds">
        DELETE FROM setmeal WHERE id IN
        <foreach collection="ids" item="id" open="(" close=")" separator=",">
            #{id}
        </foreach>
    </delete>
</mapper>
5).SetmealDishMapper接口与Mapper文件
package com.itheima.reggie.mapper;

import com.itheima.reggie.entity.SetmealDish;
import org.apache.ibatis.annotations.Param;

import java.util.List;

public interface SetmealDishMapper {


     //根据套餐的id删除套餐菜品
    void deleteBysetmealIds(@Param("ids") List<Long> ids);

}
  <delete id="deleteBysetmealIds">
        DELETE FROM `setmeal_dish` WHERE setmeal_id IN
        <foreach collection="ids" item="id" open="(" close=")" separator=",">
            #{id}
        </foreach>
    </delete>
3.4 功能测试
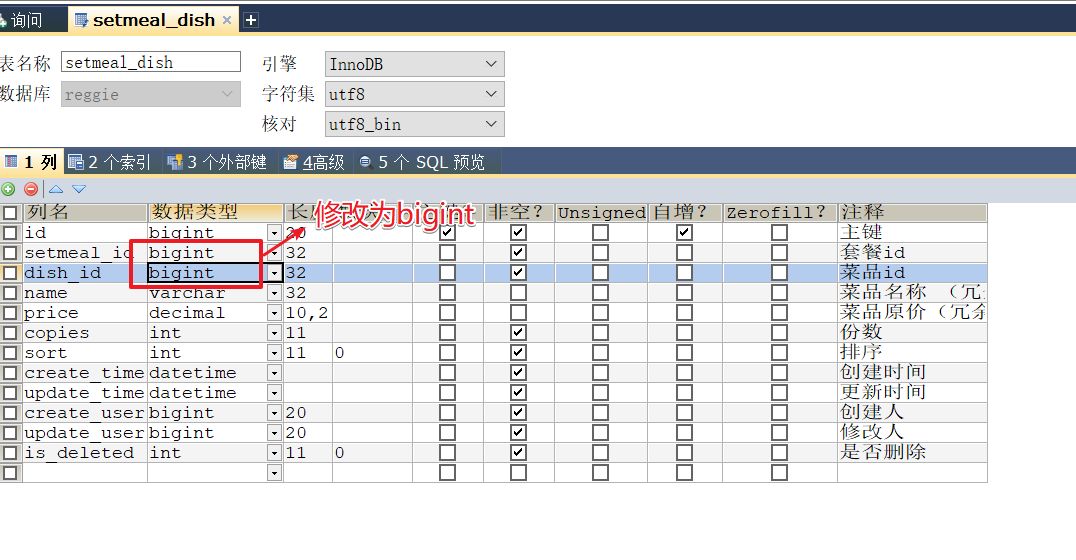
注意: 一定要修改setmeal_id类型修改bigint

代码完善后,重启服务,测试套餐的删除功能,主要测试以下几种情况。
1). 删除正在启用的套餐
2). 执行批量操作, 删除两条记录, 一个启售的, 一个停售的
由于当前我们并未实现启售/停售功能,所以我们需要手动修改数据库表结构的status状态,将其中的一条记录status修改为0。
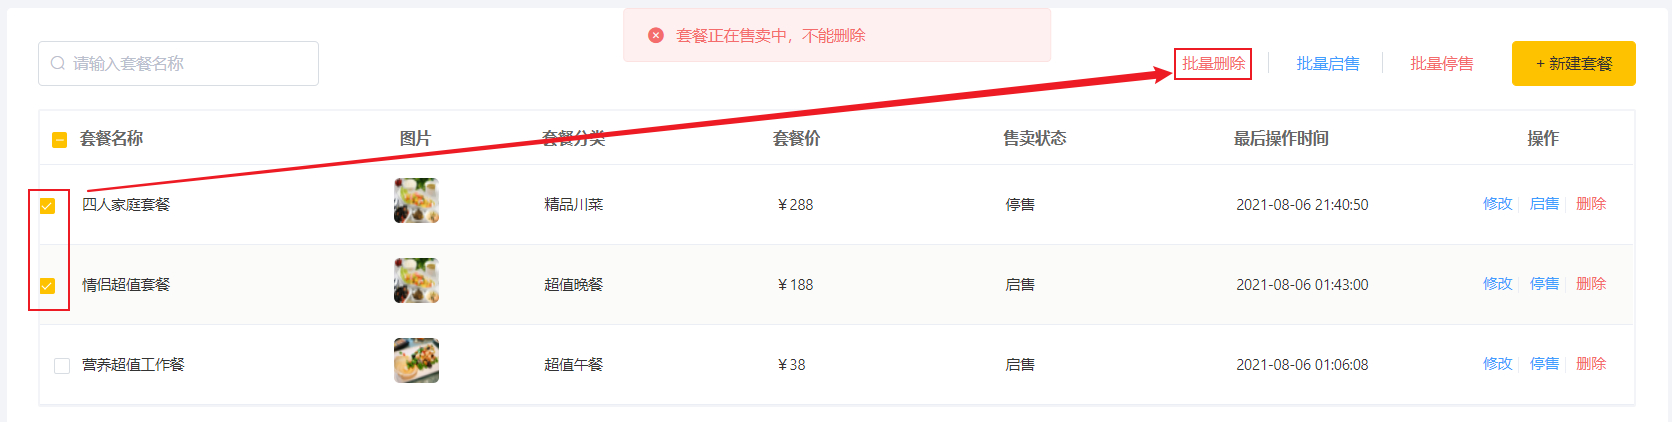
3). 删除已经停售的套餐信息,执行删除之后, 检查数据库表结构 setmeal , setmeal_dish表中的数据
4. 短信发送

在我们接下来要实现的移动端的业务开发中,第一块儿我们需要开发的功能就是移动端的登录功能,而移动端的登录功能,比较流行的方式就是基于短信验证码进行登录,那么这里涉及到了短信发送的知识,所以本章节,我们就来讲解,在项目开发中,我们如何发送短信。
4.1 短信服务介绍
在项目中,如果我们要实现短信发送功能,我们无需自己实现,也无需和运营商直接对接,只需要调用第三方提供的短信服务即可。目前市面上有很多第三方提供的短信服务,这些第三方短信服务会和各个运营商(移动、联通、电信)对接,我们只需要注册成为会员,并且按照提供的开发文档进行调用就可以发送短信。需要说明的是,这些短信服务一般都是收费服务。
常用短信服务:
-
阿里云
-
华为云
-
腾讯云
-
京东
-
梦网
-
乐信
本项目在选择短信服务的第三方服务提供商时,选择的是阿里云短信服务。
4.2 阿里云短信服务介绍
阿里云短信服务(Short Message Service)是广大企业客户快速触达手机用户所优选使用的通信能力。调用API或用群发助手,即可发送验证码、通知类和营销类短信;国内验证短信秒级触达,到达率最高可达99%;国际/港澳台短信覆盖200多个国家和地区,安全稳定,广受出海企业选用。
应用场景:
| 场景 | 案例 |
|---|---|
| 验证码 | APP、网站注册账号,向手机下发验证码; 登录账户、异地登录时的安全提醒; 找回密码时的安全验证; 支付认证、身份校验、手机绑定等。 |
| 短信通知 | 向注册用户下发系统相关信息,包括: 升级或维护、服务开通、价格调整、 订单确认、物流动态、消费确认、 支付通知等普通通知短信。 |
| 推广短信 | 向注册用户和潜在客户发送通知和推广信息,包括促销活动通知、业务推广等商品与活动的推广信息。增加企业产品曝光率、提高产品的知名度。 |

阿里云短信服务官方网站: https://www.aliyun.com/product/sms?spm=5176.19720258.J_8058803260.52.5c432c4a11Dcwf
可以访问官网,熟悉一下短信服务:

4.3 阿里云短信服务准备
4.3.1 注册账号
阿里云官网:https://www.aliyun.com/

点击官网首页注册按钮,跳转到如下注册页面:
当我们把账号注册完毕之后,我们就可以登录到阿里云系统控制台。
4.3.2 开通短信服务
注册成功后,点击登录按钮进行登录。登录后进入控制台, 在左上角的菜单栏中搜索短信服务。第一次使用,需要点击,并开通短信服务。

4.3.3 设置短信签名
开通短信服务之后,进入短信服务管理页面,选择国内消息菜单,我们需要在这里添加短信签名。
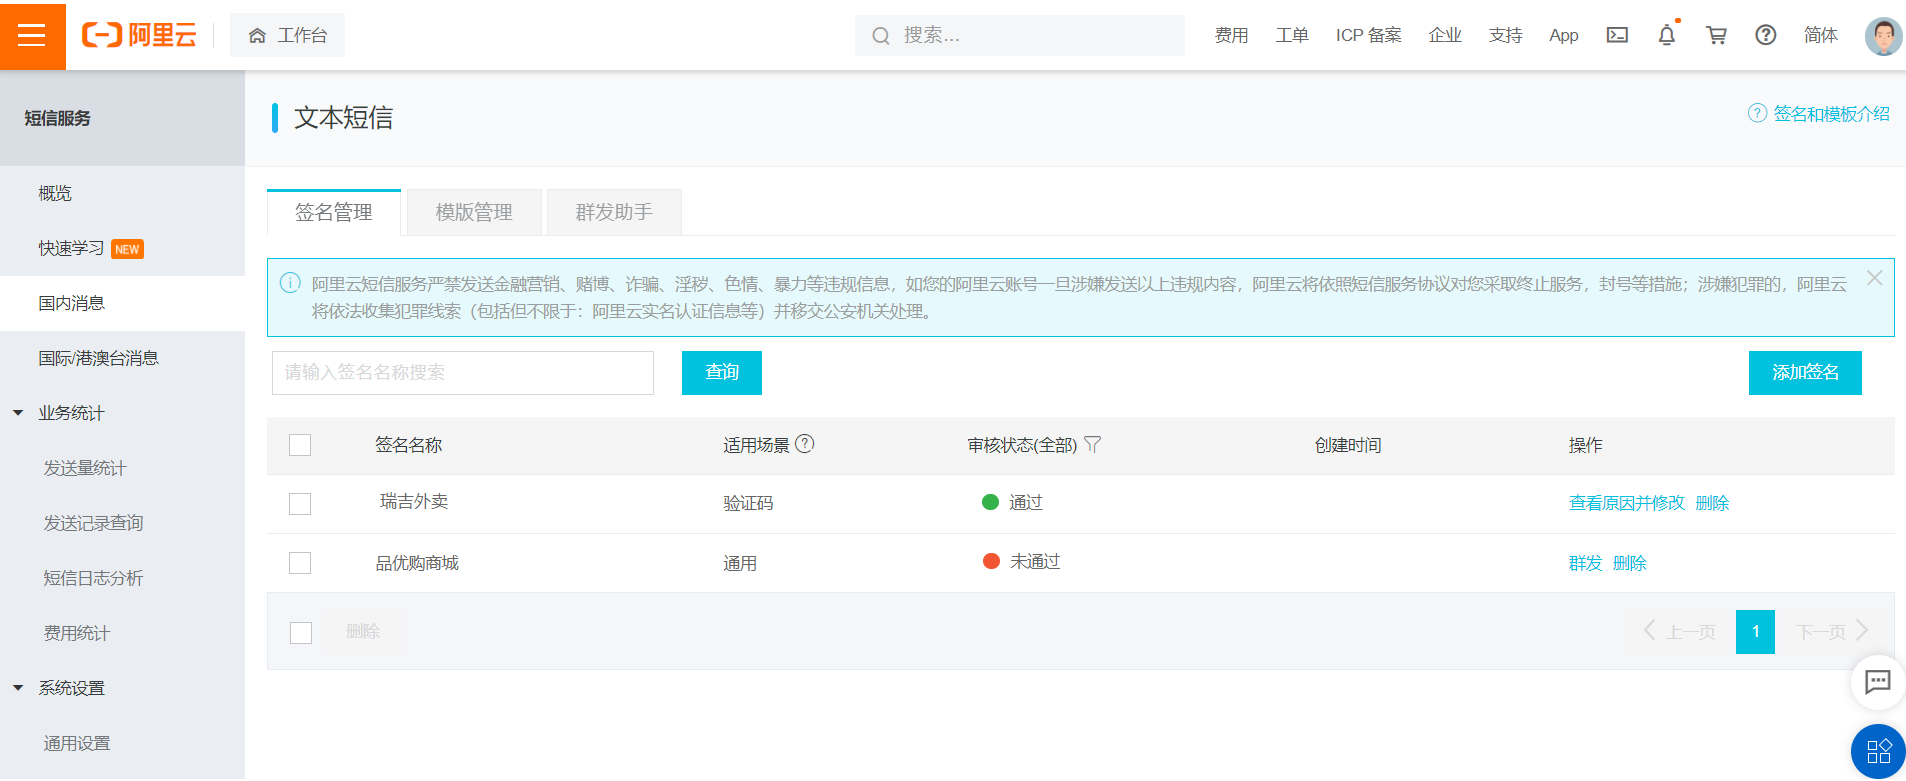
那么什么是短信签名呢?
短信签名是短信发送者的署名,表示发送方的身份。我们要调用阿里云短信服务发送短信,签名是比不可少的部分。

那么接下来,我们就需要来添加短信签名。
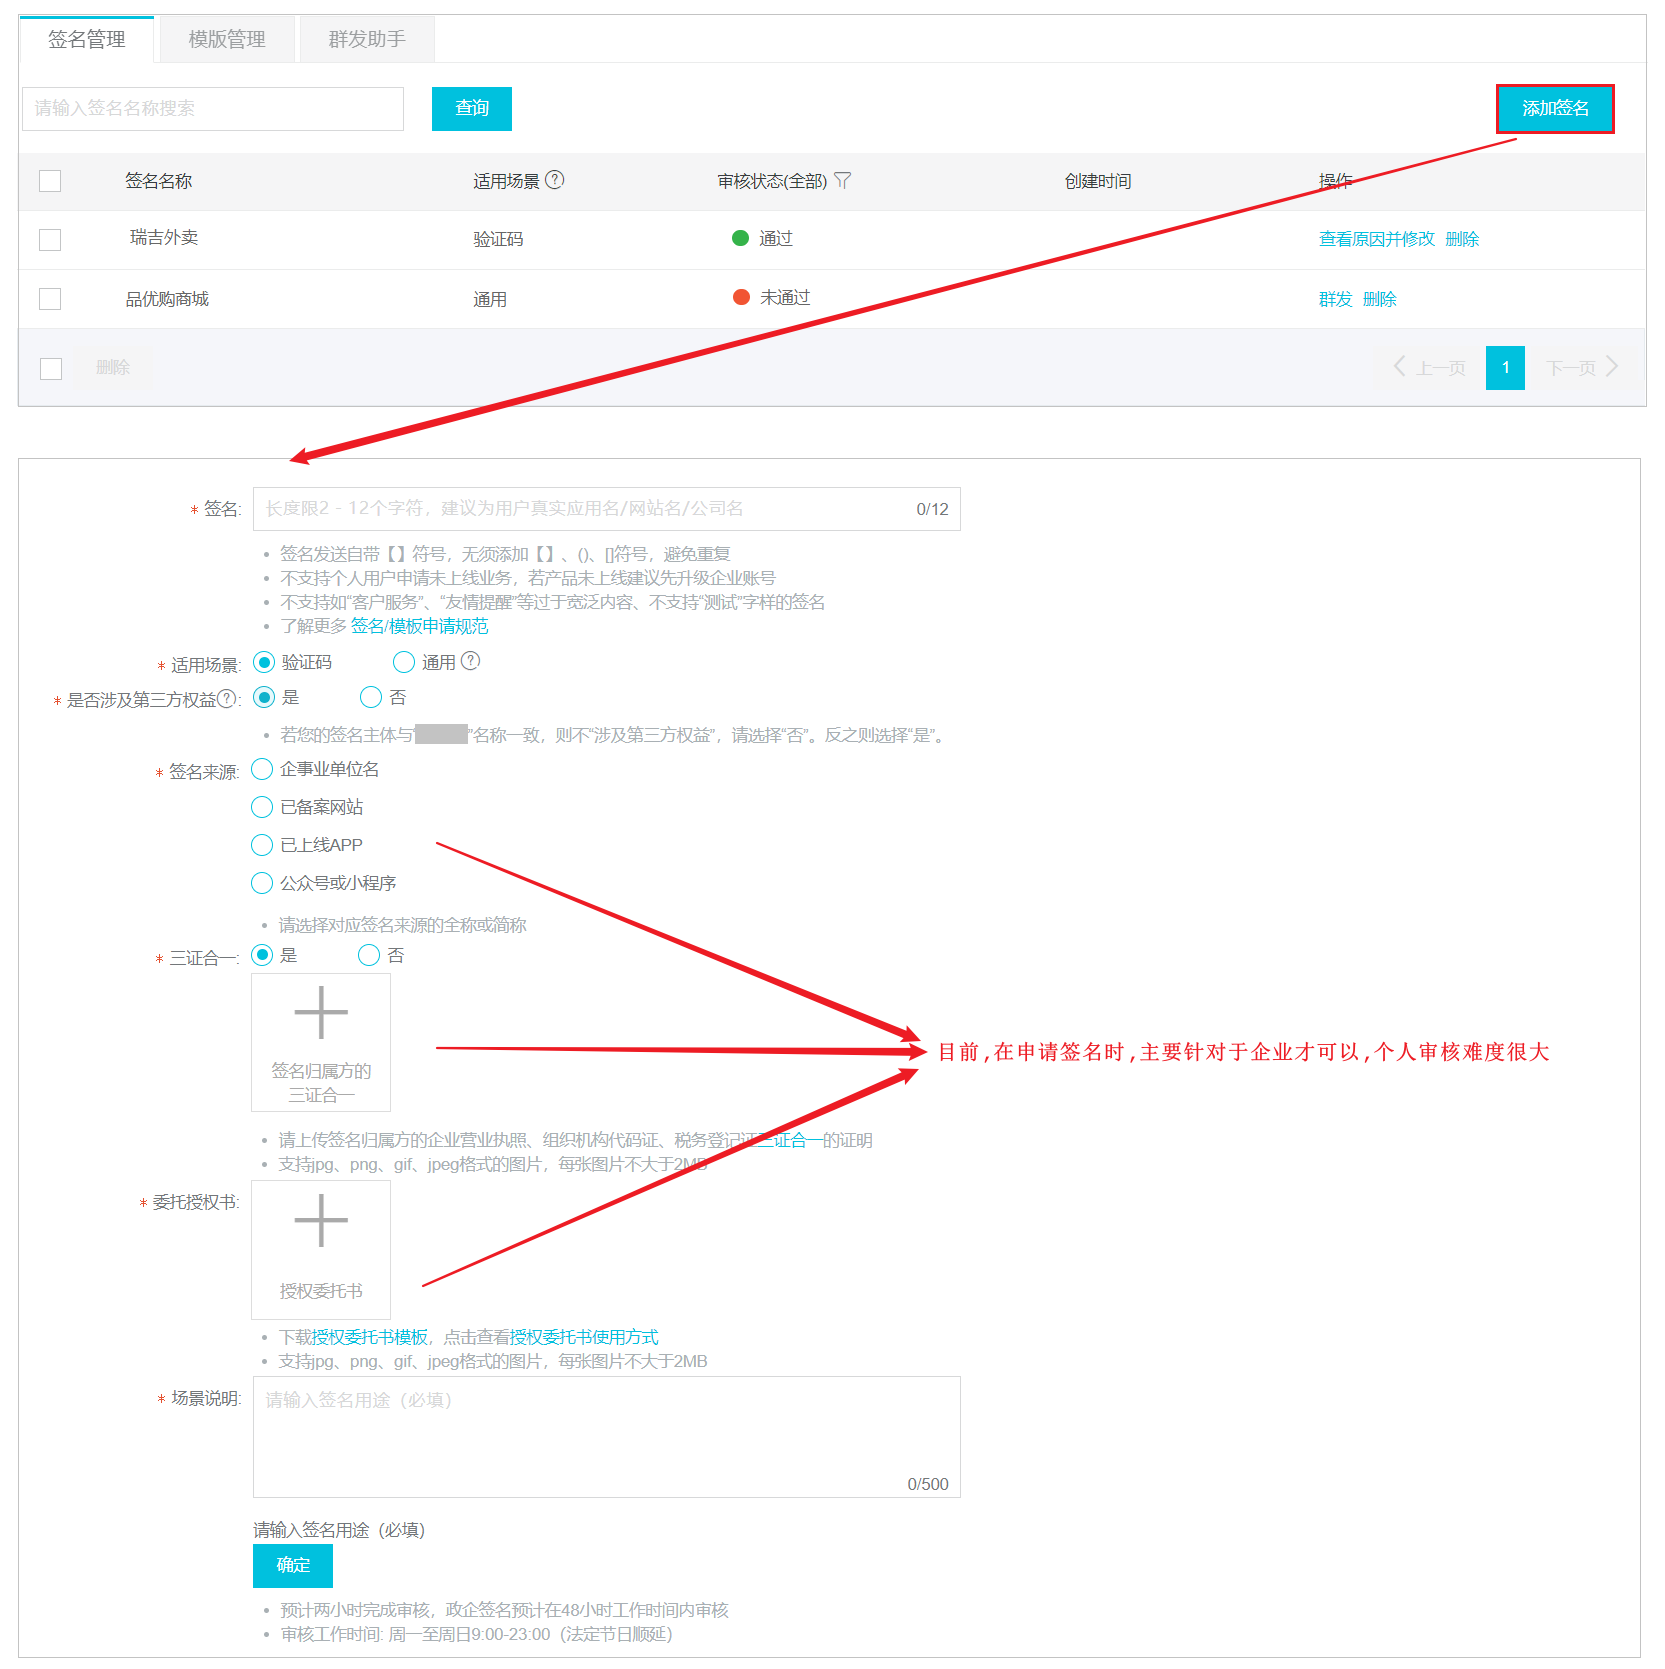
注意:
目前,阿里云短信服务申请签名主要针对企业开发,个人申请时有一定难度的,在审核时,会审核资质,需要上传营业执照 ;
所以,我们课程中,主要是演示一下短信验证码如何发送,大家只需要学习这块儿的开发流程、实现方式即可,无需真正的发送短信。如果以后在企业中做项目,需要发送短信,我们会以公司的资质去申请对应的签名。
4.3.4 设置短信模板
切换到【模板管理】标签页:
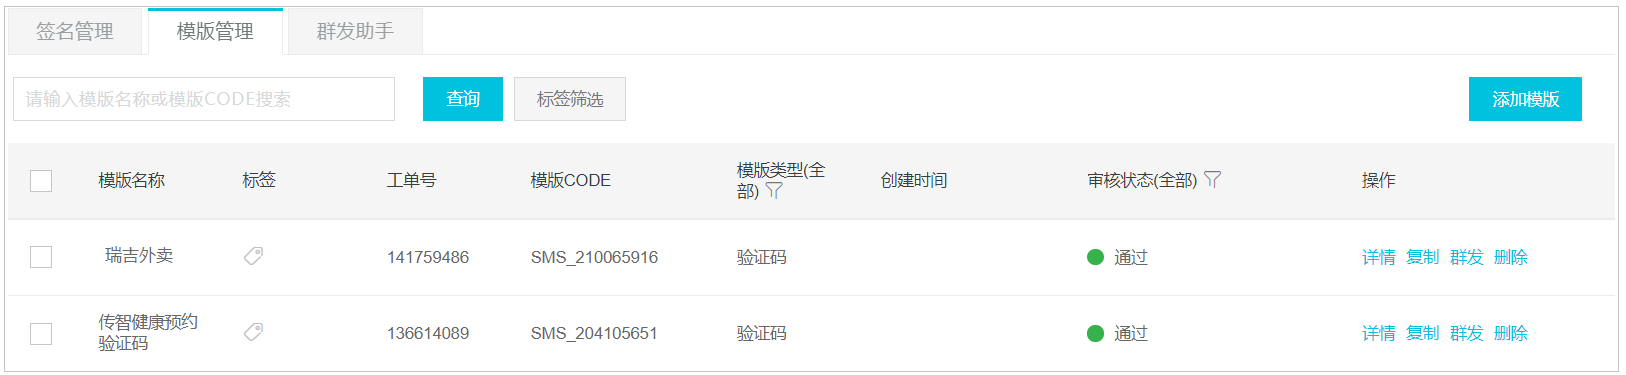
那么什么是模板呢?
短信模板包含短信发送内容、场景、变量信息。模板的详情如下:

最终我们,给用户发送的短信中,具体的短信内容,就是上面配置的这个模板内容,将${code}占位符替换成对应的验证码数据即可。如下:
【xxxxx】您好,您的验证码为173822,5分钟之内有效,不要泄露给他人!
我们可以点击右上角的按钮,添加模板,然后填写模板的基本信息及设置的模板内容:

添加的短信模板,也是需要进行审核的只有审核通过,才可以正常使用。
4.3.5 设置AccessKey
AccessKey 是访问阿里云 API 的密钥,具有账户的完全权限,我们要想在后面通过API调用阿里云短信服务的接口发送短信,那么就必须要设置AccessKey。
我们点击右上角的用户头像,选择"AccessKey管理",这时就可以进入到AccessKey的管理界面。
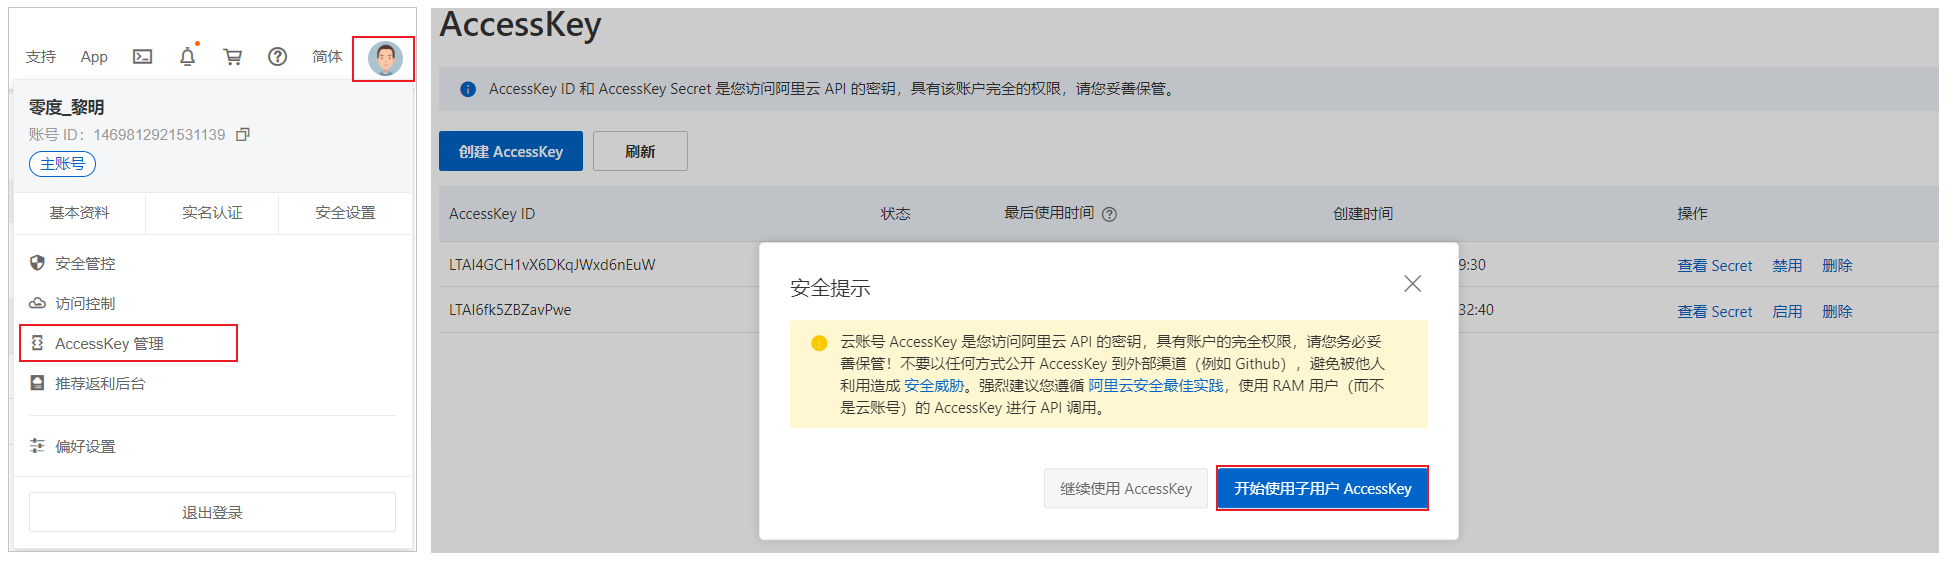
进入到AccessKey的管理界面之后,提示两个选项 “继续使用AccessKey” 和 “开始使用子用户AccessKey”,两个区别如下:
1). 继续使用AccessKey
如果选择的是该选项,我们创建的是阿里云账号的AccessKey,是具有账户的完全权限,有了这个AccessKey以后,我们就可以通过API调用阿里云的服务,不仅是短信服务,其他服务(OSS,语音服务,内容安全服务,视频点播服务…等)也可以调用。 相对来说,并不安全,当前的AccessKey泄露,会影响到我当前账户的其他云服务。
2). 开始使用子用户AccessKey
可以创建一个子用户,这个子用户我们可以分配比较低的权限,比如仅分配短信发送的权限,不具备操作其他的服务的权限,即使这个AccessKey泄漏了,也不会影响其他的云服务, 相对安全。
接下来就来演示一下,如何创建子用户AccessKey。

4.3.6 配置权限
上述我们已经创建了子用户, 但是这个子用户,目前没有任何权限,接下来,我们需要为创建的这个用户来分配权限。
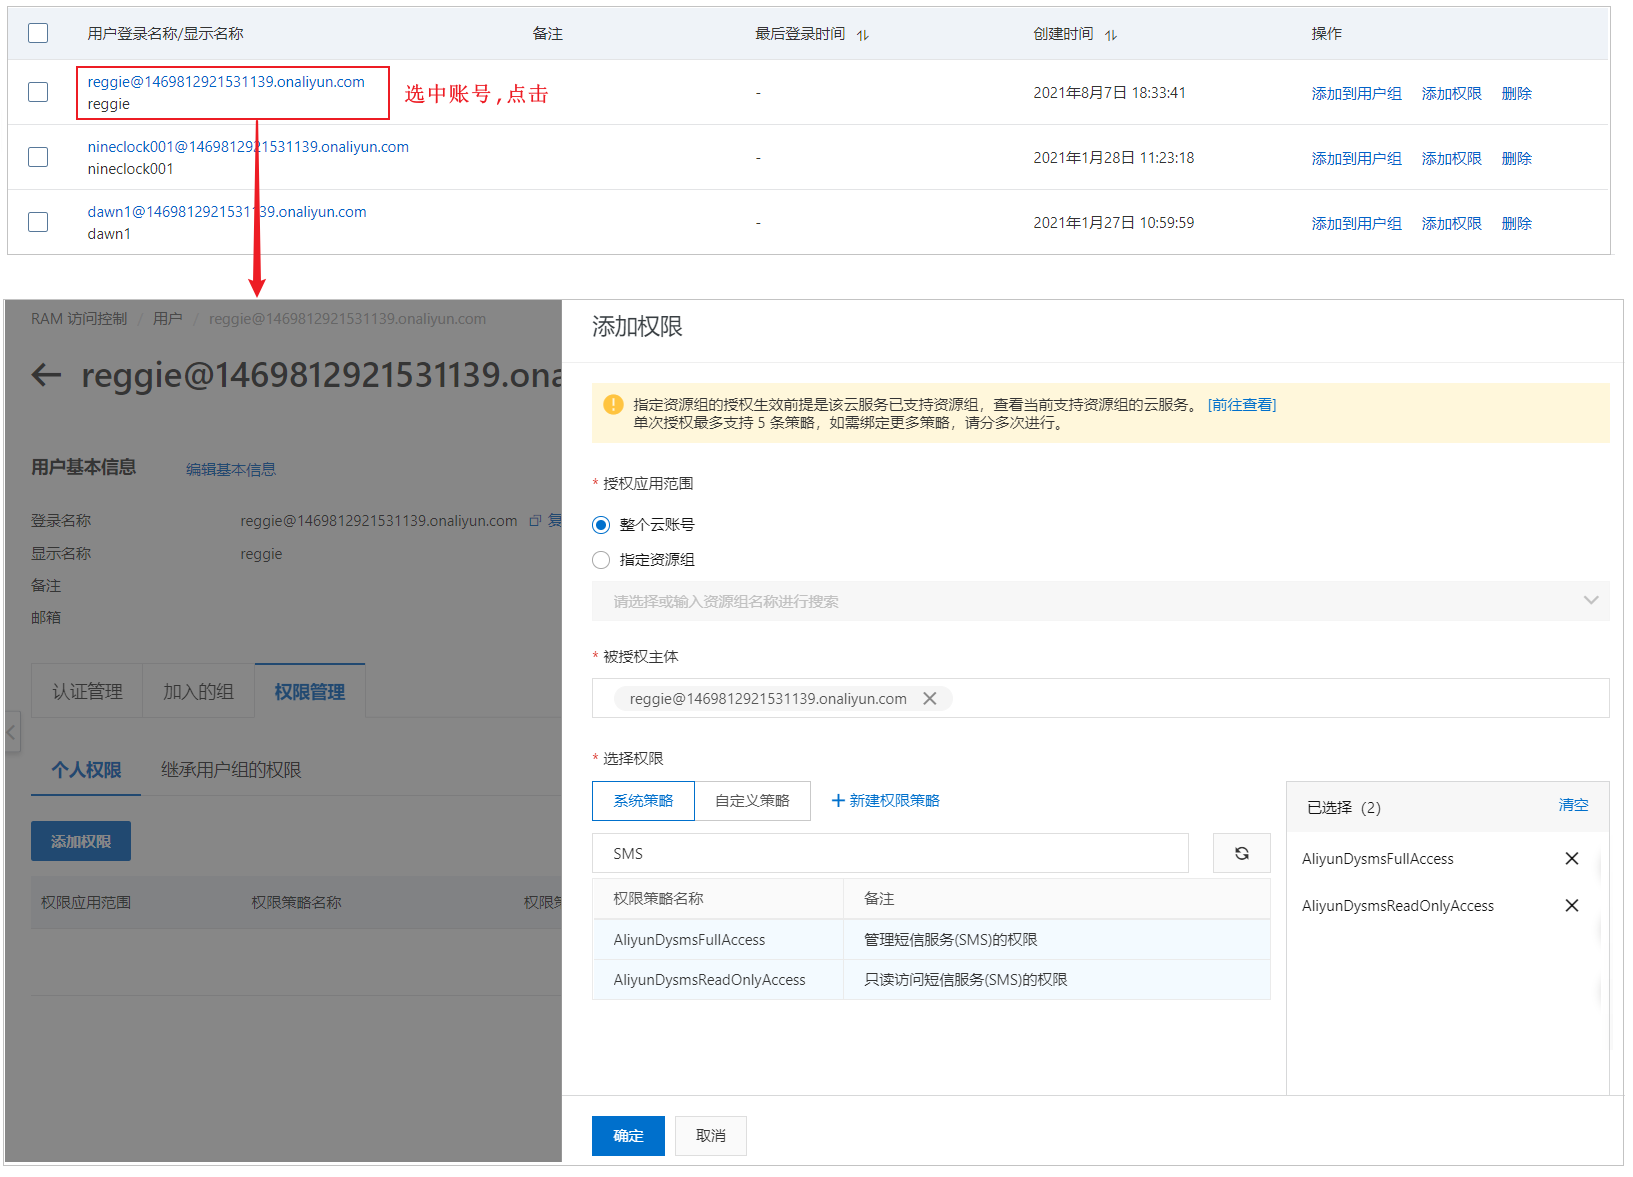
经过上述的权限配置之后,那么新创建的这个 reggie 用户,仅有短信服务操作的权限,不具备别的权限,即使当前的AccessKey泄漏了,也只会影响短信服务,其他服务是不受影响的。
4.3.7 禁用/删除AccessKey
如果在使用的过程中 AccessKey 不小心泄漏了,我们可以在阿里云控制台中, 禁用或者删除该AccessKey。

然后再创建一个新的AccessKey, 保存好AccessKeyId和AccessKeySecret。
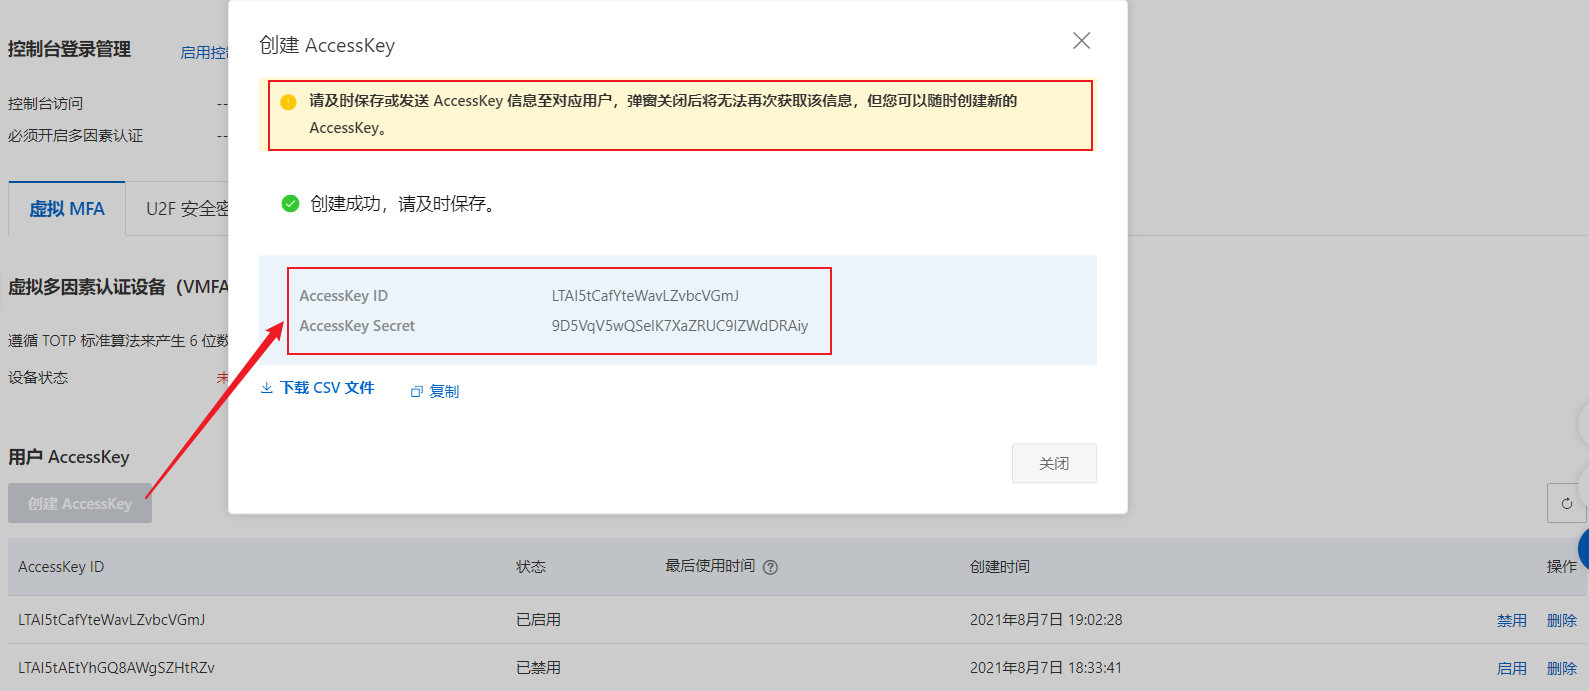
注意: 创建好了AccessKey后,请及时保存AccessKeyId 和 AccessKeySecret ,弹窗关闭后将无法再次获取该信息,但您可以随时创建新的 AccessKey。
4.4 代码开发
使用阿里云短信服务发送短信,可以参照官方提供的文档即可。
官方文档: https://help.aliyun.com/product/44282.html?spm=5176.12212571.help.dexternal.57a91cbewHHjKq
[外链图片转存失败,源站可能有防盗链机制,建议将图片保存下来直接上传(img-M4JRPiR1-1640771881987)(Q:/%E7%91%9E%E5%90%89%E5%A4%96%E5%8D%96%E7%AC%AC%E4%BA%94%E5%A4%A9/01.%E8%AE%B2%E4%B9%89/assets/image-20210807193047220.png)]
我们根据官方文档的提示,引入对应的依赖,然后再引入对应的java代码,就可以发送消息了。
[外链图片转存失败,源站可能有防盗链机制,建议将图片保存下来直接上传(img-1S7VjfL6-1640771881988)(Q:/%E7%91%9E%E5%90%89%E5%A4%96%E5%8D%96%E7%AC%AC%E4%BA%94%E5%A4%A9/01.%E8%AE%B2%E4%B9%89/assets/image-20210807193829131.png)]
SDK : SDK 就是 Software Development Kit 的缩写,翻译过来——软件开发工具包,辅助开发某一类软件的相关文档、范例和工具的集合都可以叫做SDK。在我们与第三方接口相互时, 一般都会提供对应的SDK,来简化我们的开发。
具体实现:
1). pom.xml
<dependency>
    <groupId>com.aliyun</groupId>
    <artifactId>aliyun-java-sdk-core</artifactId>
    <version>4.5.16</version>
</dependency>
<dependency>
    <groupId>com.aliyun</groupId>
    <artifactId>aliyun-java-sdk-dysmsapi</artifactId>
    <version>2.1.0</version>
</dependency>
2). 将官方提供的main方法封装为一个工具类
package com.itheima.reggie.utils;

import com.aliyuncs.DefaultAcsClient;
import com.aliyuncs.IAcsClient;
import com.aliyuncs.dysmsapi.model.v20170525.SendSmsRequest;
import com.aliyuncs.dysmsapi.model.v20170525.SendSmsResponse;
import com.aliyuncs.exceptions.ClientException;
import com.aliyuncs.profile.DefaultProfile;

/**
 * 短信发送工具类
 */
public class SMSUtils {

	/**
	 * 发送短信
	 * @param signName 签名
	 * @param templateCode 模板
	 * @param phoneNumbers 手机号
	 * @param param 参数
	 */
	public static void sendMessage(String signName, String templateCode,String phoneNumbers,String param){
		DefaultProfile profile = DefaultProfile.getProfile("cn-hangzhou", "LTAI4GHhatiznGG52T5EidAW", "xOFzvwf7G8jPhL3eNpyOmjPjFRZJfx");
		IAcsClient client = new DefaultAcsClient(profile);

		SendSmsRequest request = new SendSmsRequest();
		request.setSysRegionId("cn-hangzhou");
		request.setPhoneNumbers(phoneNumbers);
		request.setSignName(signName);
		request.setTemplateCode(templateCode);
		request.setTemplateParam("{\"code\":\""+param+"\"}");
		try {
			SendSmsResponse response = client.getAcsResponse(request);
			System.out.println("====发送的状态信息====》"+response.getMessage());
		}catch (ClientException e) {
			e.printStackTrace();
		}
	}


	public static void main(String[] args) {
		/**
		 * 参数一:签名
		 * 参数二: 模板的编号
		 * 参数三: 接收人手机号
		 * 参数四:验证码
		 */
		//生成一个四位验证码
		String code = ValidateCodeUtils.generateValidateCode4String(4);
		sendMessage("黑马旅游网","SMS_205126318","13556082481",code);
		System.out.println("验证码是:"+code);
	}
}
备注 : 由于我们个人目前无法申请阿里云短信服务,所以这里我们只需要把流程跑通,具体的短信发送可以实现。
5. 手机验证码登录
5.1 需求分析
为了方便用户登录,移动端通常都会提供通过手机验证码登录的功能。手机验证码登录有如下优点:
1). 方便快捷,无需注册,直接登录
2). 使用短信验证码作为登录凭证,无需记忆密码
3). 安全

登录流程:
输入手机号 > 获取验证码 > 输入验证码 > 点击登录 > 登录成功
注意:通过手机验证码登录,手机号是区分不同用户的标识。
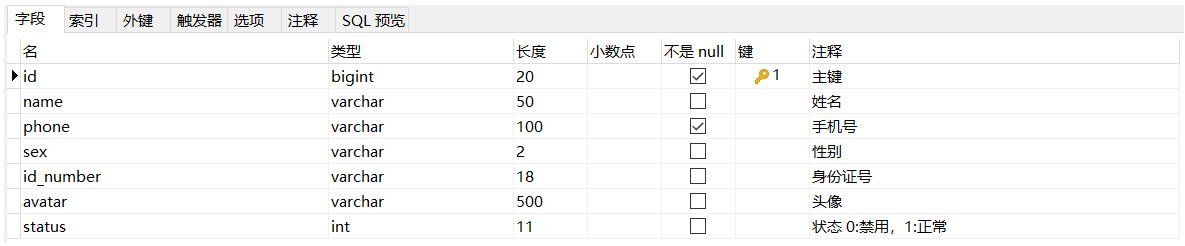
5.2 数据模型
通过手机验证码登录时,涉及的表为user表,即用户表。结构如下:
5.3 前端页面分析
在开发代码之前,需要梳理一下登录时前端页面和服务端的交互过程:
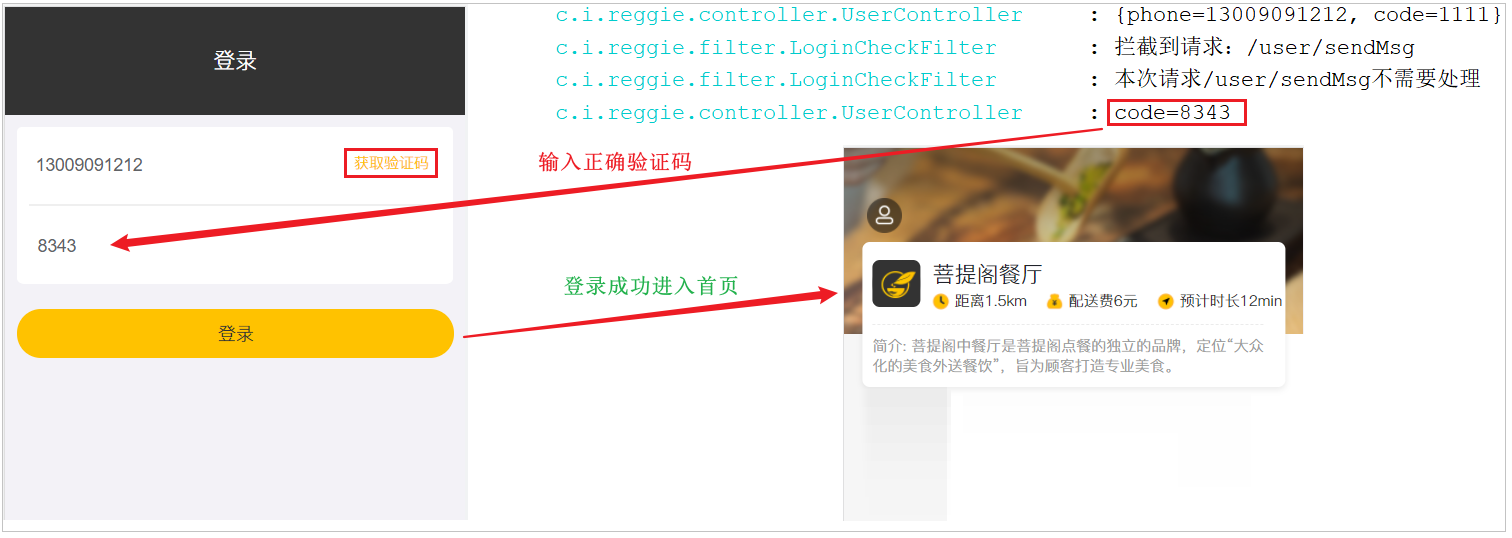
1). 在登录页面(front/page/login.html)输入手机号,点击【获取验证码】按钮,页面发送ajax请求,在服务端调用短信服务API给指定手机号发送验证码短信。

2). 在登录页面输入验证码,点击【登录】按钮,发送ajax请求,在服务端处理登录请求。

如果服务端返回的登录成功,页面将会把当前登录用户的手机号存储在sessionStorage中,并跳转到移动的首页页面。
开发手机验证码登录功能,其实就是在服务端编写代码去处理前端页面发送的这2次请求即可,分别是获取短信验证码 和 登录请求,具体的请求信息如下:
1). 获取短信验证码
| 请求 | 说明 |
|---|---|
| 请求方式 | POST |
| 请求路径 | /user/sendMsg |
| 请求参数 | {“phone”:“13100001111”} |
2). 登录
| 请求 | 说明 |
|---|---|
| 请求方式 | POST |
| 请求路径 | /user/login |
| 请求参数 | {“phone”:“13100001111”, “code”:“1111”} |
5.4 代码开发
5.4.1 准备工作
在开发业务功能前,先将需要用到的类和接口基本结构创建好:
1). 实体类 User(直接从课程资料中导入即可)
所属包: com.itheima.reggie.entity
import lombok.Data;
import java.io.Serializable;
/**
 * 用户信息
 */
@Data
public class User implements Serializable {

    private static final long serialVersionUID = 1L;

    private Long id;

    //姓名
    private String name;

    //手机号
    private String phone;

    //性别 0 女 1 男
    private String sex;

    //身份证号
    private String idNumber;

    //头像
    private String avatar;

    //状态 0:禁用,1:正常
    private Integer status;
}
2). 工具类SMSUtils、ValidateCodeUtils(直接从课程资料中导入即可)
所属包: com.itheima.reggie.utils

SMSUtils : 是我们上面改造的阿里云短信发送的工具类 ;
ValidateCodeUtils : 是验证码生成的工具类 ;
5.4.2 功能实现
5.4.2.1 修改LoginCheckFilter
前面我们已经完成了LoginCheckFilter过滤器的开发,此过滤器用于检查用户的登录状态。我们在进行手机验证码登录时,发送的两个请求(获取验证码和登录)需要在此过滤器处理时直接放行。

对于移动的端的页面,也是用户登录之后,才可以访问的,那么这个时候就需要在 LoginCheckFilter 中进行判定,如果移动端用户已登录,我们获取到用户登录信息
增加如下逻辑:
//4-2、判断登录状态,如果已登录,则直接放行
if(request.getSession().getAttribute("user") != null){
    log.info("用户已登录,用户id为:{}",request.getSession().getAttribute("user"));
    filterChain.doFilter(request,response);
    return;
}
5.4.2.2 发送短信验证码
在UserController中创建方法,处理登录页面的请求,为指定手机号发送短信验证码,同时需要将手机号对应的验证码保存到Session,方便后续登录时进行比对。
package com.itheima.reggie.controller;

import com.itheima.reggie.entity.R;
import com.itheima.reggie.entity.User;
import com.itheima.reggie.utils.SMSUtils;
import com.itheima.reggie.utils.ValidateCodeUtils;
import lombok.extern.slf4j.Slf4j;
import org.springframework.web.bind.annotation.*;

import javax.servlet.http.HttpSession;

@RestController
@RequestMapping("/user")
@Slf4j
public class UserController {


     /**
     * 发送短信
     * 疑问:
     *     发送的验证码存储在哪里好呢?
     * @param user
     * @return
     */
    @PostMapping("/sendMsg")
    public R<String> sendMsg(@RequestBody User user, HttpSession session){
        //1. 生成验证码,发送短信
        String code =  "1234";//ValidateCodeUtils.generateValidateCode(4);

        //不需要真实去发送了,主要是为方便
        // SMSUtils.sendMessage("黑马旅游网","SMS_205126318",user.getPhone(),code+"");
        //2. 把验证码存储到session中
        session.setAttribute(user.getPhone(),code); //13556082481

        log.info("本次验证码:"+ code);

        return R.success("发送成功");
    }
}
备注:
这里发送短信我们只需要调用封装的工具类中的方法即可,我们这个功能流程跑通,在测试中我们不用真正的发送短信,只需要将验证码信息,通过日志输出,登录时,我们直接从控制台就可以看到生成的验证码(实际上也就是发送到我们手机上的验证码)
5.4.2.3 验证码登录
在UserController中增加登录的方法 login,该方法的具体逻辑为:
- UserController
package com.itheima.reggie.controller;

import com.itheima.reggie.common.R;
import com.itheima.reggie.entity.User;
import com.itheima.reggie.service.UserService;
import com.itheima.reggie.utils.ValidateCodeUtils;
import lombok.extern.slf4j.Slf4j;
import org.apache.commons.lang.StringUtils;
import org.springframework.beans.factory.annotation.Autowired;
import org.springframework.web.bind.annotation.PostMapping;
import org.springframework.web.bind.annotation.RequestBody;
import org.springframework.web.bind.annotation.RequestMapping;
import org.springframework.web.bind.annotation.RestController;

import javax.servlet.http.HttpSession;
import java.util.Map;

@RestController
@RequestMapping("/user")
@Slf4j
public class UserController {


    @Autowired
    private UserService userService;


    /**
     * 登录方法
     * @param param
     * @param session
     * @return
     */
    @PostMapping("/login")
    public R<User> login(@RequestBody Map<String,String> param, HttpSession session){
        //1. 从map集合中取出用户输入的手机号与验证码
        String phone = param.get("phone");  //110
        String inputCode = param.get("code");
        //2. 从session中获取系统的验证码
        String verifyCode = (String) session.getAttribute(phone);

        //3. 把三个数据交给service
        User user = userService.login(phone,inputCode,verifyCode);
        if (user!=null){
            //登录成功,登录成功标记
            session.setAttribute("user",user.getId()); //id
        }else{
            return R.error("登录失败");
        }
        return R.success(user);
    }
}
- UserService接口
package com.itheima.reggie.service;

import com.itheima.reggie.entity.User;

public interface UserService {

      /**
     * 登录或者注册方法
     * @param phone  用户输入的手机号
     * @param inputCode  用户 输入验证码
     * @param verifyCode  系统的验证码
     * @return
     */
    User login(String phone, String inputCode, String verifyCode);
}
- UserServiceImpl实现类
package com.itheima.reggie.service.impl;

import com.itheima.reggie.entity.User;
import com.itheima.reggie.mapper.UserMapper;
import com.itheima.reggie.service.UserService;
import org.springframework.beans.factory.annotation.Autowired;
import org.springframework.stereotype.Service;

@Service
public class UserServiceImpl implements UserService {

    @Autowired(required = false)
    private UserMapper userMapper;

    /**
     * 登录或者注册方法
     * @param phone  用户输入的手机号
     * @param inputCode  用户 输入验证码
     * @param verifyCode  系统的验证码
     * @return
     */
    @Override
    public User login(String phone, String inputCode, String verifyCode) {
       //1. 校验验证码
        User user = null;
        if(inputCode.equalsIgnoreCase(verifyCode)) {
            //2. 如果验证码没有问题,查询该用户的手机号是否存在
            user = userMapper.findByPhone(phone);
            if(user==null){
                //3. 如果不存在帮该用户创建一个新用户,并且插入数据库中
                user = new User();
                user.setPhone(phone);
                user.setStatus(1);
                userMapper.save(user);
            }
        }
        return user;
    }
}
- UserMapper接口
package com.itheima.reggie.mapper;

import com.itheima.reggie.entity.User;
import org.apache.ibatis.annotations.Insert;
import org.apache.ibatis.annotations.Options;
import org.apache.ibatis.annotations.Select;

public interface UserMapper {


    @Select("select * from user where phone=#{phone}")
    User findByPhone(String phone);

    @Insert("insert into user(phone,status) values(#{phone},#{status})")
    @Options(useGeneratedKeys = true,keyColumn = "id",keyProperty = "id")
    void save(User user);
}
5.5 功能测试
代码完成后,重启服务,测试短信验证码的发送及登录功能。
1). 测试错误验证码的情况

2). 测试正确验证码的情况
检查user表,用户的数据也插入进来了:
.factory.annotation.Autowired;
import org.springframework.stereotype.Service;
@Service
public class UserServiceImpl implements UserService {
@Autowired(required = false)
private UserMapper userMapper;

/**
 * 登录或者注册方法
 * @param phone  用户输入的手机号
 * @param inputCode  用户 输入验证码
 * @param verifyCode  系统的验证码
 * @return
 */
@Override
public User login(String phone, String inputCode, String verifyCode) {
   //1. 校验验证码
    User user = null;
    if(inputCode.equalsIgnoreCase(verifyCode)) {
        //2. 如果验证码没有问题,查询该用户的手机号是否存在
        user = userMapper.findByPhone(phone);
        if(user==null){
            //3. 如果不存在帮该用户创建一个新用户,并且插入数据库中
            user = new User();
            user.setPhone(phone);
            user.setStatus(1);
            userMapper.save(user);
        }
    }
    return user;
}
}
4. UserMapper接口

```java
package com.itheima.reggie.mapper;

import com.itheima.reggie.entity.User;
import org.apache.ibatis.annotations.Insert;
import org.apache.ibatis.annotations.Options;
import org.apache.ibatis.annotations.Select;

public interface UserMapper {


    @Select("select * from user where phone=#{phone}")
    User findByPhone(String phone);

    @Insert("insert into user(phone,status) values(#{phone},#{status})")
    @Options(useGeneratedKeys = true,keyColumn = "id",keyProperty = "id")
    void save(User user);
}
5.5 功能测试
代码完成后,重启服务,测试短信验证码的发送及登录功能。
1). 测试错误验证码的情况
2). 测试正确验证码的情况
[外链图片转存中…(img-1YxulB82-1640771881997)]
检查user表,用户的数据也插入进来了:
[外链图片转存中…(img-H3geU8jq-1640771881999)]


 1863
1863


 被折叠的 条评论
为什么被折叠?
被折叠的 条评论
为什么被折叠?
 到【灌水乐园】发言


