


0.背景
在写完上一篇文章后发现,其实V5k3的组合也可以使用。Verilator v5.x 系列版本完全支持本项目的编译与仿真。 不同于 v3 版本,Verilator v5 引入了更严格的访问控制机制:要从 Verilator 生成的 C++ 仿真模型中访问内部信号或变量,必须在 Verilog 源码中显式声明为 public。
在 Verilator v5 中,这种声明需使用如下语法:
(* verilator public_flat_rw *) reg [127:0] Drg;
(* verilator public_flat_rw *) wire [127:0] Dnext_debug;
这将使信号可以通过 Verilator 生成的 C++ 模型中的 rootp->AES_ENC__DOT__Drg 等方式访问,从而配合 KLEE 等符号执行引擎进行断言验证与调试。
如果未显式声明,Verilator 将不会导出对应变量的访问接口,导致编译或链接阶段出现 undefined reference 或访问失败的情况。
搭建
在经过大量测试之后,编写了一个懒人安装v5k3组合的脚本,可以将代码复制保存为.sh,赋予可执行权限后运行即可。
#!/bin/bash
set -e

step() {
    echo -e "\n\033[1;36m🔷 Step $1: $2\033[0m"
    sleep 0.5
}
run() {
    echo -e "   \033[90m$@\033[0m"
    sleep 0.2
    eval "$@"
}

INSTALL_SCRIPT=install_verilator.sh

step "0" "生成容器内 Verilator 安装脚本 ${INSTALL_SCRIPT}"
cat << EOF > ${INSTALL_SCRIPT}
#!/bin/bash
set -e

step() {
    echo -e "\n\033[1;36m🔷 Step \$1: \$2\033[0m"
    sleep 0.5
}
run() {
    echo -e "   \033[90m\$@\033[0m"
    sleep 0.2
    eval "\$@"
}

step "1" "导入 Kitware GPG 公钥(解决 NO_PUBKEY 报错)"
if command -v apt-key &>/dev/null; then
    run "apt-key adv --keyserver keyserver.ubuntu.com --recv-keys 16FAAD7AF99A65E2 || true"
else
    run "curl -fsSL https://apt.kitware.com/keys/kitware-archive-latest.asc | gpg --dearmor -o /usr/share/keyrings/kitware-archive-keyring.gpg"
fi

step "2" "更新软件包索引"
run "apt update"

step "3" "安装构建工具与依赖库"
run "apt-get install -y git help2man perl python3 make g++ flex bison ccache autoconf automake libtool"
run "apt-get install -y libgoogle-perftools-dev numactl perl-doc"
run "apt-get install -y libfl2 libfl-dev zlib1g zlib1g-dev"

step "4" "克隆并切换到 verilator v5.032"
run "rm -rf verilator"
run "git clone https://github.com/verilator/verilator"
run "cd verilator"
run "git fetch --all --tags"
run "git checkout v5.032"

step "5" "构建并安装 Verilator"
run "autoconf"
run "./configure"
run "make -j\$(nproc)"
run "make install"

step "6" "验证 Verilator 安装"
run "verilator --version"
echo -e "\n\033[1;32m✅ Verilator v5.032 安装成功!\033[0m"
EOF

chmod +x ${INSTALL_SCRIPT}

step "1" "检查是否已存在 klee/klee 镜像"
if sudo docker images | grep -q '^klee/klee'; then
    echo -e "   ✅ 已存在 klee/klee 镜像,跳过拉取"
else
    step "1.1" "拉取 KLEE 官方镜像"
    run "sudo docker pull klee/klee"
fi

step "2" "检查是否已存在容器 v5k3"
if sudo docker ps -a --format '{{.Names}}' | grep -q '^v5k3$'; then
    echo -e "   ✅ 容器 v5k3 已存在,跳过创建"
else
    step "2.1" "启动后台容器 v5k3"
    run "sudo docker run -itd --name v5k3 klee/klee tail -f /dev/null"
fi

step "3" "复制安装脚本到容器 /root/"
run "sudo docker cp ${INSTALL_SCRIPT} v5k3:/root/"

step "4" "赋权并执行安装脚本(以 root 用户)"
run "sudo docker exec --user root -it v5k3 chmod +x /root/${INSTALL_SCRIPT}"
run "sudo docker exec --user root -it v5k3 bash /root/${INSTALL_SCRIPT}"

step "5" "验证 Verilator 与 KLEE 版本"
run "sudo docker exec --user root -it v5k3 verilator --version"
run "sudo docker exec -it v5k3 klee --version"
step "6" "自动进入容器 v5k3 交互终端"
run "sudo docker exec -it v5k3 /bin/bash"
┌──(hx㉿orz)-[~]
└─$ ./installv5k3.sh
2.安装日志
┌──(hx㉿orz)-[~]
└─$ ./installv5k3.sh
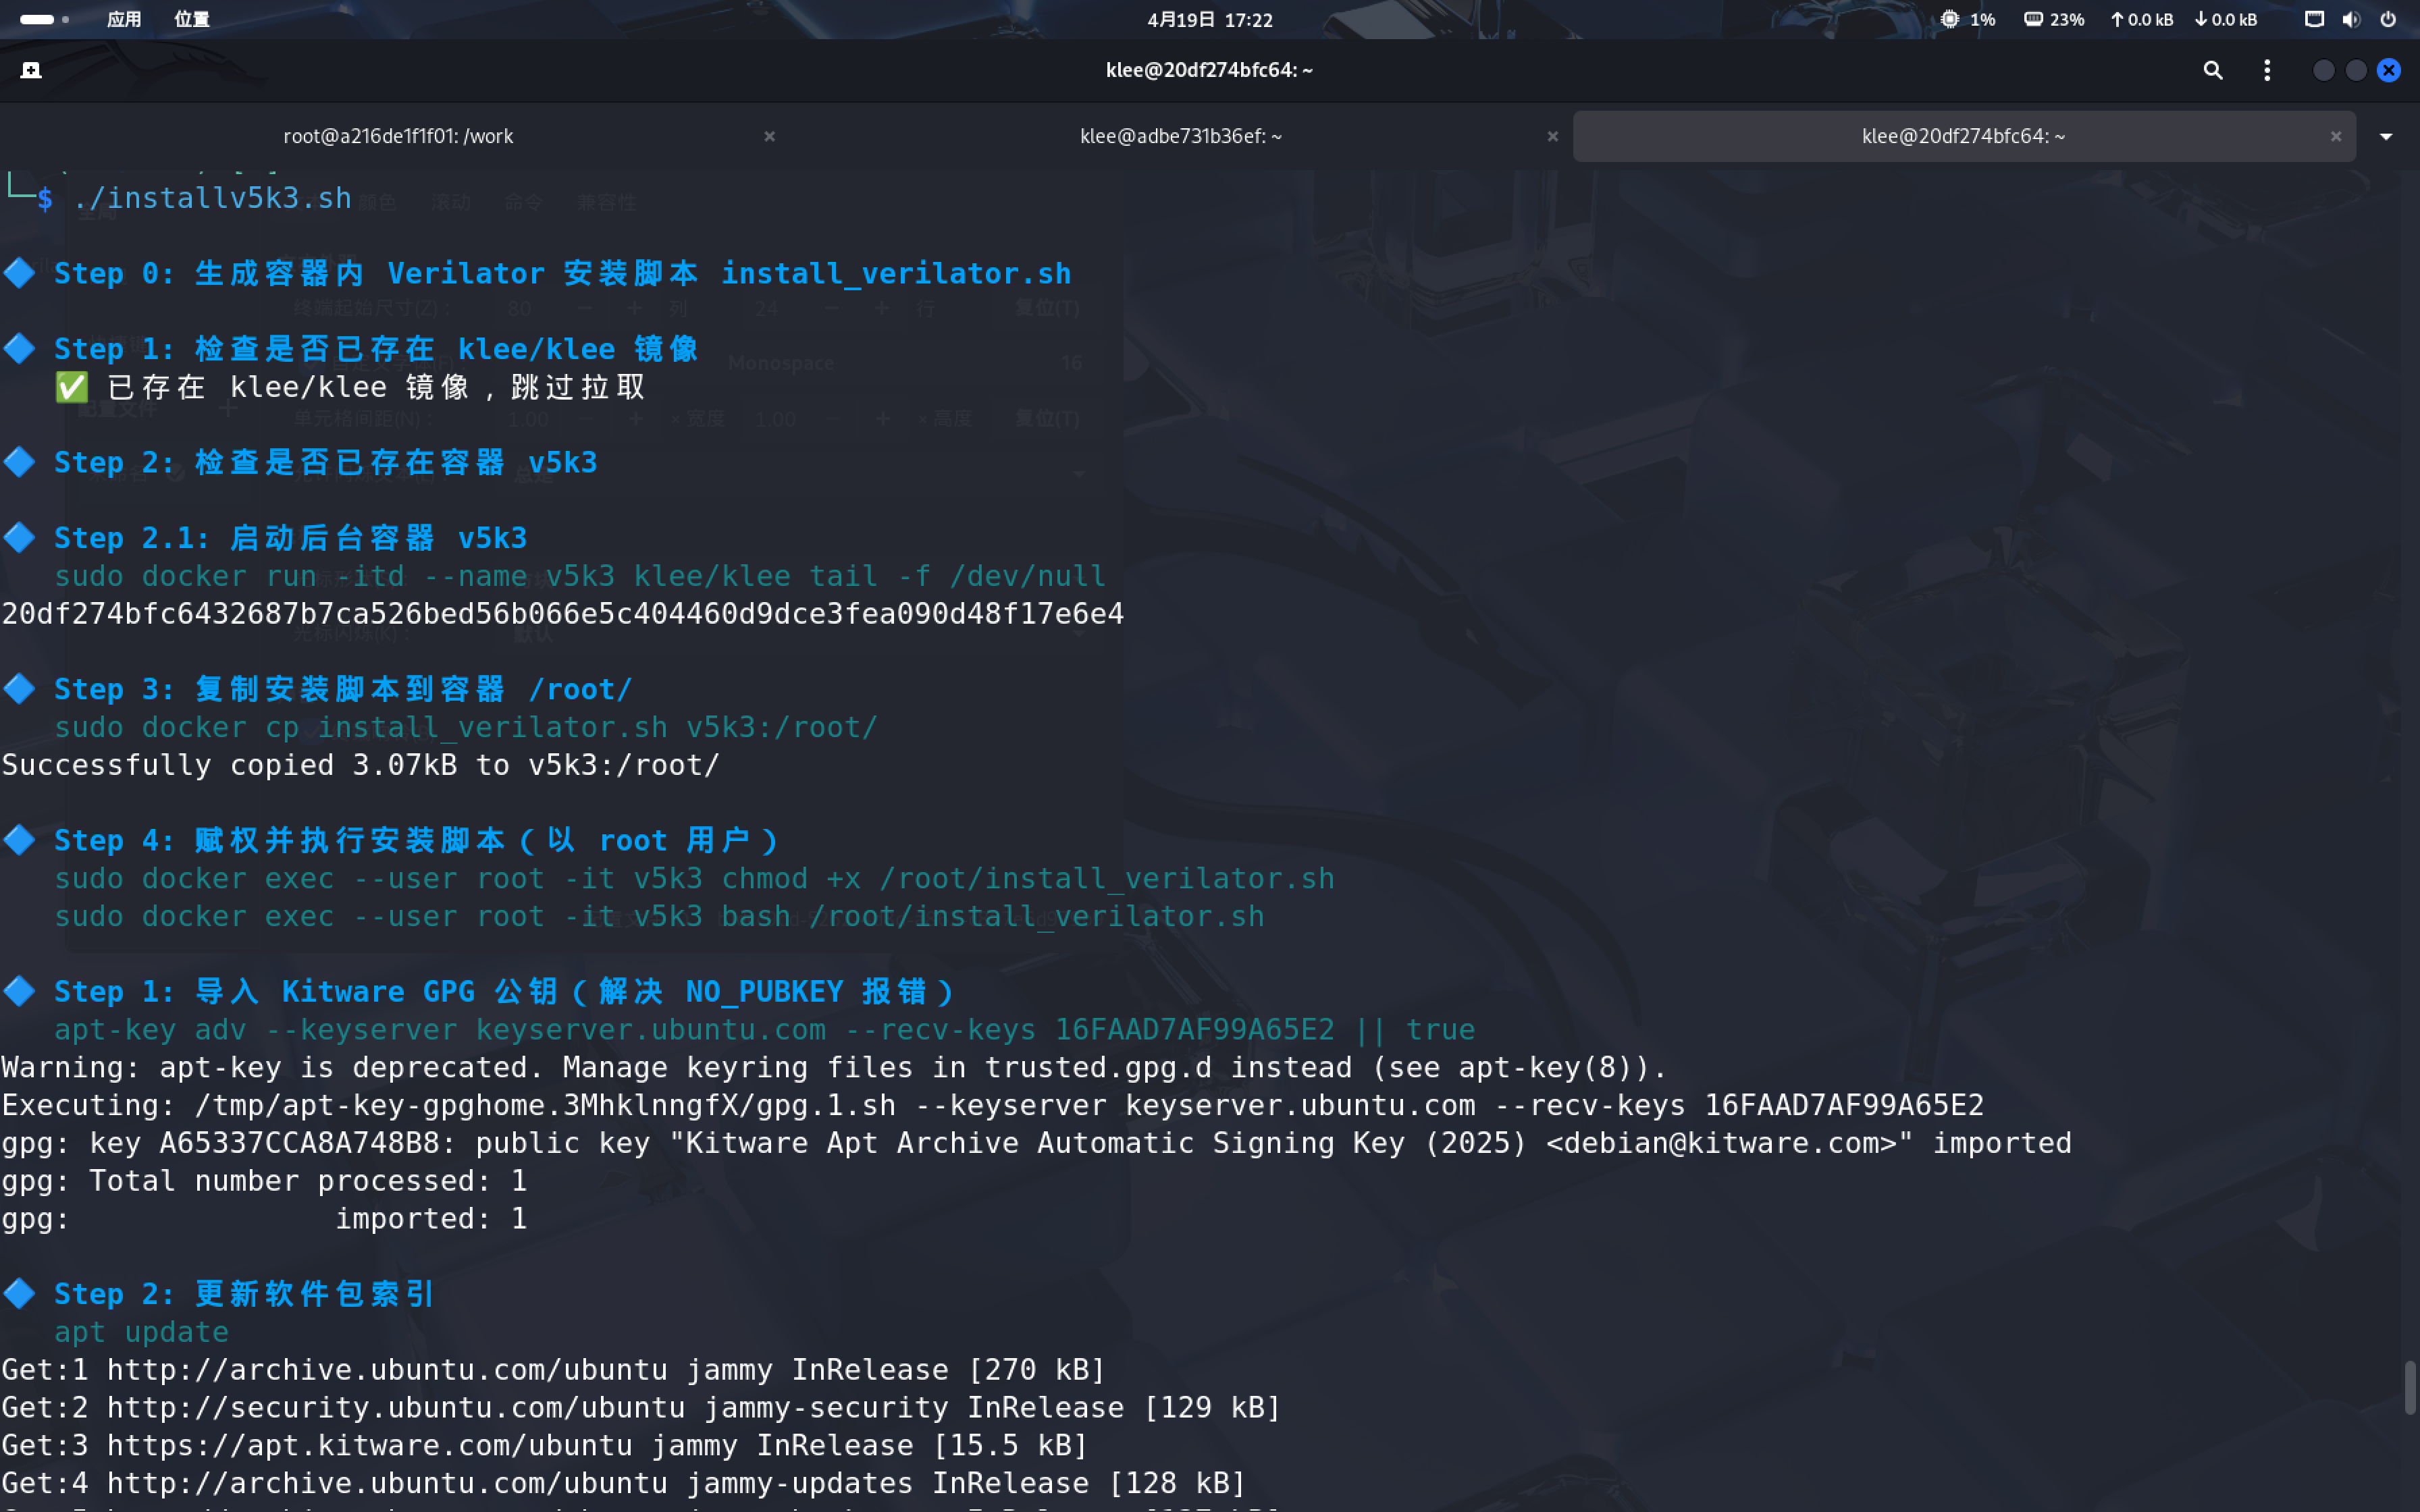
Step 0: 生成容器内 Verilator 安装脚本 install_verilator.sh
Step 1: 检查是否已存在 klee/klee 镜像
✅ 已存在 klee/klee 镜像,跳过拉取
Step 2: 检查是否已存在容器 v5k3
Step 2.1: 启动后台容器 v5k3
sudo docker run -itd --name v5k3 klee/klee tail -f /dev/null
20df274bfc6432687b7ca526bed56b066e5c404460d9dce3fea090d48f17e6e4
Step 3: 复制安装脚本到容器 /root/
sudo docker cp install_verilator.sh v5k3:/root/
Successfully copied 3.07kB to v5k3:/root/
Step 4: 赋权并执行安装脚本(以 root 用户)
sudo docker exec --user root -it v5k3 chmod +x /root/install_verilator.sh
sudo docker exec --user root -it v5k3 bash /root/install_verilator.sh
Step 1: 导入 Kitware GPG 公钥(解决 NO_PUBKEY 报错)
apt-key adv --keyserver keyserver.ubuntu.com --recv-keys 16FAAD7AF99A65E2 || true
Warning: apt-key is deprecated. Manage keyring files in trusted.gpg.d instead (see apt-key(8)).
Executing: /tmp/apt-key-gpghome.3MhklnngfX/gpg.1.sh --keyserver keyserver.ubuntu.com --recv-keys 16FAAD7AF99A65E2
gpg: key A65337CCA8A748B8: public key "Kitware Apt Archive Automatic Signing Key (2025) <debian@kitware.com>" imported
gpg: Total number processed: 1
gpg: imported: 1
Step 2: 更新软件包索引
apt update
Get:1 http://archive.ubuntu.com/ubuntu jammy InRelease [270 kB]
Get:2 http://security.ubuntu.com/ubuntu jammy-security InRelease [129 kB]
Get:3 https://apt.kitware.com/ubuntu jammy InRelease [15.5 kB]
Get:4 http://archive.ubuntu.com/ubuntu jammy-updates InRelease [128 kB]
Get:5 http://archive.ubuntu.com/ubuntu jammy-backports InRelease [127 kB]
Get:6 https://apt.kitware.com/ubuntu jammy/main amd64 Packages [68.7 kB]
Get:7 http://security.ubuntu.com/ubuntu jammy-security/main amd64 Packages [2788 kB]
Get:8 http://archive.ubuntu.com/ubuntu jammy/universe amd64 Packages [17.5 MB]
Get:9 http://security.ubuntu.com/ubuntu jammy-security/universe amd64 Packages [1243 kB]
Get:10 http://security.ubuntu.com/ubuntu jammy-security/multiverse amd64 Packages [47.7 kB]
Get:11 http://security.ubuntu.com/ubuntu jammy-security/restricted amd64 Packages [4000 kB]
Get:12 http://archive.ubuntu.com/ubuntu jammy/restricted amd64 Packages [164 kB]
Get:13 http://archive.ubuntu.com/ubuntu jammy/main amd64 Packages [1792 kB]
Get:14 http://archive.ubuntu.com/ubuntu jammy/multiverse amd64 Packages [266 kB]
Get:15 http://archive.ubuntu.com/ubuntu jammy-updates/multiverse amd64 Packages [55.7 kB]
Get:16 http://archive.ubuntu.com/ubuntu jammy-updates/restricted amd64 Packages [4246 kB]
Get:17 http://archive.ubuntu.com/ubuntu jammy-updates/universe amd64 Packages [1542 kB]
Get:18 http://archive.ubuntu.com/ubuntu jammy-updates/main amd64 Packages [3140 kB]
Get:19 http://archive.ubuntu.com/ubuntu jammy-backports/main amd64 Packages [82.7 kB]
Get:20 http://archive.ubuntu.com/ubuntu jammy-backports/universe amd64 Packages [35.2 kB]
Fetched 37.6 MB in 22s (1733 kB/s)
Reading package lists... Done
Building dependency tree... Done
Reading state information... Done
140 packages can be upgraded. Run 'apt list --upgradable' to see them.
W: https://apt.kitware.com/ubuntu/dists/jammy/InRelease: Key is stored in legacy trusted.gpg keyring (/etc/apt/trusted.gpg), see the DEPRECATION section in apt-key(8) for details.
Step 3: 安装构建工具与依赖库
apt-get install -y git help2man perl python3 make g++ flex bison ccache autoconf automake libtool
Reading package lists... Done
Building dependency tree... Done
Reading state information... Done
g++ is already the newest version (4:11.2.0-1ubuntu1).
g++ set to manually installed.
make is already the newest version (4.3-4.1build1).
make set to manually installed.
The following additional packages will be installed:
autotools-dev git-man less libcbor0.8 liberror-perl libfido2-1 libfl-dev libfl2 libhiredis0.14 liblocale-gettext-perl libltdl-dev
libperl5.34 libpython3-stdlib libsigsegv2 libxmuu1 m4 openssh-client perl-base perl-modules-5.34 python3-minimal xauth
Suggested packages:
autoconf-archive gnu-standards autoconf-doc gettext bison-doc distcc | icecc flex-doc gettext-base git-daemon-run
| git-daemon-sysvinit git-doc git-email git-gui gitk gitweb git-cvs git-mediawiki git-svn libtool-doc gfortran | fortran95-compiler
gcj-jdk m4-doc keychain libpam-ssh monkeysphere ssh-askpass perl-doc libterm-readline-gnu-perl | libterm-readline-perl-perl
libtap-harness-archive-perl python3-doc python3-tk python3-venv
Recommended packages:
netbase
The following NEW packages will be installed:
autoconf automake autotools-dev bison ccache flex git git-man help2man less libcbor0.8 liberror-perl libfido2-1 libfl-dev libfl2
libhiredis0.14 liblocale-gettext-perl libltdl-dev libsigsegv2 libtool libxmuu1 m4 openssh-client xauth
The following packages will be upgraded:
libperl5.34 libpython3-stdlib perl perl-base perl-modules-5.34 python3 python3-minimal
7 upgraded, 24 newly installed, 0 to remove and 133 not upgraded.
Need to get 18.5 MB of archives.
Step 4: 克隆并切换到 verilator v5.032
rm -rf verilator
git clone https://github.com/verilator/verilator
Cloning into 'verilator'...
remote: Enumerating objects: 93530, done.
remote: Counting objects: 100% (759/759), done.
remote: Compressing objects: 100% (260/260), done.
remote: Total 93530 (delta 592), reused 499 (delta 499), pack-reused 92771 (from 4)
Receiving objects: 100% (93530/93530), 63.24 MiB | 1.52 MiB/s, done.
Resolving deltas: 100% (78462/78462), done.
cd verilator
git fetch --all --tags
Fetching origin
git checkout v5.032
Note: switching to 'v5.032'.
You are in 'detached HEAD' state. You can look around, make experimental
changes and commit them, and you can discard any commits you make in this
state without impacting any branches by switching back to a branch.
If you want to create a new branch to retain commits you create, you may
do so (now or later) by using -c with the switch command. Example:
git switch -c <new-branch-name>
Or undo this operation with:
git switch -
Turn off this advice by setting config variable advice.detachedHead to false
HEAD is now at 8ff77e9d4 Version bump
Step 5: 构建并安装 Verilator
autoconf
./configure
configuring for Verilator 5.032 2025-01-01
checking whether to perform partial static linking of Verilator binary... yes
checking whether to use tcmalloc... check
checking whether to build for coverage collection... no
checking whether to use hardcoded paths... yes
checking whether to show and stop on compilation warnings... no
checking whether to run long tests... no
checking for z3... no
checking for cvc5... no
checking for cvc4... no
checking for SMT solver... no
compiler CXX inbound is set to...
checking for gcc... gcc
checking whether the C compiler works... yes
checking for C compiler default output file name... a.out
checking for suffix of executables...
checking whether we are cross compiling... no
checking for suffix of object files... o
checking whether the compiler supports GNU C... yes
checking whether gcc accepts -g... yes
checking for gcc option to enable C11 features... none needed
checking for g++... g++
checking whether the compiler supports GNU C++... yes
checking whether g++ accepts -g... yes
checking for g++ option to enable C++11 features... none needed
checking for a BSD-compatible install... /usr/bin/install -c
compiler g++ --version = g++ (Ubuntu 11.4.0-1ubuntu1~22.04) 11.4.0
checking that C++ compiler can compile simple program... yes
checking for ar... ar
checking for perl... perl
checking for python3... python3
python3 --version = Python 3.10.12
checking for flex... flex
flex --version = flex 2.6.4
checking for bison... bison
bison --version = bison (GNU Bison) 3.8.2
checking for ccache... ccache
objcache is ccache --version = ccache version 4.5.1
checking for stdio.h... yes
checking for stdlib.h... yes
checking for string.h... yes
checking for inttypes.h... yes
checking for stdint.h... yes
checking for strings.h... yes
checking for sys/stat.h... yes
checking for sys/types.h... yes
checking for unistd.h... yes
checking for size_t... yes
checking for size_t... (cached) yes
checking for inline... inline
checking whether g++ accepts -pg... yes
checking whether g++ accepts -std=gnu++17... yes
checking whether g++ accepts -Wextra... yes
checking whether g++ accepts -Wfloat-conversion... yes
checking whether g++ accepts -Wlogical-op... yes
checking whether g++ accepts -Wthread-safety... no
checking whether coroutines are supported by g++... no
checking whether coroutines are supported by g++ with -fcoroutines-ts... no
checking whether coroutines are supported by g++ with -fcoroutines... yes
checking whether g++ accepts -Qunused-arguments... no
checking whether g++ accepts -faligned-new... yes
checking whether g++ accepts -Wno-unused-parameter... yes
checking whether g++ accepts -Wno-shadow... yes
checking whether g++ accepts -Wno-char-subscripts... yes
checking whether g++ accepts -Wno-null-conversion... no
checking whether g++ accepts -Wno-parentheses-equality... no
checking whether g++ accepts -Wno-unused... yes
checking whether g++ accepts -Og... yes
checking whether g++ accepts -ggdb... yes
checking whether g++ accepts -gz... yes
checking whether g++ linker accepts -gz... yes
checking whether g++ accepts -faligned-new... yes
checking whether g++ accepts -fbracket-depth=4096... no
checking whether g++ accepts -fcf-protection=none... yes
checking whether g++ accepts -mno-cet... no
checking whether g++ accepts -Qunused-arguments... no
checking whether g++ accepts -Wno-bool-operation... yes
checking whether g++ accepts -Wno-c++11-narrowing... no
checking whether g++ accepts -Wno-constant-logical-operand... no
checking whether g++ accepts -Wno-non-pod-varargs... no
checking whether g++ accepts -Wno-parentheses-equality... no
checking whether g++ accepts -Wno-shadow... yes
checking whether g++ accepts -Wno-sign-compare... yes
checking whether g++ accepts -Wno-tautological-bitwise-compare... no
checking whether g++ accepts -Wno-tautological-compare... yes
checking whether g++ accepts -Wno-uninitialized... yes
checking whether g++ accepts -Wno-unused-but-set-parameter... yes
checking whether g++ accepts -Wno-unused-but-set-variable... yes
checking whether g++ accepts -Wno-unused-parameter... yes
checking whether g++ accepts -Wno-unused-variable... yes
checking whether g++ linker accepts -mt... no
checking whether g++ linker accepts -pthread... yes
checking whether g++ linker accepts -lpthread... yes
checking whether g++ linker accepts -latomic... yes
checking whether g++ linker accepts -fuse-ld=mold... no
checking whether g++ linker accepts -fuse-ld=mold... no
checking whether g++ linker accepts -static-libgcc... yes
checking whether g++ linker accepts -static-libstdc++... yes
checking whether g++ linker accepts -Xlinker -gc-sections... yes
checking whether g++ linker accepts -lpthread... yes
checking whether g++ linker accepts -latomic... yes
checking whether g++ linker accepts -lbcrypt... no
checking whether g++ linker accepts -lpsapi... no
checking whether g++ linker accepts -l:libtcmalloc_minimal.a... yes
checking whether g++ accepts -fno-builtin-malloc... yes
checking whether g++ accepts -fno-builtin-calloc... yes
checking whether g++ accepts -fno-builtin-realloc... yes
checking whether g++ accepts -fno-builtin-free... yes
checking whether g++ supports C++14... yes
checking for g++ precompile header include option... -include
checking for struct stat.st_mtim.tv_nsec... yes
checking whether SystemC is found (in system path)... no
configure: creating ./config.status
config.status: creating Makefile
config.status: creating src/Makefile
config.status: creating src/Makefile_obj
config.status: creating include/verilated.mk
config.status: creating include/verilated_config.h
config.status: creating verilator.pc
config.status: creating verilator-config.cmake
config.status: creating verilator-config-version.cmake
config.status: creating src/config_package.h
Now type 'make' (or sometimes 'gmake') to build Verilator.
make -j8
make install
------------------------------------------------------------
making verilator in src
make -C src
make[1]: Entering directory '/home/klee/verilator/src'
make -C obj_dbg -j 1 TGT=../../bin/verilator_bin_dbg VL_DEBUG=1 -f ../Makefile_obj serial
make[2]: Entering directory '/home/klee/verilator/src/obj_dbg'
make[2]: Nothing to be done for 'serial'.
make[2]: Leaving directory '/home/klee/verilator/src/obj_dbg'
make -C obj_dbg TGT=../../bin/verilator_bin_dbg VL_DEBUG=1 -f ../Makefile_obj
make[2]: Entering directory '/home/klee/verilator/src/obj_dbg'
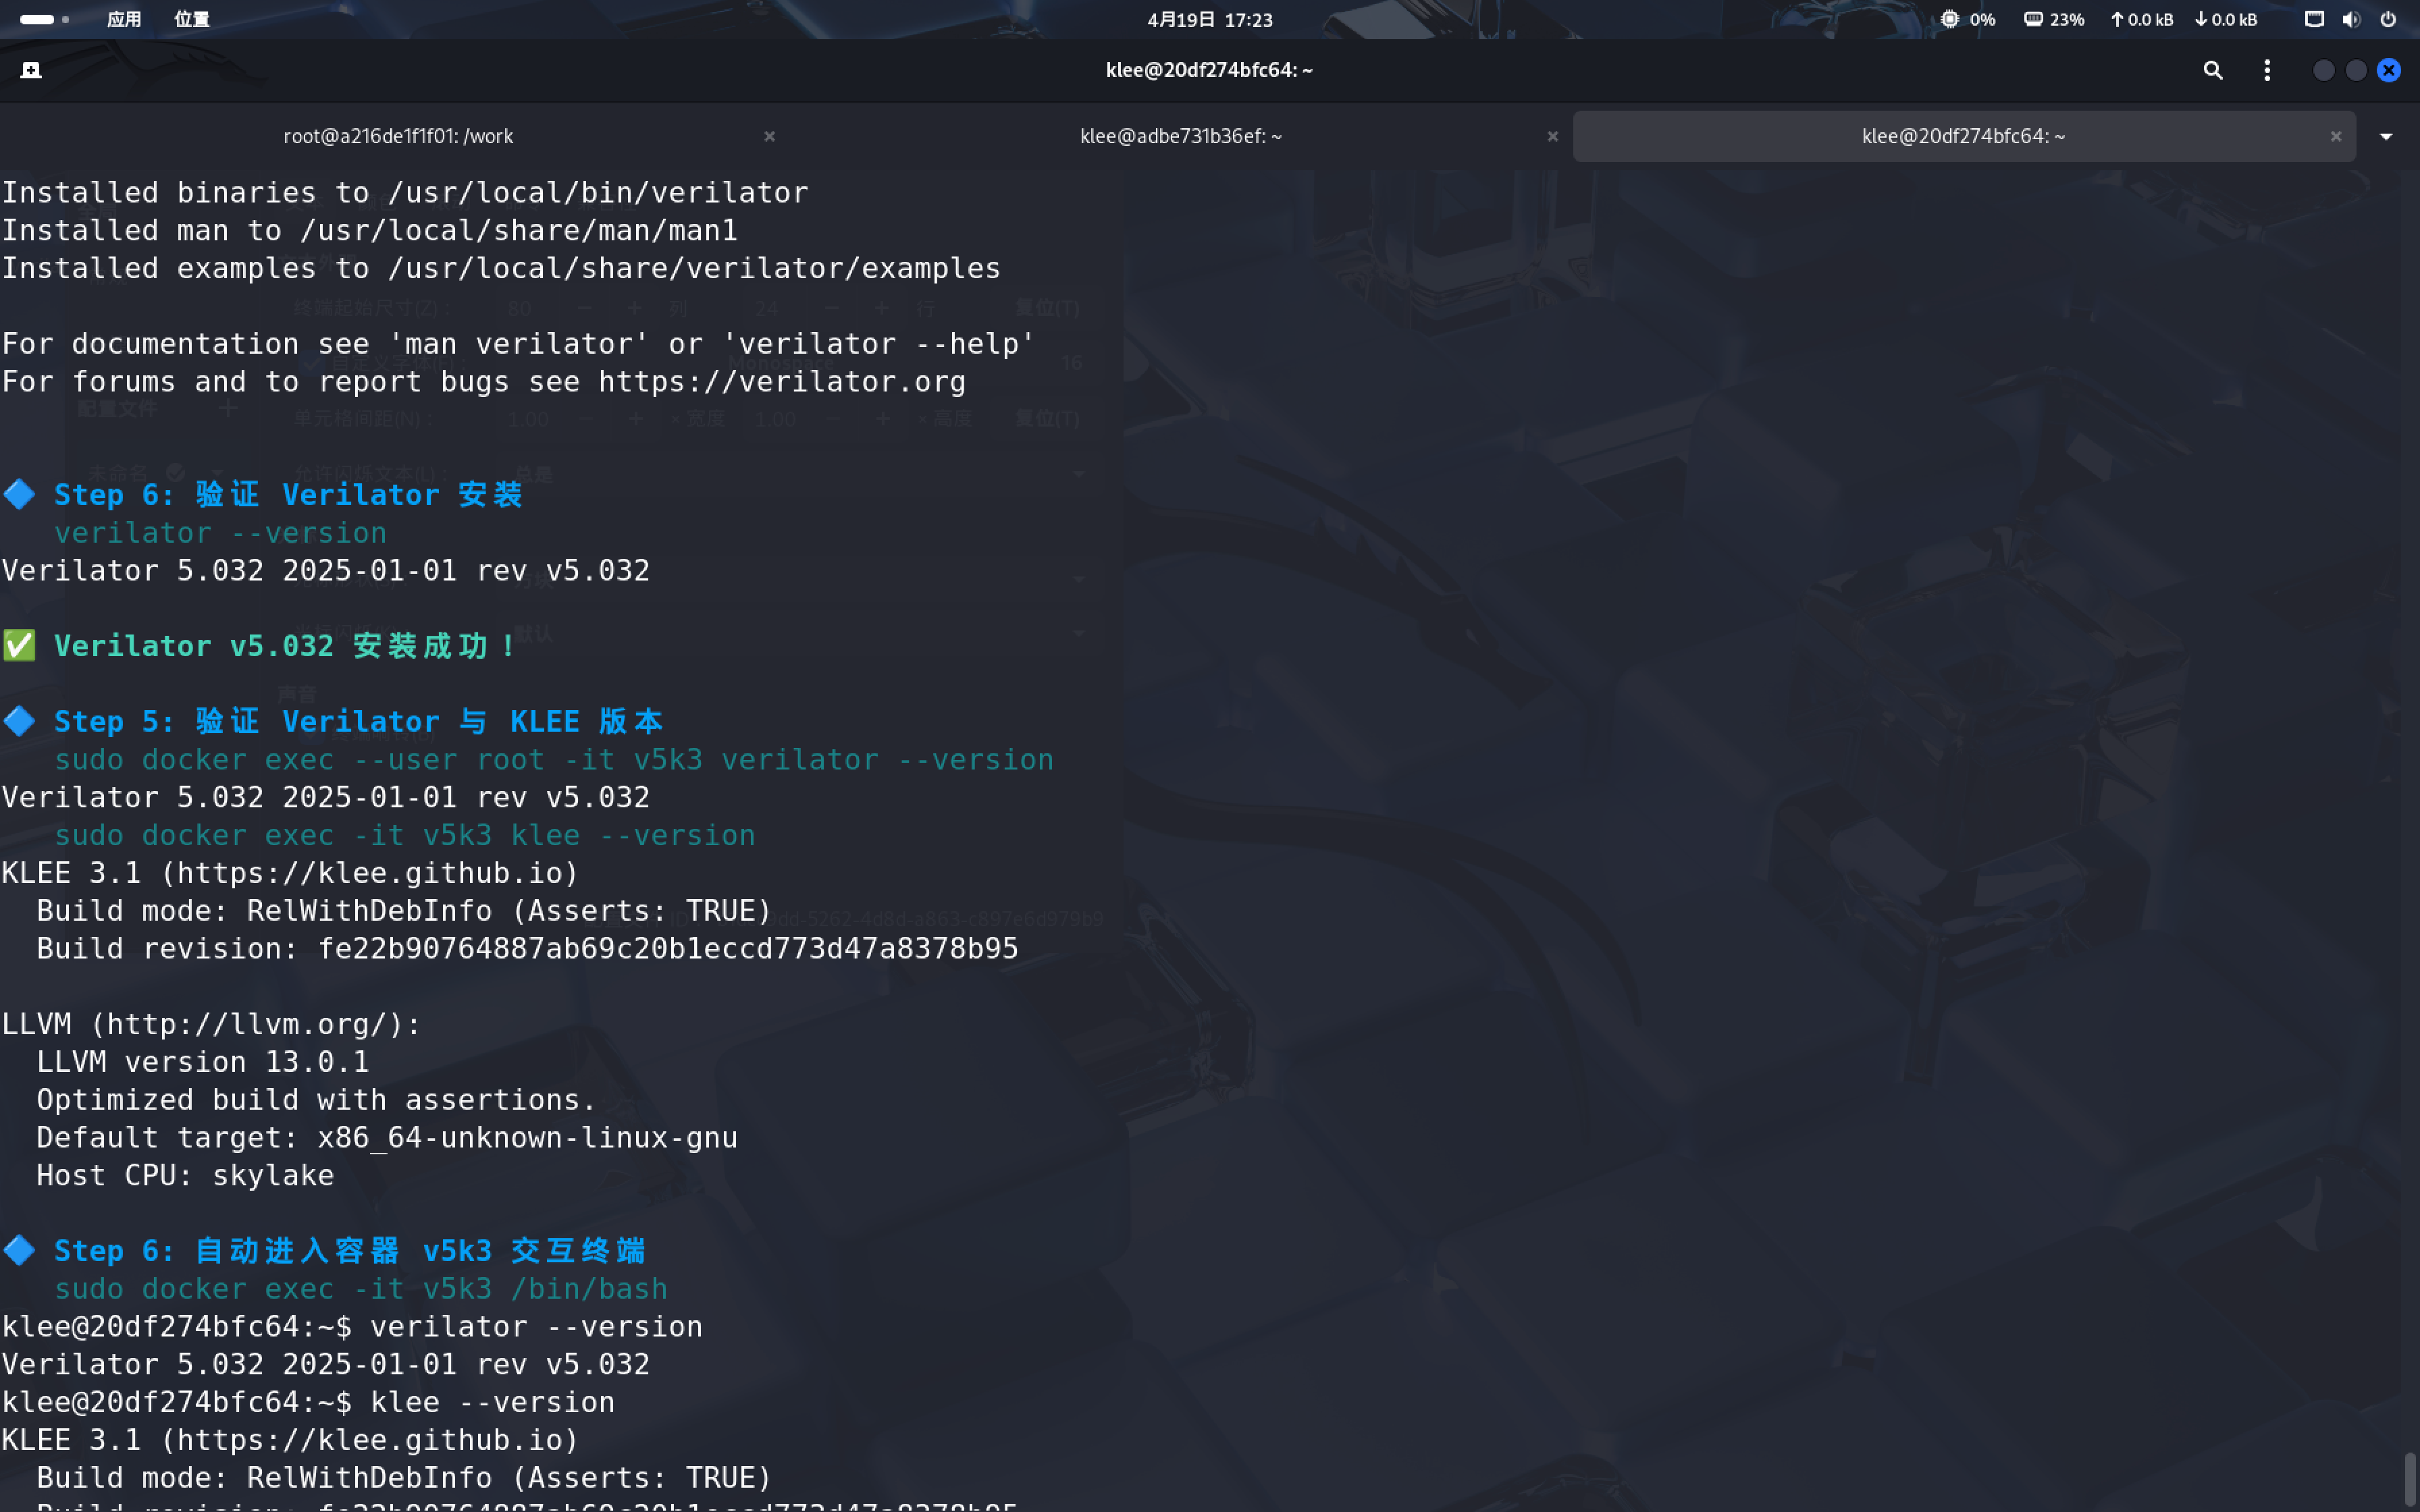
Step 6: 验证 Verilator 安装
verilator --version
Verilator 5.032 2025-01-01 rev v5.032
✅ Verilator v5.032 安装成功!
Step 5: 验证 Verilator 与 KLEE 版本
sudo docker exec --user root -it v5k3 verilator --version
Verilator 5.032 2025-01-01 rev v5.032
sudo docker exec -it v5k3 klee --version
KLEE 3.1 (https://klee.github.io)
Build mode: RelWithDebInfo (Asserts: TRUE)
Build revision: fe22b90764887ab69c20b1eccd773d47a8378b95
LLVM (http://llvm.org/):
LLVM version 13.0.1
Optimized build with assertions.
Default target: x86_64-unknown-linux-gnu
Host CPU: skylake
Step 6: 自动进入容器 v5k3 交互终端
sudo docker exec -it v5k3 /bin/bash
klee@20df274bfc64:~$ verilator --version
Verilator 5.032 2025-01-01 rev v5.032
klee@20df274bfc64:~$ klee --version
KLEE 3.1 (https://klee.github.io)
Build mode: RelWithDebInfo (Asserts: TRUE)
Build revision: fe22b90764887ab69c20b1eccd773d47a8378b95
LLVM (http://llvm.org/):
LLVM version 13.0.1
Optimized build with assertions.
Default target: x86_64-unknown-linux-gnu
Host CPU: skylake
klee@20df274bfc64:~$ 


 被折叠的 条评论
为什么被折叠?
被折叠的 条评论
为什么被折叠?
 到【灌水乐园】发言


