


Spring Cloud Config 配置中心
在微服务架构中,可能会有成百上千个服务模块,如果每个模块对应都有一个配置文件,那么单纯维护不同环境(生产、测试、开发)每个模块的配置都是一件很痛苦的事情。假如有一个中心模块对应有一个配置文件,这个模块由于业务访问量相当大,横向扩展20个实例,那么可能会有20个配置文件(如果实例不在一台机器上),现在由于业务变动修改一个参数,那么必须去找到这20台服务上的配置进行修改,再将模块重启。这是费时又易错的过程。如何解决这样的问题呢,在这个微服务盛行的时代,Spring Cloud Config给出了很完善的解决方案。
本章主要包括的内容有:
- Spring Cloud Config 配置中心原理
- Spring Cloud Config Server 构建配置服务中心
- Spring Cloud Config Client 构建配置客户端
- Spring Cloud Config Actuator 刷新模块重新读取配置
- Spring Cloud Config Bus 配置总线
一、Spring Cloud Config 配置中心原理
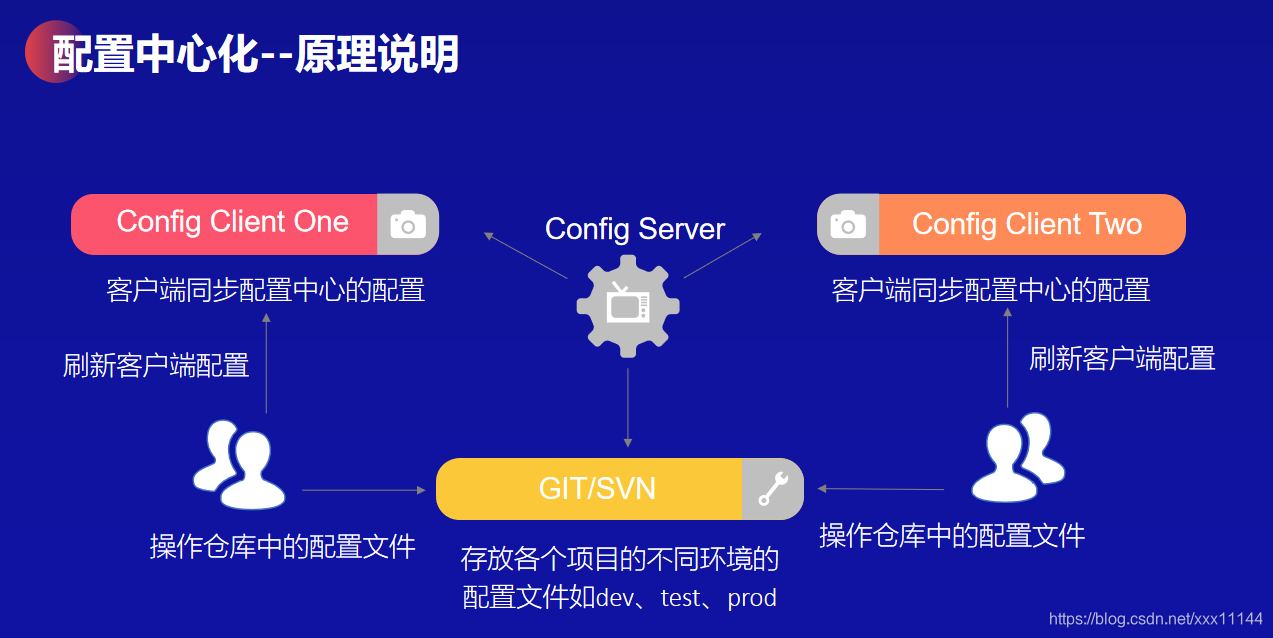
看图说原理,从原理图来看。这个架构实现需要四部分:
- GIT/SVN 配置文件存放仓库,可以使用SVN或者GIT
- Config Server 服务中心负责往仓库拉取配置文件,同步配置文件
- Config Client 配置客户端负责拉取服务中心的配置文件
- Person 维护人员负责刷新修改配置,刷新客户端模块已达到读取新配置
构建出前面三部分,便可以解决在前言中抛出的大部分问题。
二、Spring Cloud Config Server 构建配置服务中心
对于熟悉Spring Boot的使用者来讲,构建配置服务中心是很简单的事情,只需要完成以下步骤便可以是项目成为配置服务中心。
- 创建Module工程,在pom.xml引进Spring Boot基本起步依赖
- 添加Spring Cloud Config Server起步依赖,spring-cloud-config-server
<!-- 配置文件服务端依赖 -->
<dependency>
    <groupId>org.springframework.cloud</groupId>
    <artifactId>spring-cloud-config-server</artifactId>
</dependency>
- 在项目入口类添加注入
@SpringBootApplication
@EnableConfigServer //添加ConfigServer注入
public class DemoApplication {

    public static void main(String[] args) {
        SpringApplication.run(DemoApplication.class, args);
    }

}
- 在application.properties中添加以下参数
##  配置中心名称
spring.config.name=configserver
##  是否开启配置中心服务
spring.cloud.config.enabled=true
##  拉取配置的仓库地址(支持GIT、SVN、默认GIT)
spring.cloud.config.server.git.uri=http://yourGitAddress/root/springcloudconfig.git
##  仓库路径
spring.cloud.config.server.git.search-paths=config-repo
##  指定分支
spring.cloud.config.label=master
##  仓库账号
spring.cloud.config.server.git.username=you/git/username
##  仓库密码
spring.cloud.config.server.git.password=you/git/password
- 启动项目查看日志如果出现如下提示说明构建配置服务中心成功
## 已经将仓库中config-repo路径下的test-test.properties拉取过来
Adding property source: file:/C:/系统路径//config-repo/test-test.properties
三、Spring Cloud Config Client 构建配置客户端
最终目的是让对应的业务模考启动后拉取不同的环境下(生产、测试、开发)的配置文件,即如何让业务模块成为一个自动拉取配置的客户端。
- 创建Module工程,在pom.xml引进Spring Boot基本起步依赖
- 添加Spring Cloud Config Server起步依赖,spring-cloud-config-client
<!-- 读取配置文件客户端依赖 -->
<dependency>
    <groupId>org.springframework.cloud</groupId>
    <artifactId>spring-cloud-config-client</artifactId>
</dependency>
- resource路径下添加bootstrap.yml配置文件
spring:
  application:
    name: test  ## 指定了配置文件的应用名,作为配置文件的名称
  cloud:
    config:
      uri: http://localhost:8081/  ## 指定配置中心的的uri
      profile: test  ## 指定的环境 如果这样指定,会自动拉取test-test.properties文件
      label: master  ## 指定分支
server:
  port: 7002
- 启动项目查看日志如果出现如下提示说明构建配置服务客户端成功
## 说明读取配置文件成功
Located property source: CompositePropertySource {name='configService',
propertySources=[MapPropertySource {name='configClient'}, MapPropertySource
{name='http://仓库路径/config-repo/test-test.properties'}]}
四、Spring Cloud Config Actuator 刷新模块重新读取配置
显然,即使一个模块成为了配置客户端,当仓库的配置文件发生改变,服务器端拉取到新的配置文件,客户端也无法在更新配置。为了解决这个问题,需要引进Spring Cloud Config Actuator监控模块,该模块提供了一系列API对模块进行监控。包括调用刷新接口让模块重新读取配置。
- 在配置客户端添加Spring Cloud Config Actuator起步依赖 spring-boot-starter-actuator
<dependency>
    <groupId>org.springframework.boot</groupId>
    <artifactId>spring-boot-starter-actuator</artifactId>
</dependency>
- 在bootstrap.yml配置文件添加如下配置,暴露出接口(虽然这样不安全,但不是本节讨论的重点)
management:
  endpoints:
    web:
      exposure:
        include: "*"
- 使用配置客户端接口(POST请求),模块便会重新拉去配置文件
curl -X POST "http://配置客户端服务ip:port/actuator/refresh"
五、Spring Cloud Config Bus 配置总线
通过前面一些列操作,似乎解决了前言抛出的90%的问题,但仍然有一个问题没有解决,当微服务模块达到成百上千的数量时,怎么样轻松同步各个模块的配置,显然Spring Cloud家族也考虑到这个问题。Spring Cloud Config Bus便可以解决这样的问题。后续在介绍其他组件的时候会对其做重点描述。因为这里面还涉及到高级消息队列的部署,这不是本章的重点。不做过多介绍。


 7083
7083


 被折叠的 条评论
为什么被折叠?
被折叠的 条评论
为什么被折叠?
 到【灌水乐园】发言


