


目录
3.2.1.2 @Component、@Controller、@Service、@Repository
3.2.1.3 @ComponentScan、@Import
3.2.3.1 @Component + @ConfigurationProperties
3.2.3.2 @EnableConfigurationProperties + @ConfigurationProperties
第一章 Spring与SpringBoot
1.1 Spring的功能
- 微服务Microservices:把一个大型项目拆分成微小的模块。
- 响应式Reactive
- 分布式云开发cloud
- Web开发
- 无服务开发Serverless
- 事件驱动Event Driven
- 批处理业务Batch

1.2 SpringBoot概述
SpringBoot能够快速创建出生产级别的Spring应用,使开发变简单。SpringBoot是整合Spring技术栈的一站式框架。SpringBoot是简化Spring技术栈的快速开发脚手架。
1.2.1 SpringBoot优点
- 创建独立Spring应用
- 内嵌web服务器(不再需要自己安装配置Tomcat服务器)
- 自动starter依赖,简化构建配置
- 自动配置Spring以及第三方功能
- 提供生产级别的监控、健康检查及外部化配置
- 无代码生成、无需编写XML
1.2.2 SpringBoot缺点
- 版本迭代快,需要时刻关注变化
- 封装太深,内部原理复杂,不容易精通
1.3 时代背景
1.3.1 微服务
- 微服务是一种架构风格
- 一个应用拆分为一组小型服务
- 每个服务运行在自己的进程内,也就是可独立部署和升级
- 服务之间使用轻量级HTTP交互
- 服务围绕业务功能拆分
- 可以由全自动部署机制独立部署
- 去中心化,服务自治。服务可以使用不同的语言、不同的存储技术
微服务的应用不一定是分散在多个服务器上的,也可以是同一个服务器。微服务的设计是为了不会因为某个模块的升级和BUG影响现有的系统业务。低耦合+高内聚。
1.3.2 分布式
分布式是一种系统部署方式,服务分散部署在不同的机器上。其存在很多困难:
- 远程调用
- 服务发现
- 负载均衡
- 服务容错
- 配置管理
- 服务监控
- 链路追踪
- 日志管理
- 任务调度
分布式的解决:SpringBoot + SpringCloud
1.3.3 云原生
原生开发的应用如何上云,Cloud Native。传统的应用跑在本地服务器上,现在流行的应用都跑在云端。上云的困难:
- 服务自愈
- 弹性伸缩
- 服务隔离
- 自动化部署
- 灰度发布
- 流量治理
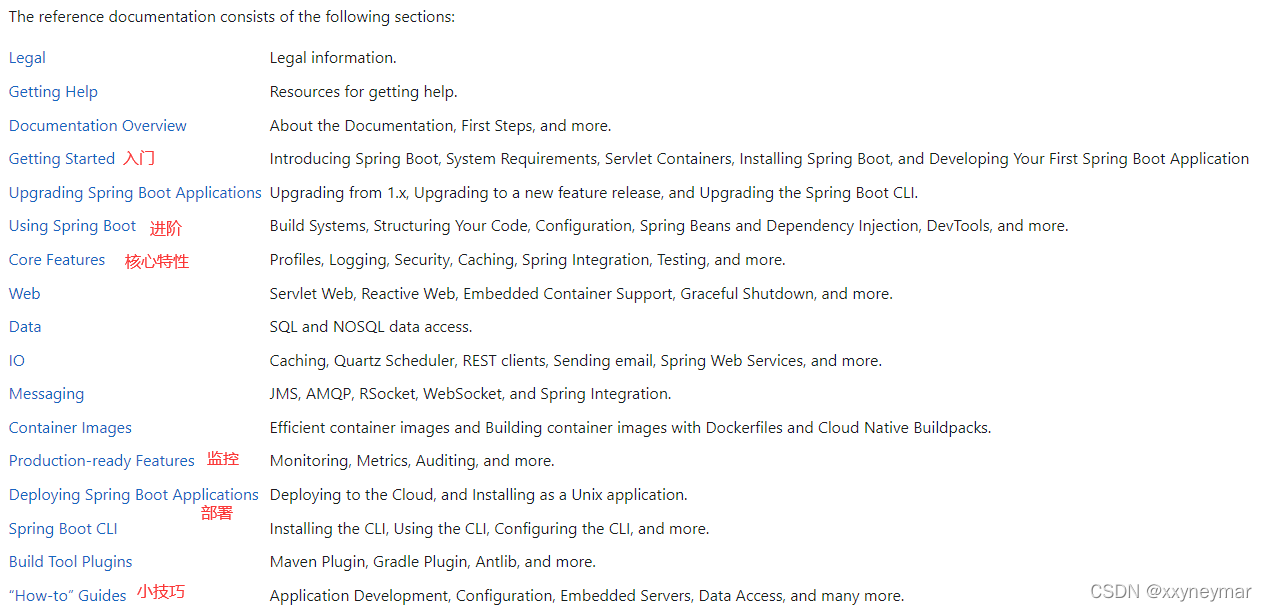
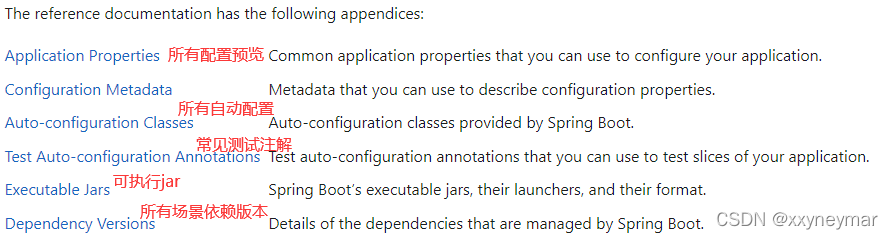
1.4 SpringBoot官方文档
1.4.1 官方文档架构
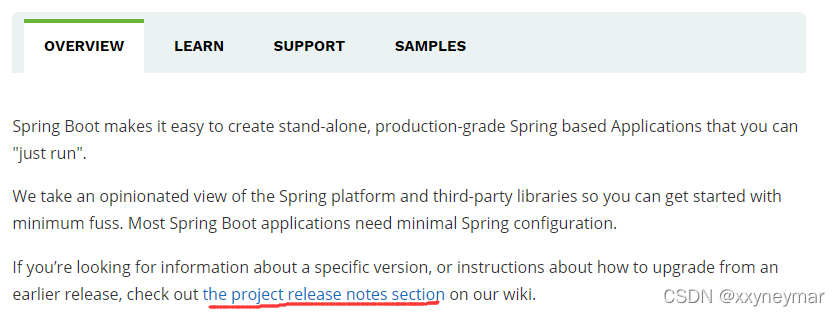
1.4.2 查看新版本特性
第二章 SPringBoot2入门
2.1 maven设置
修改安装好的maven的settings.xml配置文件。位置:maven安装位置/conf/settings.xml
<mirrors>
    <mirror>
        <id>nexus-aliyun</id>
        <mirrorOf>central</mirrorOf>
        <name>Nexus aliyun</name>
        <url>http://maven.aliyun.com/nexus/content/groups/public</url>
    </mirror>
</mirrors>

<profiles>
    <profile>
        <id>jdk-1.8</id>
        <activation>
            <activeByDefault>true</activeByDefault>
            <jdk>1.8</jdk>
        </activation>
        <properties>
            <maven.compiler.source>1.8</maven.compiler.source>
            <maven.compiler.target>1.8</maven.compiler.target>
            <maven.compiler.compilerVersion>1.8</maven.compiler.compilerVersion>
        </properties>
    </profile>
</profiles>
2.2 Hello实例
需求:浏览器发送/hello请求,响应Hello。
2.2.1 创建maven工程,引入依赖
<parent>
    <groupId>org.springframework.boot</groupId>
    <artifactId>spring-boot-starter-parent</artifactId>
    <version>2.3.4.RELEASE</version>
</parent>


<dependencies>
    <dependency>
        <groupId>org.springframework.boot</groupId>
        <artifactId>spring-boot-starter-web</artifactId>
    </dependency>
</dependencies>
2.2.2 创建主程序
package com.xxy.boot;

import org.springframework.boot.SpringApplication;
import org.springframework.boot.autoconfigure.SpringBootApplication;

/**
 * 主程序类;主配置类
 * @SpringBootApplication:这是一个SpringBoot应用
 */
@SpringBootApplication
public class MainApplication {
    public static void main(String[] args) {
        SpringApplication.run(MainApplication.class,args);
    }
}
2.2.3 编写业务
package com.xxy.boot.controller;

import org.springframework.web.bind.annotation.RequestMapping;
import org.springframework.web.bind.annotation.RestController;

/**
 * @RestController包含了注解@Controller和@ResponseBody
 */

@RestController
public class HelloController {

    @RequestMapping("/hello")
    public String handle01() {
        return  "Hello,springboot 2";
    }
}
2.2.4 简化配置
如果想修改某个配置参数,只需要在一个配置文件application.properties内修改即可:
这里举例修改一个服务器端口号:

2.2.5 简化部署
在pom.xml文件内加上配置:
<build>
    <plugins>
        <plugin>
            <groupId>org.springframework.boot</groupId>
            <artifactId>spring-boot-maven-plugin</artifactId>
        </plugin>
    </plugins>
</build>
2.2.6 使用cmd打开jar包来启动服务
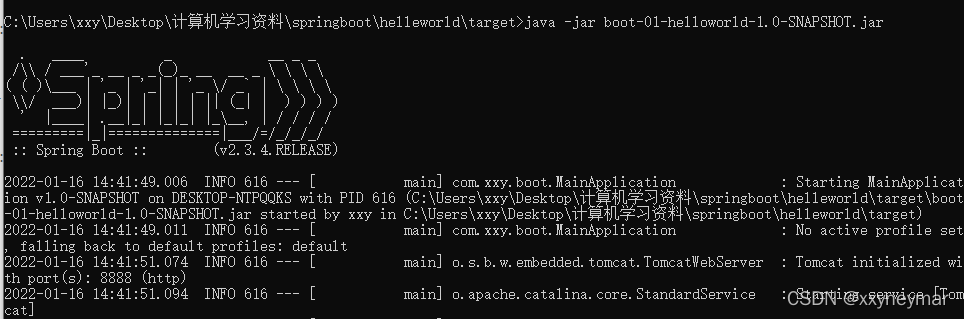
注意:用这种方式一定要取消掉cmd的快速编辑模式。
第三章 了解自动配置原理
3.1 SpringBoot特点
3.1.1 依赖管理
- 父项目做依赖管理。自己的项目需要引入一个父项目spring-boot-starter-parent,而它又引入了一个父项目spring-boot-dependencies,在spring-boot-dependencies中几乎声明了所有开发中常用依赖的版本号,因此我们在写自己需要的依赖的时候,都不用像以前一样加版本号,自动版本仲裁机制。
依赖管理
<parent>
<groupId>org.springframework.boot</groupId>
<artifactId>spring-boot-starter-parent</artifactId>
<version>2.3.4.RELEASE</version>
</parent>他的父项目
<parent>
<groupId>org.springframework.boot</groupId>
<artifactId>spring-boot-dependencies</artifactId>
<version>2.3.4.RELEASE</version>
</parent>
- 开发导入starter场景启动器。
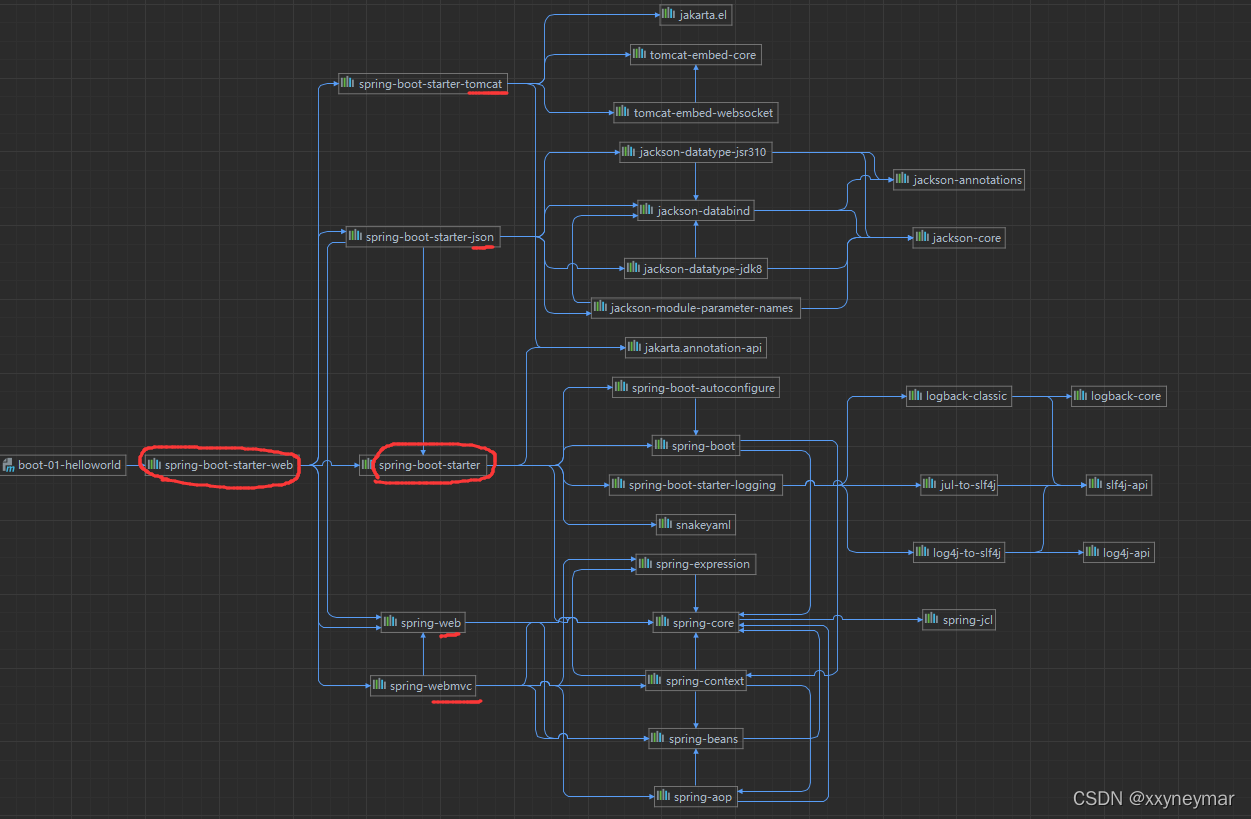
①spring-boot-starter-* : *就某种场景
②只要引入starter,这个场景的所有常规需要的依赖都会自动引入
③SpringBoot所有支持的场景:Developing with Spring Boot
④*-spring-boot-starter:是第三方提供的简化开发的场景启动器
⑤所有的场景启动器最底层的依赖都有spring-boot-starter
<dependency>
<groupId>org.springframework.boot</groupId>
<artifactId>spring-boot-starter</artifactId>
<version>2.3.4.RELEASE</version>
<scope>compile</scope>
</dependency>
- 自动版本仲裁:无需关注版本号。引入依赖默认都可以不写版本,如果要引入非版本仲裁的jar,那就需要写版本号了。
- 可以修改默认的版本号,自定义版本号。在当前项目的pom.xml里面重写配置:查看spring-boot-dependencies里面规定的当前依赖的版本用的key,下面的例子mysql使用的就是<mysql.version></mysql.version>,对其进行重写即可。maven文件的就近优先原则。
<properties>
<mysql.version>5.1.43</mysql.version>
</properties>
3.1.2 自动配置
- 自动配好Tomcat
- 引入Tomcat依赖
- 配置Tomcat
<dependency>
<groupId>org.springframework.boot</groupId>
<artifactId>spring-boot-starter-tomcat</artifactId>
<version>2.3.4.RELEASE</version>
<scope>compile</scope>
</dependency>
- 自动配好SpringMVC
- 引入SpringMVC全套组件
- 自动配置号SpringMVC常用组件(功能)
- 利用以下代码,可以看看会输出哪些
- 比如就有DispatcherServlet

@SpringBootApplication
public class MainApplication {
    public static void main(String[] args) {
        //返回IOC容器
        ConfigurableApplicationContext run = SpringApplication.run(MainApplication.class,args);
        //查看容器里面的组件
        String[] names = run.getBeanDefinitionNames();
        for (String name : names) {
            System.out.println(name);
        }
    }
}- 自动配好Web常见功能,如字符编码问题
- SpringBoot配置好了所有web开发的常见场景

- 默认包结构(之前还需要组件扫描器component-scan来指定在哪个包下)
- 主程序所在包及其下面的所有子包里面的组件都会被默认扫描进来(如果是主程序外面的包就不行了)
- 无需以前的包扫描配置
- 如果想要改变扫描路径,两种方式:
-
@SpringBootApplication(scanBasePackages="com.xxy"):自己指定包路径
-
@ComponentScan:指定扫描路径
-
@SpringBootApplication(scanBasePackages="com.xxy")
等同于
@SpringBootConfiguration
@EnableAutoConfiguration
@ComponentScan("com.xxy")
- application.properties文件中的配置都有默认值
- 默认配置最终都是映射到某个类上,如:MultipartProperties
- 配置文件的值最终会绑定某个类的属性上,这个类会在容器中创建对象
- 按需加载所有自动配置项
- SpringBoot有非常多的starter场景,引入了哪些场景这个场景的自动配置才会开启
- SpringBoot所有的自动配置功能都在spring-boot-autoconfigure包里面
3.2 容器功能
3.2.1 组件添加
创建一个User类和Pet类:
package com.xxy.boot.bean;

/**
 * 用户
 */
public class User {
    private String name;
    private Integer age;
    private Pet pet; //加上了依赖关系

    public Pet getPet() {
        return pet;
    }

    public void setPet(Pet pet) {
        this.pet = pet;
    }

    public User() {
    }

    public User(String name, Integer age) {
        this.name = name;
        this.age = age;
    }

    public String getName() {
        return name;
    }

    public void setName(String name) {
        this.name = name;
    }

    public Integer getAge() {
        return age;
    }

    public void setAge(Integer age) {
        this.age = age;
    }

    @Override
    public String toString() {
        return "User{" +
                "name='" + name + '\'' +
                ", age=" + age +
                ", pet=" + pet +
                '}';
    }
}
package com.xxy.boot.bean;

public class Pet {
    private String name;

    public Pet() {
    }

    public Pet(String name) {
        this.name = name;
    }

    public String getName() {
        return name;
    }

    public void setName(String name) {
        this.name = name;
    }

    @Override
    public String toString() {
        return "Pet{" +
                "name='" + name + '\'' +
                '}';
    }
}
之前的方式:在spring配置文件中使用bean标签来创建对象。
<?xml version="1.0" encoding="UTF-8"?>
<beans xmlns="http://www.springframework.org/schema/beans"
       xmlns:xsi="http://www.w3.org/2001/XMLSchema-instance"
       xsi:schemaLocation="http://www.springframework.org/schema/beans http://www.springframework.org/schema/beans/spring-beans.xsd">


    <bean id="user01" class="com.xxy.boot.bean.User">
        <property name="name" value="zhangsan"></property>
        <property name="age" value="18"></property>
    </bean>

    <bean id="cat" class="com.xxy.boot.bean.Pet">
        <property name="name" value="tomcat"></property>
    </bean>
</beans>
现在使用的springboot不再需要上述方法给容器中添加组件。
3.2.1.1 @Configuration
创建一个配置类来实现将组件添加到容器内。
注意Full模式与Lite模式。
package com.xxy.boot.config;

import com.xxy.boot.bean.Pet;
import com.xxy.boot.bean.User;
import org.springframework.context.annotation.Bean;
import org.springframework.context.annotation.Configuration;


/**
 * 1.配置类里面使用@Bean标注在方法上给容器注册组件,默认也是单实例的
 * 2.配置类本身也是组件
 * 3.proxyBeanMethods:代理bean的方法
 *      Full:全量级配置,proxyBeanMethods = true,保证每个@Bean方法被调用多少次返回的组件都是单实例的
 *      Lite:轻量级配置,proxyBeanMethods = false,每个@Bean方法被调用多少次返回的组件都是新创建的
 *      配置类组件之间无依赖关系用Lite模式加速容器启动过程,减少判断
 *      配置类组件之间有依赖关系,方法会被调用得到之前单实例组件,用Full模式
 */
@Configuration(proxyBeanMethods = true) //告诉SpringBoot这是一个配置类,等同于之前的配置文件
public class MyConfig {

    /**
     * @Bean:给容器中添加组件
     *    以方法名作为组件的id,返回值类型就是组件的类型,返回的值就是组件在容器中的实例
     *
     * 外部无论对配置类中的这个组件注册方法调用多少次获取的都是之前注册容器中的单实例对象
     */
    @Bean
    public User user01() {
        User zhangsan = new User("zhangsan",18);
        //User组件依赖了Pet组件
        zhangsan.setPet(tomcatPet());
        return zhangsan;
    }

    @Bean("tom")//也可以通过注解的属性自定义组件的id,而不是根据方法名
    public Pet tomcatPet() {
        return new Pet("tomcat");
    }
}
package com.xxy.boot;

import com.xxy.boot.bean.Pet;
import com.xxy.boot.bean.User;
import com.xxy.boot.config.MyConfig;
import org.springframework.boot.SpringApplication;
import org.springframework.boot.autoconfigure.SpringBootApplication;
import org.springframework.context.ConfigurableApplicationContext;

/**
 * 主程序类
 * @SpringBootApplication:这是一个SpringBoot应用
 */
@SpringBootApplication
public class MainApplication {
    public static void main(String[] args) {
        //返回IOC容器
        ConfigurableApplicationContext run = SpringApplication.run(MainApplication.class,args);
        //查看容器里面的组件
        String[] names = run.getBeanDefinitionNames();
        for (String name : names) {
            System.out.println(name);
        }
        //从容器中获取组件
        Pet tom01 = run.getBean("tom",Pet.class);
        Pet tom02 = run.getBean("tom",Pet.class);
        System.out.println(tom01 == tom02);//true,单实例

        //com.xxy.boot.config.MyConfig$$EnhancerBySpringCGLIB$$dcdc7192@72889280
        //是一个被cglib增强的代理对象
        MyConfig myConfig = run.getBean(MyConfig.class);
        System.out.println(myConfig);

        //如果@Configuration(proxyBeanMethods = true)代理对象调用方法
        //此时SpringBoot总会检查是否在容器中已经拥有,如果有就不再创建新的,保持组件单实例
        User user = myConfig.user01();
        User user1 = myConfig.user01();
        System.out.println(user == user1);//true
        //如果把proxyBeanMethods调为false,myConfig不再是代理对象,返回的也就是false了

        User user2 = run.getBean("user01",User.class);
        Pet tom = run.getBean("tom",Pet.class);
        System.out.println(user2.getPet() == tom);//true。有依赖,设置为true,单实例
    }
}
3.2.1.2 @Component、@Controller、@Service、@Repository
之前使用的注解办法同样是可行的。
@Component:表示该类是一个组件
@Controller:表示该类是一个控制器
@Service:表示该类是一个业务逻辑组件
@Repository:表示该类是一个数据库层组件
3.2.1.3 @ComponentScan、@Import
@ComponentScan:指定包扫描规则,包括指定路径。
@Import的使用:写在一个容器中的组件的类上。可以给容器中导入组件
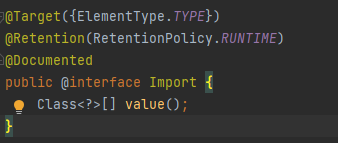
/**
* @Import({User.class, DBHelper.class})
* 给容器自动创建出这两个类型的组件,默认组建的名字就是全类名
*/
@Import({User.class, DBHelper.class})
@Configuration(proxyBeanMethods = true) //告诉SpringBoot这是一个配置类,等同于之前的配置文件
public class MyConfig{
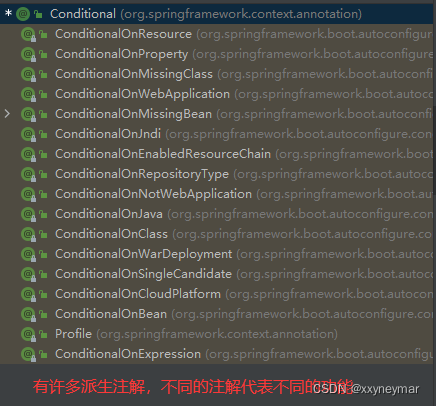
}3.2.1.4 @Conditional
条件装配:满足Conditional指定的条件,则进行组件注入。
可以加在类上,加在类上的话,只有条件成立,这个类里面的才会生效。
也可以加在方法上。
3.2.2 原生配置文件引入
3.2.2.1 @ImportResource
如果已经有了之前的SpringMVC的配置文件,里面有了创建组件的语句,此时如果不想一点一点迁移成SpringBoot的注解写法,可以在随便某一个配置类上写一次@ImportResource注解,引入之前的xml文件,此时会对该文件进行解析,创建组件放入容器内。
======================beans.xml=========================
<?xml version="1.0" encoding="UTF-8"?>
<beans xmlns="http://www.springframework.org/schema/beans"
       xmlns:xsi="http://www.w3.org/2001/XMLSchema-instance"
       xmlns:context="http://www.springframework.org/schema/context"
       xsi:schemaLocation="http://www.springframework.org/schema/beans http://www.springframework.org/schema/beans/spring-beans.xsd http://www.springframework.org/schema/context https://www.springframework.org/schema/context/spring-context.xsd">

    <bean id="haha" class="com.atguigu.boot.bean.User">
        <property name="name" value="zhangsan"></property>
        <property name="age" value="18"></property>
    </bean>

    <bean id="hehe" class="com.atguigu.boot.bean.Pet">
        <property name="name" value="tomcat"></property>
    </bean>
</beans>
@ImportResource("classpath:beans.xml")
public class MyConfig {}
======================测试=================
boolean haha = run.containsBean("haha");
boolean hehe = run.containsBean("hehe");
System.out.println("haha:"+haha);//true
System.out.println("hehe:"+hehe);//true3.2.3 配置绑定
如何使用Java读取到properties文件中的内容,并且把它封装到JavaBean中,以供随时使用。
传统方式:
public class getProperties {
     public static void main(String[] args) throws FileNotFoundException, IOException {
         Properties pps = new Properties();
         pps.load(new FileInputStream("a.properties"));
         Enumeration enum1 = pps.propertyNames();//得到配置文件的名字
         while(enum1.hasMoreElements()) {
             String strKey = (String) enum1.nextElement();
             String strValue = pps.getProperty(strKey);
             System.out.println(strKey + "=" + strValue);
             //封装到JavaBean。
         }
     }
 }
3.2.3.1 @Component + @ConfigurationProperties
在application.properties配置文件中加入(只能写在这个配置文件中):
mycar.brand=BYD
mycar.price=100000
然后在类上加入注解@ConfigurationProperties:
package com.xxy.boot.bean;

import org.springframework.boot.context.properties.ConfigurationProperties;
import org.springframework.stereotype.Component;

@ConfigurationProperties(prefix = "mycar")
public class Car {
    private String brand;
    private Integer price;

    public String getBrand() {
        return brand;
    }

    public void setBrand(String brand) {
        this.brand = brand;
    }

    public Integer getPrice() {
        return price;
    }

    public void setPrice(Integer price) {
        this.price = price;
    }

    @Override
    public String toString() {
        return "Car{" +
                "brand='" + brand + '\'' +
                ", price=" + price +
                '}';
    }
}
3.2.3.2 @EnableConfigurationProperties + @ConfigurationProperties
这种方式一定要在配置类中写。
@EnableConfigurationProperties(Car.class)
//1、开启Car配置绑定功能
//2、把这个Car这个组件自动注册到容器中
public class MyConfig {
}
package com.xxy.boot.bean;
import org.springframework.boot.context.properties.ConfigurationProperties;
import org.springframework.stereotype.Component;
@ConfigurationProperties(prefix = "mycar")
public class Car {
}PS:根据尚硅谷课程整理,如有侵权,联系删除。


 170
170


 被折叠的 条评论
为什么被折叠?
被折叠的 条评论
为什么被折叠?
 到【灌水乐园】发言


