


在开发中经常需要不同页面间进行信息传递,经过了解,页面间传值有八大传值方式,本篇文章中我们就了解并比较比较常用的几种传值方式(五大传值、单例传值)
运行结果放在每个传值方法的结尾!
本篇文章详细地介绍了开发过程中常用的页面传值方式! 😶🌫️
先创建一UINavigation导航栏做根视图,方便用ta的push方法进行页面切换:
- (void)scene:(UIScene *)scene willConnectToSession:(UISceneSession *)session options:(UISceneConnectionOptions *)connectionOptions {

    UIWindowScene* windowScene = (UIWindowScene *)scene;
    self.window = [[UIWindow alloc] initWithWindowScene: windowScene];
    self.window.frame = windowScene.coordinateSpace.bounds;

    FirstViewController* firstViewController = [[FirstViewController alloc] init];
    UINavigationController* navigationController = [[UINavigationController alloc] initWithRootViewController: firstViewController];

    [self.window setRootViewController: navigationController];
    [self.window makeKeyAndVisible];
}
属性传值
现在想让第二个界面label显示第一个界面textField中的文本 (页面1 -> 页面2)
首先我们建立两个页面FirstViewController、SecondViewController
FirstController.h
@interface FirstViewController : UIViewController

@property (nonatomic, copy)UITextField* textField;

@end
FirstController.m
- (void)viewDidLoad {
    [super viewDidLoad];
    // Do any additional setup after loading the view.
    self.view.backgroundColor = [UIColor lightGrayColor];

    self.textField = [[UITextField alloc] initWithFrame: CGRectMake(20, 100, 200, 30)];
    self.textField.center = self.view.center;
    self.textField.borderStyle = UITextBorderStyleRoundedRect;
    [self.view addSubview: self.textField];

    UITapGestureRecognizer* tapGesture = [[UITapGestureRecognizer alloc] initWithTarget: self action: @selector(pushSecondController)];
    [self.view addGestureRecognizer: tapGesture];
}

- (void)pushSecondController {
    SecondViewController* secondViewController = [[SecondViewController alloc] init];

    //属性传值
    secondViewController.textFromFirstView = self.textField.text;

    [self.navigationController pushViewController: secondViewController animated: YES];
}
SecondController.h
@interface SecondViewController : UIViewController

@property (nonatomic, strong)UILabel* label;
@property (nonatomic, copy)NSString* textFromFirstView;

@end
SecondController.m
@implementation SecondViewController

- (void)viewDidLoad {
    [super viewDidLoad];
    // Do any additional setup after loading the view.
    self.view.backgroundColor = [UIColor lightGrayColor];

    self.label = [[UILabel alloc] initWithFrame: CGRectMake(20, 100, 200, 30)];
    self.label.center = self.view.center;
    self.label.text = self.textFromFirstView;

    [self.view addSubview: self.label];
}


- (instancetype)init {
    self = [super init];
    if (self) {
        self.textFromFirstView = [[NSString alloc] init];
    }
    return self;
}

@end

代理(委托)传值
代理传值与属性传值恰恰相反,属性传值是将页面1的值赋给页面2,而代理传值是信息回传,页面2 <- 页面1
例如,现在想让第一个界面textField显示第二个界面textField中的文本
首先在第二个界面的头文件 (SecondViewController.h) 中定义一个委托协议:
@protocol SecondViewControllerDelegate <NSObject>

- (void)didUpdateText: (NSString *)text;

@end

@interface SecondViewController : UIViewController

//设置代理
@property (nonatomic, weak) id<SecondViewControllerDelegate> delegate;
@property (nonatomic, strong) UITextField *textField;

@end
SecondViewController.m
在第二个界面中,当文本发生更改时,调用委托方法通知第一个界面:
- (void)viewDidLoad {
    [super viewDidLoad];

    self.view.backgroundColor = [UIColor lightGrayColor];

    self.textField = [[UITextField alloc] initWithFrame: CGRectMake(20, 100, 200, 30)];
    self.textField.center = self.view.center;
    self.textField.borderStyle = UITextBorderStyleRoundedRect;
    //self.textField.text = @"placeholder";
    self.textField.delegate = self;

    [self.view addSubview: self.textField];
}

- (void)textFieldDidChangeSelection:(UITextField *)textField {
    if ([self.delegate respondsToSelector: @selector(didUpdateText:)]) {
        [self.delegate didUpdateText: textField.text];
    }
}
这里textField协议函数中使用[self.delegate respondsToSelector: @selector(didUpdateText:)]确保委托对象实现了didUpdateText:方法避免在没有实现该方法的情况下发生运行时错误。
如果委托对象没有实现didUpdateText:方法,调用该方法会导致程序崩溃。因此,使用respondsToSelector:方法进行检查可以在调用委托方法之前提前进行处理,确保程序的稳定性和可靠性。
FirstViewController.h
在第一个界面中遵循第二个界面的委托协议:
#import <UIKit/UIKit.h>
#import "SecondViewController.h"

@interface FirstViewController : UIViewController <SecondViewControllerDelegate>

@property (nonatomic, strong)UITextField* textField;

@end
FirstViewController.m
接着实现委托协议:
- (void)viewDidLoad {
    [super viewDidLoad];

    self.view.backgroundColor = [UIColor lightGrayColor];

    self.textField = [[UITextField alloc] initWithFrame: CGRectMake(20, 100, 200, 30)];
    self.textField.center = self.view.center;
    self.textField.borderStyle = UITextBorderStyleRoundedRect;
    [self.view addSubview: self.textField];

    UITapGestureRecognizer* tapGesture = [[UITapGestureRecognizer alloc] initWithTarget: self action: @selector(pushSecondController)];
    [self.view addGestureRecognizer: tapGesture];
}

- (void)pushSecondController {
    SecondViewController* secondViewController = [[SecondViewController alloc] init];
    //将委托对象(代理)设置为FirstViewController
    secondViewController.delegate = self;

    [self.navigationController pushViewController: secondViewController animated: YES];
}

//实现委托协议
- (void)didUpdateText:(NSString *)text {
    //协议传值
    self.textField.text = text;
}

通知传值
假设现在有三个相邻的页面,要将第三个页面textField的文本传递给第一个页面textField的文本,用代理传值就只能先传递给第二个界面,再由第二个界面传递给第一个界面,如果页面数量庞大,这种页页相传的方式就显得极其麻烦,页面1 <- 页面2 <- 页面3
要想直接将信息从第三个页面传递给第一个页面,可以用通知传值,而且也不需要引入头文件,只需指定typedef NSString *NSNotificationName即可,基于这种特性,通知传值既可用于正向传值,也可用于反向传值,以反向为例:页面1 <- 页面3

通知中心的使用属于观察者模式的一种,基本原理就是将要接受通知的对象作为观察者注册到通知中心,发送通知的类或者对象给通知中心发消息时,通知中心就会寻找是哪个类在ta这儿进行了注册,最后观察者接收信息并调用指定方法
在第一个界面注册观察者:
FirstViewController.h
@interface FirstViewController : UIViewController

@property (nonatomic, strong)UITextField* textField;
@property (nonatomic, strong)UITextField* textField2;

@end
FirstViewController.m
- (void)viewDidLoad {
[super viewDidLoad];
// Do any additional setup after loading the view.
self.view.backgroundColor = [UIColor lightGrayColor];
self.textField = [[UITextField alloc] initWithFrame: CGRectMake(20, 100, 200, 30)];
self.textField.center = self.view.center;
self.textField.borderStyle = UITextBorderStyleRoundedRect;
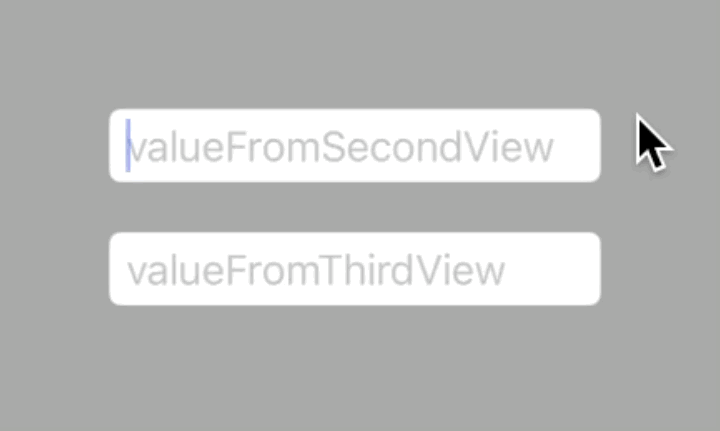
self.textField.placeholder = @"valueFromSecondView";
[self.view addSubview: self.textField];
self.textField2 = [[UITextField alloc] initWithFrame: CGRectMake(20, 100, 200, 30)];
self.textField2.center = CGPointMake(self.view.center.x, self.view.center.y + 50);
self.textField2.borderStyle = UITextBorderStyleRoundedRect;
self.textField2.placeholder = @"valueFromThirdView";
[self.view addSubview: self.textField2];
UITapGestureRecognizer* tapGesture = [[UITapGestureRecognizer alloc] initWithTarget: self action: @selector(pushSecondController)];
[self.view addGestureRecognizer: tapGesture];
//创建一个通知中心
NSNotificationCenter* center = [NSNotificationCenter defaultCenter];
//注册观察者监听第二个页面textField的变化通知
[center addObserver: self selector: @selector(recieveTextFromSecondView:) name: @"firstViewFromSecondView" object: nil];
//注册观察者监听第三个页面textField的变化通知
[center addObserver: self selector: @selector(recieveTextFromThirdView:) name: @"firstViewFromThirdView" object: nil];
}
//将传过来的值赋给页面一的两个textField
- (void)recieveTextFromSecondView: (NSNotification *)notification {
self.textField.text = notification.userInfo[@"key"];
}
- (void)recieveTextFromThirdView: (NSNotification *)notification {
self.textField2.text = notification.userInfo[@"key"];
}
- (void)pushSecondController {
SecondViewController* secondViewController = [[SecondViewController alloc] init];
[self.navigationController pushViewController: secondViewController animated: YES];
}
在第二个和第三个页面监听textFIeld的变化并发布通知(post):
SecondViewController.m
- (void)viewDidLoad {
    [super viewDidLoad];

    self.view.backgroundColor = [UIColor lightGrayColor];

    self.textField = [[UITextField alloc] initWithFrame: CGRectMake(20, 100, 200, 30)];
    self.textField.center = self.view.center;
    self.textField.borderStyle = UITextBorderStyleRoundedRect;
    self.textField.placeholder = @"secondView";
    self.textField.delegate = self;

    [self.view addSubview: self.textField];

    UITapGestureRecognizer* tapGesture = [[UITapGestureRecognizer alloc] initWithTarget: self action: @selector(pushThirdController)];
    [self.view addGestureRecognizer: tapGesture];
}

- (void)pushThirdController {
    ThirdViewController* thirdViewController = [[ThirdViewController alloc] init];

    [self.navigationController pushViewController: thirdViewController animated: YES];
}

//监听textField的变化
- (void)textFieldDidChangeSelection:(UITextField *)textField {
    NSDictionary* message = @{@"key" : textField.text};
    NSNotificationCenter* center = [NSNotificationCenter defaultCenter];

    //发布通知,将textField的文本作为参数传递
    [center postNotificationName: @"firstViewFromSecondView" object: self userInfo: message];
}
ThirdViewController.m
- (void)viewDidLoad {
    [super viewDidLoad];

    self.view.backgroundColor = [UIColor lightGrayColor];

    self.textField = [[UITextField alloc] initWithFrame: CGRectMake(20, 100, 200, 30)];
    self.textField.center = self.view.center;
    self.textField.borderStyle = UITextBorderStyleRoundedRect;
    self.textField.placeholder = @"thirdView";
    self.textField.delegate = self;

    [self.view addSubview: self.textField];
}

- (void)textFieldDidChangeSelection:(UITextField *)textField {
    NSDictionary* message = @{@"key" : textField.text};
    NSNotificationCenter* center = [NSNotificationCenter defaultCenter];
    [center postNotificationName: @"firstViewFromThirdView" object: self userInfo: message];
}
我们发现在每个页面都创建了NSNotificationCenter(通知中心)实例,这是不是会很消耗内存?
实际不用担心这个问题,NSNotificationCenter是一个单例,调用
[NSNotificationCenter defaultCenter]方法,可以获取到全局唯一的NSNotificationCenter实例
如果我们在某个阶段不借用通知中心来发送消息了,但ta作为单例又一直存在,就会一直占用内存,所以最好在观察者类中重写一下dealloc方法:
- (void)dealloc {
    [[NSNotificationCenter defaultCenter] removeObserver: self];
}
这个重写一般也不用调用父类的dealloc方法:[super dealloc]
在 ARC环境下,由于系统会自动管理内存,编译器会自动插入 dealloc 方法的实现,并调用父类的 dealloc 方法(不需要手动调用)。所以在 ARC 环境下,不需要手动调用 super dealloc
但是,在非 ARC 环境下(即手动管理内存的情况下),我们仍然需要在 dealloc 方法中手动调用 [super dealloc],以确保正确释放父类的资源

KVO传值
KVO和通知中心同属于观察者模式,都可以通过注册观察者来对被观察者进行监听,实时对收到的通知作出反馈。
观察者模式(Observer Pattern)是一种行为型设计模式,用于处理对象之间的一对多依赖关系。在该模式中,当一个对象的状态发生改变时,所有依赖它的对象都会得到通知并自动更新
什么是KVO?
KVO(Key-Value-Observing,键值观察)是一种在Objective-C中的编程模式。它允许对象监测其他对象特定属性的变化。当被监测的属性发生变化时,观察者对象会接收到通知,并可以采取相应的操作
由于KVO的实现机制,只针对属性才会发生作用,一般继承NSObject的对象都默认支持KVO
KVO的基本使用
现将第一个页面作为观察者,观察第二个界面的属性textField
一、 使用addObserver:forKeyPath:options:context:方法来注册观察者,观察者可以接收keyPath属性的变化事件
SecondViewController.m
- (void)viewDidLoad {
    [super viewDidLoad];

    self.view.backgroundColor = [UIColor lightGrayColor];

    self.textField = [[UITextField alloc] initWithFrame: CGRectMake(20, 100, 200, 30)];
    self.textField.center = self.view.center;
    self.textField.borderStyle = UITextBorderStyleRoundedRect;
    self.textField.placeholder = @"secondView";
    self.textField.delegate = self;

    self.string = [[NSString alloc] init];

    [self.view addSubview: self.textField];
}

- (void)textFieldDidChangeSelection:(UITextField *)textField {
    self.string = self.textField.text;
    NSLog(@"%@", self.string);
}
FirstViewController.h
创建好被观察者secondViewController
@interface SecondViewController : UIViewController <UITextFieldDelegate>

@property (nonatomic, strong)UITextField* textField;
@property (nonatomic, strong)SecondViewController* secondViewController;

@end
FirstViewController.m
注册观察者
- (void)viewDidLoad {
    [super viewDidLoad];
    // Do any additional setup after loading the view.
    self.view.backgroundColor = [UIColor lightGrayColor];

    self.textField = [[UITextField alloc] initWithFrame: CGRectMake(20, 100, 200, 30)];
    self.textField.center = self.view.center;
    self.textField.borderStyle = UITextBorderStyleRoundedRect;
    self.textField.placeholder = @"valueFromSecondView";
    [self.view addSubview: self.textField];

    self.textField2 = [[UITextField alloc] initWithFrame: CGRectMake(20, 100, 200, 30)];
    self.textField2.center = CGPointMake(self.view.center.x, self.view.center.y + 50);
    self.textField2.borderStyle = UITextBorderStyleRoundedRect;
    self.textField2.placeholder = @"valueFromThirdView";
    [self.view addSubview: self.textField2];

    UITapGestureRecognizer* tapGesture = [[UITapGestureRecognizer alloc] initWithTarget: self action: @selector(pushSecondController)];
    [self.view addGestureRecognizer: tapGesture];

}

- (void)pushSecondController {
    self.secondViewController = [[SecondViewController alloc] init];
    //注册观察者
    [self.secondViewController addObserver: self forKeyPath: @"string" options: NSKeyValueObservingOptionNew | NSKeyValueObservingOptionOld context: nil];

    [self.navigationController pushViewController: self.secondViewController animated: YES];
}
option分为四个类型:

二、 继续在第一个页面中实现observeValueForKeyPath:ofObject:change:context:方法
当被观察的keyPath属性发生改变时,观察者对象会收到observeValueForKeyPath:ofObject:change:context:回调方法(每改变一次,此方法就被回调一次),可以在该方法中处理属性变化的逻辑
//监听方法
/*
 keyPath:观察的属性
 object:观察的是哪个对象的属性
 change:这是一个字典类型的值,通过键值对显示新的属性值和旧的属性值
 context:上面添加观察者时携带的信息
 */
- (void)observeValueForKeyPath:(NSString *)keyPath ofObject:(id)object change:(NSDictionary<NSKeyValueChangeKey,id> *)change context:(void *)context {
    if ([keyPath isEqualToString: @"string"]) {
        self.textField.text = change[@"new"];
        NSLog(@"%@ %@ %@", change, object, keyPath);
    }
}
三、 当观察者不需要监听时,可以调用removeObserver:forKeyPath:方法移除观察者
和通知中心一样,减少内存多余的占用
- (void)dealloc {
    [self.secondViewController removeObserver: self forKeyPath: @"string"];
}

Block传值
有关Block块的基本使用,请参考这篇文章:
Block传值也是从第二个界面传给第一个界面
SecondViewController.h
在第二个界面的头文件中定义一个带有回调Block的属性
@interface SecondViewController : UIViewController <UITextFieldDelegate>

@property (nonatomic, strong)UITextField* textField;
@property (nonatomic, copy) void(^stringBlock)(NSString* string);

@end
SecondViewController.m
当需要传递textField的文本时,调用回调Block
- (void)textFieldDidChangeSelection:(UITextField *)textField {
    if (self.stringBlock) {
        self.stringBlock(textField.text);
    }
}
FirstViewController.m
当呈现第二个界面时,实现第二个界面的回调Block
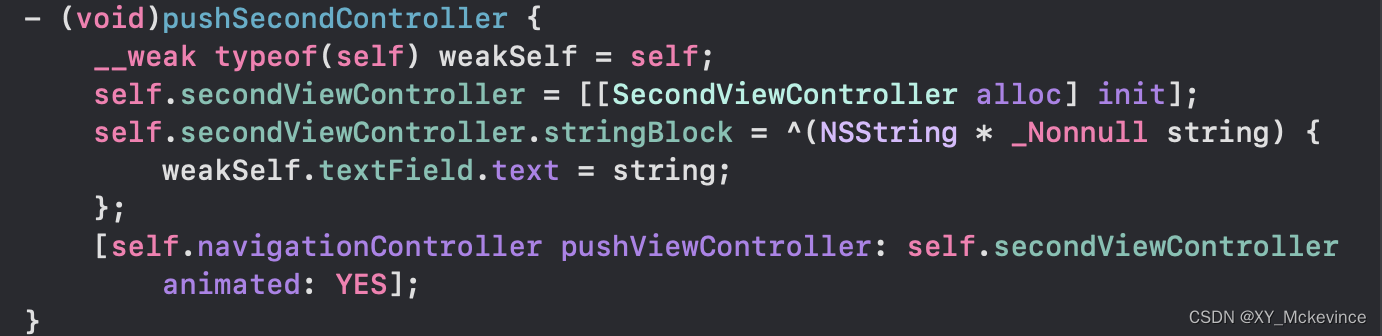
- (void)pushSecondController {
    self.secondViewController = [[SecondViewController alloc] init];
    self.secondViewController.stringBlock = ^(NSString * _Nonnull string) {
        self.textField.text = string;
    };
    [self.navigationController pushViewController: self.secondViewController animated: YES];
}
这样,当从第二个界面返回到第一个界面时,第一个界面的textField文本会被更新为第二个界面的textField文本
编者在使用Block传值时,遇到了以下提示,意味着在一个Block中强引用了当前类的实例变量self,这可能导致循环引用(retain cycle)的问题:
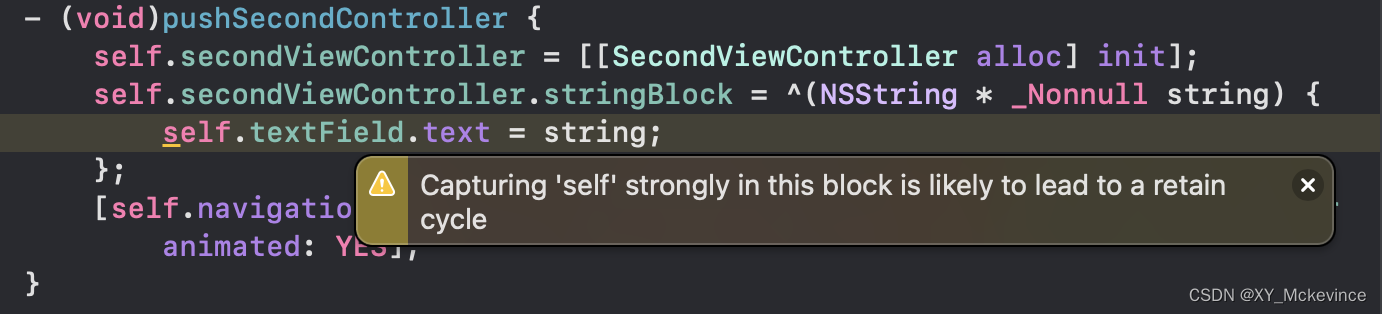
Objective-C 或 Swift 的内存管理中,当一个对象持有对自身的强引用并且同时被其他对象持有时,就会形成循环引用,导致对象无法被释放,从而造成内存泄漏
可以在 Block 内部使用__weak或__block来弱引用当前类的实例,从而避免循环引用:
__weak typeof(self) weakSelf = self;
这样Xcode就不会有提示了:
标题编者目前仅对循环引用作以简单了解,有关更深层的原理以后会学习,如果读者们对编者有什么学习上的建议,非常欢迎你们能指出!!🙏
五大传值的比较
下面是对比属性传值、代理传值(委托)、通知传值、KVO传值和Block传值使用情况的简要说明:
- 属性传值适用于简单的单向传值
- 代理传值适用于对象之间有交互和回调的情况
- 通知传值适用于多个对象之间的松散耦合传值
- KVO传值适用于监听对象属性的变化
- Block传值则适用于需要传递一段可执行代码且相对独立的情况
这些传值方式各有适用的场景,选择合适的方式取决于具体的需求和架构设计
单例传值
最后编者简单学习了单例传值,仅作以记录!
单例是一种只允许创建一个实例的类并提供一个全局访问点
开发中,单例传值可以在应用程序的不同部分共享数据
创建一个单例类 DataManager:
@interface DataManager : NSObject

//用来存储要传递的值
@property (nonatomic, strong)NSString *data;

+ (instancetype)sharedManager;

@end

@implementation DataManager

+ (instancetype)sharedManager {
    static DataManager *sharedInstance;
    static dispatch_once_t onceToken;
    dispatch_once(&onceToken, ^{
        sharedInstance = [[DataManager alloc] init];
    });
    return sharedInstance;
}

@end
在 DataManager 中,我们使用了 GCD 的 dispatch_once 函数来确保只有一个实例被创建(有关单例模式的实现方法请见这篇文章:【Objective-C】单例模式)
发送方类PostClass
通过 sharedManager 方法获取到单例对象,并将值传递给ta:
- (void)postValue: (NSString *)value {
    self.valueToPost = value;
    DataManager* sharedManager = [DataManager sharedManager];
    sharedManager.data = self.valueToPost;
}
接收方类RecieveClass
通过 sharedManager 方法获取到单例对象,并读取传递的值:
- (void)recieveValue {
    DataManager* sharedManager = [DataManager sharedManager];
    self.valueToRecieve = sharedManager.data;
    NSLog(@"%@", self.valueToRecieve);
}
main函数:
int main(int argc, const char * argv[]) {
    @autoreleasepool {
        PostClass* postClass = [[PostClass alloc] init];
        [postClass postValue: @"Singleton Pattern"];

        RecieveClass* recieveClass = [[RecieveClass alloc] init];
        [recieveClass recieveValue];
    }
    return 0;
}

【Github源码】:单例传值测试
这种方式可以在整个应用程序中共享数据,并且不需要手动传递值到每个类中,简化了数值传递的过程


 265
265


 被折叠的 条评论
为什么被折叠?
被折叠的 条评论
为什么被折叠?
 到【灌水乐园】发言


