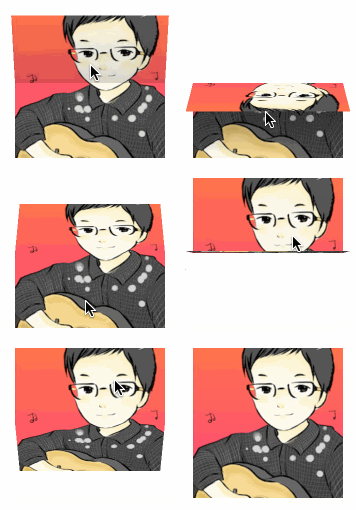
在进入正文前,想说明些事,之前写博客的目的主要是给自己做个笔记,方便以后的回顾。所以,有些博客没有写出处。我最近的关于动画交互的博客,大都是从这个博客(杨骑滔博客地址)上学习到的。他还是个学生,但是却立志要做出最棒的用户交互,博主真心佩服。
我的博客中是自己对实践过程的体会和一些总结,但由于博主才疏学浅,如果读者不是很明白可以到他的博客上学习。以后每篇文章都会贴出链接。这篇的链接

这就是要实现的效果。很炫吧!那我们就来看看是如何实现的吧。
1. 使用2个imageView,拼成一张整图。
2. 修改2个imageView的图层锚点和position,上半张锚点是(0.5, 1),下半张锚点是(0.5, 0)。此处锚点决定了旋转时不动轴的位置。(锚点和position的作用看这里)
3. 做好以上准备后,给每个imageView添加拖拽手势,然后只需要根据手势移动的距离修改旋转角度即可。(做3D旋转实现的方式很多,这里用POP动画框架来完成。)
4. 以上都很容易实现和想到,整个程序最关键的地方是手势移动距离和旋转角度之间的关系是如何建立的呢?
将手指刚触摸到屏幕的点 到 边界(如果向上划指上边界,向下划指下边界)处的y轴距离记为distanceY;
用该值平分180°记为percent,表示每移动1个单位,转动的角度为M_PI / distanceY;
那么手指移动的y轴距离乘以percent,就是图片该转得角度。
5. 为了更真实模仿折叠过程中的阴影效果,在2个imageView身上各加了个CAGradientLayer,通过改变图层的透明度,达到阴影加深的效果。
大致过程就是这样。接下来看代码:
topImageView的设置
    UIImageView *topView = [[UIImageView alloc] initWithFrame:CGRectMake(0, 0, CGRectGetWidth(self.bounds), CGRectGetHeight(self.bounds) * 0.5)];
    topView.image = [self cutImageWithTag:@"top"];
    topView.userInteractionEnabled = YES;
    [self addSubview:topView];
    self.topView = topView;

    // 设置layer层
    // 1. 锚点(0.5,1)和position。
    /*position指的是视图锚点在其父视图中的坐标.默认值是锚点为(0.5,0.5)时,即视图center在父视图中的坐标。*/
    topView.layer.anchorPoint = CGPointMake(0.5, 1);
    topView.layer.position = CGPointMake(CGRectGetMidX(self.bounds), CGRectGetMidY(self.bounds));
    // 正交矩阵转透视矩阵
    topView.layer.transform = [topView setTransform3D];

    // 设置阴影层
    CAGradientLayer *topShadowLayer = [CAGradientLayer layer];
    topShadowLayer.frame = self.topView.bounds;
    topShadowLayer.colors = @[(__bridge id)[UIColor clearColor].CGColor, (__bridge id)[UIColor blackColor].CGColor];
    topShadowLayer.opacity = 0.0f;
    [self.topView.layer addSublayer:topShadowLayer];
self.topShadowLayer = topShadowLayer;- 由于topView只需要显示半张图片,所以需要将image的上半张挖取出来,见下面的方法。
- 注意设置imageView的锚点和position。
- 由于系统使用的是正交矩阵,为了有3D效果,我们需要将其变为透视矩阵。
// 挖取图片
- (UIImage *)cutImageWithTag:(NSString *)tag
{
    CGSize imageSize = self.image.size;
    CGRect rect = CGRectMake(0, 0, imageSize.width, imageSize.height * 0.5);

    if ([tag isEqualToString:@"bottom"]) {
        rect.origin.y = imageSize.height * 0.5;
    }

    // 按照范围挖取图片
    CGImageRef imageRef = CGImageCreateWithImageInRect(self.image.CGImage, rect);
    return [UIImage imageWithCGImage:imageRef];
}

// 转换矩阵
- (CATransform3D)setTransform3D
{
    //如果不设置这个值,无论转多少角度都不会有3D效果
    CATransform3D transform = CATransform3DIdentity;
    transform.m34 = 2.5/-2000;
    return transform;
}
topView手势事件
    CGPoint location = [recognizer locationInView:self];

    /*
        对于topView, 手势移动y轴距离和旋转的角度之间的关系:
        手指在pageView内可连续向下移动的最大y轴距离,用该值将180°平分(该值记为percent)。用perce乘上手指移动距离就为旋转角度。
     */

    // 1. 记录初始y值并将图片带到最上层
    if (recognizer.state == UIGestureRecognizerStateBegan) {
        self.startY = location.y;
        [self bringSubviewToFront:self.topView];
    }

    // 2. 判断触摸点是否在pageView内
    if ([self isLocation:location inView:self]) {
        // 阴影动画
        [self top_shadowAnimationWithLocation:location];

        // 计算转动角度
        CGFloat percent = - M_PI / (CGRectGetHeight(self.bounds) - self.startY);
        CGFloat progress = percent * (location.y - self.startY);

        if (recognizer.state == UIGestureRecognizerStateChanged)
        {
            POPBasicAnimation *rotationAnim = [POPBasicAnimation animationWithPropertyNamed:kPOPLayerRotationX];
            rotationAnim.duration = 0.01;
            rotationAnim.toValue = @(progress);
            [self.topView.layer pop_addAnimation:rotationAnim forKey:@"topViewAnimation"];
        }
        else if (recognizer.state == UIGestureRecognizerStateEnded || recognizer.state == UIGestureRecognizerStateCancelled)
        {
            POPSpringAnimation *recoverAnim = [POPSpringAnimation animationWithPropertyNamed:kPOPLayerRotationX];
            recoverAnim.springBounciness = 18.0f;
            recoverAnim.dynamicsMass = 2.0f;
            recoverAnim.dynamicsTension = 200;
            recoverAnim.toValue = @0;
            [self.topView.layer pop_addAnimation:recoverAnim forKey:@"recoverAnimation"];
            self.topShadowLayer.opacity = 0;
            self.bottomShadowLayer.opacity = 0;
        }

    } else { // 超出触摸范围
        recognizer.enabled = NO;
        POPSpringAnimation *recoverAnim = [POPSpringAnimation animationWithPropertyNamed:kPOPLayerRotationX];
        recoverAnim.springBounciness = 18.0f;
        recoverAnim.dynamicsMass = 2.0f;
        recoverAnim.dynamicsTension = 200;
        recoverAnim.toValue = @0;
        [self.topView.layer pop_addAnimation:recoverAnim forKey:@"recoverAnimation"];
        self.topShadowLayer.opacity = 0;
        self.bottomShadowLayer.opacity = 0;
    }

    recognizer.enabled = YES;
- 首先,根据现实世界中的情况,手指移动超过了图片的四周,折叠效果终止,图片返回最初状态。所以,才有触摸点是否在图片内的判断。
- 手指出界后,手势要结束,也即是手势方法不再被调用。所以,要将手势的enable置为No。
- startY是用于记录手指的初始位置。用于计算手指移动的距离。
- 注意,由于topView是逆时针转动,所以转动角度是负值。
- 阴影效果,参照光源在上方的情况所做。在向下折叠没有超过90°时,俩张图都会有阴影。向下折叠超过90°时,上面图片的背面完全在光照下,不会有阴影,但是下面图片被遮住,阴影越来越深。如果想象不出来,自己开灯试下就清楚了。代码如下:
阴影动画
- (void)top_shadowAnimationWithLocation:(CGPoint)location
{
    CGFloat percent0 = 1 / (CGRectGetHeight(self.bounds) - self.startY);
    CGFloat progress0 = percent0 * (location.y - self.startY);
    if ([[self.topView.layer valueForKeyPath:@"transform.rotation.x"] floatValue] > - M_PI_2) {
        self.bottomShadowLayer.opacity = progress0;
        self.topShadowLayer.opacity = progress0;
    } else {
        self.bottomShadowLayer.opacity = progress0;
        self.topShadowLayer.opacity = 0.0f;
    }
}


 5712
5712

 被折叠的 条评论
为什么被折叠?


