


因为最近在实习过程中,需要学习jpa框架,所以在学习后,简单总结一下 spring boot 和 spring data jpa的整合。 因为之前学习了一下 spring boot ,所以这次就将二者整合一下,也是实践一下spring boot吧
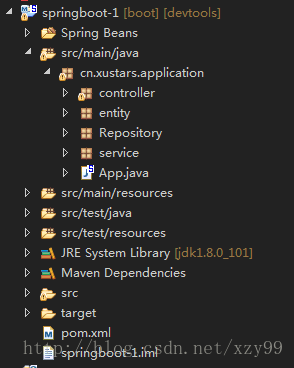
项目整体结构截图
首先贴出最最基本的pom文件
<project xmlns="http://maven.apache.org/POM/4.0.0" xmlns:xsi="http://www.w3.org/2001/XMLSchema-instance" xsi:schemaLocation="http://maven.apache.org/POM/4.0.0 http://maven.apache.org/xsd/maven-4.0.0.xsd">
  <modelVersion>4.0.0</modelVersion>
  <groupId>cn.xustars</groupId>
  <artifactId>springboot-1</artifactId>
  <version>0.0.1-SNAPSHOT</version>
  <parent>
    <groupId>org.springframework.boot</groupId>
    <artifactId>spring-boot-starter-parent</artifactId>
    <version>1.5.2.RELEASE</version>
  </parent>


  <dependencies>
    <dependency>
        <groupId>org.springframework.boot</groupId>
        <artifactId>spring-boot-starter-web</artifactId>
    </dependency>

    <!-- freemarker的依赖配置信息 -->
    <dependency>
           <groupId>org.springframework.boot</groupId>
           <artifactId>spring-boot-starter-freemarker</artifactId>
    </dependency>
    <dependency>
        <groupId>org.springframework.boot</groupId>
        <artifactId>spring-boot-devtools</artifactId>
        <optional>true</optional>
    </dependency>
    <dependency>
      <groupId>mysql</groupId>
      <artifactId>mysql-connector-java</artifactId>
    </dependency>

    <dependency>
      <groupId>org.springframework.boot</groupId>
      <artifactId>spring-boot-starter-data-jpa</artifactId>
    </dependency>


  </dependencies>

  <build>
    <plugins>
       <plugin>
           <groupId>org.springframework.boot</groupId>
           <artifactId>spring-boot-maven-plugin</artifactId>
           <configuration>
               <fork>true</fork>
           </configuration>
       </plugin>
    </plugins>
  </build>
</project>
spring boot 强调的是约束大于配置,所以相比传统的ssm ,ssh等,配置文件少了许多,这也是spring boot很大的优势吧,下面就是项目中唯一的配置文件 application.properties ,主要用到的是 数据库的配置
########################################################
###server \u914d\u7f6e\u4fe1\u606f.
########################################################
#spring boot\u9ed8\u8ba4\u7aef\u53e3\u53f7\u662f8080
#server.port = 8081
#spring boot\u9ed8\u8ba4\u7684context-path \u662f /
#server.context-path = /springboot

#server.port=8080
#server.address= # bind to a specific NIC
#server.session-timeout= # session timeout in seconds
#the context path, defaults to '/'
#server.context-path=/spring-boot
#server.servlet-path= # the servlet path, defaults to '/'
#server.tomcat.access-log-pattern= # log pattern of the access log
#server.tomcat.access-log-enabled=false # is access logging enabled
#server.tomcat.protocol-header=x-forwarded-proto # ssl forward headers
#server.tomcat.remote-ip-header=x-forwarded-for
#server.tomcat.basedir=/tmp # base dir (usually not needed, defaults to tmp)
#server.tomcat.background-processor-delay=30; # in seconds
#server.tomcat.max-threads = 0 # number of threads in protocol handler
#server.tomcat.uri-encoding = UTF-8 # character encoding to use for URL decoding


########################################################
###THYMELEAF (ThymeleafAutoConfiguration)
########################################################
#spring.thymeleaf.prefix=classpath:/templates/
#spring.thymeleaf.suffix=.html
#spring.thymeleaf.mode=HTML5
#spring.thymeleaf.encoding=UTF-8
# ;charset=<encoding> is added
#spring.thymeleaf.content-type=text/html
# set to false for hot refresh
#\u5f00\u53d1\u8fc7\u7a0b\u5efa\u8bae\u5173\u95ed\u7f13\u5b58.
spring.thymeleaf.cache=false


########################################################
###FREEMARKER (FreeMarkerAutoConfiguration)
########################################################
spring.freemarker.allow-request-override=false
spring.freemarker.cache=false
spring.freemarker.check-template-location=true
spring.freemarker.charset=UTF-8
spring.freemarker.content-type=text/html
spring.freemarker.expose-request-attributes=false
spring.freemarker.expose-session-attributes=false
spring.freemarker.expose-spring-macro-helpers=false
#spring.freemarker.prefix=
#spring.freemarker.request-context-attribute=
#spring.freemarker.settings.*=
spring.freemarker.suffix=.ftl
#spring.freemarker.template-loader-path=classpath:/templates/ #comma-separated list
#spring.freemarker.view-names= # whitelist of view names that can be resolved


########################################################
###datasource -- \u6307\u5b9amysql\u6570\u636e\u5e93\u8fde\u63a5\u4fe1\u606f.
########################################################
spring.datasource.url = jdbc:mysql://localhost:3306/spring-boot
spring.datasource.username = root
spring.datasource.password = 123456
spring.datasource.driverClassName = com.mysql.jdbc.Driver
spring.datasource.max-active=20
spring.datasource.max-idle=8
spring.datasource.min-idle=8
spring.datasource.initial-size=10


########################################################
### Java Persistence Api --  Spring jpa\u7684\u914d\u7f6e\u4fe1\u606f.
########################################################
# Specify the DBMS
spring.jpa.database = MYSQL
# Show or not log for each sql query
spring.jpa.show-sql = true
# Hibernate ddl auto (create, create-drop, update)
spring.jpa.hibernate.ddl-auto = update
# Naming strategy
#[org.hibernate.cfg.ImprovedNamingStrategy  #org.hibernate.cfg.DefaultNamingStrategy]
spring.jpa.hibernate.naming-strategy = org.hibernate.cfg.ImprovedNamingStrategy
# stripped before adding them to the entity manager)
spring.jpa.properties.hibernate.dialect = org.hibernate.dialect.MySQL5Dialect
接着看代码,下面是实体类的配置,通过注释和数据表进行映射,因为仅仅是用来整合测试的,所以就只建了一个实体类
package cn.xustars.application.entity;

import javax.persistence.Cacheable;
import javax.persistence.Entity;
import javax.persistence.GeneratedValue;
import javax.persistence.Id;
import javax.persistence.Table;


@Table(name = "student")
@Entity
@Cacheable
public class Student {
    private Integer id;
    private String name;
    private Integer age;
    private String password;

    public Student() {
        super();
    }

    public Student(Integer id, String name, Integer age, String password) {
        super();
        this.id = id;
        this.name = name;
        this.age = age;
        this.password = password;
    }

    @Id
    @GeneratedValue
    public Integer getId() {
        return id;
    }

    public void setId(Integer id) {
        this.id = id;
    }

    public String getName() {
        return name;
    }

    public void setName(String name) {
        this.name = name;
    }

    public Integer getAge() {
        return age;
    }

    public void setAge(Integer age) {
        this.age = age;
    }

    public String getPassword() {
        return password;
    }

    public void setPassword(String password) {
        this.password = password;
    }

}
下面是dao层的代码,这也是jpa与其他持久层框架不同的地方
package cn.xustars.application.Repository;

import java.util.List;

import org.springframework.data.jpa.repository.Query;
import org.springframework.data.repository.PagingAndSortingRepository;

import cn.xustars.application.entity.Student;

public interface StudnetRepository extends PagingAndSortingRepository<Student, Integer>{

    @Query("from Student")
    public List<Student> getAll();

    @Query("from Student where id=:id")
    public Student getById(Integer id);
}
sql语句可以通过@Query的注释来自己定义,上面两条语句,其实jpa中都有封装好的方法,分别是 findOne() 和findAll(),这里我只是想说明@Query的用法,所以重新写了这两个方法,实际项目中可以直接调用相关方法
下面是service层的相关代码
package cn.xustars.application.service;

import java.util.List;

import javax.annotation.Resource;
import javax.transaction.Transactional;

import org.springframework.stereotype.Service;

import cn.xustars.application.Repository.StudnetRepository;
import cn.xustars.application.entity.Student;

@Service
public class StudentService {

    @Resource
    private StudnetRepository studnetRepository;

    @Transactional
    public List<Student> getAll(){
        return studnetRepository.getAll();
    }

    @Transactional
    public Student getById(Integer id){
        return studnetRepository.getById(id);
    }

    @Transactional
    public void save(){
        Student student = new Student(3,"daf",21,"sdfads");
        studnetRepository.save(student);
    }

}
controller层代码
package cn.xustars.application.controller;

import java.util.List;

import org.springframework.beans.factory.annotation.Autowired;
import org.springframework.web.bind.annotation.RequestMapping;
import org.springframework.web.bind.annotation.RestController;
import org.springframework.web.servlet.ModelAndView;

import cn.xustars.application.entity.Student;
import cn.xustars.application.service.StudentService;

@RestController
public class StudentController {

    @Autowired
    private String save;

    @Autowired
    private StudentService studentService;

    @RequestMapping("/getAll")
    public Iterable<Student> queryList(){
        List<Student> studentList = studentService.getAll();
        return studentList;
    }

    @RequestMapping("/getById")
    public Student queryById(Integer id){
        Student student = studentService.getById(id);
        return student;
    }

    @RequestMapping("/save")
    public String save(){
        studentService.save();
        return save;
    }
}
注意这里用的注解是@RestController,而不是我们以前经常用的@Controller,前者主要是多了一个功能,就是相当于在此Controller中的所有方法上加了一个@ResponseBody 注解,适合spring boot 的 restful 风格,所以@RestController也是spring boot中比较常用的
最后是spring boot 的程序入口,也可以叫主程序,贴上代码
package cn.xustars.application;

import org.springframework.boot.SpringApplication;
import org.springframework.boot.autoconfigure.SpringBootApplication;

@SpringBootApplication
public class App {

    public static void main(String[] args) throws Exception {
        SpringApplication.run(App.class, args);
    }

}
至此,spring boot 和 spring data jpa的整合也就完成了.


 910
910

 被折叠的 条评论
为什么被折叠?
被折叠的 条评论
为什么被折叠?
 到【灌水乐园】发言


