


第一步:创建一个基础项目第二步:创建写接口的模块,建立moogodb数据库连接,写添加与查询接口第三步:加入Swagger文档第四步:加入请求参数校验
-
注:不要关心注释代码,那是属于后面功能的区域。因为随着代码体量加大,功能不再明确,只需按照步骤并参考效果图,把关键代码写入即可,所以下只写关键代码,具体请看效果图。项目地址
1 解决跨域问题
npm i cors1.1 将cros挂到全局中间件上
~/src/app.module.ts

import { Module, MiddlewareConsumer, NestModule } from '@nestjs/common';
// 跨域
import * as cors from 'cors';

// 定义中间件
export class AppModule implements NestModule {
  configure(consumer: MiddlewareConsumer) {
    consumer
      // 解决跨域的问题的全局中间件
      .apply(cors()).forRoutes('*')
      // 验证token的全局中间件
      // .apply(JwtExpiredMiddleware).forRoutes('*')
  }
}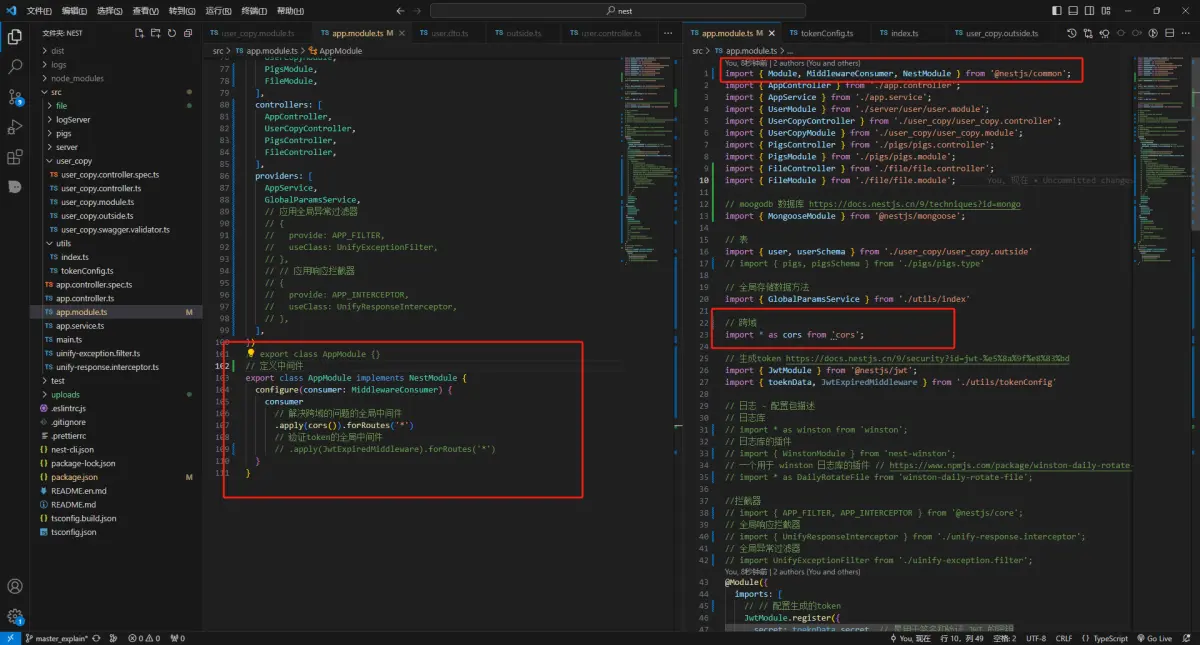
效果图
2 生成token,校验token
2.3 生成token
// 生成token https://docs.nestjs.cn/9/security?id=jwt-%e5%8a%9f%e8%83%bd
import { JwtService } from '@nestjs/jwt';

  // Swagger标签
  @ApiTags('有Swagger文档/开启请求参数校验/Token')
  // 请求方式:Post, 请求路径:/user-copy/queryToken
  @Post('queryToken')
  // @Body() 装饰器
  async queryToken(@Body() body: userResponsesValidator) {
    // 存储参数到全局
    this.globalParamsService.setParam('globalToken', body);
    return {
      // 对参数进行签名  生成token -- 正常来说肯定是要去库里查这个账号存不存在的 -- 由于是示例代码  就不写那么麻烦了 -- 不然忘了账号又得再注册一个
      access_token: this.jwtService.sign({ user_name: body.user_name, password: body.password }),
    };
  }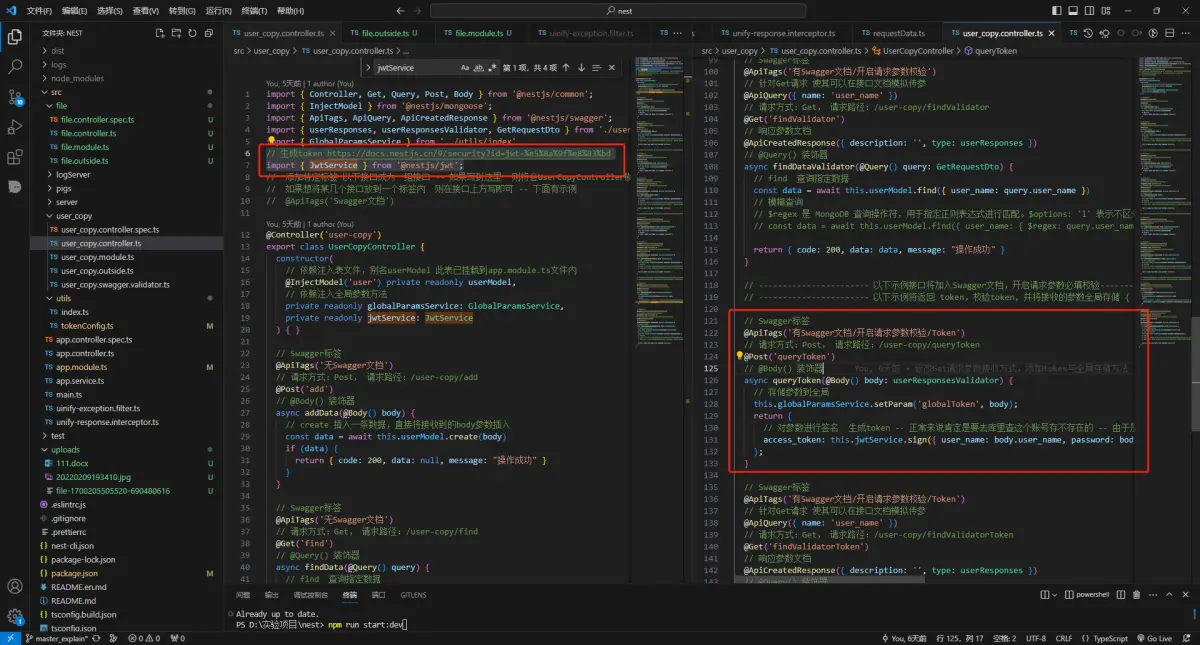
效果图
2.2 创建token配置文件
npm i @nestjs/jwt jsonwebtoken~/src/utils/tokenConfig.ts
import { Injectable, NestMiddleware } from '@nestjs/common';
import { Request, Response, NextFunction } from 'express';
// npm i jsonwebtoken
import * as jwt from 'jsonwebtoken';
interface JwtPayload {
exp: number;
// 其他 JWT 载荷属性
}
// 定义token的签名与超时时间
export const toeknData = {
secret: "tokenKey", // 密匙
expiresIn:"60s", // 超时时间60秒
}
@Injectable()
export class JwtExpiredMiddleware implements NestMiddleware {
use(req: Request, res: Response, next: NextFunction) {
// 一般来说 可能会以正则去匹配白名单接口 - 大部分情况下,只会有极个别的接口会是白名单 - 由于是示例 就直接写死了
// 如果 请求地址不为 /user-copy/findValidatorToken 则直接跳过
if (req.baseUrl !== '/user-copy/findValidatorToken') return next()
const token = req.headers.authorization?.split(' ')[1]; // 从请求头中获取 JWT
if (token) {
try {
// 解码
const decoded = jwt.verify(token, toeknData.secret) as JwtPayload;
// 接收到JWT后执行的逻辑
// 当前时间戳
// const currentTime = Math.floor(Date.now() / 1000);
// decoded.exp 是解码后的 JWT 中的过期时间,表示该令牌的有效期截止时间。
// decoded.iat 是解码后的 JWT 中的签发时间,表示该令牌的生成时间。
// 比较当前时间是否已经超出令牌有效期截至时间
// if (decoded.exp < currentTime) {
// // JWT 已经超时
// // 执行相应的逻辑
// return res.send({ status: 99998, data: [], message: '登录超时' });
// }
} catch (error) {
// JWT 验证失败
// 执行相应的逻辑
return res.send({ status: 99998, data: error, message: '认证失败' });
}
} else {
// token认证失败
// 执行相应的逻辑
return res.send({ status: 99999, data: 'token in required', message: '认证失败' });
}
next();
}
}2.3 引入并配置生成token规则, 并挂载到全局中间件
~/src/app.module.ts

// npm i @nestjs/jwt
// 生成token https://docs.nestjs.cn/9/security?id=jwt-%e5%8a%9f%e8%83%bd
import { JwtModule } from '@nestjs/jwt';
import { toeknData, JwtExpiredMiddleware } from './utils/tokenConfig'

// 配置生成的token
  imports: [
    JwtModule.register({
      secret: toeknData.secret, // 是用于签名和验证 JWT 的密钥
      signOptions: { expiresIn: toeknData.expiresIn }, // JWT 的过期时间。
    }),
  ]

// 定义中间件
export class AppModule implements NestModule {
  configure(consumer: MiddlewareConsumer) {
    consumer
      // 解决跨域的问题的全局中间件
      .apply(cors()).forRoutes('*')
      // 验证token的全局中间件
      .apply(JwtExpiredMiddleware).forRoutes('*')
  }
}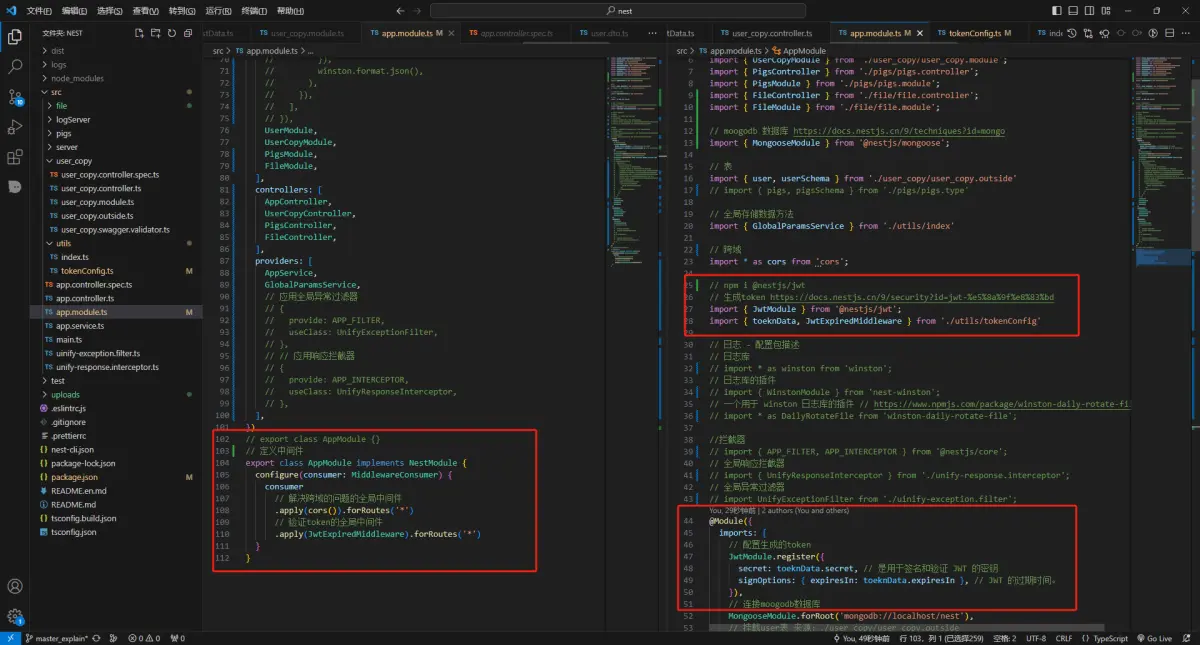
效果图
3 测试效果
3.1 生成token接口
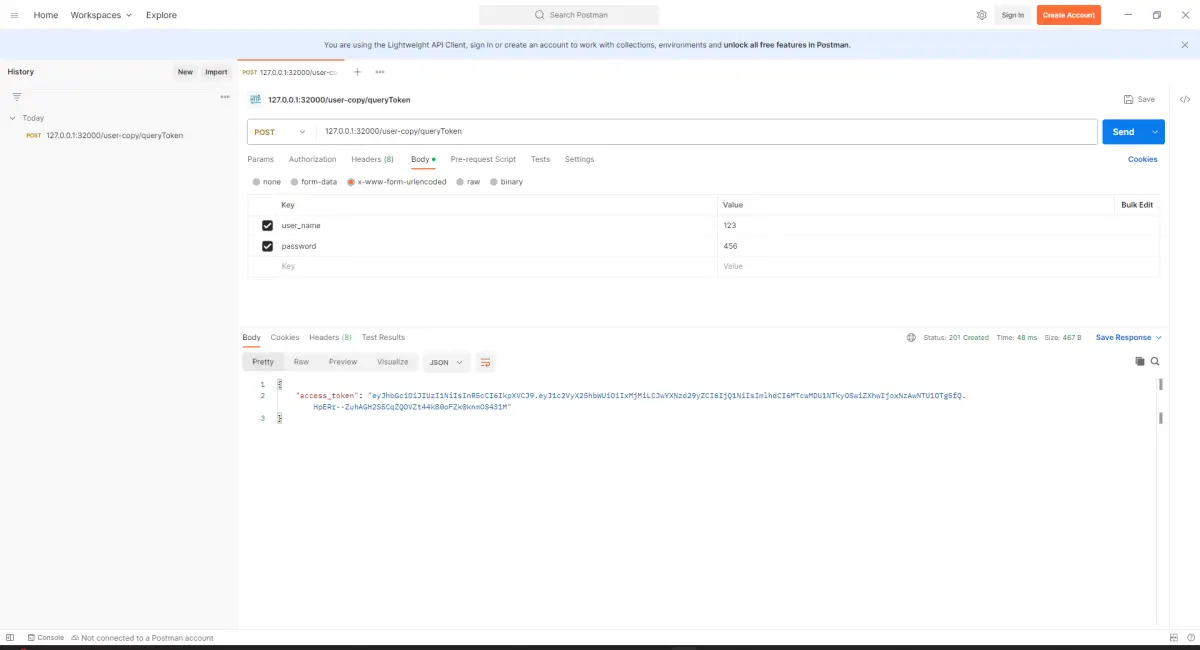
效果图
3.2 不传token
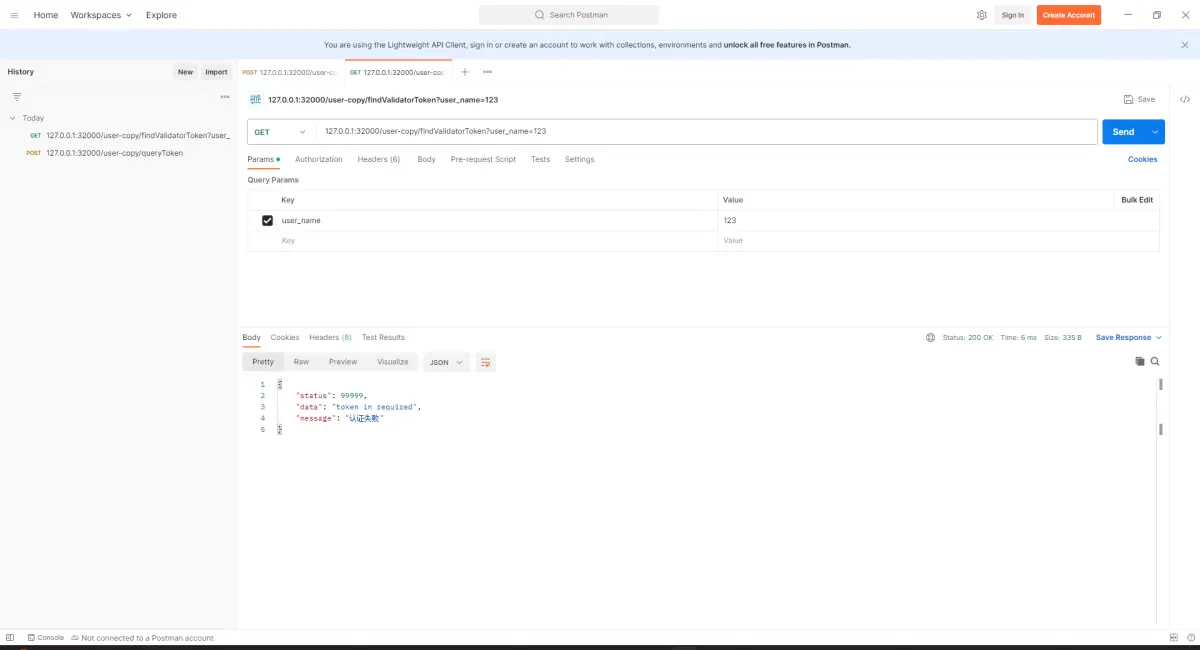
效果图
3.3 传token
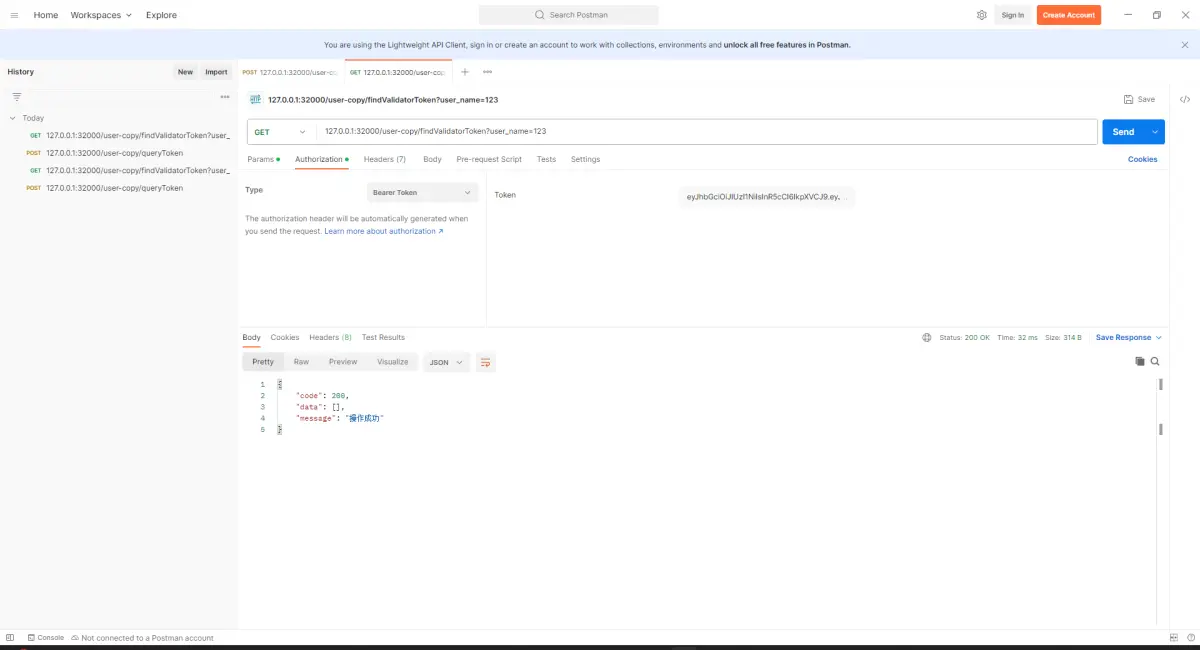
效果图
token失败错误/token过期
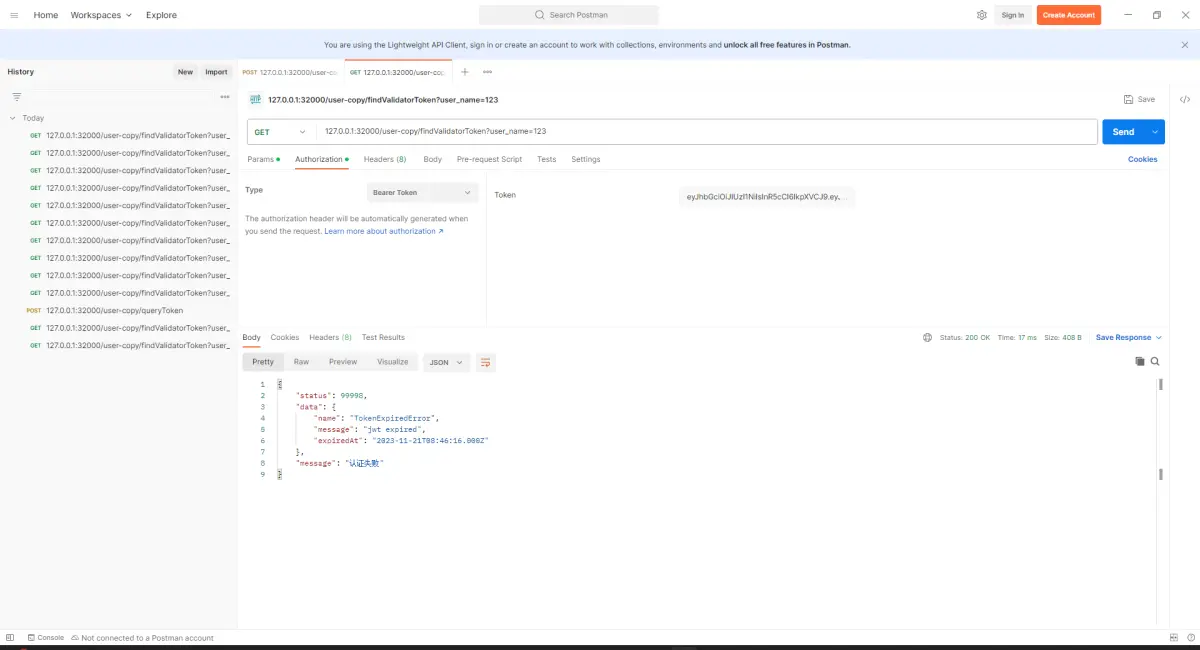
效果图


 被折叠的 条评论
为什么被折叠?
被折叠的 条评论
为什么被折叠?
 到【灌水乐园】发言


