


Auto Layout(NSLayoutConstraint)
2 常量
3 实战演练
在IPhone 6出来之后,作为开发人员不得不考虑一件事了,那就是屏幕适配。曾经这是安卓开发人员头疼的事,现在也让苹果开发人员头疼了。
苹果基于不同屏幕的考虑,支持大家去做兼容性开发。所使用的类是NSLayoutConstraint,这帮助我们在基于不同的屏幕使用同一套UI。
1 NSLayoutConstraint
NSLayoutConstraint就是我们屏幕适配的核心类,你可以通过动态修改它内部数据以达到修改UI的目的。
1.1 创建约束
// 连续创建多个约束
public class func constraintsWithVisualFormat(format: String, options opts: NSLayoutFormatOptions, metrics: [String : AnyObject]?, views: [String : AnyObject]) -> [NSLayoutConstraint]

// 基于两个View创建约束,也可以约束一个View的宽、高
public convenience init(item view1: AnyObject, attribute attr1: NSLayoutAttribute, relatedBy relation: NSLayoutRelation, toItem view2: AnyObject?, attribute attr2: NSLayoutAttribute, multiplier: CGFloat, constant c: CGFloat)
在UI上,创建约束的规则有两点:
- 左边的View对应view1,右边的View对应view2;
- 下面的View对应View1,上面的View对应View2。
口诀就是:前右下后左上
生成约束的公式是:
firstItem.firstAttribute {==,<=,>=} secondItem.secondAttribute * multiplier + constant1.2 启用和禁用约束
// 启用约束
public var active: Bool

// 启用多个约束
public class func activateConstraints(constraints: [NSLayoutConstraint])

// 禁用多个约束
public class func deactivateConstraints(constraints: [NSLayoutConstraint])
1.3 访问约束数据
// 约束的优先级
public var priority: UILayoutPriority
// 左或上View
unowned(unsafe) public var firstItem: AnyObject { get }
// firstItem对应的约束属性
public var firstAttribute: NSLayoutAttribute { get }
// 两个约束的关系{==,<=,>=}
public var relation: NSLayoutRelation { get }
// 右或下View
unowned(unsafe) public var secondItem: AnyObject? { get }
// secondItem对应的约束属性
public var secondAttribute: NSLayoutAttribute { get }
// 比较级,默认1.0
public var multiplier: CGFloat { get }
// 约束条件下的常量位移
public var constant: CGFloat
1.4 识别约束
// 约束的唯一标示
public var identifier: String?
1.5 控制约束归档
// 约束是否归档
public var shouldBeArchived: Bool
2 常量
2.1 NSLayoutRelation
public enum NSLayoutRelation : Int {
    case LessThanOrEqual
    case Equal
    case GreaterThanOrEqual
}
2.2 NSLayoutAttribute
public enum NSLayoutAttribute : Int {

    case Left
    case Right
    case Top
    case Bottom
    case Leading
    case Trailing
    case Width
    case Height
    case CenterX
    case CenterY
    case Baseline
    public static var LastBaseline: NSLayoutAttribute { get }
    @available(iOS 8.0, *)
    case FirstBaseline

    @available(iOS 8.0, *)
    case LeftMargin
    @available(iOS 8.0, *)
    case RightMargin
    @available(iOS 8.0, *)
    case TopMargin
    @available(iOS 8.0, *)
    case BottomMargin
    @available(iOS 8.0, *)
    case LeadingMargin
    @available(iOS 8.0, *)
    case TrailingMargin
    @available(iOS 8.0, *)
    case CenterXWithinMargins
    @available(iOS 8.0, *)
    case CenterYWithinMargins

    case NotAnAttribute
}
3 实战演练
3.1 效果图模型
我们要实现如下效果图。
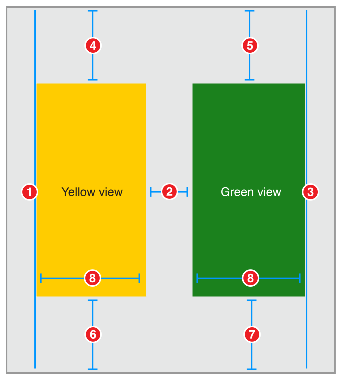
一个黄View和一个绿View在不同的屏幕上显示同样的效果。
通过观察我们写出如下伪代码。
- Yellow View.Leading = Superview.LeadingMargin
- Green View.Leading = Yellow View.Trailing + 30.0
- Green View.Trailing = Superview.TrailingMargin
- Yellow View.Top = Top Layout Guide.Bottom + 20.0
- Green View.Top = Top Layout Guide.Bottom + 20.0
- Bottom Layout Guide.Top = Yellow View.Bottom + 20.0
- Bottom Layout Guide.Top = Green View.Bottom + 20.0
- Yellow View.Width = Green View.Width
3.2 代码实现
在代码实现的时候,UIView是默认禁止约束的,你要通过。
public var translatesAutoresizingMaskIntoConstraints: Bool // Default YES将该属性设为false时,则代表启用约束。
下面是核心代码的实现。
//
// YJAutoLayoutAnchorVC.swift
// UI
//
// CSDN:http://blog.csdn.net/y550918116j
// GitHub:https://github.com/937447974/Blog
//
// Created by yangjun on 15/12/18.
// Copyright © 2015年 阳君. All rights reserved.
//
import UIKit
/// NSLayoutAnchor 是IOS9推出的,优化NSLayoutConstraint
class YJAutoLayoutAnchorVC: UIViewController {
override func viewDidLoad() {
super.viewDidLoad()
// 1 添加View
// 黄View
let yellowView = UIView()
yellowView.backgroundColor = UIColor.yellowColor()
self.view.addSubview(yellowView)
// 绿View
let greenView = UIView()
greenView.backgroundColor = UIColor.greenColor()
self.view.addSubview(greenView)
// 2 开启AutoLayout
yellowView.translatesAutoresizingMaskIntoConstraints = false;
greenView.translatesAutoresizingMaskIntoConstraints = false;
// 3 设置约束
/* 约束伪代码
Yellow View.Leading = Superview.Leading + 20.0
Yellow View.Top = Top Layout Guide.Bottom + 20.0
Bottom Layout Guide.Top = Yellow View.Bottom + 20.0
Green View.Trailing = Superview.Trailing + 20.0
Green View.Top = Top Layout Guide.Bottom + 20.0
Bottom Layout Guide.Top = Green View.Bottom + 20.0
Green View.Leading = Yellow View.Trailing + 30.0
Yellow View.Width = Green View.Width
*/
// 3.1 yellow约束
yellowView.leadingAnchor.constraintEqualToAnchor(self.view.leadingAnchor, constant: 20).active = true
yellowView.topAnchor.constraintEqualToAnchor(self.topLayoutGuide.bottomAnchor, constant: 20).active = true
self.bottomLayoutGuide.topAnchor.constraintEqualToAnchor(yellowView.bottomAnchor, constant: 20).active = true
// 3.2 green约束
greenView.topAnchor.constraintEqualToAnchor(self.topLayoutGuide.bottomAnchor, constant: 20).active = true
self.view.trailingAnchor.constraintEqualToAnchor(greenView.trailingAnchor, constant: 20).active = true
self.bottomLayoutGuide.topAnchor.constraintEqualToAnchor(greenView.bottomAnchor, constant: 20).active = true
// 3.3 green和yellow的共有约束
greenView.leadingAnchor.constraintEqualToAnchor(yellowView.trailingAnchor, constant: 30).active = true // 间距
greenView.widthAnchor.constraintEqualToAnchor(yellowView.widthAnchor, constant: 20).active = true // 等宽
// 打印所有约束
for constraint in self.view.constraints {
print(constraint)
}
}
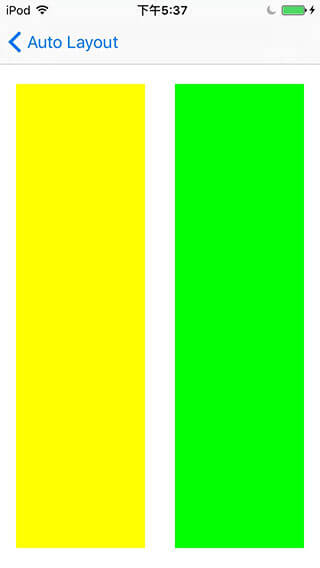
}3.3 效果图
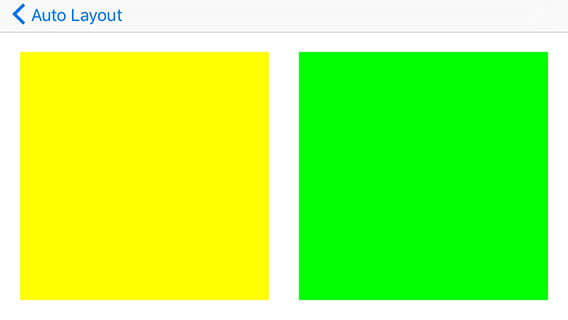
运行项目后,在不同的屏幕上都可以看到如下效果图,还可以旋转屏幕。
竖屏
横屏幕
其他
源代码
参考资料
NSLayoutConstraint Class Reference
文档修改记录
| 时间 | 描述 |
|---|---|
| 2015-12-18 | 博文完成 |


 1601
1601

 被折叠的 条评论
为什么被折叠?
被折叠的 条评论
为什么被折叠?
 到【灌水乐园】发言


